拨号界面代码_第1部分-拨号界面
拨号界面代码
When Apple launched Apple Card, I really liked the way you can make a payment using the dial. I asked myself, how would I develop that?
当Apple推出Apple Card时,我真的很喜欢您使用转盘付款的方式。 我问自己,我将如何发展呢?
So last year, I did exactly that and never did anything with it.
因此,去年,我做到了这一点,却从未做过任何事情。
Instead of gathering virtual dust in my projects folder, I’d like to share it with you now.
现在,我不想与我的项目文件夹中收集虚拟灰尘,而是与您共享。
I’m going to split this series into five parts:
我将把这个系列分为五个部分:
Part 1 — The dial’s interface.
第1部分-拨号盘的界面。
Part 2 — The text of the dial or how to draw text on a curve.
第2部分 -表盘上的文字或如何在曲线上绘制文字。
Part 3 — User interaction.
第3部分 -用户交互。
Part 4 — Interface updates based on user interaction.
第4部分 -基于用户交互的界面更新。
Part 5 — Accessibility.
第5部分 -可访问性。
I’d like to mention that I’m based in the UK and don’t have access to the Apple Card Wallet app. All the work is an approximation based on the images and videos that Apple have shared. Also I have no clue what you’d call this interface element, so I just refer to it as a dial!
我想提一下,我位于英国,没有访问Apple Card Wallet应用的权限。 所有工作都是基于Apple共享的图像和视频的近似值。 另外我也不知道您将如何称呼此界面元素,因此我仅将其称为刻度盘!
Assumption
假设条件
In this series, I’m going to assume that you know your way around Xcode and Interface Builder and have an understanding of Swift.
在本系列中,我将假设您了解Xcode和Interface Builder的使用方法,并且对Swift有所了解。
With that out of the way, lets start.
从此开始,让我们开始吧。
第1部分-拨号界面 (Part 1 — The Dial Interface)
Create a new Xcode project, using the iOS Single View Application template. I called my project PaymentDial.
使用iOS Single View Application模板创建一个新的Xcode项目。 我叫我的项目PaymentDial。

I’m a big fan of Interface Builder, if I can get a custom view up and running there, I’m not going to write a single line of code.
我是Interface Builder的忠实拥护者,如果我可以在其中建立自定义视图并在其中运行,那么我不会编写任何代码。
Create a new Cocoa Touch Class and call it PaymentDialView.
创建一个新的Cocoa Touch类,并将其命名为PaymentDialView 。
Create a new XIB resource file, call it PaymentDialView as well.
创建一个新的XIB资源文件,也将其命名为PaymentDialView 。
Select the File’s Owner in the Document Outline pane on the left.
在左侧的“ 文档大纲”窗格中选择文件的所有者 。
If you can’t see the Document Outline in Xcode, open the Editor menu and select Document Outline.
如果看不到Xcode中的文档大纲 ,请打开“ 编辑器”菜单,然后选择“ 文档大纲” 。
With the File’s Owner selected open the Custom Class inspector in the Inspector pane on the right and set the class to PaymentDialView.
选中“ 文件所有者”后 ,在右侧的“ 检查器”窗格中打开“ 自定义类”检查器 ,并将该类设置为PaymentDialView 。
If you can’t see the Inspector pane, open the View menu then goto into the Inspectors submenu and select Show Inspectors.
如果看不到“ 检查器”窗格,请打开“ 查看”菜单,然后转到“ 检查器”子菜单,然后选择“ 显示检查器” 。

Goto the File inspector in the Inspector pane on the right and untick “Use Safe Area Layout Guides”.
转到右侧“ 检查器”窗格中的“ 文件”检查器 ,然后取消选中“使用安全区域布局指南”。

Select the top View in the Documents Outline panel on the left. Make the view a square. I’ve made mine 414 x 414, doesn’t matter much what size you choose as long as it’s a square.
在左侧的“ 文档大纲”面板中选择顶视图。 将视图设为正方形。 我已经把我的尺寸为414 x 414,只要是正方形,选择什么尺寸都没关系。

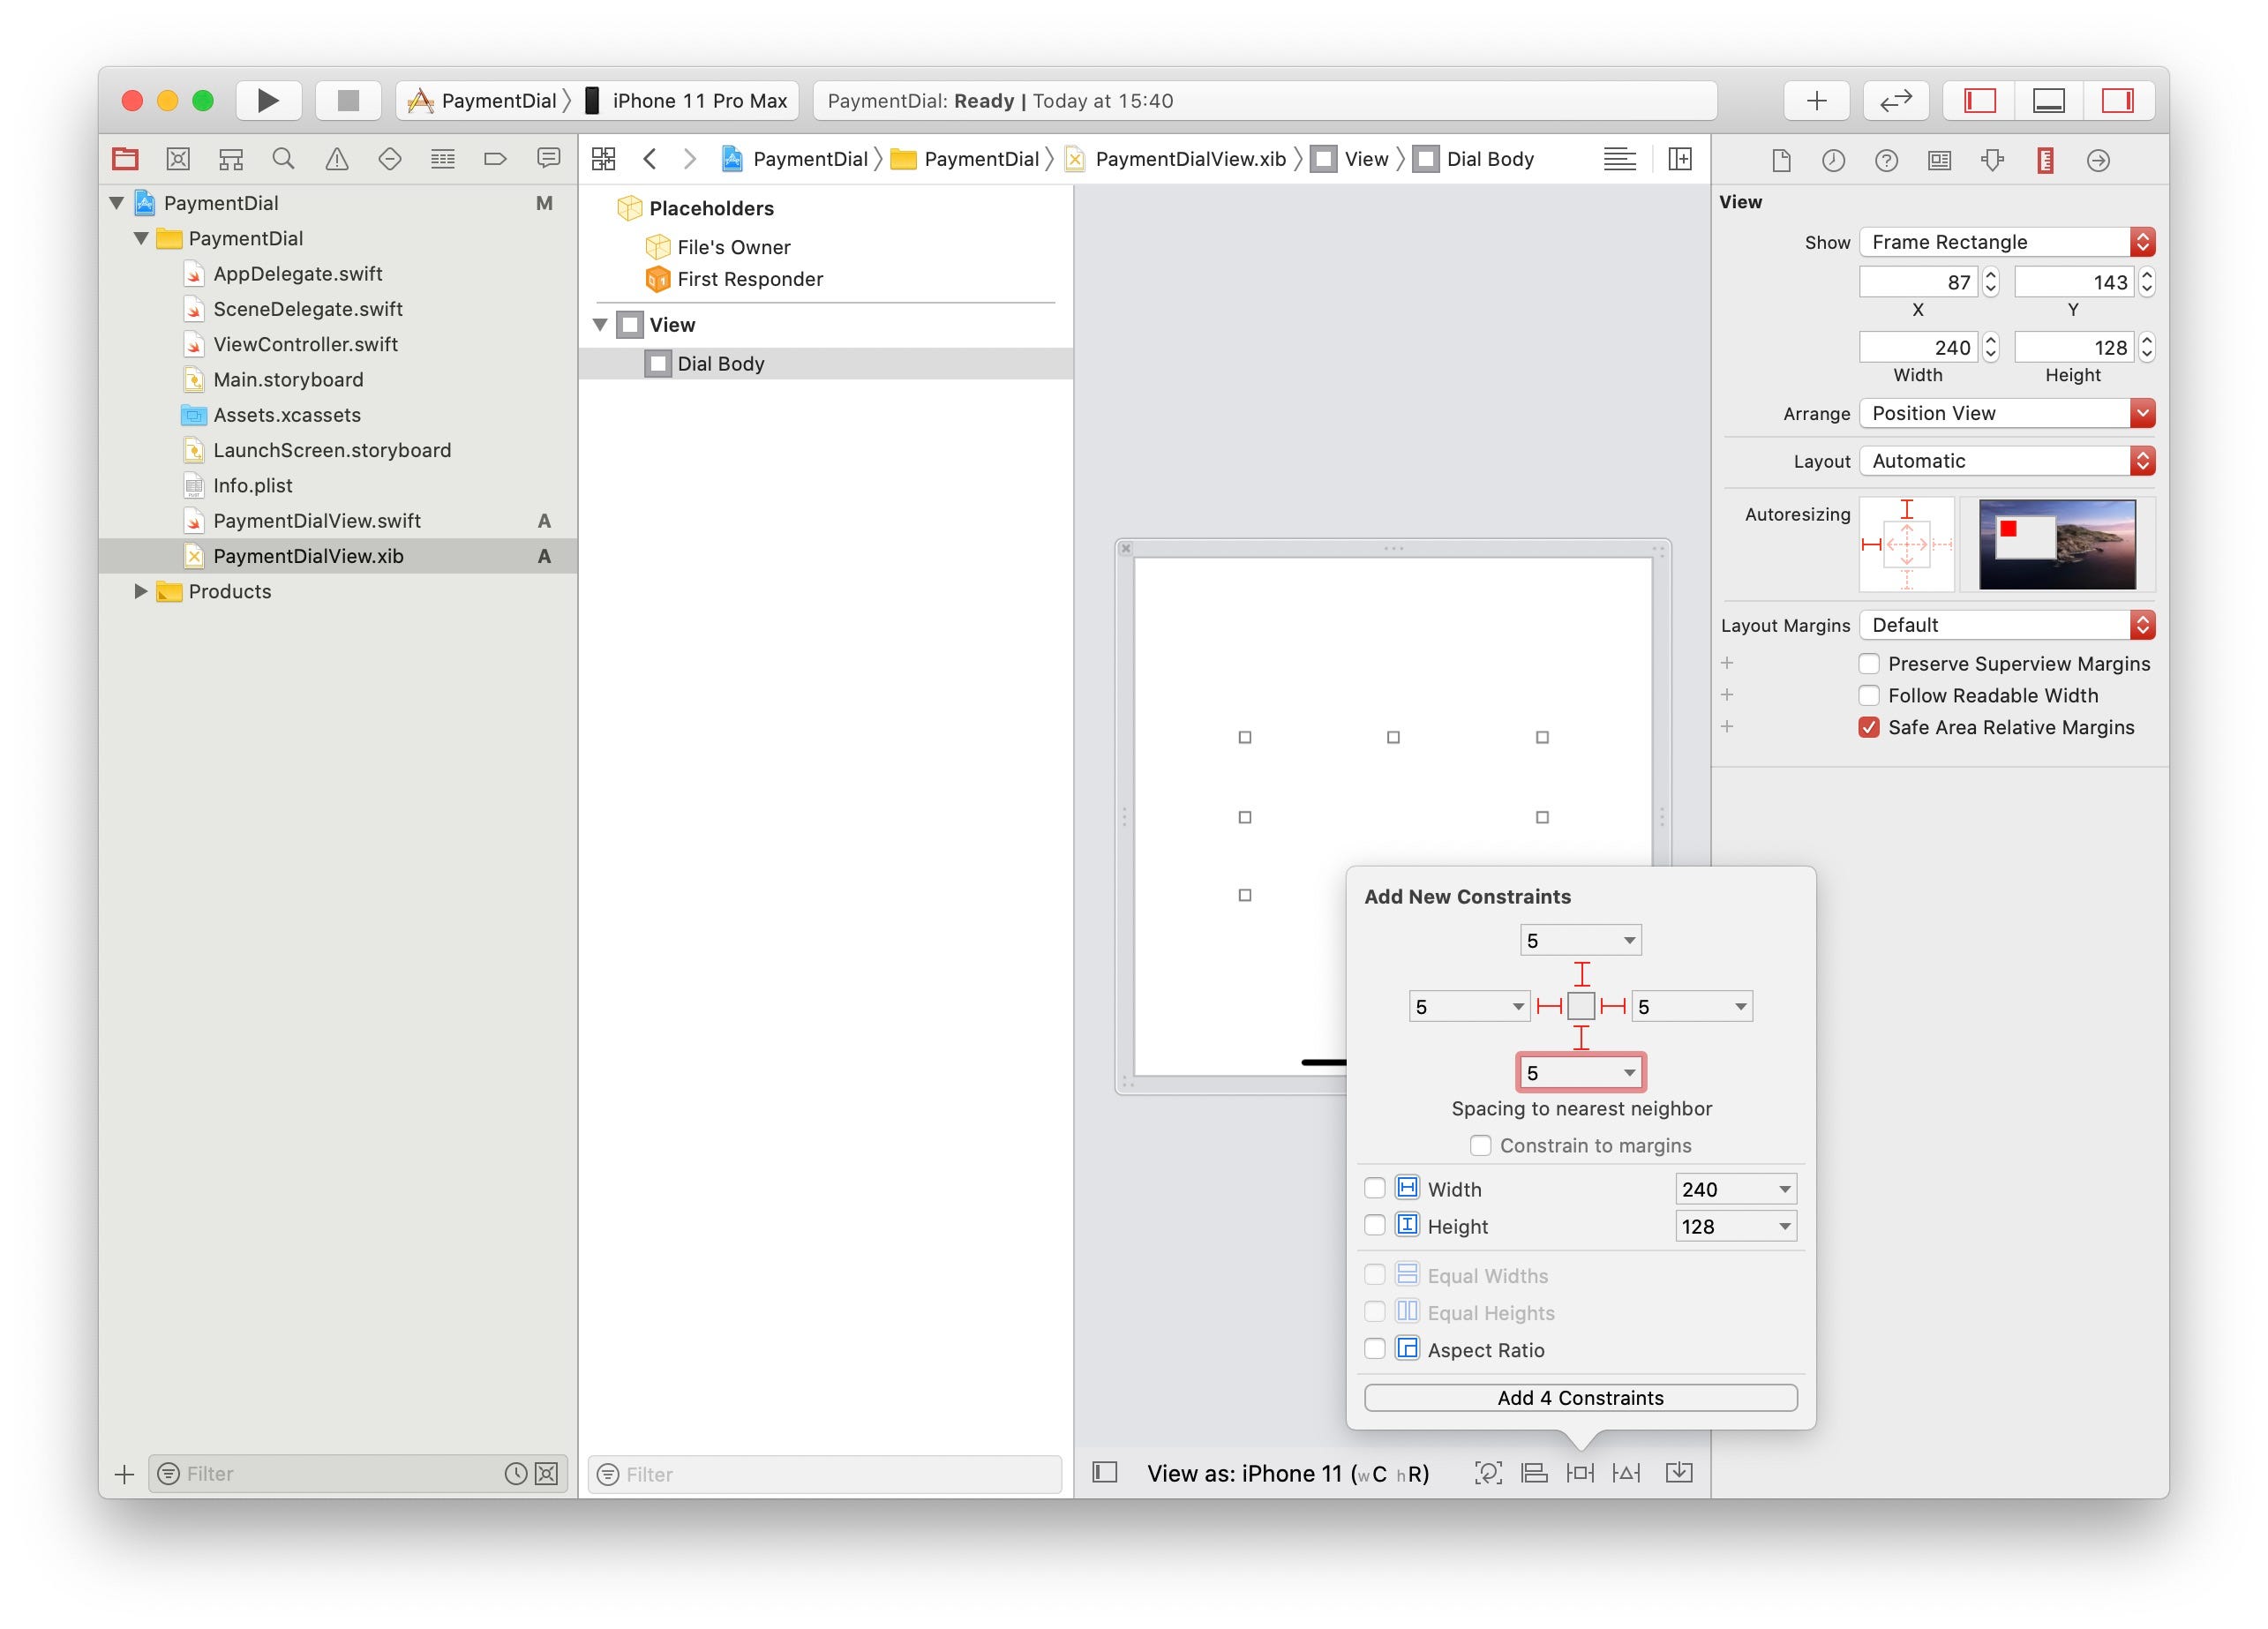
Add a view into the main View and pin it to it’s superview by setting all of it’s constraints to 5. Label the view in the Documents Outline panel as Dial Body.
通过将所有约束设置为5,将视图添加到主视图并将其固定到其父视图。在Documents Outline面板中将该视图标记为Dial Body 。
Set the background color of Dial Body to hex value #E6E5E6 or Red 230, Green 229 and Blue 230.
将表盘主体的背景色设置为十六进制值#E6E5E6或红色230,绿色229和蓝色230。

Add a new view to the main view not to Dial Body, pin it to it’s super view by setting all of it’s constraints to 51. Label the view in the Documents Outline panel as Text View.
通过将所有约束设置为51,将新视图添加到主视图而不是“ 拨号主体” ,将其固定到其超级视图。在“ 文档大纲”面板中将该视图标记为“ 文本视图” 。

Now let’s go ahead and add two labels inside the Text View we just created. The first label we will centre inside the text view, and set its font to Ariel Round MT Bold, the closest font I found that looks like the font used in Apple Card’s payment dial. Set the size of the font to 45.0. Name the label Balance Label and set its text value to £ 128.00, feel free to use the currency of your choice. Set this label’s constraints to Align Horizontally in Container and Align Vertically in Container both with a value of 0. Set the label’s text color to hex value #E48072 or Red 228, Green 128 and Blue 114.
现在让我们继续,在我们刚刚创建的“ 文本视图”中添加两个标签。 我们将在文本视图中居中的第一个标签,并将其字体设置为Ariel Round MT Bold ,这是我发现的最接近的字体,看起来像Apple Card支付拨盘中使用的字体。 将字体的大小设置为45.0。 将标签命名为Balance Label并将其文本值设置为£128.00 ,请随时使用您选择的货币。 将此标签的约束设置为“ 在容器中水平对齐”和在“容器中 垂直对齐”两者均设置为0。将标签的文本颜色设置为十六进制值#E48072或红色228,绿色128和蓝色114。

Add the second label below the previous label, name it Funding Label. Set it’s font to Ariel Round MT Bold with a size of 20. Set the text color to black and set it’s text value to £ 5.00. With regards to its constraints, pin it’s top to the bottom of the the Balance Label with a value of 20, and add an Align Horizontally in Container constraint with a value of 0.
在前一个标签下添加第二个标签,将其命名为Funding Label 。 将其字体设置为Ariel Round MT Bold ,大小为20。将文本颜色设置为黑色,并将其文本值设置为5.00英镑 。 关于其约束,将其顶部固定在“ 平衡标签”的底部,值为20,然后添加值为0的“ 在容器中水平对齐”约束。

Now let’s define our IBOutlets, you can either open up the editor to the right and control drag each view or type it out and then connect them in Interface builder.
现在,我们定义IBOutlet ,您可以向右打开编辑器并控制拖动每个视图或将其键入,然后将它们连接到Interface builder中。
Going back to PaymentDialView.swift, we need to load the nib when the class is instantiated. We do this by creating a common initializer commonInit() that get's called whenever one of UIView's initializers get called.
回到PaymentDialView.swift ,我们需要在实例化类时加载笔尖。 我们通过创建一个公共初始化程序commonInit()来实现此目的,每当UIView的初始化程序之一被调用时,都会被调用。
To achieve a round view, we need to update both dialBody and textView's cornerRadius's property on their respective layers. We do that by adding the following code to PaymentDialView:
为了实现全方位视角,我们需要更新两个dialBody和textView的cornerRadius看自己的各层财产。 为此,我们向PaymentDialView添加以下代码:
Now let’s add our view to the Main.storyboard. Open Main.storyboard and add an empty view into the View Controller. Make the added view a square and set it’s constraints with 20 point leading and trailing, tick “Aspect Ratio” as well (We are aiming for a 1:1 aspect ratio). That way our view will render correctly on all portrait or compact size class sizes. Center the view by setting it’s constraints to Align Horizontally in Container and Align Vertically in Container both with a value of 0.Open the Identity Inspector in in the inpector panel on the right and change the view’s class to PaymentDialView.
现在,让我们将视图添加到Main.storyboard 。 打开Main.storyboard并将一个空视图添加到“ 视图控制器”中 。 使添加的视图成为正方形,并使用20个点的前导和尾随设置其约束,同时勾选“长宽比”(我们的目标是1:1长宽比)。 这样,我们的视图将在所有纵向或紧凑尺寸类尺寸上正确呈现。 通过将其约束设置为“ 使容器中的水平对齐”和“ 容器中的 垂直 对齐”的约束居中,将其值都设置为0。在右侧的“ 检查器 ”面板中打开“ 身份检查器” ,然后将视图的类更改为PaymentDialView 。

Finally let’s run the project to see our view in action. The simulator should look like the this.
最后,让我们运行项目以查看我们的视图。 模拟器应如下所示。

奖金材料 (Bonus material)
The last Xcode screenshot where we added the view to a view controller, looked blank even though it had a view inside it, and running the project to see the final result is fine. It took less time than it took me to scratch my chin. However what if I could see my view rendered in Interface Builder? That’s exactly what we’re going to do now.
我们在其中将视图添加到视图控制器的最后一个Xcode屏幕截图,即使其中包含视图,也显示为空白,并且运行项目以查看最终结果是可以的。 花的时间比花我的下巴要少。 但是,如果可以在Interface Builder中看到我的视图怎么办? 这正是我们现在要做的。
Let’s go back to PaymentDialView.swift and add @IBDesignable to the beginning of our class's declaration like this:
让我们回到PaymentDialView.swift并将@IBDesignable添加到类声明的开头,如下所示:
@IBDesignable class PaymentDialView: UIView {@IBDesignable let's Interface Builder instantiate and draw a copy of the view directly in it's canvas.Go back to Main.storyboard and you should see the following:
@IBDesignable让Interface Builder实例化并直接在画布中绘制视图的副本。回到Main.storyboard ,您应该看到以下内容:
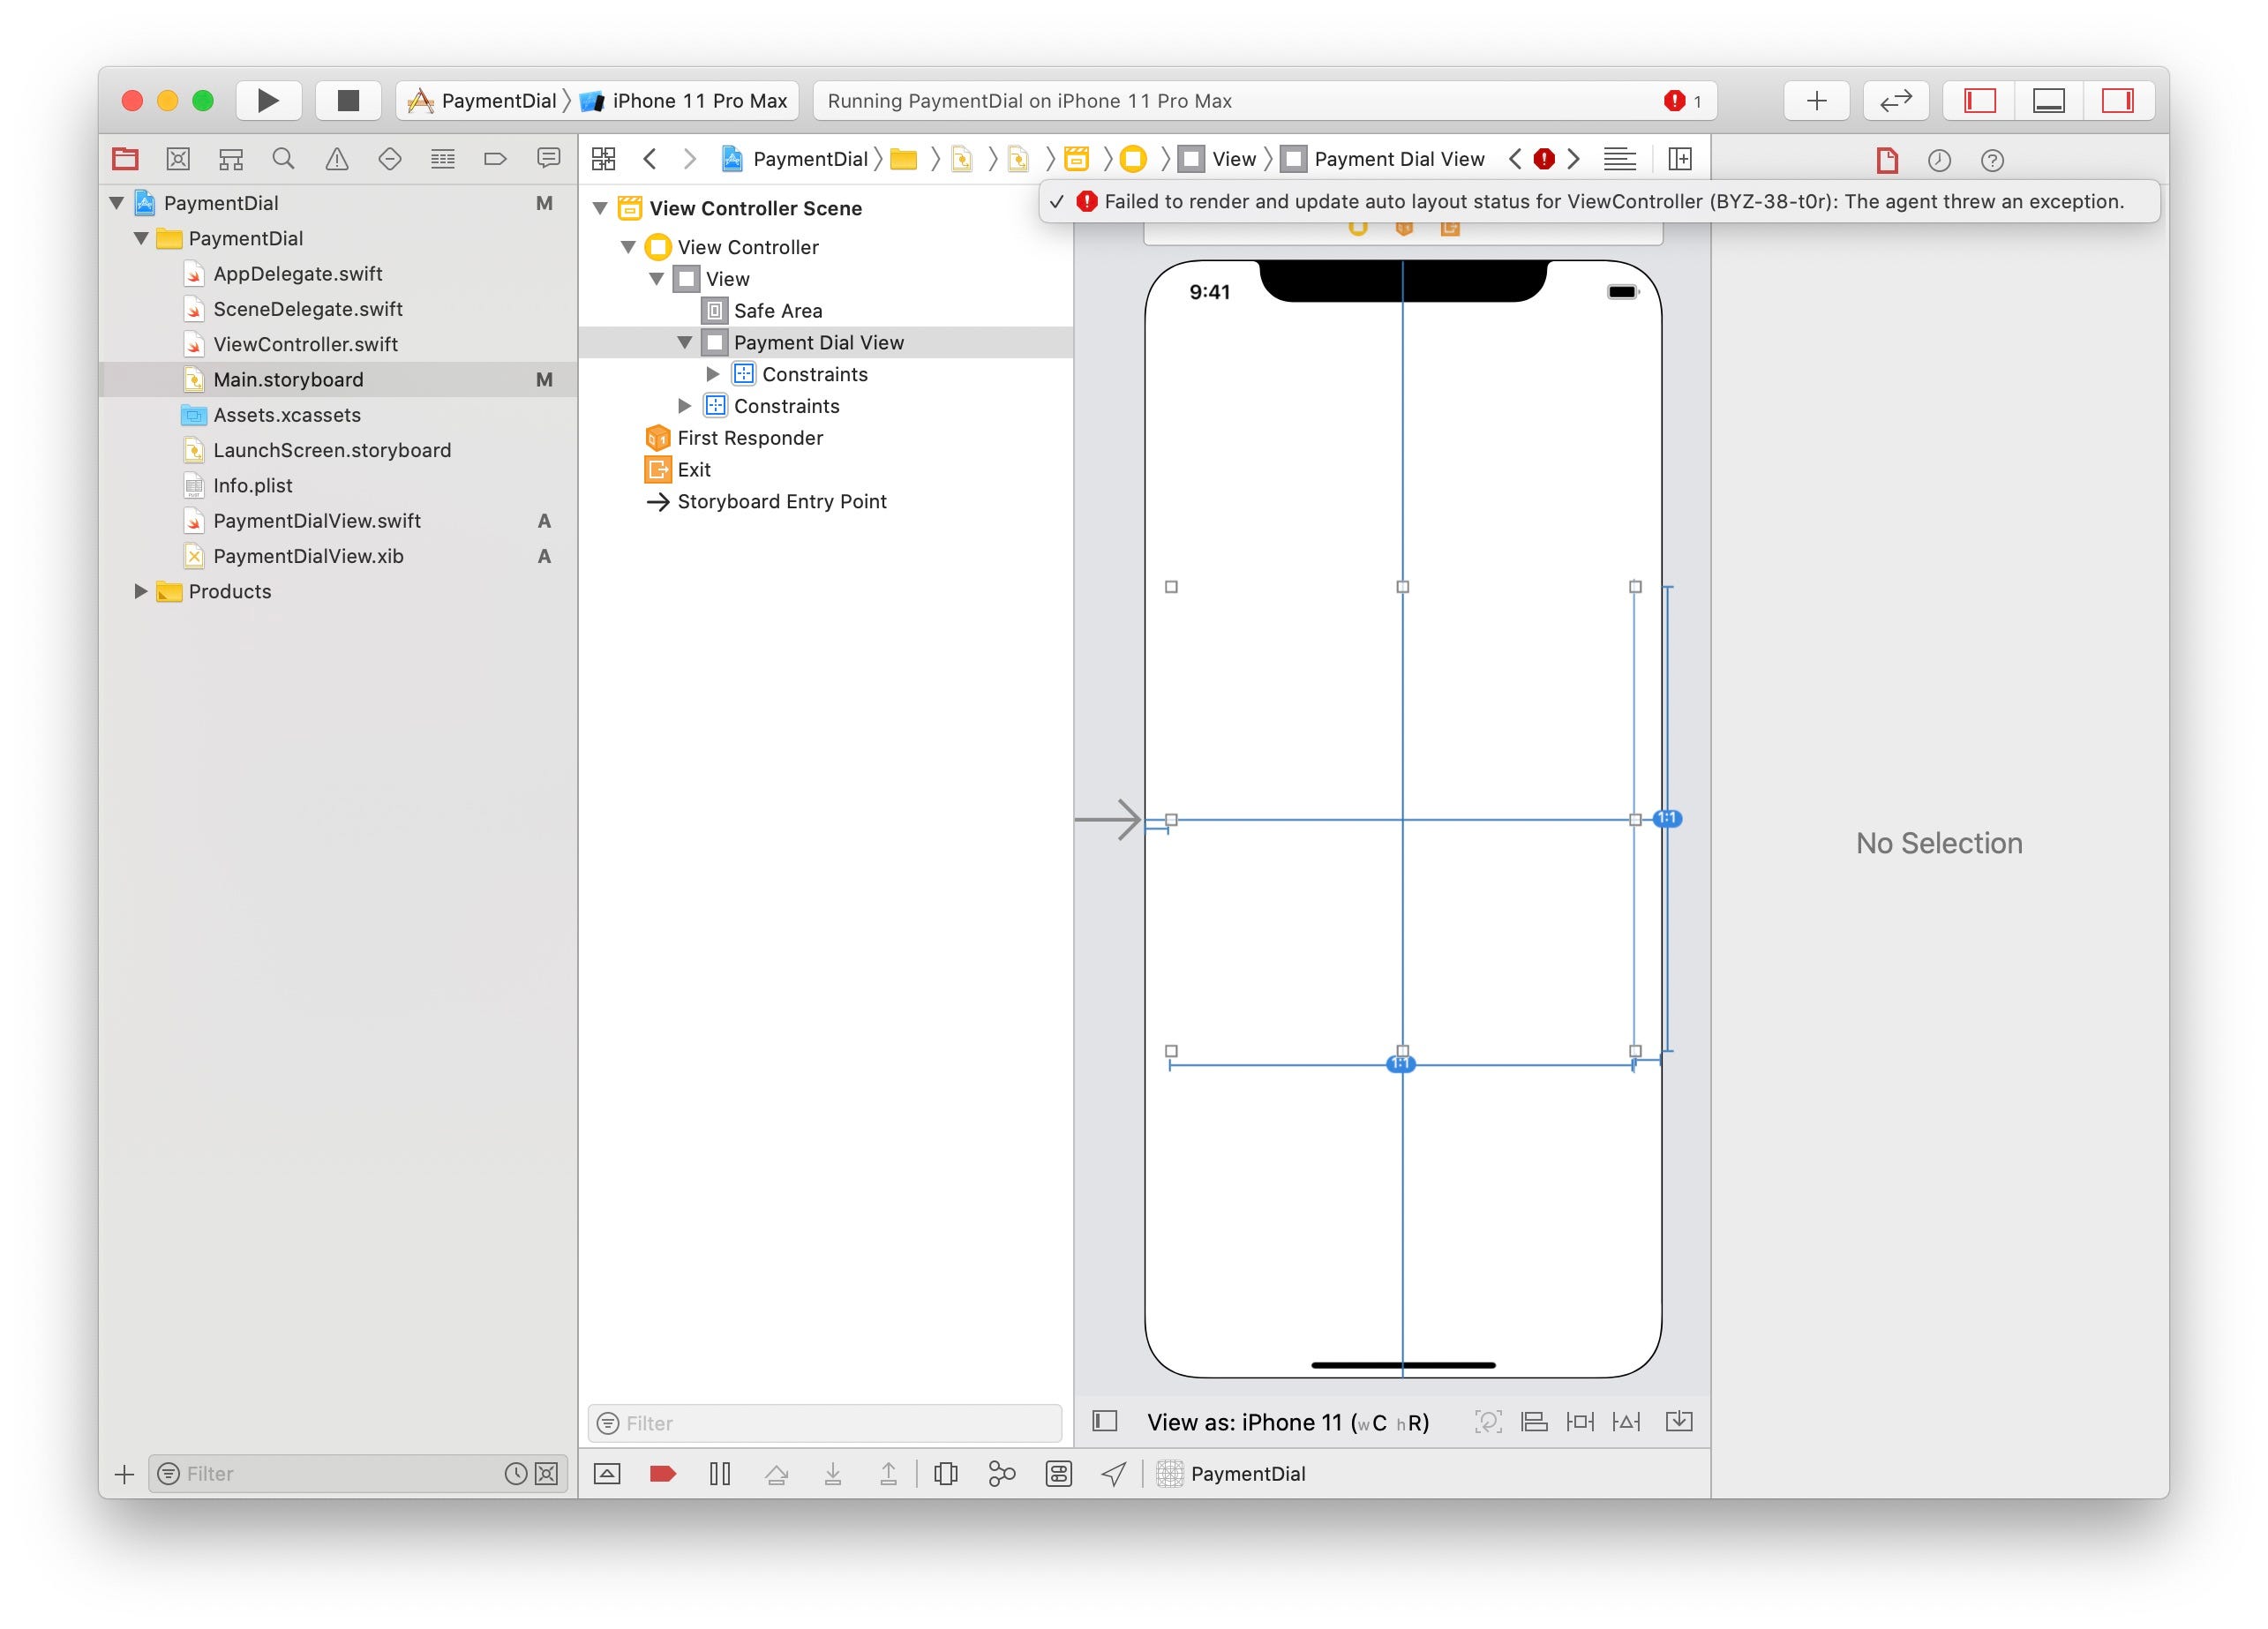
You’ll get an error stating that an “agent throw an exception.” Searching the net for answers and looking at IBDesignablesAgent-iOS logs, IBDesignablesAgent couldn’t unwrap the the @IBOutlet’s properly, sounds like it can’t load our nib correctly! The problem seems to occur because the agent IBDesignablesAgent has it’s own main bundle and when loading our code which points to Bundle.main it can't find the views.Luckily the fix is trivial. We need to update our nib loading in commonInit() to let it know where it's correct bundle is by doing the following:
您会收到一条错误消息,指出“代理抛出异常”。 在网上寻找答案并查看IBDesignablesAgent-iOS日志, IBDesignablesAgent无法正确打开@IBOutlet的包装,听起来好像无法正确加载我们的笔尖! 因为代理IBDesignablesAgent具有它自己的主捆绑包,并且在加载指向Bundle.main代码时找不到该视图,所以似乎出现了问题。幸运的是修复很简单。 我们需要通过执行以下操作来更新commonInit()笔尖加载,以使其知道正确的捆绑包位置:
Our view controller in Main.storyboard should now look like this:
现在, Main.storyboard中的视图控制器应如下所示:

You’ll notice that the view still isn’t 100% right. We need to let Interface Builder know that the view needs some updates. To interact with Interface Builder while it attempts to render the view, add the following function to the PaymentDialView class:
您会注意到视图仍然不是100%正确。 我们需要让Interface Builder知道该视图需要一些更新。 要在尝试渲染视图时与Interface Builder进行交互,请将以下函数添加到PaymentDialView类:
The view should refresh automatically, if it doesn’t go to the Editor menu and select Automatically Refresh Views. You Main.storyboard should look like this:
如果未转到“ 编辑器”菜单并选择“ 自动刷新视图” ,则该视图应自动刷新 。 您的Main.storyboard应该如下所示:

What about the text labels? Wouldn’t it be cool if we could update them from the storyboard directly, instead of having to go to the view’s nib file! That exactly what we’ll do using @IBInspectables next.Goto PaymentDialView.swift and add the following properties:
文字标签呢? 如果我们可以直接从情节提要中更新它们,而不必转到视图的nib文件,那将很酷! 这正是我们将使用@IBInspectable的next.Goto PaymentDialView.swift并添加以下属性进行的操作:
Goto Main.storyboard and open the Attributes inpector in the Inspector pane on the right. At the top you’ll see a new section called Payment Dial View, with two text fields. Change the Balance text field’s value, the view’s balanceLabel will update to the new string.
转到Main.storyboard ,然后在右侧的“ 检查器”窗格中打开“ 属性 ” 检查器 。 在顶部,您将看到一个名为Payment Dial View的新部分,其中有两个文本字段。 更改“ 余额”文本字段的值,视图的balanceLabel将更新为新字符串。

You can download the code from github.
您可以从github下载代码。
See you in part 2, where we will add curved text to our view.
在第二部分中见,我们将在视图中添加弯曲的文本。
翻译自: https://medium.com/dev-genius/how-to-create-an-apple-card-payment-dial-bdbae4017c21
拨号界面代码
http://www.taodudu.cc/news/show-6708154.html
相关文章:
- 手机页面调用拨号的几种方法
- 拨号常见代码解析
- 手机网站中 拨打电话代码
- 手机网站实现一键拨号及html5短信发送功能JS代码(微信适用)
- 钱伟刚 计算机系,新媒体传播与应用
- 大众传媒计算机网络技术,计算机辅助教育在大众传媒背景下的发展机遇
- 计算机教育传播的规律,计算机网络引发教育传播变革的分析
- 计算机教育传播的规律,教育传播学总结.doc
- Ubuntu报错E:Package vim has no installation candidate
- E: Package 'p7zip-full' has no installation candidate
- E:Package 'Vim' has no installation candidate问题解决
- E:Package ‘Vim‘ has no installation candidate问题解决
- Ubuntu 报错:E: Package ' *** ' has no installation candidate
- springcloud(11)Alibaba-AHAS 限流方式
- 提示“Your session has expired. Please log in.” 解决办法
- E0135 namespace “std“ has no member “back_inserter“
- 解决svn: E230001: Server SSL certificate verification failed: certificate has expired
- E: Package ‘curl‘ has no installation candidate(问题解决)
- 报错:E: Method https has died unexpectedly! E: Sub-process https received signalxs 4.
- 【21】报错E: Package ‘python-dev‘ has no installation candidate
- 【解决错误】E: Package ‘libtcl‘ has no installation candidate
- 安装git提示E: Package ‘git‘ has no installation candidate
- ubuntu常见问题:E: Package ‘xxx‘ has no installation candidate 解决方法
- E: Package ‘xxx‘ has no installation candidate 问题成功解决
- 异常:This application has no explicit mapping for /error, so you are seeing this as a fallback解决方法
- 解决start tomcat has encountered a problem出错的方法
- E: package ‘gcc‘ has no installation candidate
- E: Package ‘git‘ has no installation candidate
- Hase权威指南笔记
- Hadoop Hase zookeeper 集群搭建
拨号界面代码_第1部分-拨号界面相关推荐
- aspnet登录界面代码_使用Python编写一个QQ办公版的图形登录界面!
最近,QQ的办公版本--TIM进行了一次更新升级.本次更新升级大幅修改了界面的样式,看起来更加的清爽.简洁和高效了. 这种界面州的先生还是比较喜欢的,没有QQ那么花里胡哨,也比微信那些残缺的功能更加丰 ...
- aspnet登录界面代码_英雄联盟手游登录问题汇总
1.出现"无法安装完成"的情况 已经获取了资格,但出现"无法安装完成"的情况,譬如谷歌商店的下载界面一直闪退.下载没进度.卡在安装中.卡在等待中怎么办? 可前往 ...
- java 用户登录界面代码_求JAVA实现用户登录界面代码?
展开全部 你要先学会截图哦e5a48de588b63231313335323631343130323136353331333431373961,你发的看不清楚,重新写了一个你参考参考! import ...
- c语言拨号程序代码,c语言完成宽带拨号
C#知识点记录 用于记录C#知识要点. 参考:CLR via C#.C#并发编程.MSDN.百度 记录方式:读每本书,先看一遍,然后第二遍的时候,写笔记. CLR:公共语言运行时(Common Lan ...
- html通知公告代码_网站通用简洁html界面单页
介绍: 简介好用的一款非常实用的网站公告单页面源码,内容用记事本修改就可以! 背景图调用了随机的api接口,也可以自行修改 源码下载地址:gonggao.zip - 蓝奏云
- python登陆界面代码_python编辑用户登入界面的实现代码
1.需求分析 登入界面需要达到以下要求: 系统要有登入和注册两个选项可供选择 系统要能够实现登入出错提示,比如账户密码错误等,用户信息保存在user_info.txt文件夹中 系统要能够进行登入错误次 ...
- php欢迎界面代码,分享微信小程序欢迎界面开发的实例代码
这篇文章主要分享微信小程序欢迎界面开发的实例代码的相关资料,这里实现欢迎界面的简单实例和实现代码及实现效果图,需要的朋友可以参考下 微信小程序 欢迎界面 市面上大多数的app都会有一个欢迎界面,下面将 ...
- java怎么使两个界面联系_怎么样用java编写界面实现两个数的加法运算
详细代码为: import java.util.scanner; public class jisuanqi { public static void main(string[] args) { in ...
- python安装好的界面剂_刮腻子前要刷界面剂吗 界面剂的作用是什么
在装修施工的时候每个步骤都是很重要的方面,需要大家多了解相关的内容,这样对于正确施工装修有很好的参考和里哦啊接,刮腻子是装修中很常见的一个步骤,那么刮腻子前要刷界面剂吗,这是很多装修队需要考虑的问题. ...
最新文章
- 【C语言入门教程】7.1 结构体类型变量的定义和引用
- R语言使用ggplot2包使用geom_boxplot函数绘制基础分组箱图(分组箱体框颜色调色板配置)实战
- 惨!重新申请了网页的Counter
- 关于TextBox控件字体颜色绑定
- [总结] 网络流最大流算法反向边的作用
- 【超坑人的面试题】switch没有break
- python的6种基本数据类型--字典
- python tkinter控件_python GUI作业:使用tkinter的重要控件
- Frequency 频率统计
- JDK的目录结构及结构图
- Java中的mapreduce没了_MapReduce的过程总结
- Linux Bash Shell编程快速入门
- JAVA设计模式-观察者模式(Observe)
- 【Android游戏开发二十一】Android os设备谎言分辨率的解决方案!
- SAM4E单片机之旅——22、GMAC和PHY的介绍与初始化
- 郝斌java教程下载_郝斌Java自学教程全集打包,视频教程下载
- 统计学的Python实现-005:最大值、最小值、极差
- 项目管理到底是一个什么样的职位,具体都做些什么事情?
- Android获内外网IP地址工具类(Json解析读取)
- CSS中的display与visibility