初学者python编辑器_Thonny:适合初学者的Python编辑器
初学者python编辑器
Are you a Python beginner looking for a tool that can support your learning? This article is for you! Every programmer needs a place to write their code. This article will discuss an awesome tool called Thonny that will enable you to start working with Python in a beginner-friendly environment.
您是Python的新手,正在寻找一种可以支持您的学习的工具吗? 本文适合您! 每个程序员都需要一个编写代码的地方。 本文将讨论一个名为Thonny的出色工具,使您能够在对初学者友好的环境中开始使用Python。
In this article, you’ll learn:
在本文中,您将学习:
- How to install Thonny on your computer
- How to navigate Thonny’s user interface to use its built-in features
- How to use Thonny to write and run your code
- How to use Thonny to debug your code
- 如何在计算机上安装Thonny
- 如何浏览Thonny的用户界面以使用其内置功能
- 如何使用Thonny编写和运行代码
- 如何使用Thonny调试代码
By the end of this article, you’ll be comfortable with the development workflow in Thonny and ready to use it for your Python learning.
到本文结尾,您将对Thonny的开发工作流程感到满意,并准备将其用于Python学习。
So what is Thonny? Great question!
那么什么是通尼? 好问题!
Thonny is a free Python Integrated Development Environment (IDE) that was especially designed with the beginner Pythonista in mind. Specifically, it has a built-in debugger that can help when you run into nasty bugs, and it offers the ability to do step through expression evaluation, among other really awesome features.
Thonny是一个免费的Python集成开发环境(IDE),它是专门为初学者Pythonista设计的。 特别是,它具有一个内置的调试器,可以在您遇到令人讨厌的错误时提供帮助,并且还具有逐步执行表达式求值的功能,以及其他一些非常出色的功能。
Free Sample Chapter: Download a free sample chapter from the Real Python course and gain practical Python programming skills.
免费样本章节: 从Real Python课程下载免费样本章节,并获得实用的Python编程技能。
安装Thonny (Installing Thonny)
This article assumes that you have Python 3 installed on your computer. If not, please review Python 3 Installation & Setup.
本文假定您在计算机上安装了Python 3。 如果没有,请查看Python 3 Installation&Setup 。
网页下载 (Web Download)
The web download can be accessed via a web browser by visiting the Thonny website. Once on the page, you will see a light gray box in the top right corner like this:
可以通过访问Thonny网站来通过Web浏览器访问Web下载。 进入页面后,您将在右上角看到一个浅灰色的框,如下所示:
Once you’ve found the gray box, click the appropriate link for your operating system. This tutorial assumes you’ve downloaded version 3.0.1.
找到灰色框后,单击适用于您的操作系统的链接。 本教程假定您已下载3.0.1版。
命令行下载 (Command Line Download)
You can also install Thonny via your system’s command line. On Windows, you can do this by starting a program called Command Prompt, while on macOS and Linux you start a program called Terminal. Once you’ve done that, enter the following command:
您也可以通过系统的命令行安装Thonny。 在Windows上,您可以通过启动一个名为Command Prompt的程序来执行此操作,而在macOS和Linux上,您可以启动一个名为Terminal的程序。 完成此操作后,输入以下命令:
 pip install thonny
pip install thonny
用户界面 (The User Interface)
Let’s make sure you understand what Thonny has to offer. Think of Thonny as the workroom in which you will create amazing Python projects. Your workroom contains a toolbox containing many tools that will enable you to be a rock star Pythonista. In this section, you’ll learn about each of the features of the UI that’ll help you use each of the tools in your Thonny toolbox.
让我们确保您了解Thonny所提供的服务。 将Thonny视为您将在其中创建出色的Python项目的工作室。 您的工作室包含一个工具箱,其中包含许多工具,可以使您成为巨星Pythonista。 在本部分中,您将了解UI的每个功能,这些功能将帮助您使用Thonny工具箱中的每个工具。
代码编辑器和Shell (The Code Editor and Shell)
Now that you have Thonny installed, open the application. You should see a window with several icons across the top, and two white areas:
现在您已经安装了Thonny,打开应用程序。 您应该看到一个窗口,顶部带有多个图标,两个白色区域:
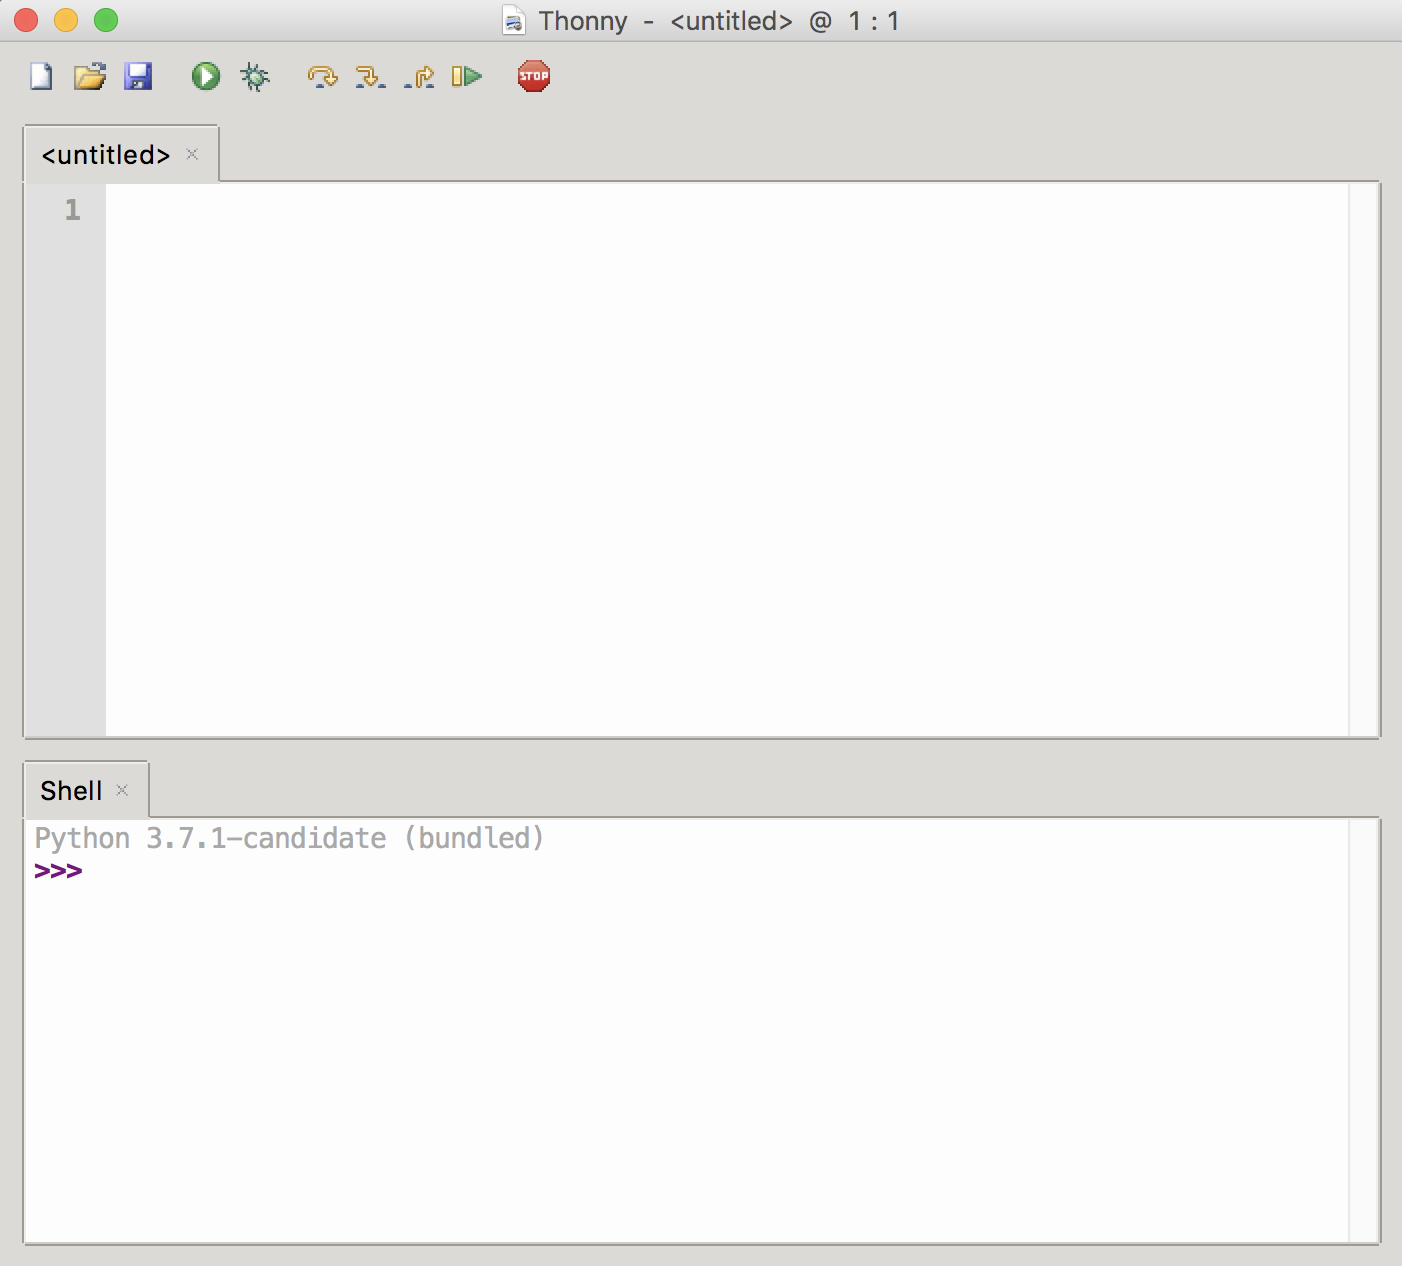
Notice the two main sections of the window. The top section is your code editor, where you will write all of your code. The bottom half is your Shell, where you will see outputs from your code.
注意窗口的两个主要部分。 顶部是代码编辑器,您将在其中编写所有代码。 下半部分是您的Shell,您将在其中看到代码的输出。
图标 (The Icons)
Across the top you’ll see several icons. Let’s explore what each of them does. You’ll see an image of the icons below, with a letter above each one. We will use these letters to talk about each of the icons:
在顶部,您将看到几个图标。 让我们探索它们各自的作用。 您会在下面看到图标的图像,每个图标上方都有一个字母。 我们将使用这些字母来讨论每个图标:
Working our way from left to right, below is a description of each of the icons in the image.
下面是从左到右的工作原理,描述了图像中的每个图标。
A: The paper icon allows you to create a new file. Typically in Python you want to separate your programs into separate files. You’ll use this button later in the tutorial to create your first program in Thonny!
答:纸张图标可让您创建一个新文件。 通常,在Python中,您要将程序分成单独的文件。 您将在本教程的后面部分中使用此按钮在Thonny中创建您的第一个程序!
B: The open folder icon allows you to open a file that already exists on your computer. This might be useful if you come back to a program that you worked on previously.
B:打开文件夹图标可让您打开计算机上已经存在的文件。 如果您返回以前使用的程序,这可能会很有用。
C: The floppy disk icon allows you to save your code. Press this early and often. You’ll use this later to save your first Thonny Python program.
C:使用软盘图标可以保存代码。 尽早并经常按此。 稍后将使用它保存您的第一个Thonny Python程序。
D: The play icon allows you to run your code. Remember that the code you write is meant to be executed. Running your code means you’re telling Python, “Do what I told you to do!” (In other words, “Read through my code and execute what I wrote.”)
D:播放图标可让您运行代码。 请记住,您编写的代码是要执行的。 运行代码意味着您要告诉Python,“按照我告诉您的做!” (换句话说,“通读我的代码并执行我编写的内容。”)
E: The bug icon allows you to debug your code. It’s inevitable that you will encounter bugs when you’re writing code. A bug is another word for a problem. Bugs can come in many forms, sometimes appearing when you use inappropriate syntax and sometimes when your logic is incorrect.
E:错误图标可让您调试代码。 在编写代码时不可避免地会遇到错误。 错误是问题的代名词。 错误可能以多种形式出现,有时在使用不当语法时出现,有时在逻辑不正确时出现。
Thonny’s bug button is typically used to spot and investigate bugs. You’ll work with this later in the tutorial. By the way, if you’re wondering why they’re called bugs, there’s also a fun story of how it came about!
Thonny的错误按钮通常用于发现和调查错误。 您将在本教程的后面部分中对此进行处理。 顺便说一句,如果您想知道为什么将它们称为错误,那么还有一个有趣的故事,它是如何产生的!
F-H: The arrow icons allow you to run your programs step by step. This can be very useful when you’re debugging or, in other words, trying to find those nasty bugs in your code. These icons are used after you press the bug icon. You’ll notice as you hit each arrow, a yellow highlighted bar will indicate which line or section Python is currently evaluating:
FH:箭头图标使您可以逐步运行程序。 这在调试或换句话说,试图在代码中查找那些讨厌的错误时非常有用。 按下错误图标后,将使用这些图标。 当您击中每个箭头时,您会注意到黄色的突出显示的条将指示Python当前正在评估的行或部分:
- The F arrow tells Python to take a big step, meaning jumping to the next line or block of code.
- The G arrow tells Python to take a small step, meaning diving deep into each component of an expression.
- The H arrow tells Python to exit out of the debugger.
- F箭头指示Python迈出了一大步,这意味着跳转到下一行代码。
- G箭头指示Python迈出一小步,这意味着深入探究表达式的每个组成部分。
- H箭头指示Python退出调试器。
I: The resume icon allows you to return to play mode from debug mode. This is useful in the instance when you no longer want to go step by step through the code, and instead want your program to finish running.
I:恢复图标可让您从调试模式返回播放模式。 在您不想再逐步浏览代码,而又希望程序完成运行的情况下,这很有用。
J: The stop icon allows you to stop running your code. This can be particularly useful if, let’s say, your code runs a program that opens a new window, and you want to stop that program. You’ll use the stop icon later in the tutorial.
J:使用停止图标可以停止运行代码。 假设您的代码运行一个打开新窗口的程序,而您想停止该程序,则此功能特别有用。 您将在本教程的后面部分使用停止图标。
让我们尝试一下! (Let’s Try It!)
Get ready to write your first official Python program in Thonny:
准备在Thonny中编写您的第一个官方Python程序:
Enter the following code into the code editor:
Click the play button to run your program.
See the output in the Shell window.
Click the play button again to see that it says hello one more time.
在代码编辑器中输入以下代码:
print ( "Hello World" )单击播放按钮以运行您的程序。
在“外壳”窗口中查看输出。
再次单击“播放”按钮,它会再次打个招呼。
Congratulations! You’ve now completed your first program in Thonny! You should see Hello world! printed inside the Shell, also known as the console. This is because your program told Python to print this phrase, and the console is where you see the output of this execution.
恭喜你! 您现在已经完成了Thonny的第一个程序! 您应该看到Hello world! 印在外壳内,也称为控制台。 这是因为您的程序告诉Python打印此短语,并且在控制台中可以看到此执行的输出。
其他UI功能 (Other UI Features)
To see more of the other features that Thonny has to offer, navigate to the menu bar and select the View dropdown. You should see that Shell has a check mark next to it, which is why you see the Shell section in Thonny’s application window:
要查看Thonny必须提供的其他更多功能,请导航至菜单栏,然后选择查看下拉菜单。 您应该看到Shell旁边有一个复选标记,这就是为什么您在Thonny的应用程序窗口中看到Shell部分的原因:
Let’s explore some of the other offerings, specifically those that will be useful to a beginning Pythonista:
让我们探索其他一些产品,特别是那些对入门Pythonista有用的产品:
Help: You’ll select the Help view if you want more information about working with Thonny. Currently this section offers more reading on the following topics: Running Programs Step-wise, how to install 3rd Party Packages, or using Scientific Python Packages.
Variables: This feature can be very valuable. A variable in Python is a value that you define in code. Variables can be numbers, strings, or other complex data structures. This section allows you to see the values assigned to all of the variables in your program.
Assistant: The Assistant is there to give you helpful hints when you hit Exceptions or other types of errors.
帮助:如果需要有关使用Thonny的更多信息,请选择“帮助”视图。 当前,本节提供有关以下主题的更多阅读:分步运行程序,如何安装3rd Party软件包或使用Scientific Python软件包。
变量:此功能可能非常有价值。 Python中的变量是您在代码中定义的值。 变量可以是数字,字符串或其他复杂的数据结构。 本节允许您查看分配给程序中所有变量的值。
助手:当您遇到“异常”或其他类型的错误时,“助手”将为您提供有用的提示。
The other features will become useful as you advance your skills. Check them out once you get more comfortable with Thonny!
随着技能的提高,其他功能也将变得有用。 一旦对Thonny感到更舒服,就去看看吧!
代码编辑器 (The Code Editor)
Now that you have an understanding of the UI, let’s use Thonny to write another little program. In this section, you’ll go through the features of Thonny that will help guide you through your development workflow.
现在您已经了解了UI,让我们使用Thonny编写另一个小程序。 在本节中,您将介绍Thonny的功能,这些功能将指导您完成开发工作流程。
写一些代码 (Write Some Code)
In the code editor (top portion of the UI), add the following function:
在代码编辑器(UI的顶部)中,添加以下功能:
保存您的代码 (Save Your Code)
Before we move on, let’s save your program. Last time, you were prompted to do this after pressing the play button. You can also do this by clicking the blue floppy disk icon or by going to the menu bar and selecting File > Save. Let’s call the program factorial.py.
在继续之前,让我们保存您的程序。 上次,提示您按播放按钮后执行此操作。 您也可以通过单击蓝色软盘图标或进入菜单栏并选择“文件”>“保存”来执行此操作。 我们将程序称为factorial.py 。
运行您的代码 (Run Your Code)
In order to run your code, find and press the play icon. The output should look like this:
为了运行您的代码,找到并按下播放图标。 输出应如下所示:

调试代码 (Debug Your Code)
To truly understand what this function is doing, try the step feature. Take a few large and small steps through the function to see what is happening. Remember you can do this by pressing the arrow icons:
要真正了解此功能的作用,请尝试步进功能。 通过一些大大小小的步骤来了解该功能。 请记住,您可以通过按箭头图标来做到这一点:
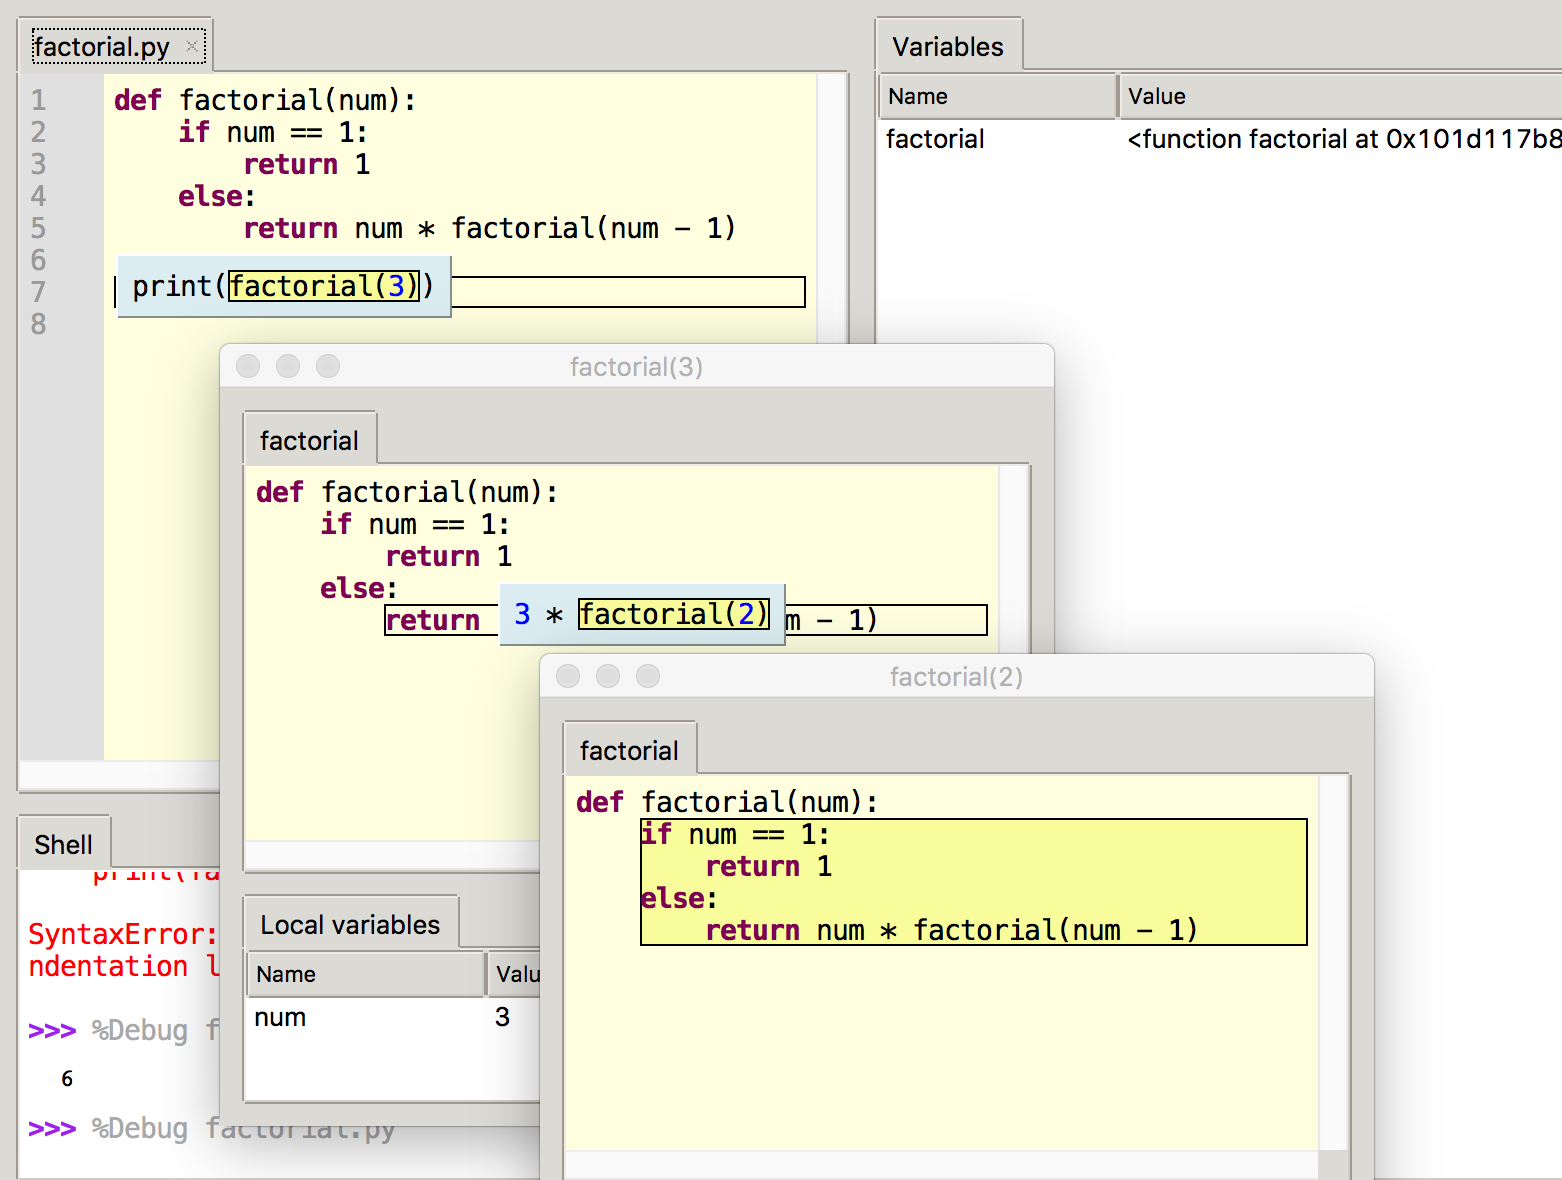
As you can see, the steps will show how the computer is evaluating each part of the code. Each pop up window is like a piece of scratch paper that the computer is using to compute each portion of the code. Without this awesome feature, this may have been hard to conceptualize—but now you’ve got it!
如您所见,这些步骤将显示计算机如何评估代码的每个部分。 每个弹出窗口都像一张草稿纸,计算机正在使用该草稿纸来计算代码的每个部分。 没有这个出色的功能,可能很难将其概念化,但是现在您已经掌握了!
停止运行您的代码 (Stop Running Your Code)
So far, there hasn’t been a need to hit the stop icon for this program, particularly because it exits as soon as it has executed print(). Try increasing the number being passed to the factorial function to 100:
到目前为止,不需要点击该程序的停止图标,尤其是因为它在执行print()立即退出。 尝试将传递给阶乘函数的数字增加到100 :
 def def factorialfactorial (( numnum ):):if if num num == == 11 ::return return 11elseelse ::return return num num * * factorialfactorial (( num num - - 11 ))printprint (( factorialfactorial (( 100100 ))
))
Then step through the function. After a while, you will notice that you will be clicking for a long time to reach the end. This is a good time to use the stop button. The stop button can be really useful to stop a program that is either intentionally or unintentionally running continuously.
然后逐步执行该功能。 一段时间后,您会注意到您将单击很长时间才能到达终点。 这是使用停止按钮的好时机。 停止按钮对于停止有意或无意连续运行的程序非常有用。
在您的代码中查找语法错误 (Find Syntax Errors in Your Code)
Now that you have a simple program that works, let’s break it! By intentionally creating an error in your factorial program, you’ll be able to see how Thonny handles these types of issues.
现在,您有了一个可以运行的简单程序,让我们打破它! 通过在阶乘程序中故意创建错误,您将能够了解Thonny如何处理此类问题。
We will be creating what is called a syntax error. A syntax error is an error that indicates that your code is syntactically incorrect. In other words, your code does not follow the proper way to write Python. When Python notices the error, it will display a syntax error to complain about your invalid code.
我们将创建所谓的语法错误 。 语法错误是表示您的代码在语法上不正确的错误。 换句话说,您的代码未遵循编写Python的正确方法。 当Python注意到错误时,它将显示语法错误以抱怨您的无效代码。
Above the print statement, let’s add another print statement that says print("The factorial of 100 is:"). Now let’s go ahead and create syntax errors. In the first print statement, remove the second quotation mark, and in the other remove the second parenthesis.
在print语句的上方,让我们添加另一个打印语句,该语句为print("The factorial of 100 is:") 。 现在让我们继续创建语法错误。 在第一个打印语句中,删除第二个引号,在另一个语句中,删除第二个括号。
As you do this, you should see that Thonny will highlight your SyntaxErrors. Missing quotations are highlighted in green, and missing parenthesis are in gray:
这样做时,您应该看到Thonny将突出显示您的SyntaxErrors 。 缺少的引号以绿色突出显示,缺少的括号以灰色显示:
For beginners, this is a great resource that will allow you to help spot any typos while you’re writing. Some of the most common and frustrating errors when you start programming are missing quotes and mismatched parentheses.
对于初学者来说,这是一个很好的资源,可以让您在写作时发现任何错别字。 开始编程时,一些最常见且令人沮丧的错误是缺少引号和括号不匹配。
If you have your Assistant View turned on, you will also notice that it will give you a helpful message to guide you in the right direction when you are debugging:
如果您打开了助手视图,您还将注意到,它将在调试时为您提供一条有用的信息,以指导您朝着正确的方向前进:
As you get more comfortable with Thonny, the Assistant can be a useful tool to help you get unstuck!
当您对Thonny感到更舒适时,助手可以成为帮助您摆脱粘滞的有用工具!
包管理器 (The Package Manager)
As you continue to learn Python, it can be quite useful to download a Python package to use inside of your code. This allows you to use code that someone else has written inside of your program.
在继续学习Python时,下载Python包以在代码内部使用可能会非常有用。 这使您可以使用别人在程序内部编写的代码。
Consider an example where you want to do some calculations in your code. Instead of writing your own calculator, you might want to use a third-party package called simplecalculator. In order to do this, you’ll use Thonny’s package manager.
考虑一个您想在代码中进行一些计算的示例。 与其编写自己的计算器, simplecalculator使用一个名为simplecalculator 的第三方程序包 。 为此,您将使用Thonny的软件包管理器。
The package manager will allow you to install packages that you will need to use with your program. Specifically, it allows you to add more tools to your toolbox. Thonny has the built-in benefit of handling any conflicts with other Python interpreters.
程序包管理器将允许您安装程序需要使用的程序包。 具体来说,它允许您向工具箱添加更多工具。 Thonny具有处理与其他Python解释器的任何冲突的内在优势。
To access the package manager, go to the menu bar and select Tools > Manage Packages… This should pop open a new window with a search field. Type simplecalculator into that field and click the Search button.
要访问软件包管理器,请转到菜单栏,然后选择“工具”>“管理软件包...”。这应该会弹出一个带有搜索字段的新窗口。 在该字段中键入simplecalculator ,然后单击“搜索”按钮。
The output should look similar to this:
输出应类似于以下内容:

Go ahead and click Install to install this package. You will see a small window pop up showing the system’s logs while it installs the package. Once it completes, you are ready to use simplecalculator in your code!
继续并单击安装以安装此软件包。 安装软件包时,将弹出一个小窗口,显示系统的日志。 完成后,就可以在代码中使用simplecalculator了!
In the next section, you will use the simplecalculator package along with some of the other skills you’ve learned in this tutorial to create a simple calculator program.
在下一节中,您将使用simplecalculator软件包以及在本教程中学到的其他一些技能来创建一个简单的计算器程序。
检查您的理解 (Check Your Understanding)
You’ve learned so much about Thonny so far! Here’s what you’ve learned:
到目前为止,您已经学到了很多有关Thonny的知识! 这是您学到的东西:
- Where to write your code
- How to save your code
- How to run your code
- How to stop your code from running
- Where to see your code execute
- How to spot
SyntaxErrors - How to install third party packages
- 在哪里编写代码
- 如何保存您的代码
- 如何执行程式码
- 如何停止您的代码运行
- 在哪里看到您的代码执行
- 如何发现
SyntaxErrors - 如何安装第三方软件包
Let’s check your understanding of these concepts.
让我们检查一下您对这些概念的理解。
Now that you have simplecalculator installed, let’s create a simple program that will use this package. You’ll also use this as an opportunity to check that you understand some of the UI and development features that you’ve learned thus far in the tutorial.
现在您已经安装了simplecalculator ,让我们创建一个将使用此软件包的简单程序。 您还将以此为契机,检查自己是否了解本教程到目前为止所学的一些UI和开发功能。
第1部分:创建文件,添加一些代码并理解代码 (Part 1: Create a File, Add Some Code, and Understand the Code)
In Part 1, you will create a file, and add some code to it! Do your best to try to dig into what the code is actually doing. If you get stuck, check out the Take a Deeper Look window. Let’s get started:
在第1部分中,您将创建一个文件,并向其中添加一些代码! 尽最大努力尝试探究代码的实际作用。 如果遇到问题,请查看“深入了解”窗口。 让我们开始吧:
- Start a new file.
- Add the following code into your Thonny code editor:
- 启动一个新文件。
- 将以下代码添加到您的Thonny代码编辑器中:
This code will print out the result of 2 * 2 to the Thonny Shell in the main UI. To understand what each part of the code is doing, check out the Take a Deeper Look section below.
此代码会将2 * 2的结果打印到主UI中的Thonny Shell中。 要了解代码的每个部分在做什么,请查看下面的“深入了解”部分。
Take a Deeper Look Show/Hide
进行更深入的 显示/隐藏
Line 1: This code imports the library
calculatorinside of the package calledsimplecalculator. From this library, we import the class calledSimpleCalculatorfrom a file calledsimple.py. You can see the code here.Lines 2: This is a blank line behind code blocks, which is generally a preferred style. Read more about Python Code Quality in this article.
Line 3: Here we create an instance of the class
SimpleCalculatorand assign it to a variable calledmy_calculator. This can be used to run different calculators. If you’re new to classes, you can learn more about object-oriented programming here.Line 4: Here we have the calculator run the operation
2 * 2by callingrun()and passing in the expression as a string.Line 5: Here we print the result of the calculation. You’ll notice in order to get the most recent calculation result, we must access the attribute called
lcd.
第1行:此代码将库
calculator导入名为simplecalculator的包内。 从该库中,我们从名为simple.py的文件中导入名为SimpleCalculator的类。 您可以在此处查看代码。第2行:这是代码块后面的空白行,通常是一种首选样式。 在本文中阅读有关Python代码质量的更多信息。
第3行:在这里,我们创建类
SimpleCalculator的实例,并将其分配给名为my_calculator的变量。 这可以用于运行不同的计算器。 如果您不熟悉类,可以在此处了解有关面向对象编程的更多信息。第4行:在这里,我们让计算器通过调用
run()并将表达式作为字符串传递来运行2 * 2运算。第5行:这里我们打印计算结果。 您会注意到,为了获取最新的计算结果,我们必须访问名为
lcd的属性。
Great! Now that you know exactly what your calculator code is doing, let’s move on to running this code!
大! 既然您确切知道计算器代码在做什么,那么让我们继续运行此代码!
第2部分:保存文件,查看变量和运行代码 (Part 2: Save the File, View the Variables, and Run Your Code)
Now it’s time to save and run your code. In this section, you’ll make use of two of the icons we reviewed earlier:
现在该保存并运行您的代码了。 在本节中,您将使用我们之前浏览过的两个图标:
- Save your new file as
calculations.py. - Open the Variables window and make note of the two variables listed. You should see
SimpleCalculatorandmy_calculator. This section also gives you insight into the value that each variable is pointing to. - Run your code! You should see
4.0in the output:
- 将新文件另存为
calculations.py。 - 打开“变量”窗口,并记下列出的两个变量。 您应该看到
SimpleCalculator和my_calculator。 本节还让您深入了解每个变量指向的值。 - 运行您的代码! 您应该在输出中看到
4.0:

Great job! Next you’ll explore how Thonny’s debugger can help you to better understand this code.
很好! 接下来,您将探索Thonny的调试器如何帮助您更好地理解此代码。
其他出色的初学者功能 (Other Great Beginner Features)
As you get more comfortable with Thonny, the features in this section will come in quite handy.
随着您对Thonny的使用越来越熟悉,本节中的功能将非常方便。
调试 (Debugging)
Using your calculations.py script, you’re going to use the debugger to investigate what is happening. Update your code in calculations.py to the following:
使用您的calculations.py脚本,您将使用调试器来调查正在发生的事情。 将您的calculations.py中的代码更新为以下内容:
 from from calculator.simple calculator.simple import import SimpleCalculatorSimpleCalculatordef def create_add_stringcreate_add_string (( xx , , yy ):):'''Returns a string containing an addition expression.''''''Returns a string containing an addition expression.'''return return 'x + y''x + y'my_calculator my_calculator = = SimpleCalculatorSimpleCalculator ()
()
my_calculatormy_calculator .. runrun (( create_add_stringcreate_add_string (( 22 , , 22 ))
))
printprint (( my_calculatormy_calculator .. lcdlcd )
)
Hit the save icon to save this version.
点击保存图标以保存该版本。
You’ll notice the code has a new function called create_add_string(). If you’re unfamiliar with Python functions, learn more in this awesome Real Python course!
您会注意到该代码具有一个名为create_add_string()的新函数。 如果您不熟悉Python函数,请在此很棒的Real Python课程中了解更多信息!
As you inspect the function, you may notice why this script will not work as expected. If not, that’s okay! Thonny is going to help you see exactly what is going on, and squash that bug! Go ahead and run your program and see what happens. The Shell output should be the following:
在检查该功能时,您可能会注意到为什么此脚本无法按预期运行。 如果没有,那没关系! Thonny将帮助您确切地了解发生了什么,并消除该错误! 继续运行程序,看看会发生什么。 Shell输出应为以下内容:
Oh no! Now you can see there is a bug in your program. The answer should be 4! Next, you’ll use Thonny’s debugger to find the bug.
不好了! 现在您可以看到您的程序中存在一个错误。 答案应该是4! 接下来,您将使用Thonny的调试器查找错误。
让我们尝试一下! (Let’s Try It!)
Now that we have a bug in our program, this is a great chance to use Thonny’s debugging features:
现在我们的程序中有一个错误,这是使用Thonny调试功能的好机会:
Click the bug icon at the top of the window. This enters debugger mode.
You should see the import statements highlighted. Click the small step arrow icon, the yellow arrow in the middle. Keep pressing this to see how the debugger works. You should notice that it highlights each step that Python takes to evaluate your program. Once it hits
create_add_string(), you should see a new window pop up.Examine the pop up window carefully. You should see that it shows the values for x and y. Keep pressing the small step icon until you see the value that Python will return to your program. It will be enclosed in a light-blue box:

Oh no! There’s the bug! It looks like Python will return a string containing the letters
xandy(meaning'x + y'and not a string containing the values of those variables, like'2 + 2', which is what the calculator is expecting.) Each time you see a light-blue box, you can think of this as Python replacing subexpressions with their values, step by step. The pop up window can be thought of as a piece of scratch paper that Python uses to figure out those values. Continue to step through the program to see how this bug results in a calculation of0.The bug here has to do with string formatting. If you are unfamiliar with string formatting, check out this article on Python String Formatting Best Practices. Inside
create_add_string(), the f-string formatting method should be used. Update this function to the following:Run your program again. You should see the following output:
>>> %Run calculations.py
4.0
单击窗口顶部的错误图标。 这将进入调试器模式。
您应该看到突出显示的导入语句。 单击小步箭头图标,中间的黄色箭头。 继续按此键以查看调试器的工作方式。 您应该注意到,它突出了Python评估程序所采取的每个步骤。 一旦到达
create_add_string(),您应该会看到一个新窗口。仔细检查弹出的窗口。 您应该看到它显示了x和y的值。 继续按下小步图标,直到看到Python将返回到程序的值。 它将被包装在一个浅蓝色的盒子中: 不好了! 有错误! 看起来Python会返回包含字母
x和y的字符串(意思是'x + y'而不是包含那些变量的值的字符串,如'2 + 2',这是计算器期望的。)您会看到一个浅蓝色的框,您可以将其视为Python逐步将子表达式替换为其值。 弹出窗口可以视为Python用来找出这些值的草稿纸。 继续逐步执行该程序,以查看此错误如何导致计算结果为0。这里的错误与字符串格式有关。 如果您不熟悉字符串格式,请查阅有关Python字符串格式最佳实践的本文 。 在
create_add_string()内部,应使用f字符串格式化方法 。 将此功能更新为以下内容:def create_add_string ( x , y ):'''Returns a string containing an addition expression.'''return f ' {x} + {y} '再次运行程序。 您应该看到以下输出:
Success! You have just demonstrated how the step-by-step debugger can help you find a problem in your code! Next you’ll learn about some other fun Thonny features.
成功! 您刚刚演示了逐步调试器如何帮助您在代码中发现问题! 接下来,您将了解Thonny的其他一些有趣功能。
可变范围突出显示 (Variable Scope Highlighting)
Thonny offers variable highlighting to remind you that the same name doesn’t always mean the same variable. In order for this feature to work, on the menu bar, go to Thonny > Preferences and ensure that Highlight matching names is checked.
Thonny提供变量高亮显示,以提醒您相同的名称并不总是意味着相同的变量。 为了使此功能起作用,请在菜单栏上转到Thonny>首选项,并确保选中了Highlight Highlight名称。
Notice in the code snippet below, that create_add_string() now has a new variable called my_calculator, though this is not the same as the my_calculator on lines 10 and 11. You should be able to tell because Thonny highlights the variables that reference the same thing. This my_calculator inside the function only exists within the scope of that function, which is why it is not highlighted when the cursor is on the other my_calculator variable on line 10:
注意,在下面的代码片段中,尽管create_add_string()现在具有一个名为my_calculator的新变量,但它与第10行和第11行的my_calculator 。您应该可以知道,因为Thonny突出显示了引用相同内容的变量。 。 该my_calculator内部的my_calculator仅存在于该函数的范围内,因此,当光标位于第10行的另一个my_calculator变量上时,它不会突出显示:
This feature can really help you avoid typos and understand the scope of your variables.
此功能确实可以帮助您避免输入错误并了解变量的范围。
代码补全 (Code Completion)
Thonny also offers code completion for APIs. Notice in the snapshot below how pressing the Tab key shows the methods available from the random library:
Thonny还提供API的代码完成。 请注意,在下面的快照中,按Tab键如何显示random库中可用的方法:
This can be very useful when you’re working with libraries and don’t want to look at the documentation to find a method or attribute name.
当您使用库并且不想查看文档以查找方法或属性名称时,这可能非常有用。
处理现有项目 (Working on a Pre-Existing Project)
Now that you’ve learned the basic features of Thonny, let’s explore how you can use it to work on a pre-existing project.
既然您已经了解了Thonny的基本功能,那么让我们探索如何使用它来处理预先存在的项目。
在您的计算机上查找文件 (Find a File on Your Computer)
Opening a file on your computer is as easy as going to the menu bar, selecting File > Open, and using your browser to navigate to the file. You can also use the open folder icon at the top of the screen to do this as well.
在计算机上打开文件就像进入菜单栏,选择“文件”>“打开”,然后使用浏览器导航到该文件一样容易。 您也可以使用屏幕顶部的打开文件夹图标来执行此操作。
If you have a requirements.txt file and pip locally installed, you can pip install these from the Thonny system Shell. If you don’t have pip installed, remember you can use the Package Manager to install it:
如果您具有本地安装的requirements.txt文件和pip ,则可以从Thonny系统外壳中进行pip install 。 如果没有安装pip,请记住可以使用“ 程序包管理器”进行安装:
 $ pip install -r requirements.txt
$ pip install -r requirements.txt
在Github上进行项目 (Work on a Project From Github)
Now that you are a Thonny expert, you can use it to work on the exercises from Real Python Course 1: Introduction to Python:
现在您是Thonny专家,您可以使用它来进行Real Python课程1:Python入门中的练习:
Navigate to the Real Python GitHub repo called book1-exercises.
Click the green button labeled Clone or download and select Download Zip.
Click the opening folder icon to navigate and find the downloaded files. You should find a folder called
book1-exercises1.Open one of the files and start working!
导航到名为book1-exercises的Real Python GitHub存储库。
单击标有“克隆”或下载的绿色按钮,然后选择“下载Zip”。
单击打开的文件夹图标以浏览并找到下载的文件。 您应该找到一个名为
book1-exercises1的文件夹。打开其中一个文件并开始工作!
This is useful because there are tons of cool projects available on GitHub!
这很有用,因为GitHub上有很多很棒的项目!
结论 (Conclusion)
Awesome job getting through this tutorial on Thonny!
在Thonny上获得本教程的真棒工作!
You can now start using Thonny to write, debug, and run Python code! If you like Thonny, you might also like some of the other IDEs we’ve listed in Python IDEs and Code Editors (Guide).
您现在可以开始使用Thonny编写,调试和运行Python代码! 如果您喜欢Thonny,则可能还喜欢我们在Python IDE和代码编辑器(指南)中列出的其他一些IDE。
Thonny is actively maintained, and new features are being added all the time. There are several awesome new features that are currently in beta that can be found on the Thonny Blog. Thonny’s main development takes place at the Institute of Computer Science of the University of Tartu, Estonia, as well as by contributors around the world.
Thonny得到了积极的维护,并且一直在增加新功能。 Thonny Blog上提供了当前处于beta版的一些很棒的新功能。 Thonny的主要发展发生在爱沙尼亚塔尔图大学 的计算机科学研究所 ,以及世界各地的贡献者。
翻译自: https://www.pybloggers.com/2018/12/thonny-the-beginner-friendly-python-editor/
初学者python编辑器
初学者python编辑器_Thonny:适合初学者的Python编辑器相关推荐
- c语言和python哪个更适合初学者?
转自:http://www.pinlue.com/article/2021/02/1002/0211529627512.html
- python需要学多久才能找到工作-为什么Python适合初学者,一般要学习多久
为什么Python适合初学者?一般Python要学习多久?很多人都觉得,Python是一门很好学的语言,非常适合入门.但更多人都是不清楚具体原因的.那么,我们不如一起来看看Python为何更适合初学者 ...
- python一般学多久可以考试_为何Python适合初学者 一般Python要学习多久
为何Python适合初学者?一般Python要学习多久?很多人都觉得,Python是一门很好学的语言,非常适合入门.但更多人都是不清楚具体原因的.那么,我们不如一起来看看Python为何更适合初学者, ...
- 为什么Python适合初学者,一般要学习多久
为什么Python适合初学者?一般Python要学习多久?很多人都觉得,Python是一门很好学的语言,非常适合入门.但更多人都是不清楚具体原因的.那么,我们不如一起来看看Python为何更适合初学者 ...
- 适合初学者和经验的十大最佳Python书籍-2022
1,最佳Python书籍清单 在这篇文章中,我收集了一些适合初学者和经验丰富的最佳Python书籍的信息.我们还提到了每本书的简要介绍.这将帮助您根据您的要求选择最好的python书籍.此外,它还涵盖 ...
- python语言入门p-python初学者怎么入门
据百度大数据统计每月有4260705的用户在百度检索Python相关介绍,在大众周围,也总是充斥着各种如何学习Python的声音,许多人已经对于是否"应该学习Python"也都发表 ...
- 初学者先学python语音好吗_献给Python初学者 零基础学习Python能学会吗
献给Python初学者 零基础学习Python能学会吗 时间:2018-01-08 来源:零基础学习Python方法讲解 零基础学习Python能学会吗?这个问题几乎是所有初学Python的小 ...
- python最适合做什么-Python简直是万能的,这5大主要用途你一定要知道!
从2015开始国内就开始慢慢接触Python了,从16年开始Python就已经在国内的热度更高了,目前也可以算的上"全民Python"了. 众所周知小学生的教材里面已经有Pytho ...
- 软件测试用python一般用来做什么-Python简直是万能的,这5大主要用途你一定要知道!...
从2015开始国内就开始慢慢接触Python了,从16年开始Python就已经在国内的热度更高了,目前也可以算的上"全民Python"了. 众所周知小学生的教材里面已经有Pytho ...
- python自学行吗-《》 python自学行吗?
<> python自学行吗? python语言自学教程2020-09-24 23:24:35人已围观 python自学行吗? 学习Python编程,是大家走入编程世界的想选择.无论是学习任 ...
最新文章
- Queue:poll、offer、element、peek
- hdu_5085_Counting problem(莫队分块思想)
- PaddleOCR——DEMO
- [Laravel框架学习一]:Laravel框架的安装以及 Composer的安装
- 阿里云开源EasyTransfer:业界首个面向NLP场景深度迁移学习框架
- 入门快应用的另一种姿势
- 七年为限 一觉梦已远——我与你的新贵族
- 手机写代码 termux
- win10 电池测试软件,Win10电池检测方法及查看Win10电池检测报告说明
- 2020年,生活从“不易”开始
- 笔记本连接显示器后没有声音_win7系统电脑连接HDMI显示器后没声音的处理方法...
- 【数据库】三级模式两级映射详解
- 计算机取证volatility
- H5实现调用本地摄像头实现实时视频以及拍照功能
- 向量场的散度和旋度_矢量场,标量场,散度,梯度,旋度的理解
- python3集合_python3集合练习(set)
- 陈怡暖:黄金在1180附近跌势受限,因希腊问题获避险支持
- 24339 Problem B 采药
- Directshow获取高帧率无驱摄像头
- 自考生三级跳成博士生 从英语零分到专业讲师
热门文章
- idea导入web项目
- HTML+CSS大作业_ 美食网页制作作业_生猛海鲜美食网页设计
- java的cms系统_基于Java的开源CMS系统选择
- PNG图片压缩原理解析--屌丝的眼泪
- 用计算机内置蜂鸣器音乐,WINCC如何用计算机的蜂鸣器作声音报警?-工业支持中心-西门子中国...
- 2021-2027全球及中国平板显示器测试设备行业研究及十四五规划分析报告
- 【周末学习】五格货栈的互联网思维:如何不花一分钱实现...
- HTML5中快速运用Google Maps JavaScript API V3
- 一款好用的markdown编辑器Typora
- 列车运行图的编制原则是什么_列车运行图编制解读.ppt