利用CloudFormation自动化部署AWS GWLB集成Palo Alto防火墙
AWS VPC 流量集中检测系列--(2)利用CloudFormation自动化部署AWS GWLB集成Palo Alto防火墙
B站视频:https://www.bilibili.com/video/BV1EP411N73r/?spm_id_from=333.999.0.0
上一篇文章讲过了AWS GWLB如何集成Palo Alto防火墙,来对流量做集中检测。上一次实验是通过AWS 控制台操作的,部署起来还是比较繁琐的,这里分享一下实验环境的CloudFormation代码,帮助大家快速部署一下实验环境。
一、CloudFormation 代码部署
这里的CloudFormation代码在Tokyo区域(ap-northeast-1)部署的,如果要在其他Region部署,请修改paloalto和windows的ami id。堆栈大概会在8分钟创建完成。
AWSTemplateFormatVersion: "2010-09-09"

Mappings:  RegionMap:    ap-northeast-1:      PaBundle1: ami-0bcddfc3678d5a897      PaBundle2: ami-0c4d901d7a5370b78    us-west-2:      PaBundle1: ami-01d7ef8ff7ddaff25      PaBundle2: ami-0d45d840ed2fe3ebaParameters:  EC2InstanceAmiId:    Type: AWS::SSM::Parameter::Value<AWS::EC2::Image::Id>    Default: '/aws/service/ami-amazon-linux-latest/amzn2-ami-hvm-x86_64-gp2'

  MyKeyPair:    Description: Amazon EC2 Key Pair    Type: AWS::EC2::KeyPair::KeyName

  PaVmType:    Description: Choice PA Firewall License Type    Type: String    Default: PaBundle2    AllowedValues:      - PaBundle1      - PaBundle2

Resources:#=========================================创建SSM Role========================================#

  BastionSsmRole:    Type: AWS::IAM::Role    Properties:      AssumeRolePolicyDocument:        Statement:          - Effect: Allow            Principal:              Service:                - ec2.amazonaws.com            Action:              - 'sts:AssumeRole'      Path: /

  BastionSsmPolicy:    Type: AWS::IAM::Policy    Properties:      PolicyName: ApplianceInstanceAccess      PolicyDocument:        Statement:          - Effect: Allow            Action:              - ssm:DescribeAssociation              - ssm:GetDeployablePatchSnapshotForInstance              - ssm:GetDocument              - ssm:DescribeDocument              - ssm:GetManifest              - ssm:GetParameter              - ssm:GetParameters              - ssm:ListAssociations              - ssm:ListInstanceAssociations              - ssm:PutInventory              - ssm:PutComplianceItems              - ssm:PutConfigurePackageResult              - ssm:UpdateAssociationStatus              - ssm:UpdateInstanceAssociationStatus              - ssm:UpdateInstanceInformation            Resource: "*"          - Effect: Allow            Action:              - ssmmessages:CreateControlChannel              - ssmmessages:CreateDataChannel              - ssmmessages:OpenControlChannel              - ssmmessages:OpenDataChannel            Resource: "*"          - Effect: Allow            Action:              - ec2messages:AcknowledgeMessage              - ec2messages:DeleteMessage              - ec2messages:FailMessage              - ec2messages:GetEndpoint              - ec2messages:GetMessages              - ec2messages:SendReply            Resource: "*"      Roles:        - !Ref BastionSsmRole

  BastionSsmProfile:    Type: AWS::IAM::InstanceProfile    Properties:      Path: /      Roles:        - !Ref BastionSsmRole#=========================================创建VPC、IGW========================================## 创建一SecVpc  SecVpc:    Type: AWS::EC2::VPC    Properties:      CidrBlock: 10.20.0.0/16      EnableDnsSupport: 'true'      EnableDnsHostnames: 'true'      Tags:       - Key: Name         Value: SecVpc

# 创建IGW并且关联到VPC  SecVpcIGW:    Type: "AWS::EC2::InternetGateway"    Properties:      Tags:        - Key: Name          Value: SecVpcIGW

  SecVpcAttachIgw:    Type: "AWS::EC2::VPCGatewayAttachment"    Properties:      VpcId: !Ref SecVpc      InternetGatewayId: !Ref SecVpcIGW

#---------------------------SecVpc创建4个子网-------------------------------------#

# SecVpc AZ1内创建GWLB子网  Az1GwlbSubnet:    Type: AWS::EC2::Subnet    Properties:      VpcId: !Ref SecVpc      CidrBlock: 10.20.10.0/24      AvailabilityZone:        Fn::Select:          - 0          - Fn::GetAZs: ""      Tags:      - Key: Name        Value: SecVpc-GWLB1-Subnet

# SecVpc AZ2内创建GWLB子网  Az2GwlbSubnet:    Type: AWS::EC2::Subnet    Properties:      VpcId: !Ref SecVpc      CidrBlock: 10.20.30.0/24      AvailabilityZone:        Fn::Select:          - 1          - Fn::GetAZs: ""      Tags:      - Key: Name        Value: SecVpc-GWLB2-Subnet

# SecVpc AZ1内创建MGT子网  Az1MgtSubnet:    Type: AWS::EC2::Subnet    Properties:      VpcId: !Ref SecVpc      CidrBlock: 10.20.20.0/24      AvailabilityZone:        Fn::Select:          - 0          - Fn::GetAZs: ""      Tags:      - Key: Name        Value: SecVpc-MGT1-Subnet

# SecVpc AZ2内创建MGT子网  Az2MgtSubnet:    Type: AWS::EC2::Subnet    Properties:      VpcId: !Ref SecVpc      CidrBlock: 10.20.40.0/24      AvailabilityZone:        Fn::Select:          - 1          - Fn::GetAZs: ""      Tags:      - Key: Name        Value: SecVpc-MGT2-Subnet

#---------------------------SecVpc创建路由表-------------------------------------#

# SecVpc创建管理网段的路由表  MgtRouteTable:    Type: "AWS::EC2::RouteTable"    Properties:      VpcId: !Ref SecVpc      Tags:        - Key: Name          Value: SecVpc-Mgt-route-table

# Mgt路由表关联子网  Az1MgtSubnetAssociation:    Type: "AWS::EC2::SubnetRouteTableAssociation"    Properties:      RouteTableId: !Ref MgtRouteTable      SubnetId: !Ref Az1MgtSubnet

  Az2MgtSubnetAssociation:    Type: "AWS::EC2::SubnetRouteTableAssociation"    Properties:      RouteTableId: !Ref MgtRouteTable      SubnetId: !Ref Az2MgtSubnet

# SecVpc创建Gwlb的路由表  GwlbRouteTable:    Type: "AWS::EC2::RouteTable"    Properties:      VpcId: !Ref SecVpc      Tags:        - Key: Name          Value: SecVpc-Gwlb-route-table

# Gwlb路由表关联子网  Az1GwlbSubnetAssociation:    Type: "AWS::EC2::SubnetRouteTableAssociation"    Properties:      RouteTableId: !Ref GwlbRouteTable      SubnetId: !Ref Az1GwlbSubnet

  Az2GwlbSubnetAssociation:    Type: "AWS::EC2::SubnetRouteTableAssociation"    Properties:      RouteTableId: !Ref GwlbRouteTable      SubnetId: !Ref Az2GwlbSubnet

# 管理网段添加默认路由去往IGW  MgtToInternetRoute:    Type: "AWS::EC2::Route"    DependsOn: SecVpcIGW    Properties:     RouteTableId: !Ref MgtRouteTable     DestinationCidrBlock: 0.0.0.0/0     GatewayId: !Ref SecVpcIGW

#---------------------------SecVpc创建安全组------------------------------------#

# 在SecVpc内创建一个安全组  SecVpcSg:    Type: AWS::EC2::SecurityGroup    Properties:      GroupDescription: SG to test ping      VpcId: !Ref SecVpc      SecurityGroupIngress:      - IpProtocol: tcp        FromPort: 22        ToPort: 22        CidrIp: 0.0.0.0/0      - IpProtocol: icmp        FromPort: -1        ToPort: -1        CidrIp: 0.0.0.0/0      - IpProtocol: tcp        FromPort: 443        ToPort: 443        CidrIp: 0.0.0.0/0      - IpProtocol: tcp        FromPort: 8443        ToPort: 8443        CidrIp: 0.0.0.0/0      - IpProtocol: -1        FromPort: -1        ToPort: -1        CidrIp: 10.20.0.0/16      - IpProtocol: -1        FromPort: -1        ToPort: -1        CidrIp: 10.10.0.0/16      - IpProtocol: tcp        FromPort: 3389        ToPort: 3389        CidrIp: 0.0.0.0/0      Tags:        - Key: Name          Value: SecVpcSg

#---------------------------SecVpc创建paloalto接口------------------------------------#

  Pa1MgmtEip:    Type: "AWS::EC2::EIP"    Properties:      Tags:        - Key: Name          Value: SecVpc-pa1-mgmt-eip

  Pa1MgmtEni:  # 创建PA1管理接口    Type: "AWS::EC2::NetworkInterface"    Properties:      GroupSet:        - Ref: "SecVpcSg"      SubnetId:        Ref: "Az1MgtSubnet"      Tags:        - Key: Name          Value: SecVpc-pa1-mgmt-eni

  Pa1MgmtEniAssociation:  # 关联公网IP到Mgt弹性接口    Type: AWS::EC2::EIPAssociation    DependsOn: PA1    Properties:      AllocationId: !GetAtt Pa1MgmtEip.AllocationId # 这里是EIP      NetworkInterfaceId: !Ref Pa1MgmtEni

  Pa1DataEni:  # 创建PA1数据接口    Type: "AWS::EC2::NetworkInterface"    Properties:      GroupSet:        - Ref: "SecVpcSg"      SubnetId:        Ref: "Az1GwlbSubnet"      Tags:        - Key: Name          Value: SecVpc-pa1-data-eni

  Pa2MgmtEip:    Type: "AWS::EC2::EIP"    Properties:      Tags:        - Key: Name          Value: SecVpc-pa2-mgmt-eip

  Pa2MgmtEni:  # 创建PA2管理接口    Type: "AWS::EC2::NetworkInterface"    Properties:      GroupSet:        - Ref: "SecVpcSg"      SubnetId:        Ref: "Az2MgtSubnet"      Tags:        - Key: Name          Value: SecVpc-pa2-mgmt-eni

  Pa2MgmtEniAssociation:  # 关联公网IP到Mgt弹性接口    Type: AWS::EC2::EIPAssociation    DependsOn: PA2    Properties:      AllocationId: !GetAtt Pa2MgmtEip.AllocationId # 这里是EIP      NetworkInterfaceId: !Ref Pa2MgmtEni

  Pa2DataEni:  # 创建PA2数据接口    Type: "AWS::EC2::NetworkInterface"    Properties:      GroupSet:        - Ref: "SecVpcSg"      SubnetId:        Ref: "Az2GwlbSubnet"      Tags:        - Key: Name          Value: SecVpc-pa2-data-eni

#---------------------------SecVpc创建PA实例------------------------------------#

# PA1  PA1:    Type: AWS::EC2::Instance    Properties:      ImageId: !FindInMap [RegionMap, !Ref "AWS::Region", !Ref PaVmType]      KeyName: !Ref MyKeyPair      InstanceType: m5.2xlarge      NetworkInterfaces:        -          NetworkInterfaceId: !Ref Pa1DataEni          DeviceIndex: 0        -          NetworkInterfaceId: !Ref Pa1MgmtEni          DeviceIndex: 1      UserData:        Fn::Base64:          !Sub |          mgmt-interface-swap=enable          plugin-op-commands=aws-gwlb-inspect:enable      Tags:        - Key: Name          Value: PA-FW1

# PA2  PA2:    Type: AWS::EC2::Instance    Properties:      ImageId: !FindInMap [RegionMap, !Ref "AWS::Region", !Ref PaVmType]      KeyName: !Ref MyKeyPair      InstanceType: m5.2xlarge      NetworkInterfaces:        -          NetworkInterfaceId: !Ref Pa2DataEni          DeviceIndex: 0        -          NetworkInterfaceId: !Ref Pa2MgmtEni          DeviceIndex: 1      UserData:        Fn::Base64:          !Sub |          mgmt-interface-swap=enable          plugin-op-commands=aws-gwlb-inspect:enable      Tags:        - Key: Name          Value: PA-FW2

#---------------------------创建GWLB------------------------------------#

  Gwlb:    Type: AWS::ElasticLoadBalancingV2::LoadBalancer    Properties:      LoadBalancerAttributes:        - Key: load_balancing.cross_zone.enabled          Value: true      Name: PA-GWLB      Type: gateway      Subnets:        - !Ref Az1GwlbSubnet        - !Ref Az2GwlbSubnet      Tags:      - Key: Name        Value: SecVpc-pa-gwlb

  TargetGroup:    Type: AWS::ElasticLoadBalancingV2::TargetGroup    Properties:      HealthCheckIntervalSeconds: 5      Name: PA-Target      Port: 6081      Protocol: GENEVE      TargetGroupAttributes:      - Key: deregistration_delay.timeout_seconds        Value: 20      VpcId: !Ref SecVpc      HealthCheckPort: 80      HealthCheckProtocol: HTTP      TargetType: instance      Targets:        - Id: !Ref PA1        - Id: !Ref PA2      Tags:      - Key: Name        Value: !Sub "${AWS::StackName}-gwlbtg"

  Listener:    Type: AWS::ElasticLoadBalancingV2::Listener    Properties:      DefaultActions:      - Type: forward        TargetGroupArn: !Ref TargetGroup      LoadBalancerArn: !Ref Gwlb

#---------------------------创建Endpoint Service------------------------------------#

  VpcEndpointService:    Type: AWS::EC2::VPCEndpointService    Properties:      GatewayLoadBalancerArns:        - !Ref Gwlb      AcceptanceRequired: false

# Create Lambda Custom Resource to retrieve VPC Endpoint Service Name:

  VpceServiceLambdaExecutionRole:    Type: AWS::IAM::Role    Properties:      AssumeRolePolicyDocument:        Version: 2012-10-17        Statement:          - Effect: Allow            Principal:              Service:                - lambda.amazonaws.com            Action:              - sts:AssumeRole      Path: /      Policies:        - PolicyName: root          PolicyDocument:            Version: 2012-10-17            Statement:              - Effect: Allow                Action:                  - logs:CreateLogStream                  - logs:PutLogEvents                Resource: arn:aws:logs:*:*:*              - Effect: Allow                Action:                  - ec2:DescribeVpcEndpointServiceConfigurations                  - ec2:DescribeVpcEndpointServicePermissions                  - ec2:DescribeVpcEndpointServices                Resource: "*"

  # Lambda creates CloudWatch Log Group.  # Since CF stack didn't explicitly create the Log Group, Log Group doesn't get deleted when stack is deleted.  # Hence creating Log Group though the stack for Lambda specific funciton.  # Their are few things to consider. For more details refer to: https://github.com/aws/serverless-application-model/issues/1216  VpceServiceLogGroup:    Type: AWS::Logs::LogGroup    Properties:        LogGroupName: !Sub /aws/lambda/${AWS::StackName}-service        RetentionInDays: 1

  VpceServiceName:    Type: AWS::Lambda::Function    DependsOn: VpceServiceLogGroup    Properties:      FunctionName: !Sub ${AWS::StackName}-service      Handler: "index.handler"      Role: !GetAtt VpceServiceLambdaExecutionRole.Arn      Code:        ZipFile: |          import json          import logging          import time

          import boto3          import cfnresponse          from botocore.exceptions import ClientError

          try:              ec2 = boto3.client('ec2')          except ClientError as e:              logger.error(f"ERROR: failed to connect to EC2 client: {e}")              sys.exit(1)

          def handler(event, context):              logger = logging.getLogger()              logger.setLevel(logging.INFO)              logger.info('Received event: {}'.format(json.dumps(event)))

              responseData = {}              responseStatus = cfnresponse.FAILED

              try:                  serviceid = event["ResourceProperties"]["VpceServiceId"]              except Exception as e:                  logger.info('Attribute retrival failure: {}'.format(e))

              try:                  if event["RequestType"] == "Delete":                      responseStatus = cfnresponse.SUCCESS                      cfnresponse.send(event, context, responseStatus, responseData)              except Exception:                  logger.exception("Signaling failure to CloudFormation.")                  cfnresponse.send(event, context, cfnresponse.FAILED, {})

              if event["RequestType"] == "Create":                  logger.info("Retrieving VPC Endpoint Service Name:")                  try:                      response = ec2.describe_vpc_endpoint_service_configurations(                          Filters=[                              {                                  'Name': 'service-id',                                  'Values': [serviceid]                              }                          ]                      )                  except Exception as e:                      logger.info('ec2.describe_vpc_endpoint_service_configurations failure: {}'.format(e))

                  service_name = response['ServiceConfigurations'][0]['ServiceName']

                  time.sleep(120)

                  responseData['ServiceName'] = service_name                  responseStatus = cfnresponse.SUCCESS                  cfnresponse.send(event, context, responseStatus, responseData)      Runtime: python3.7      Timeout: 150

  RetrieveVpceServiceName:    Type: Custom::RetrieveAttributes    Properties:      ServiceToken: !GetAtt VpceServiceName.Arn      VpceServiceId: !Ref VpcEndpointService

  App1Endpoint:    Type: AWS::EC2::VPCEndpoint    Properties:      VpcId: !Ref AppVpc      ServiceName: !GetAtt RetrieveVpceServiceName.ServiceName      VpcEndpointType: GatewayLoadBalancer      SubnetIds:        - !Ref Gwlbe1Subnet

  App2Endpoint:    Type: AWS::EC2::VPCEndpoint    Properties:      VpcId: !Ref AppVpc      ServiceName: !GetAtt RetrieveVpceServiceName.ServiceName      VpcEndpointType: GatewayLoadBalancer      SubnetIds:        - !Ref Gwlbe2Subnet#==============================创建App VPC、IGW==============================## 创建一APP VPC  AppVpc:    Type: AWS::EC2::VPC    Properties:      CidrBlock: 10.10.0.0/16      EnableDnsSupport: 'true'      EnableDnsHostnames: 'true'      Tags:       - Key: Name         Value: AppVpc

# 创建IGW并且关联到VPC  AppVpcIGW:    Type: "AWS::EC2::InternetGateway"    Properties:      Tags:        - Key: Name          Value: AppVpc-IGW

  AppVpcAttachIgw:    Type: "AWS::EC2::VPCGatewayAttachment"    Properties:      VpcId: !Ref AppVpc      InternetGatewayId: !Ref AppVpcIGW

#---------------------------AppVpc创建4个子网-------------------------------------#

# AppVpc创建GWLBe1子网  Gwlbe1Subnet:    Type: AWS::EC2::Subnet    Properties:      VpcId: !Ref AppVpc      CidrBlock: 10.10.10.0/24      AvailabilityZone:        Fn::Select:          - 0          - Fn::GetAZs: ""      Tags:      - Key: Name        Value: AppVpc-GWLBe1-Subnet

# AppVpc创建App1子网  App1Subnet:    Type: AWS::EC2::Subnet    Properties:      VpcId: !Ref AppVpc      CidrBlock: 10.10.20.0/24      AvailabilityZone:        Fn::Select:          - 0          - Fn::GetAZs: ""      Tags:      - Key: Name        Value: AppVpc-App1-Subnet

# AppVpc创建GWLBe1子网  Gwlbe2Subnet:    Type: AWS::EC2::Subnet    Properties:      VpcId: !Ref AppVpc      CidrBlock: 10.10.30.0/24      AvailabilityZone:        Fn::Select:          - 1          - Fn::GetAZs: ""      Tags:      - Key: Name        Value: AppVpc-GWLBe2-Subnet

# AppVpc创建App1子网  App2Subnet:    Type: AWS::EC2::Subnet    Properties:      VpcId: !Ref AppVpc      CidrBlock: 10.10.40.0/24      AvailabilityZone:        Fn::Select:          - 1          - Fn::GetAZs: ""      Tags:      - Key: Name        Value: AppVpc-App2-Subnet

#---------------------------AppVpc创建4个路由表-------------------------------------#

#---------------IGW路由---------------#

# AppVpc创建IGW的路由表  IgwIngressRouteTable:    Type: "AWS::EC2::RouteTable"    Properties:      VpcId: !Ref AppVpc      Tags:        - Key: Name          Value: AppVpc-Igw-Ingress-route-table

# IgwIngress路由表关联IGW  IgwIngressAssociation:    Type: "AWS::EC2::GatewayRouteTableAssociation"    Properties:      RouteTableId: !Ref IgwIngressRouteTable      GatewayId: !Ref AppVpcIGW

# IgwIngress去往App网段的路由  IgwIngressToApp1:    Type: "AWS::EC2::Route"    DependsOn: App1Endpoint    Properties:     RouteTableId: !Ref IgwIngressRouteTable     DestinationCidrBlock: 10.10.20.0/24     VpcEndpointId: !Ref App1Endpoint

  IgwIngressToApp2:    Type: "AWS::EC2::Route"    DependsOn: App2Endpoint    Properties:     RouteTableId: !Ref IgwIngressRouteTable     DestinationCidrBlock: 10.10.40.0/24     VpcEndpointId: !Ref App2Endpoint

#---------------GWLBe路由---------------#

# AppVpc创建Gwlbe的路由表  GwlbeRouteTable:    Type: "AWS::EC2::RouteTable"    Properties:      VpcId: !Ref AppVpc      Tags:        - Key: Name          Value: AppVpc-Gwlbe-route-table

# Gwlbe路由表关联子网  GwlbeRouteTableAz1Association:    Type: "AWS::EC2::SubnetRouteTableAssociation"    Properties:      RouteTableId: !Ref GwlbeRouteTable      SubnetId: !Ref Gwlbe1Subnet

  GwlbeRouteTableAz2Association:    Type: "AWS::EC2::SubnetRouteTableAssociation"    Properties:      RouteTableId: !Ref GwlbeRouteTable      SubnetId: !Ref Gwlbe2Subnet

# 管理网段添加默认路由去往IGW  GwlbeToInternetRoute:    Type: "AWS::EC2::Route"    DependsOn: AppVpcIGW    Properties:     RouteTableId: !Ref GwlbeRouteTable     DestinationCidrBlock: 0.0.0.0/0     GatewayId: !Ref AppVpcIGW

#---------------App路由---------------#

# AppVpc创建App1的路由表  App1RouteTable:    Type: "AWS::EC2::RouteTable"    Properties:      VpcId: !Ref AppVpc      Tags:        - Key: Name          Value: AppVpc-App1-route-table

# App1路由表关联子网  App1RouteTableAssociation:    Type: "AWS::EC2::SubnetRouteTableAssociation"    Properties:      RouteTableId: !Ref App1RouteTable      SubnetId: !Ref App1Subnet

# App1网段添加默认路由去往Endpoint  App1ToEndpoint:    Type: "AWS::EC2::Route"    DependsOn: App1Endpoint    Properties:     RouteTableId: !Ref App1RouteTable     DestinationCidrBlock: 0.0.0.0/0     VpcEndpointId: !Ref App1Endpoint

# AppVpc创建App2的路由表  App2RouteTable:    Type: "AWS::EC2::RouteTable"    Properties:      VpcId: !Ref AppVpc      Tags:        - Key: Name          Value: AppVpc-App2-route-table

# App2路由表关联子网  App2RouteTableAssociation:    Type: "AWS::EC2::SubnetRouteTableAssociation"    Properties:      RouteTableId: !Ref App2RouteTable      SubnetId: !Ref App2Subnet

# App2网段添加默认路由去往Endpoint  App2ToEndpoint:    Type: "AWS::EC2::Route"    DependsOn: App1Endpoint    Properties:     RouteTableId: !Ref App2RouteTable     DestinationCidrBlock: 0.0.0.0/0     VpcEndpointId: !Ref App2Endpoint

#---------------------------AppVpc创建安全组------------------------------------#

# 在SEC VPC内创建一个安全组  AppVpcSg:    Type: AWS::EC2::SecurityGroup    Properties:      GroupDescription: SG to test ping      VpcId: !Ref AppVpc      SecurityGroupIngress:      - IpProtocol: tcp        FromPort: 22        ToPort: 22        CidrIp: 0.0.0.0/0      - IpProtocol: icmp        FromPort: -1        ToPort: -1        CidrIp: 0.0.0.0/0      - IpProtocol: tcp        FromPort: 8443        ToPort: 8443        CidrIp: 0.0.0.0/0      - IpProtocol: tcp        FromPort: 443        ToPort: 443        CidrIp: 0.0.0.0/0      - IpProtocol: -1        FromPort: -1        ToPort: -1        CidrIp: 10.20.0.0/16      - IpProtocol: -1        FromPort: -1        ToPort: -1        CidrIp: 10.10.0.0/16      - IpProtocol: tcp        FromPort: 3389        ToPort: 3389        CidrIp: 0.0.0.0/0      Tags:        - Key: Name          Value: AppVpcSg

#---------------------------AppVpc创建EC2实例------------------------------------#

# App1  App1:    Type: AWS::EC2::Instance    Properties:      IamInstanceProfile: !Ref BastionSsmProfile      ImageId: !Ref EC2InstanceAmiId      KeyName: !Ref MyKeyPair      InstanceType: t2.micro      NetworkInterfaces:        - AssociatePublicIpAddress: true          DeviceIndex: 0          GroupSet:            - Ref: AppVpcSg          SubnetId:  !Ref App1Subnet      Tags:        - Key: Name          Value: App1-Linux

#  App2 Windows AMI  App2:    Type: AWS::EC2::Instance    Properties:      ImageId: ami-09e5001ad68a3ec91  #Tokyo ami-09e5001ad68a3ec91      KeyName: !Ref MyKeyPair      InstanceType: t2.xlarge      NetworkInterfaces:        - AssociatePublicIpAddress: true          DeviceIndex: 0          GroupSet:            - Ref: AppVpcSg          SubnetId:  !Ref App2Subnet      Tags:        - Key: Name          Value: App2-Windows      UserData:        Fn::Base64:          !Sub |          <powershell>          $PASSWORD= ConvertTo-SecureString –AsPlainText -Force -String LIYJMSgaliu1qiang2long3windemoZJ2vG5          New-LocalUser -Name "labuser" -Description "rdp user" -Password $Password          Add-LocalGroupMember -Group 'Administrators' -Member 'labuser'          net localgroup "Remote Desktop Users" /add labuser          $file = "C:\" + (Get-Date).ToString("MM-dd-yy-hh-mm")          New-Item $file -ItemType file          </powershell>
二、命令行配置 paloalto
AWS上paloalto其实可以做成开机自动加载配置,关键词是Bootstrap the VM-Series Firewall on AWS[参见链接1]。原理大致是将相关的文件到放在S3桶内,在paloalto EC2的User Data里面指定S3的路径来加载这些文件。视频演示可以[参见链接2]。
这里使用CloudFormation做成全自动需要写的代码挺多,但是实际场景并不多,所以这里我并不进一步往下研究了。
通过SSH登录paloalto修改admin密码。
Welcome admin.admin@PA-VM> configureEntering configuration mode[edit]admin@PA-VM# set mgt-config users admin passwordEnter password   :Confirm password :

[edit]admin@PA-VM# commit

Commit job 2 is in progress. Use Ctrl+C to return to command prompt.........55%75%98%..............100%Configuration committed successfully

[edit]admin@PA-VM#
将下面的命令刷到PA FW1和FW2上。
set network profiles interface-management-profile MgtProfile http yesset network profiles interface-management-profile MgtProfile ssh yesset network profiles interface-management-profile MgtProfile ping yes

set network interface ethernet ethernet1/1 layer3 ndp-proxy enabled noset network interface ethernet ethernet1/1 layer3 sdwan-link-settings upstream-nat enable noset network interface ethernet ethernet1/1 layer3 sdwan-link-settings upstream-nat static-ipset network interface ethernet ethernet1/1 layer3 sdwan-link-settings enable noset network interface ethernet ethernet1/1 layer3 interface-management-profile MgtProfileset network interface ethernet ethernet1/1 layer3 lldp enable noset network interface ethernet ethernet1/1 layer3 dhcp-client

set network virtual-router default interface ethernet1/1set zone untrust network layer3 ethernet1/1

set rulebase default-security-rules rules intrazone-default action allowset rulebase default-security-rules rules intrazone-default log-start yesset rulebase default-security-rules rules intrazone-default log-end yesset rulebase default-security-rules rules intrazone-default profile-setting profiles url-filtering defaultset rulebase default-security-rules rules intrazone-default profile-setting profiles file-blocking "strict file blocking"set rulebase default-security-rules rules intrazone-default profile-setting profiles virus defaultset rulebase default-security-rules rules intrazone-default profile-setting profiles spyware strictset rulebase default-security-rules rules intrazone-default profile-setting profiles vulnerability strictset rulebase default-security-rules rules intrazone-default profile-setting profiles wildfire-analysis default

commit

Commit job 3 is in progress. Use Ctrl+C to return to command prompt.........55%70%98%.............100%Configuration committed successfullyWarning: No valid Antivirus content package exists(Module: device)
三、测试
3.1 App1 HTTP访问测试
通过SSH连接到App1上,安装HTTP服务,修改端口为8443。
yum install -y httpdsed -i.bak 's/Listen 80/Listen 8443/g' /etc/httpd/conf/httpd.confecho "<h2>Hello World from $(hostname -f)</h2>" > /var/www/html/index.htmlsystemctl start httpd.servicesystemctl enable httpd.service访问EC2的公网8443端口测试,在浏览器界面可以使用CTRL+F5多强制刷新几次。
查看PA-FW1上的日志。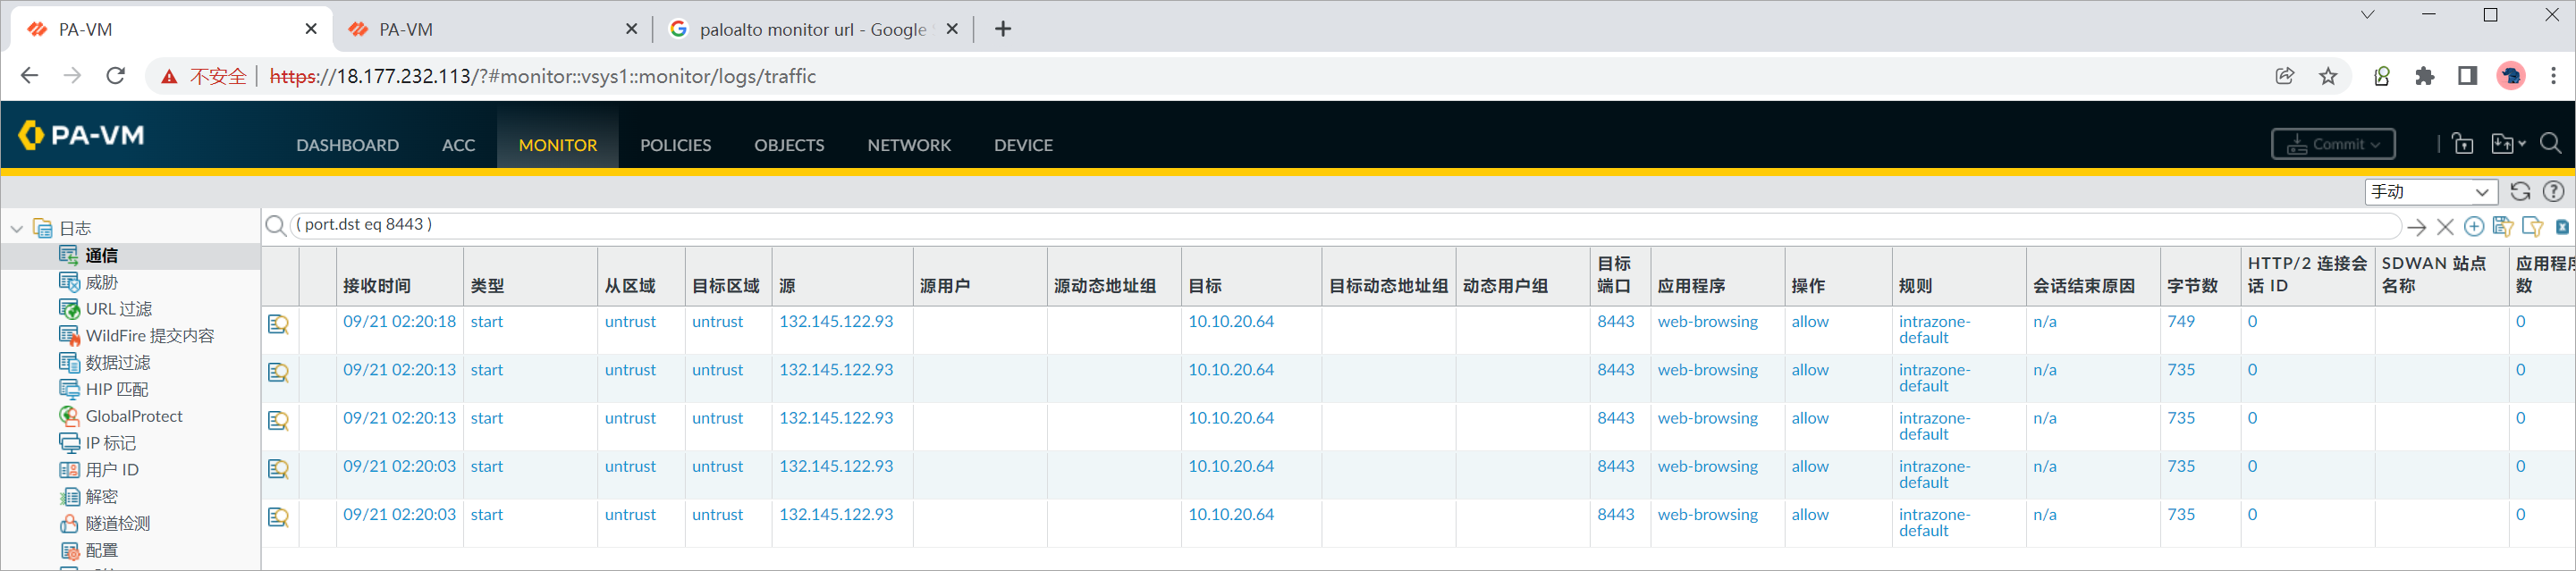
查看PA-FW2上的日志。
3.2 App2 RDP连接测试
通过RDP连接到App2上,可以通过浏览器访问一些网页制造流量。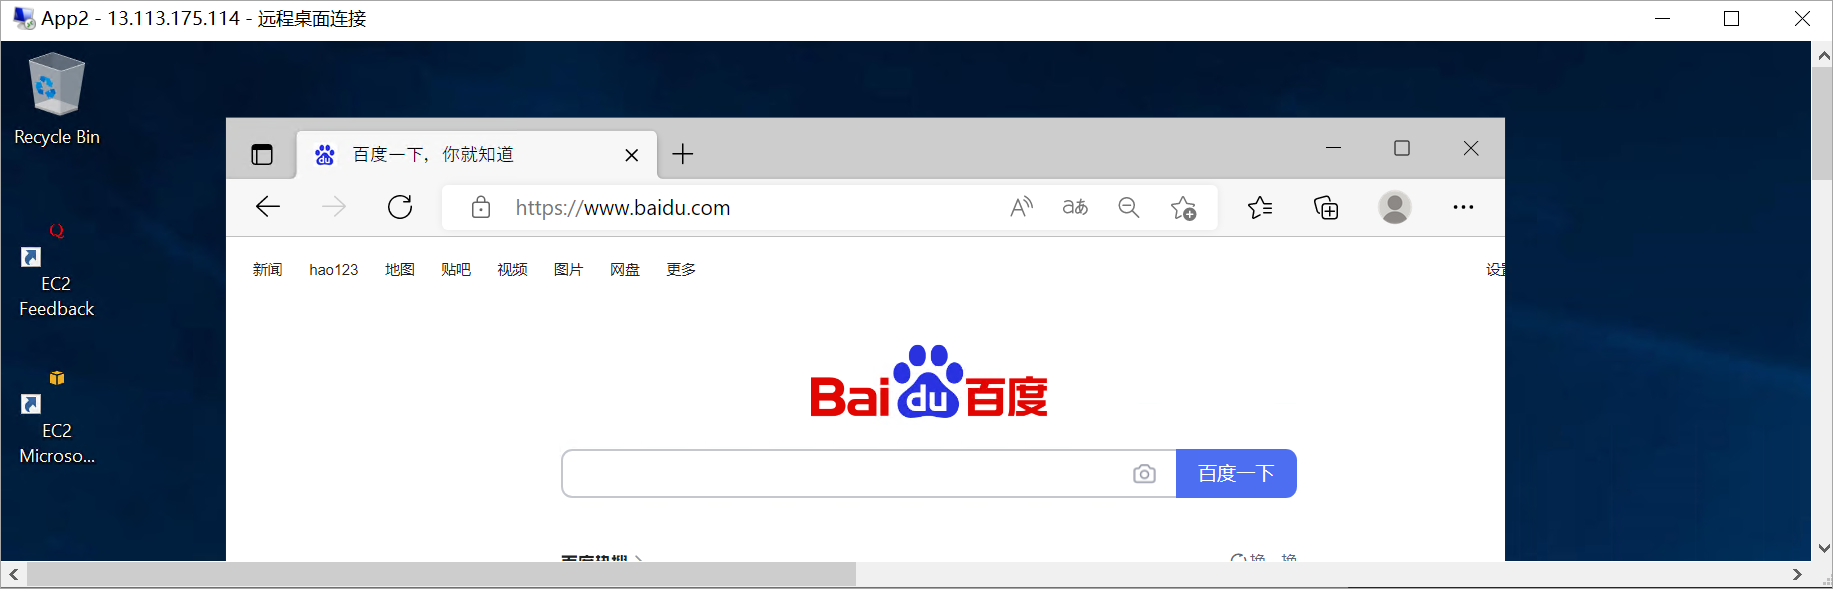
查看PA-FW1上的日志。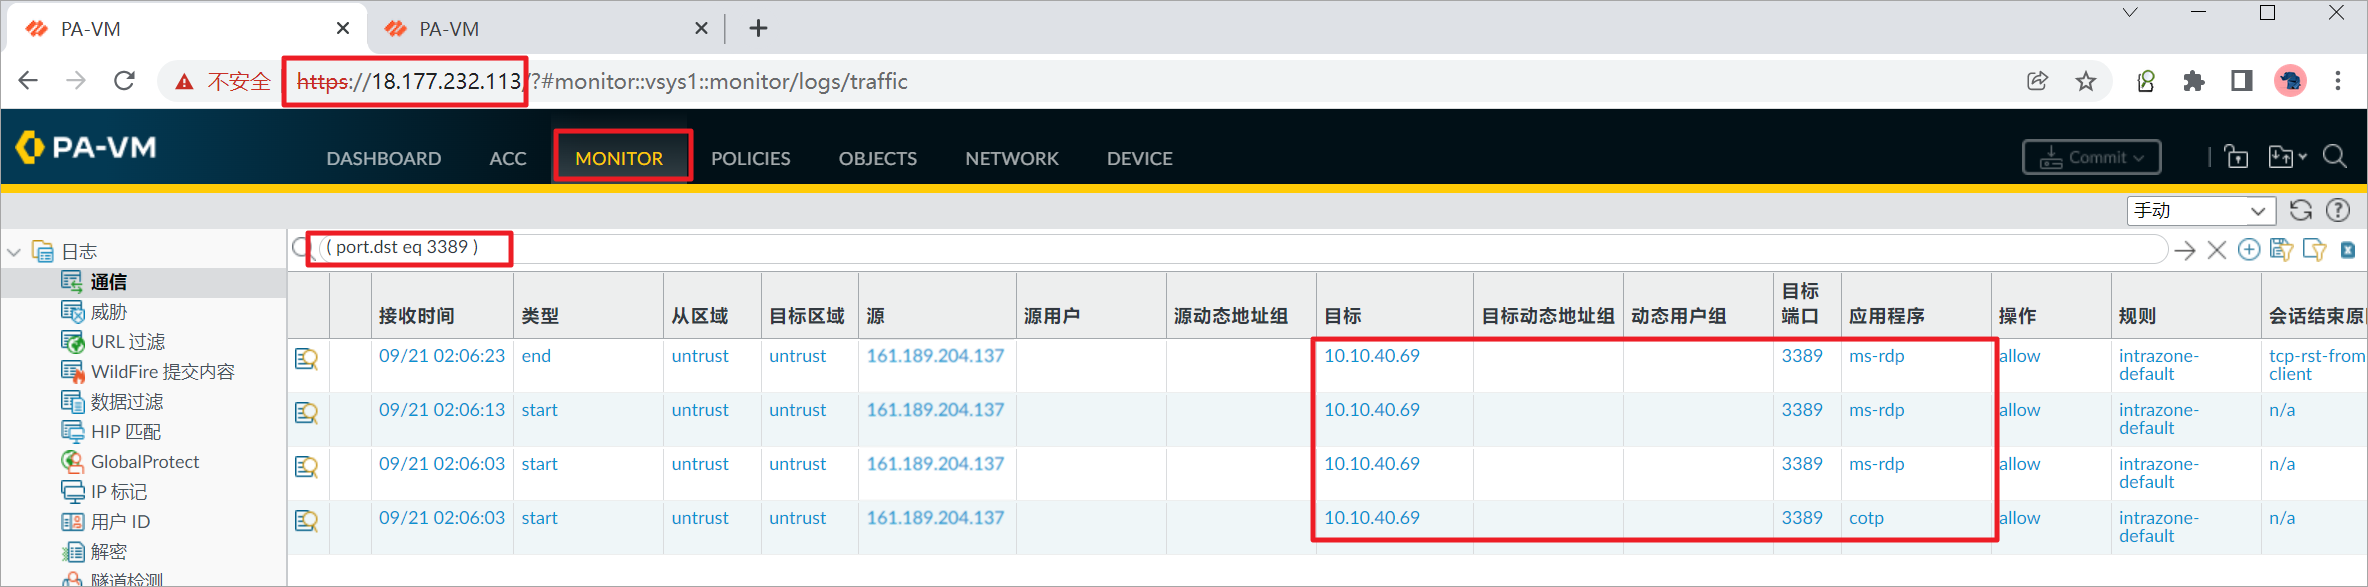
查看PA-FW2上的日志。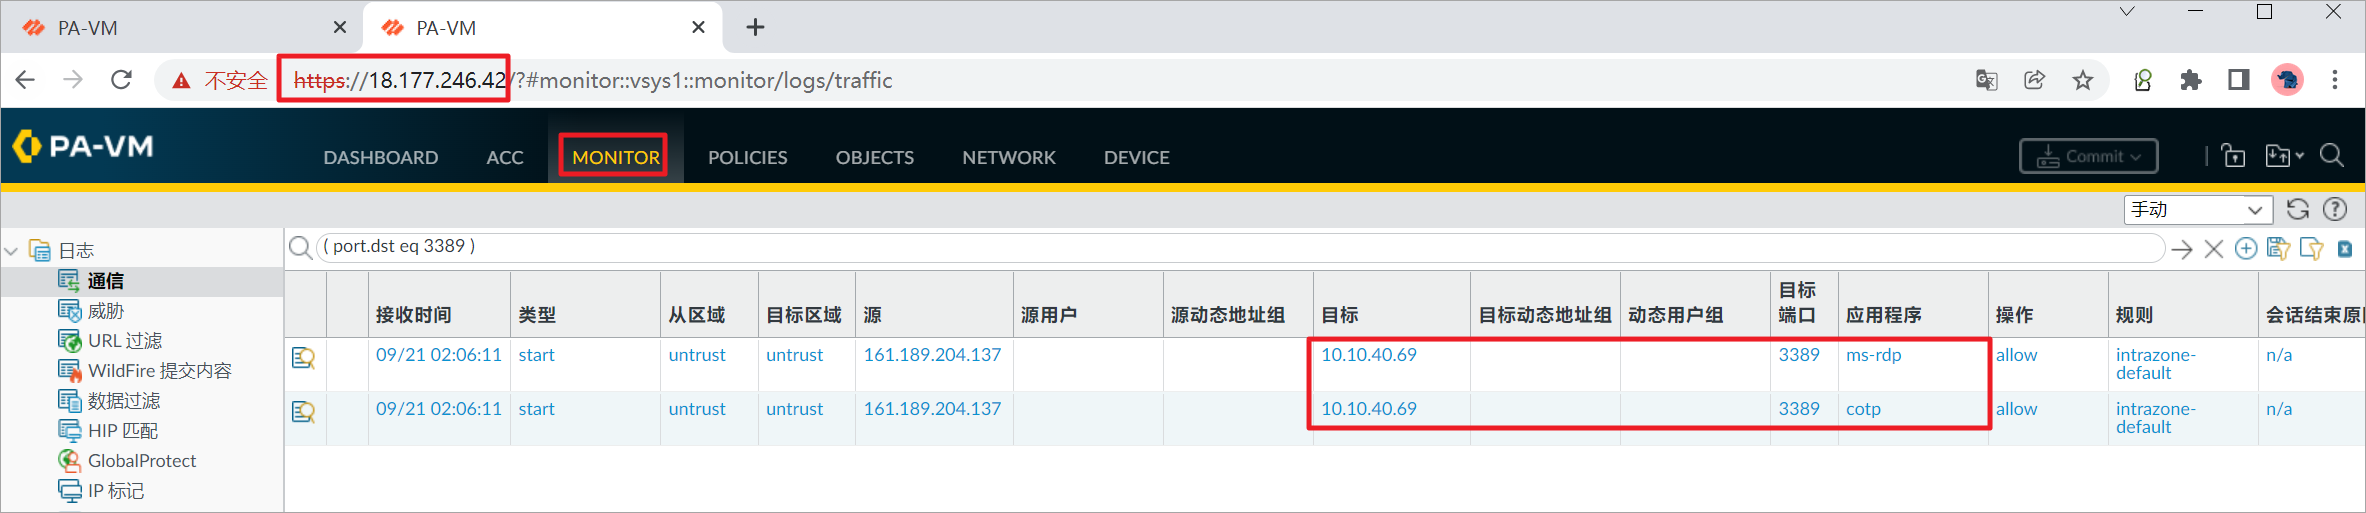
四、参考链接
[1] Bootstrap the VM-Series Firewall on AWS:https://docs.paloaltonetworks.com/vm-series/9-1/vm-series-deployment/bootstrap-the-vm-series-firewall/bootstrap-the-vm-series-firewall-in-aws
[2] Bootstrapping the VM-Series on AWS:https://www.youtube.com/watch?v=v4HIvytbVU8
利用CloudFormation自动化部署AWS GWLB集成Palo Alto防火墙相关推荐
- 利用CloudFormation自动化部署AWS GWLB集成FortiGate防火墙
AWS VPC 流量集中检测系列--(4)利用CloudFormation自动化部署AWS GWLB集成FortiGate防火墙 B站视频: https://www.bilibili.com/vid ...
- AWS GWLB集成FortiGate防火墙
AWS VPC 流量集中检测系列--(3)AWS GWLB集成FortiGate防火墙 B站视频:https://www.bilibili.com/video/BV1ee4y147HK/?spm_id ...
- Palo Alto 防火墙升级 Software
今天早上豆子需要升级一下Palo Alto 防火墙的软件.上一次升级已经是半年前的事情了,目前使用的版本是8.0.8,而最新的版本是8.1.2.由于中间跨越了多个版本,因此升级需要从8.0.8 -&g ...
- 利用Jenkins自动化部署springboot项目到阿里云服务器(centos8)
背景: 最近想部署一个springboot项目到阿里云服务器里面.捣鼓了很久,构建了很多次,都失败了!实在是一脸辛酸,有点气馁~ 在此想记录一下构建的过程. 不了解Jenkins之前,觉得Jenkin ...
- Palo Alto防火墙虚拟机版本配置
1.下载Palo Alto虚拟机. 链接: https://pan.baidu.com/s/1eksBzBG3uLWyxhvlgmxulQ 提取码: nc76 2.虚拟机的IP地址为192.168.1 ...
- Mac 利用 homebrew 安装部署 Jenkins 持续集成环境
万叶集
- Palo Alto 防火墙配置Nat详解
NAT 策略的区域选择基于 NAT 前地址区域 1.snat,主要用于防火墙内部用户访问外网 举例如下所示: ps:在源地址转换中,转换类型有静态ip,在这种情况下,内部的一个服务器私有地址被转为一个 ...
- git自动部署代码到服务器windows,Jenkins-在windows上配置自动化部署(Jenkins+Gitlab+IIS)...
Jenkins-在windows上配置自动化部署(Jenkins+Gitlab+IIS) web部署样例 windows服务部署样例 系统备份 在服务器上创建后缀名为.ps1的文件,例:BackUpD ...
- Java利用jenkins做项目的自动化部署
本地的jekins密码 2722e8ea873b4cf08884c22dff732bab 这篇文章主要介绍了Java利用jenkins做项目的自动化部署,小编觉得挺不错的,现在分享给大家,也给大家做个 ...
最新文章
- Tomcat 系统架构与设计模式,第 1 部分: 工作原理
- 《移动优先与响应式Web设计》一上册 移动优先
- 揭秘下一代云数据库引擎MyBasefor PostgreSQL
- 嵌入式OS入门笔记-以RTX为案例:三.初探进程
- 一文了解 CVPR 2022 Workshop 都要做什么
- Tablet UI模式: 中心舞台
- 基于RNN和CTC的语音识别模型,探索语境偏移解决之道
- 力扣111. 二叉树的最小深度(JavaScript)
- ODrive踩坑(三)AS5047P磁编码器的ABI接口
- 济南学习 Day 5 T2 am
- django导入mysql_django如何直接对数据库进行插入操作?
- 拓端tecdat|ARIMA模型预测CO2浓度时间序列-python实现
- mysql压缩版8.0安装_mysql8.0压缩版安装和配置教程
- 【交易技术前沿】新一代证券交易系统应用架构的研究
- 74HC20双4输入与非门介绍
- java将geotiff文件发布为geoserver服务
- 【原理图和PCB】基于单片机的超声波测距仪设计
- 道路中心线提取、河道中心线的提取(ArcScan)
- java输出皮卡丘_使用CSS实现皮卡丘
- linux mysql stop 报错_mysql linux上安装使用