加快Linux磁盘加密
linux加密磁盘
Originally published at https://blog.cloudflare.com on March 25, 2020.
最初于 2020年3月25日 发布在 https://blog.cloudflare.com 上。
Data encryption at rest is a must-have for any modern Internet company. Many companies, however, don’t encrypt their disks, because they fear the potential performance penalty caused by encryption overhead.
静态数据加密是任何现代Internet公司都必须具备的。 但是,许多公司不加密磁盘,因为他们担心加密开销可能会导致性能下降。
Encrypting data at rest is vital for Cloudflare with more than 200 data centres across the world. In this post, we will investigate the performance of disk encryption on Linux and explain how we made it at least two times faster for ourselves and our customers!
静态数据加密对于Cloudflare在全球拥有200多个数据中心至关重要。 在这篇文章中,我们将研究Linux上磁盘加密的性能,并说明如何使我们自己和我们的客户至少快两倍的速度!
静态加密数据 (Encrypting data at rest)
When it comes to encrypting data at rest there are several ways it can be implemented on a modern operating system (OS). Available techniques are tightly coupled with a typical OS storage stack. A simplified version of the storage stack and encryption solutions can be found on the diagram below:
在静态数据加密方面,有几种方法可以在现代操作系统(OS)上实现。 可用的技术与典型的OS存储堆栈紧密结合在一起。 下图提供了存储堆栈和加密解决方案的简化版本:
On the top of the stack are applications, which read and write data in files (or streams). The file system in the OS kernel keeps track of which blocks of the underlying block device belong to which files and translates these file reads and writes into block reads and writes, however the hardware specifics of the underlying storage device is abstracted away from the filesystem. Finally, the block subsystem actually passes the block reads and writes to the underlying hardware using appropriate device drivers.
应用程序位于堆栈的顶部,该应用程序在文件(或流)中读写数据。 OS内核中的文件系统跟踪底层块设备的哪些块属于哪些文件,并将这些文件的读写操作转换为块读写,但是底层存储设备的硬件细节是从文件系统中抽象出来的。 最后,块子系统实际上使用适当的设备驱动程序将对块的读写操作传递给基础硬件。
The concept of the storage stack is actually similar to the well-known network OSI model, where each layer has a more high-level view of the information and the implementation details of the lower layers are abstracted away from the upper layers. And, similar to the OSI model, one can apply encryption at different layers (think about TLS vs IPsec or a VPN).
存储堆栈的概念实际上类似于众所周知的网络OSI模型 ,其中每个层都具有更高级别的信息视图,而较低层的实现细节则从较高层中抽象出来。 而且,类似于OSI模型,人们可以在不同的层上应用加密(考虑TLS与IPsec或VPN的关系 )。
For data at rest we can apply encryption either at the block layers (either in hardware or in software) or at the file level (either directly in applications or in the filesystem).
对于静态数据,我们可以在块层(在硬件或软件中)或在文件级别(直接在应用程序或文件系统中)应用加密。
块与文件加密 (Block vs file encryption)
Generally, the higher in the stack we apply encryption, the more flexibility we have. With application level encryption the application maintainers can apply any encryption code they please to any particular data they need. The downside of this approach is they actually have to implement it themselves and encryption in general is not very developer-friendly: one has to know the ins and outs of a specific cryptographic algorithm, properly generate keys, nonces, IVs etc. Additionally, application level encryption does not leverage OS-level caching and Linux page cache in particular: each time the application needs to use the data, it has to either decrypt it again, wasting CPU cycles, or implement its own decrypted “cache”, which introduces more complexity to the code.
通常,在堆栈中应用加密的级别越高,我们拥有的灵活性就越大。 通过应用程序级加密,应用程序维护者可以将他们喜欢的任何加密代码应用于所需的任何特定数据。 这种方法的缺点是实际上他们必须自己实现,而且加密通常对开发人员不是很友好:必须了解特定加密算法的来龙去脉,正确生成密钥,随机数,IV等。此外,应用程序级别的加密不特别利用OS级别的缓存和Linux页面缓存 :每次应用程序需要使用数据时,它都必须再次解密数据,浪费CPU周期或实现自己的解密“缓存”,这引入了更多信息代码的复杂性。
File system level encryption makes data encryption transparent to applications, because the file system itself encrypts the data before passing it to the block subsystem, so files are encrypted regardless if the application has crypto support or not. Also, file systems can be configured to encrypt only a particular directory or have different keys for different files. This flexibility, however, comes at a cost of a more complex configuration. File system encryption is also considered less secure than block device encryption as only the contents of the files are encrypted. Files also have associated metadata, like file size, the number of files, the directory tree layout etc., which are still visible to a potential adversary.
文件系统级加密使数据加密对应用程序透明,因为文件系统本身在将数据传递到块子系统之前先对其进行加密,因此无论应用程序是否支持加密,文件都将被加密。 同样,可以将文件系统配置为仅加密特定目录,或者对不同文件使用不同的密钥。 但是,这种灵活性是以更复杂的配置为代价的。 文件系统加密也被认为不如块设备加密安全,因为仅文件内容被加密。 文件还具有关联的元数据,如文件大小,文件数,目录树布局等,这些对潜在对手仍然可见。
Encryption down at the block layer (often referred to as disk encryption or full disk encryption) also makes data encryption transparent to applications and even whole file systems. Unlike file system level encryption it encrypts all data on the disk including file metadata and even free space. It is less flexible though — one can only encrypt the whole disk with a single key, so there is no per-directory, per-file or per-user configuration. From the crypto perspective, not all cryptographic algorithms can be used as the block layer doesn’t have a high-level overview of the data anymore, so it needs to process each block independently. Most common algorithms require some sort of block chaining to be secure, so are not applicable to disk encryption. Instead, special modes were developed just for this specific use-case.
在块层向下加密(通常称为磁盘加密或全盘加密)也使数据加密对应用程序甚至整个文件系统透明。 与文件系统级加密不同,它会加密磁盘上的所有数据,包括文件元数据,甚至可用空间。 但是,它的灵活性较差-只能用一个密钥加密整个磁盘,因此没有按目录,按文件或按用户的配置。 从加密的角度来看,并不是所有的加密算法都可以使用,因为块层不再具有数据的高级概览,因此它需要独立处理每个块。 大多数常见算法都需要某种类型的块链来确保安全,因此不适用于磁盘加密。 相反,仅针对此特定用例开发了特殊模式 。
So which layer to choose? As always, it depends… Application and file system level encryption are usually the preferred choice for client systems because of the flexibility. For example, each user on a multi-user desktop may want to encrypt their home directory with a key they own and leave some shared directories unencrypted. On the contrary, on server systems, managed by SaaS/PaaS/IaaS companies (including Cloudflare) the preferred choice is configuration simplicity and security — with full disk encryption enabled any data from any application is automatically encrypted with no exceptions or overrides. We believe that all data needs to be protected without sorting it into “important” vs “not important” buckets, so the selective flexibility the upper layers provide is not needed.
那么选择哪一层呢? 与往常一样,这取决于…由于灵活性,应用程序和文件系统级加密通常是客户端系统的首选。 例如,多用户桌面上的每个用户可能都希望使用自己拥有的密钥来加密其主目录,而使某些共享目录未加密。 相反,在由SaaS / PaaS / IaaS公司(包括Cloudflare)管理的服务器系统上,首选的选择是配置简单性和安全性-启用全盘加密后,来自任何应用程序的任何数据都会自动加密,没有例外或覆盖。 我们认为,需要保护所有数据,而不要将其分类为“重要”和“不重要”存储桶,因此不需要上层提供的选择性灵活性。
硬件与软件磁盘加密 (Hardware vs software disk encryption)
When encrypting data at the block layer it is possible to do it directly in the storage hardware, if the hardware supports it. Doing so usually gives better read/write performance and consumes less resources from the host. However, since most hardware firmware is proprietary, it does not receive as much attention and review from the security community. In the past this led to flaws in some implementations of hardware disk encryption, which render the whole security model useless. Microsoft, for example, started to prefer software-based disk encryption since then.
如果在块层加密数据,则可以在存储硬件中直接进行加密(如果硬件支持) 。 这样做通常可以提供更好的读/写性能,并从主机消耗更少的资源。 但是,由于大多数硬件固件是专有的,因此不会引起安全界的广泛关注和审查。 过去,这导致了某些硬件磁盘加密实施中的缺陷 ,从而使整个安全模型失效。 例如,从那时起,Microsoft 就开始偏爱基于软件的磁盘加密 。
We didn’t want to put our data and our customers’ data to the risk of using potentially insecure solutions and we strongly believe in open-source. That’s why we rely only on software disk encryption in the Linux kernel, which is open and has been audited by many security professionals across the world.
我们不想让我们的数据和客户数据面临使用潜在不安全解决方案的风险,我们坚信开源 。 这就是为什么我们仅依赖Linux内核中的软件磁盘加密的原因,Linux内核是开放的,并且已经由世界各地的许多安全专业人员进行了审核。
Linux磁盘加密性能 (Linux disk encryption performance)
We aim not only to save bandwidth costs for our customers, but to deliver content to Internet users as fast as possible.
我们的目标不仅是为我们的客户节省带宽成本,而且还希望尽快向Internet用户交付内容。
At one point we noticed that our disks were not as fast as we would like them to be. Some profiling as well as a quick A/B test pointed to Linux disk encryption. Because not encrypting the data (even if it is supposed-to-be a public Internet cache) is not a sustainable option, we decided to take a closer look into Linux disk encryption performance.
在某一时刻,我们注意到磁盘的速度不如我们希望的那样快。 一些配置文件以及快速的A / B测试都指出Linux磁盘加密。 因为不加密数据(即使应该将其当作公共Internet缓存)也不是一种可持续的选择,所以我们决定仔细研究Linux磁盘加密性能。
设备映射器和dm-crypt (Device mapper and dm-crypt)
Linux implements transparent disk encryption via a dm-crypt module and dm-crypt itself is part of device mapper kernel framework. In a nutshell, the device mapper allows pre/post-process IO requests as they travel between the file system and the underlying block device.
Linux通过dm-crypt模块实现透明磁盘加密,而dm-crypt本身是设备映射器内核框架的一部分。 简而言之,设备映射器允许在文件系统和基础块设备之间传输IO之前/之后的请求。
dm-crypt in particular encrypts "write" IO requests before sending them further down the stack to the actual block device and decrypts "read" IO requests before sending them up to the file system driver. Simple and easy! Or is it?
dm-crypt特别是在将“写入” IO请求进一步向下发送到实际块设备之前对其进行加密,并在将“读取” IO请求发送至文件系统驱动程序之前对其进行解密。 简单容易! 还是?
标杆设置 (Benchmarking setup)
For the record, the numbers in this post were obtained by running specified commands on an idle Cloudflare G9 server out of production. However, the setup should be easily reproducible on any modern x86 laptop.
作为记录,此文章中的数字是通过在闲置的Cloudflare G9服务器上运行指定的命令而获得的。 但是,该设置应该可以在任何现代x86笔记本电脑上轻松复制。
Generally, benchmarking anything around a storage stack is hard because of the noise introduced by the storage hardware itself. Not all disks are created equal, so for the purpose of this post we will use the fastest disks available out there — that is no disks.
通常,由于存储硬件本身引入的噪声,很难对存储堆栈周围的任何事物进行基准测试。 并非所有磁盘都是相同的,因此,出于本文的目的,我们将使用现有最快的磁盘-即没有磁盘。
Instead Linux has an option to emulate a disk directly in RAM. Since RAM is much faster than any persistent storage, it should introduce little bias in our results.
相反,Linux可以选择直接在RAM中模拟磁盘。 由于RAM比任何持久性存储都快得多,因此它应该不会给我们的结果带来任何偏差。
The following command creates a 4GB ramdisk:
以下命令创建一个4GB的ramdisk:
$ sudo modprobe brd rd_nr=1 rd_size=4194304$ ls /dev/ram0Now we can set up a dm-crypt instance on top of it thus enabling encryption for the disk. First, we need to generate the disk encryption key, "format" the disk and specify a password to unlock the newly generated key.
现在,我们可以在其之上设置dm-crypt实例,从而为磁盘启用加密。 首先,我们需要生成磁盘加密密钥,“格式化”磁盘并指定密码以解锁新生成的密钥。
$ fallocate -l 2M crypthdr.img$ sudo cryptsetup luksFormat /dev/ram0 --header crypthdr.imgWARNING!========This will overwrite data on crypthdr.img irrevocably.Are you sure? (Type uppercase yes): YESEnter passphrase:Verify passphrase:Those who are familiar with LUKS/dm-crypt might have noticed we used a LUKS detached header here. Normally, LUKS stores the password-encrypted disk encryption key on the same disk as the data, but since we want to compare read/write performance between encrypted and unencrypted devices, we might accidentally overwrite the encrypted key during our benchmarking later. Keeping the encrypted key in a separate file avoids this problem for the purposes of this post.
那些熟悉LUKS/dm-crypt可能已经注意到我们在这里使用了LUKS分离头 。 通常,LUKS将密码加密的磁盘加密密钥与数据存储在同一磁盘上,但是由于我们想比较加密和未加密设备之间的读写性能,因此稍后在基准测试期间可能会意外覆盖加密密钥。 出于本文的目的,将加密密钥保存在单独的文件中可以避免此问题。
Now, we can actually “unlock” the encrypted device for our testing:
现在,我们实际上可以“解锁”加密的设备以进行测试:
$ sudo cryptsetup open --header crypthdr.img /dev/ram0 encrypted-ram0Enter passphrase for /dev/ram0:$ ls /dev/mapper/encrypted-ram0/dev/mapper/encrypted-ram0At this point we can now compare the performance of encrypted vs unencrypted ramdisk: if we read/write data to /dev/ram0, it will be stored in plaintext. Likewise, if we read/write data to /dev/mapper/encrypted-ram0, it will be decrypted/encrypted on the way by dm-crypt and stored in ciphertext.
现在,我们可以比较加密和未加密ramdisk的性能:如果我们将数据读/写到/dev/ram0 ,它将以纯文本格式存储。 同样,如果我们将数据读/写到/dev/mapper/encrypted-ram0 ,它将被dm-crypt解密/加密并存储在密文中 。
It’s worth noting that we’re not creating any file system on top of our block devices to avoid biasing results with a file system overhead.
值得注意的是,我们不会在块设备之上创建任何文件系统,以避免因文件系统开销而导致结果偏差。
测量吞吐量 (Measuring throughput)
When it comes to storage testing/benchmarking Flexible I/O tester is the usual go-to solution. Let’s simulate simple sequential read/write load with 4K block size on the ramdisk without encryption:
当涉及到存储测试/基准测试时, Flexible I / O测试仪是常见的解决方案。 让我们在虚拟磁盘上模拟4K块大小的简单顺序读取/写入负载,而不进行加密:
$ sudo fio --filename=/dev/ram0 --readwrite=readwrite --bs=4k --direct=1 --loops=1000000 --name=plainplain: (g=0): rw=rw, bs=4K-4K/4K-4K/4K-4K, ioengine=psync, iodepth=1fio-2.16Starting 1 process...Run status group 0 (all jobs): READ: io=21013MB, aggrb=1126.5MB/s, minb=1126.5MB/s, maxb=1126.5MB/s, mint=18655msec, maxt=18655msec WRITE: io=21023MB, aggrb=1126.1MB/s, minb=1126.1MB/s, maxb=1126.1MB/s, mint=18655msec, maxt=18655msecDisk stats (read/write): ram0: ios=0/0, merge=0/0, ticks=0/0, in_queue=0, util=0.00%The above command will run for a long time, so we just stop it after a while. As we can see from the stats, we’re able to read and write roughly with the same throughput around 1126 MB/s. Let's repeat the test with the encrypted ramdisk:
上面的命令将运行很长时间,因此我们只是在一段时间后将其停止。 从统计数据中可以看出,我们能够以大约1126 MB/s的相同吞吐量大致进行读写。 让我们用加密的虚拟磁盘重复测试:
$ sudo fio --filename=/dev/mapper/encrypted-ram0 --readwrite=readwrite --bs=4k --direct=1 --loops=1000000 --name=cryptcrypt: (g=0): rw=rw, bs=4K-4K/4K-4K/4K-4K, ioengine=psync, iodepth=1fio-2.16Starting 1 process...Run status group 0 (all jobs): READ: io=1693.7MB, aggrb=150874KB/s, minb=150874KB/s, maxb=150874KB/s, mint=11491msec, maxt=11491msec WRITE: io=1696.4MB, aggrb=151170KB/s, minb=151170KB/s, maxb=151170KB/s, mint=11491msec, maxt=11491msecWhoa, that’s a drop! We only get ~147 MB/s now, which is more than 7 times slower! And this is on a totally idle machine!
哇,真是滴! 现在,我们只得到~147 MB/s速度,这比慢7倍多! 这是在完全空闲的机器上!
也许加密很慢 (Maybe, crypto is just slow)
The first thing we considered is to ensure we use the fastest crypto. cryptsetup allows us to benchmark all the available crypto implementations on the system to select the best one:
我们考虑的第一件事是确保我们使用最快的加密货币。 cryptsetup允许我们对系统上所有可用的加密实现进行基准测试,以选择最佳的加密实现:
$ sudo cryptsetup benchmark# Tests are approximate using memory only (no storage IO).PBKDF2-sha1 1340890 iterations per second for 256-bit keyPBKDF2-sha256 1539759 iterations per second for 256-bit keyPBKDF2-sha512 1205259 iterations per second for 256-bit keyPBKDF2-ripemd160 967321 iterations per second for 256-bit keyPBKDF2-whirlpool 720175 iterations per second for 256-bit key# Algorithm | Key | Encryption | Decryption aes-cbc 128b 969.7 MiB/s 3110.0 MiB/s serpent-cbc 128b N/A N/A twofish-cbc 128b N/A N/A aes-cbc 256b 756.1 MiB/s 2474.7 MiB/s serpent-cbc 256b N/A N/A twofish-cbc 256b N/A N/A aes-xts 256b 1823.1 MiB/s 1900.3 MiB/s serpent-xts 256b N/A N/A twofish-xts 256b N/A N/A aes-xts 512b 1724.4 MiB/s 1765.8 MiB/s serpent-xts 512b N/A N/A twofish-xts 512b N/A N/AIt seems aes-xts with a 256-bit data encryption key is the fastest here. But which one are we actually using for our encrypted ramdisk?
带有256位数据加密密钥的aes-xts似乎是最快的。 但是,我们实际上将哪一个用于加密的虚拟磁盘?
$ sudo dmsetup table /dev/mapper/encrypted-ram00 8388608 crypt aes-xts-plain64 0000000000000000000000000000000000000000000000000000000000000000 0 1:0 0We do use aes-xts with a 256-bit data encryption key (count all the zeroes conveniently masked by dmsetup tool - if you want to see the actual bytes, add the --showkeys option to the above command). The numbers do not add up however: cryptsetup benchmark tells us above not to rely on the results, as "Tests are approximate using memory only (no storage IO)", but that is exactly how we've set up our experiment using the ramdisk. In a somewhat worse case (assuming we're reading all the data and then encrypting/decrypting it sequentially with no parallelism) doing back-of-the-envelope calculation we should be getting around (1126 * 1823) / (1126 + 1823) =~696 MB/s, which is still quite far from the actual 147 * 2 = 294 MB/s (total for reads and writes).
我们确实使用带有256位数据加密密钥的aes-xts (计算dmsetup工具方便地掩盖的所有零-如果要查看实际字节,请在上述命令中添加--showkeys选项)。 但是,这些数字并没有相加: cryptsetup benchmark告诉我们不要依赖结果,因为“测试仅是使用内存(没有存储IO)进行的近似测试”,但这正是我们使用ramdisk设置实验的方式。 在更差的情况下(假设我们正在读取所有数据,然后在没有并行性的情况下依次加密/解密),进行后包络计算,我们应该得到(1126 * 1823) / (1126 + 1823) =~696 MB/s ,与实际的147 * 2 = 294 MB/s (读写总和)相差甚远。
dm-crypt性能标志 (dm-crypt performance flags)
While reading the cryptsetup man page we noticed that it has two options prefixed with --perf-, which are probably related to performance tuning. The first one is --perf-same_cpu_crypt with a rather cryptic description:
在阅读cryptsetup手册页时,我们注意到它有两个带有--perf-前缀的选项,这可能与性能调整有关。 第一个是--perf-same_cpu_crypt ,它的描述很神秘:
Perform encryption using the same cpu that IO was submitted on. The default is to use an unbound workqueue so that encryption work is automatically balanced between available CPUs. This option is only relevant for open action.So we enable the option
所以我们启用该选项
$ sudo cryptsetup close encrypted-ram0$ sudo cryptsetup open --header crypthdr.img --perf-same_cpu_crypt /dev/ram0 encrypted-ram0Note: according to the latest man page there is also a cryptsetup refresh command, which can be used to enable these options live without having to "close" and "re-open" the encrypted device. Our cryptsetup however didn't support it yet.
注意:根据最新的手册页 ,还有一个cryptsetup refresh命令,该命令可用于启用这些选项,而无需“关闭”和“重新打开”加密设备。 但是,我们的cryptsetup还不支持它。
Verifying if the option has been really enabled:
验证是否确实启用了该选项:
$ sudo dmsetup table encrypted-ram00 8388608 crypt aes-xts-plain64 0000000000000000000000000000000000000000000000000000000000000000 0 1:0 0 1 same_cpu_cryptYes, we can now see same_cpu_crypt in the output, which is what we wanted. Let's rerun the benchmark:
是的,我们现在可以在输出中看到same_cpu_crypt 。 让我们重新运行基准测试:
$ sudo fio --filename=/dev/mapper/encrypted-ram0 --readwrite=readwrite --bs=4k --direct=1 --loops=1000000 --name=cryptcrypt: (g=0): rw=rw, bs=4K-4K/4K-4K/4K-4K, ioengine=psync, iodepth=1fio-2.16Starting 1 process...Run status group 0 (all jobs): READ: io=1596.6MB, aggrb=139811KB/s, minb=139811KB/s, maxb=139811KB/s, mint=11693msec, maxt=11693msec WRITE: io=1600.9MB, aggrb=140192KB/s, minb=140192KB/s, maxb=140192KB/s, mint=11693msec, maxt=11693msecHmm, now it is ~136 MB/s which is slightly worse than before, so no good. What about the second option --perf-submit_from_crypt_cpus:
嗯,现在是~136 MB/s ,比以前稍微差一点,所以不好。 第二个选项--perf-submit_from_crypt_cpus ?
Disable offloading writes to a separate thread after encryption. There are some situations where offloading write bios from the encryption threads to a single thread degrades performance significantly. The default is to offload write bios to the same thread. This option is only relevant for open action.Maybe, we are in the “some situation” here, so let’s try it out:
也许我们在这里处于“某种情况”,所以让我们尝试一下:
$ sudo cryptsetup close encrypted-ram0$ sudo cryptsetup open --header crypthdr.img --perf-submit_from_crypt_cpus /dev/ram0 encrypted-ram0Enter passphrase for /dev/ram0:$ sudo dmsetup table encrypted-ram00 8388608 crypt aes-xts-plain64 0000000000000000000000000000000000000000000000000000000000000000 0 1:0 0 1 submit_from_crypt_cpusAnd now the benchmark:
现在是基准:
$ sudo fio --filename=/dev/mapper/encrypted-ram0 --readwrite=readwrite --bs=4k --direct=1 --loops=1000000 --name=cryptcrypt: (g=0): rw=rw, bs=4K-4K/4K-4K/4K-4K, ioengine=psync, iodepth=1fio-2.16Starting 1 process...Run status group 0 (all jobs): READ: io=2066.6MB, aggrb=169835KB/s, minb=169835KB/s, maxb=169835KB/s, mint=12457msec, maxt=12457msec WRITE: io=2067.7MB, aggrb=169965KB/s, minb=169965KB/s, maxb=169965KB/s, mint=12457msec, maxt=12457msec~166 MB/s, which is a bit better, but still not good...
~166 MB/s ,虽然好一点,但还是不好...
询问社区 (Asking the community)
Being desperate we decided to seek support from the Internet and posted our findings to the dm-crypt mailing list, but the response we got was not very encouraging:
绝望的我们决定寻求Internet的支持,并将我们的发现发布到 dm-crypt 邮件列表中 ,但是得到的响应并不令人鼓舞:
If the numbers disturb you, then this is from lack of understanding on your side. You are probably unaware that encryption is a heavy-weight operation…
如果数字打扰您,那是因为您缺乏理解。 您可能没有意识到加密是一项繁重的操作……
We decided to make a scientific research on this topic by typing “is encryption expensive” into Google Search and one of the top results, which actually contains meaningful measurements, is… our own post about cost of encryption, but in the context of TLS! This is a fascinating read on its own, but the gist is: modern crypto on modern hardware is very cheap even at Cloudflare scale (doing millions of encrypted HTTP requests per second). In fact, it is so cheap that Cloudflare was the first provider to offer free SSL/TLS for everyone.
我们决定通过在Google搜索中输入“加密是否昂贵”来对此主题进行科学研究,实际上,其中包含有意义的衡量指标的最高结果之一是…… 关于加密成本的我们自己的帖子 ,但仅限于TLS ! 这本身就是一个有趣的读物,但是要点是:即使在Cloudflare规模上(每秒执行数百万个加密的HTTP请求),现代硬件上的现代加密也非常便宜。 实际上,它是如此便宜,以至于Cloudflare是第一个为所有人提供免费SSL / TLS的提供商。
挖掘源代码 (Digging into the source code)
When trying to use the custom dm-crypt options described above we were curious why they exist in the first place and what is that "offloading" all about. Originally we expected dm-crypt to be a simple "proxy", which just encrypts/decrypts data as it flows through the stack. Turns out dm-crypt does more than just encrypting memory buffers and a (simplified) IO traverse path diagram is presented below:
当尝试使用上述自定义dm-crypt选项时,我们很好奇它们为什么首先存在,以及“卸载”到底是什么。 最初,我们希望dm-crypt是一个简单的“代理”,仅在数据流过堆栈时对其进行加密/解密。 事实证明, dm-crypt不仅能对内存缓冲区进行加密,而且还提供了(简化的)IO遍历路径图:
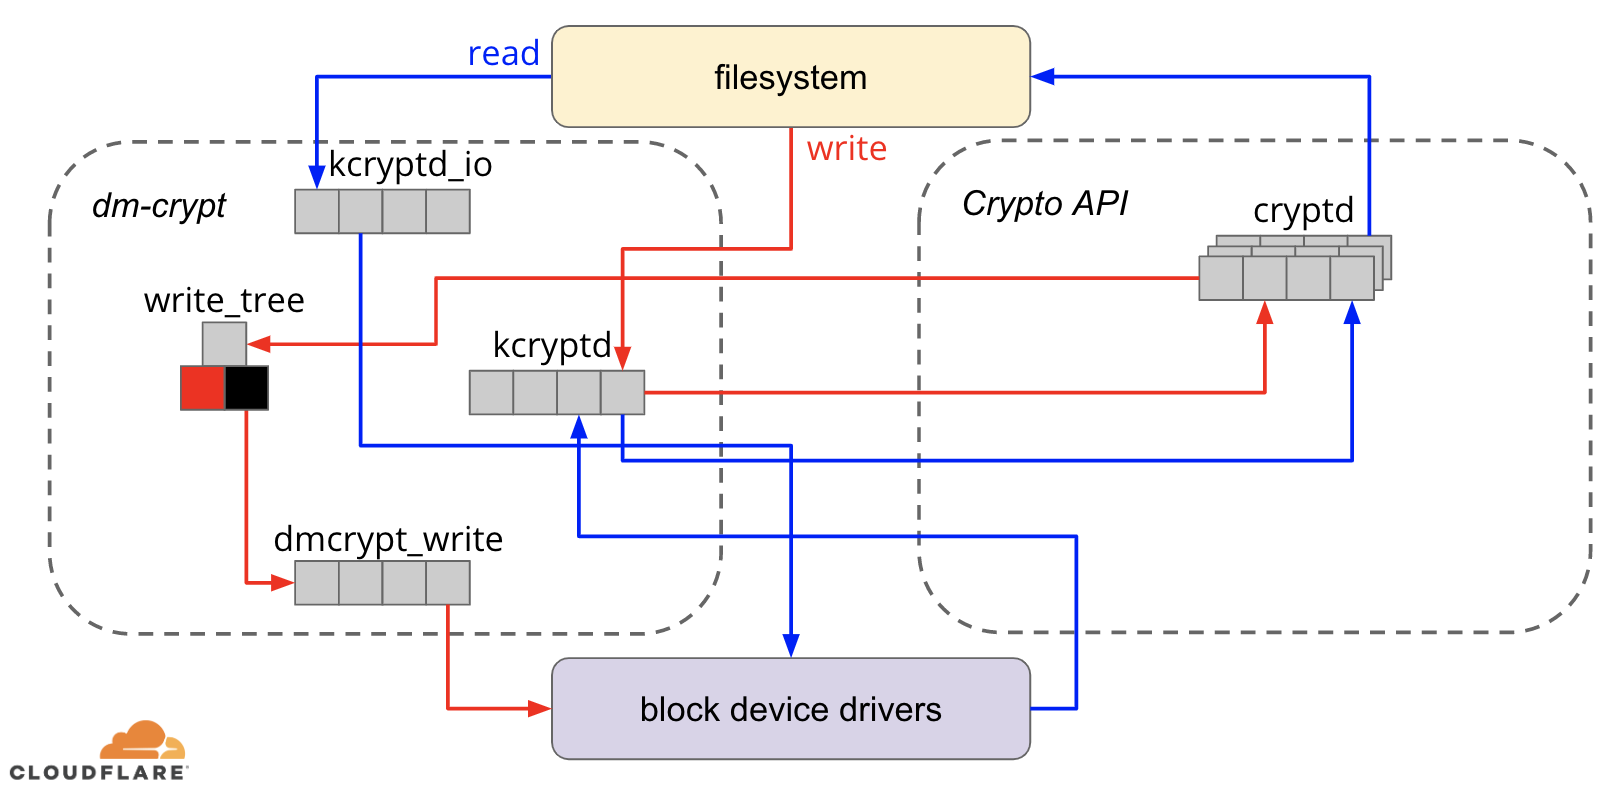
When the file system issues a write request, dm-crypt does not process it immediately - instead it puts it into a workqueue named "kcryptd". In a nutshell, a kernel workqueue just schedules some work (encryption in this case) to be performed at some later time, when it is more convenient. When "the time" comes, dm-crypt sends the request to Linux Crypto API for actual encryption. However, modern Linux Crypto API is asynchronous as well, so depending on which particular implementation your system will use, most likely it will not be processed immediately, but queued again for "later time". When Linux Crypto API will finally do the encryption, dm-crypt may try to sort pending write requests by putting each request into a red-black tree. Then a separate kernel thread again at "some time later" actually takes all IO requests in the tree and sends them down the stack.
当文件系统发出写请求时, dm-crypt不会立即处理它-而是将其放入名为“ kcryptd”的工作队列中 。 简而言之,内核工作队列只是安排一些工作(在这种情况下是加密),以便在以后的某个更方便的时间执行。 当“时间到了”时, dm-crypt 将请求发送到Linux Crypto API进行实际的加密。 但是,现代Linux Crypto API 也是异步的 ,因此,取决于您的系统将使用哪个特定实现,很可能不会立即对其进行处理,而是将其再次排队等待“稍后时间”。 当Linux Crypto API最终进行加密时 , dm-crypt可能会尝试通过将每个请求放入一棵红黑树中来排序未决的写请求 。 然后,在“稍后的某个时间”再次使用单独的内核线程实际上将树中的所有IO请求接收到并发送到堆栈中 。
Now for read requests: this time we need to get the encrypted data first from the hardware, but dm-crypt does not just ask for the driver for the data, but queues the request into a different workqueue named "kcryptd_io". At some point later, when we actually have the encrypted data, we schedule it for decryption using the now familiar "kcryptd" workqueue. "kcryptd" will send the request to Linux Crypto API, which may decrypt the data asynchronously as well.
现在是读取请求:这次我们需要首先从硬件中获取加密的数据,但是dm-crypt不仅向驱动程序索要数据,而且将请求排队到另一个名为“ kcryptd_io”的工作 队列中 。 稍后,当我们实际拥有加密数据时,我们计划使用现在熟悉的“ kcrypted”工作队列将其解密 。 “ kcrypted” 会将请求发送到Linux Crypto API,后者也可以异步解密数据。
To be fair the request does not always traverse all these queues, but the important part here is that write requests may be queued up to 4 times in dm-crypt and read requests up to 3 times. At this point we were wondering if all this extra queueing can cause any performance issues. For example, there is a nice presentation from Google about the relationship between queueing and tail latency. One key takeaway from the presentation is:
公平地说,请求并不总是遍历所有这些队列,但是这里的重要部分是,写请求在dm-crypt最多可以排队4次,读请求最多可以排队3次。 在这一点上,我们想知道所有这些额外的队列是否会导致任何性能问题。 例如, Google很好地介绍了排队和尾部延迟之间的关系。 演示文稿的一个主要收获是:
A significant amount of tail latency is due to queueing effects
大量的尾部等待时间是由于排队效应
So, why are all these queues there and can we remove them?
那么,为什么所有这些队列都在那里,我们可以将其删除吗?
Git考古学 (Git archeology)
No-one writes more complex code just for fun, especially for the OS kernel. So all these queues must have been put there for a reason. Luckily, the Linux kernel source is managed by git, so we can try to retrace the changes and the decisions around them.
没有人会为了娱乐而编写更复杂的代码,尤其是对于OS内核。 因此,所有这些队列都必须放置在某个位置,这是有原因的。 幸运的是,Linux内核源代码由git管理,因此我们可以尝试追溯更改及其周围的决策。
The “kcryptd” workqueue was in the source since the beginning of the available history with the following comment:
自可用历史记录开始以来, “ kcrypted”工作队列就已出现在源代码中,并带有以下注释:
Needed because it would be very unwise to do decryption in an interrupt context, so bios returning from read requests get queued here.
需要这样做是因为在中断上下文中进行解密非常不明智,因此从读取请求返回的BIOS会在此处排队。
So it was for reads only, but even then — why do we care if it is interrupt context or not, if Linux Crypto API will likely use a dedicated thread/queue for encryption anyway? Well, back in 2005 Crypto API was not asynchronous, so this made perfect sense.
因此,它仅用于读取,但是即使如此-如果Linux Crypto API仍可能使用专用线程/队列进行加密,我们为什么还要关心它是否是中断上下文? 好吧,早在2005年,Crypto API 就不是异步的 ,因此这很合理。
In 2006 dm-crypt started to use the "kcryptd" workqueue not only for encryption, but for submitting IO requests:
在2006年, dm-crypt 开始将“ kcryptd”工作队列不仅用于加密,而且用于提交IO请求:
This patch is designed to help dm-crypt comply with the new constraints imposed by the following patch in -mm: md-dm-reduce-stack-usage-with-stacked-block-devices.patch
此补丁旨在帮助dm-crypt遵守-mm中以下补丁所施加的新约束:md-dm-reduce-stack-usage-with-stacked-block-devices.patch
It seems the goal here was not to add more concurrency, but rather reduce kernel stack usage, which makes sense again as the kernel has a common stack across all the code, so it is a quite limited resource. It is worth noting, however, that the Linux kernel stack has been expanded in 2014 for x86 platforms, so this might not be a problem anymore.
似乎这里的目标不是增加更多的并发性,而是减少内核堆栈的使用,这再次有意义,因为内核在所有代码中都有一个通用的堆栈,因此资源非常有限。 但是,值得注意的是, Linux内核堆栈已在2014年针对x86平台进行了扩展 ,因此这可能不再是问题。
A first version of “kcryptd_io” workqueue was added in 2007 with the intent to avoid:
为了避免出现以下情况,在2007 年添加了“ kcryptd_io”工作队列的第一个版本 :
starvation caused by many requests waiting for memory allocation…
由于许多请求正在等待内存分配而导致饥饿。
The request processing was bottlenecking on a single workqueue here, so the solution was to add another one. Makes sense.
请求处理在这里是单个工作队列的瓶颈,因此解决方案是添加另一个工作队列。 说得通。
We are definitely not the first ones experiencing performance degradation because of extensive queueing: in 2011 a change was introduced to conditionally revert some of the queueing for read requests:
我们绝对不是第一个因为队列过多而导致性能下降的人:2011年,我们进行了一项更改,以有条件地还原一些读取请求的队列 :
If there is enough memory, code can directly submit bio instead queuing this operation in a separate thread.
如果有足够的内存,则代码可以直接提交bio,而不必在单独的线程中对该操作进行排队。
Unfortunately, at that time Linux kernel commit messages were not as verbose as today, so there is no performance data available.
不幸的是,那时Linux内核提交消息并不像今天那样冗长,因此没有可用的性能数据。
In 2015 dm-crypt started to sort writes in a separate “dmcrypt_write” thread before sending them down the stack:
在2015年, dm-crypt开始在一个单独的“ dmcrypt_write”线程中对写入进行排序 ,然后再将它们发送到堆栈中:
On a multiprocessor machine, encryption requests finish in a different order than they were submitted. Consequently, write requests would be submitted in a different order and it could cause severe performance degradation.
在多处理器计算机上,加密请求以与提交请求不同的顺序完成。 因此,写请求将以不同的顺序提交,并且可能导致严重的性能下降。
It does make sense as sequential disk access used to be much faster than the random one and dm-crypt was breaking the pattern. But this mostly applies to spinning disks, which were still dominant in 2015. It may not be as important with modern fast SSDs (including NVME SSDs).
这确实有道理,因为顺序磁盘访问曾经比随机磁盘访问快得多,而dm-crypt打破了这种模式。 但这主要适用于旋转磁盘 , 旋转磁盘在2015年仍占主导地位。对于现代快速SSD(包括NVME SSD)而言,它可能不那么重要。
Another part of the commit message is worth mentioning:
提交消息的另一部分值得一提:
…in particular it enables IO schedulers like CFQ to sort more effectively…
……尤其是它使CFQ等IO调度程序可以更有效地进行分类……
It mentions the performance benefits for the CFQ IO scheduler, but Linux schedulers have improved since then to the point that CFQ scheduler has been removed from the kernel in 2018.
它提到了CFQ IO调度程序的性能优势,但是从那以后Linux调度程序得到了改进,以至于CFQ调度程序已于 2018年从内核中删除 。
The same patchset replaces the sorting list with a red-black tree:
相同的补丁集用红黑树替换了排序列表 :
In theory the sorting should be performed by the underlying disk scheduler, however, in practice the disk scheduler only accepts and sorts a finite number of requests. To allow the sorting of all requests, dm-crypt needs to implement its own sorting.
理论上,排序应由基础磁盘调度程序执行,但实际上,磁盘调度程序仅接受并排序有限数量的请求。 为了允许对所有请求进行排序,dm-crypt需要实现自己的排序。
The overhead associated with rbtree-based sorting is considered negligible so it is not used conditionally.
与基于rbtree的排序相关的开销被认为是可以忽略的,因此不会有条件地使用它。
All that make sense, but it would be nice to have some backing data.
所有这些都是有道理的,但是拥有一些后备数据会很好。
Interestingly, in the same patchset we see the introduction of our familiar “submit_from_crypt_cpus” option:
有趣的是,在同一补丁集中,我们看到了熟悉的“ submit_from_crypt_cpus”选项的引入 :
There are some situations where offloading write bios from the encryption threads to a single thread degrades performance significantly
在某些情况下,将写BIOS从加密线程转移到单个线程会大大降低性能。
Overall, we can see that every change was reasonable and needed, however things have changed since then:
总体而言,我们可以看到每一次更改都是合理且必要的,但是此后发生了变化:
- hardware became faster and smarter硬件变得更快,更智能
- Linux resource allocation was revisited重新讨论了Linux资源分配
- coupled Linux subsystems were rearchitected重新组合了耦合的Linux子系统
And many of the design choices above may not be applicable to modern Linux.
并且上面的许多设计选择可能不适用于现代Linux。
“清理” (The “clean-up”)
Based on the research above we decided to try to remove all the extra queueing and asynchronous behaviour and revert dm-crypt to its original purpose: simply encrypt/decrypt IO requests as they pass through. But for the sake of stability and further benchmarking we ended up not removing the actual code, but rather adding yet another dm-crypt option, which bypasses all the queues/threads, if enabled. The flag allows us to switch between the current and new behaviour at runtime under full production load, so we can easily revert our changes should we see any side-effects. The resulting patch can be found on the Cloudflare GitHub Linux repository.
根据上面的研究,我们决定尝试删除所有多余的排队和异步行为,并将dm-crypt恢复为原始用途:在IO请求通过时对其进行简单的加密/解密。 但是为了稳定和进一步进行基准测试,我们最终没有删除实际的代码,而是添加了另一个dm-crypt选项,如果启用,它将绕过所有队列/线程。 该标志允许我们在满负荷生产的情况下在运行时在当前行为与新行为之间进行切换,因此,如果我们看到任何副作用,我们可以轻松地还原所做的更改。 可以在Cloudflare GitHub Linux存储库中找到生成的补丁。
同步Linux加密API (Synchronous Linux Crypto API)
From the diagram above we remember that not all queueing is implemented in dm-crypt. Modern Linux Crypto API may also be asynchronous and for the sake of this experiment we want to eliminate queues there as well. What does "may be" mean, though? The OS may contain different implementations of the same algorithm (for example, hardware-accelerated AES-NI on x86 platforms and generic C-code AES implementations). By default the system chooses the "best" one based on the configured algorithm priority. dm-crypt allows overriding this behaviour and request a particular cipher implementation using the capi: prefix. However, there is one problem. Let us actually check the available AES-XTS (this is our disk encryption cipher, remember?) implementations on our system:
从上图可以看出,并不是所有的排队都在dm-crypt 。 现代Linux Crypto API也可能是异步的,因此,为了进行本实验,我们也希望在其中消除队列。 但是,“可能是”是什么意思? 操作系统可能包含同一算法的不同实现(例如, x86平台上的硬件加速AES-NI和通用C代码AES实现)。 默认情况下,系统根据配置的算法优先级选择“最佳”。 dm-crypt允许覆盖此行为,并使用capi:前缀请求特定的密码实现 。 但是,有一个问题。 让我们实际检查系统上可用的AES-XTS(这是磁盘加密密码,还记得吗?)实现:
$ grep -A 11 'xts(aes)' /proc/cryptoname : xts(aes)driver : xts(ecb(aes-generic))module : kernelpriority : 100refcnt : 7selftest : passedinternal : notype : skcipherasync : noblocksize : 16min keysize : 32max keysize : 64--name : __xts(aes)driver : cryptd(__xts-aes-aesni)module : cryptdpriority : 451refcnt : 1selftest : passedinternal : yestype : skcipherasync : yesblocksize : 16min keysize : 32max keysize : 64--name : xts(aes)driver : xts-aes-aesnimodule : aesni_intelpriority : 401refcnt : 1selftest : passedinternal : notype : skcipherasync : yesblocksize : 16min keysize : 32max keysize : 64--name : __xts(aes)driver : __xts-aes-aesnimodule : aesni_intelpriority : 401refcnt : 7selftest : passedinternal : yestype : skcipherasync : noblocksize : 16min keysize : 32max keysize : 64We want to explicitly select a synchronous cipher from the above list to avoid queueing effects in threads, but the only two supported are xts(ecb(aes-generic)) (the generic C implementation) and __xts-aes-aesni (the x86 hardware-accelerated implementation). We definitely want the latter as it is much faster (we're aiming for performance here), but it is suspiciously marked as internal (see internal: yes). If we check the source code:
我们要从上面的列表中明确选择一个同步密码,以避免线程中的排队效应,但是仅支持两个支持xts(ecb(aes-generic)) (通用C实现)和__xts-aes-aesni ( x86硬件) -加速实施 )。 我们绝对希望后者,因为它要快得多(我们在这里着眼于性能),但是可疑地标记为内部(请参阅internal: yes )。 如果我们检查源代码 :
Mark a cipher as a service implementation only usable by another cipher and never by a normal user of the kernel crypto API
将密码标记为只能由其他密码使用,而不能由内核密码API的普通用户使用的服务实现
So this cipher is meant to be used only by other wrapper code in the Crypto API and not outside it. In practice this means, that the caller of the Crypto API needs to explicitly specify this flag, when requesting a particular cipher implementation, but dm-crypt does not do it, because by design it is not part of the Linux Crypto API, rather an "external" user. We already patch the dm-crypt module, so we could as well just add the relevant flag. However, there is another problem with AES-NI in particular: x86 FPU. "Floating point" you say? Why do we need floating point math to do symmetric encryption which should only be about bit shifts and XOR operations? We don't need the math, but AES-NI instructions use some of the CPU registers, which are dedicated to the FPU. Unfortunately the Linux kernel does not always preserve these registers in interrupt context for performance reasons (saving/restoring FPU is expensive). But dm-crypt may execute code in interrupt context, so we risk corrupting some other process data and we go back to "it would be very unwise to do decryption in an interrupt context" statement in the original code.
因此,该密码只能由Crypto API中的其他包装程序代码使用,而不能在其外部使用。 实际上,这意味着,当请求特定的密码实现时,Crypto API的调用者需要显式指定此标志,但dm-crypt不会这样做,因为从设计上来说,它不是Linux Crypto API的一部分,而是“外部”用户。 我们已经修补了dm-crypt模块,因此我们也可以只添加相关的标志。 但是,尤其是AES-NI还有一个问题: x86 FPU 。 你说的是“浮点数”? 为什么我们需要浮点数学来进行对称加密,而对称加密只应涉及移位和XOR操作? 我们不需要数学运算,但是AES-NI指令使用一些专用于FPU的CPU寄存器。 不幸的是,出于性能方面的考虑,Linux内核并不总是在中断上下文中保留这些寄存器 (保存/恢复FPU的成本很高)。 但是dm-crypt可能会在中断上下文中执行代码,因此我们冒着破坏其他进程数据的风险,并返回原始代码中的“在中断上下文中进行解密是非常不明智的”语句。
Our solution to address the above was to create another somewhat “smart” Crypto API module. This module is synchronous and does not roll its own crypto, but is just a “router” of encryption requests:
我们针对上述问题的解决方案是创建另一个“智能”的Crypto API模块 。 该模块是同步的,不会滚动其自己的加密货币,而只是加密请求的“路由器”:
if we can use the FPU (and thus AES-NI) in the current execution context, we just forward the encryption request to the faster, “internal”
__xts-aes-aesniimplementation (and we can use it here, because now we are part of the Crypto API)如果我们可以在当前执行上下文中使用FPU(并因此使用AES-NI),我们只需将加密请求转发到更快的“内部”
__xts-aes-aesni实现(我们可以在这里使用它,因为现在Crypto API的一部分)otherwise, we just forward the encryption request to the slower, generic C-based
xts(ecb(aes-generic))implementation否则,我们只是将加密请求转发到较慢的,通用的基于C的
xts(ecb(aes-generic))实现
使用全部 (Using the whole lot)
Let’s walk through the process of using it all together. The first step is to grab the patches and recompile the kernel (or just compile dm-crypt and our xtsproxy modules).
让我们来看一下一起使用它的过程。 第一步是获取补丁并重新编译内核(或仅编译dm-crypt和我们的xtsproxy模块)。
Next, let’s restart our IO workload in a separate terminal, so we can make sure we can reconfigure the kernel at runtime under load:
接下来,让我们在单独的终端上重新启动IO工作负载,以便确保可以在运行时在负载下重新配置内核:
$ sudo fio --filename=/dev/mapper/encrypted-ram0 --readwrite=readwrite --bs=4k --direct=1 --loops=1000000 --name=cryptcrypt: (g=0): rw=rw, bs=4K-4K/4K-4K/4K-4K, ioengine=psync, iodepth=1fio-2.16Starting 1 process...In the main terminal make sure our new Crypto API module is loaded and available:
在主终端中,确保我们的新Crypto API模块已加载并可用:
$ sudo modprobe xtsproxy$ grep -A 11 'xtsproxy' /proc/cryptodriver : xts-aes-xtsproxymodule : xtsproxypriority : 0refcnt : 0selftest : passedinternal : notype : skcipherasync : noblocksize : 16min keysize : 32max keysize : 64ivsize : 16chunksize : 16Reconfigure the encrypted disk to use our newly loaded module and enable our patched dm-crypt flag (we have to use low-level dmsetup tool as cryptsetup obviously is not aware of our modifications):
重新配置加密磁盘以使用新加载的模块并启用修补的dm-crypt标志(我们必须使用低级dmsetup工具,因为cryptsetup显然不知道我们的修改):
$ sudo dmsetup table encrypted-ram0 --showkeys | sed 's/aes-xts-plain64/capi:xts-aes-xtsproxy-plain64/' | sed 's/$/ 1 force_inline/' | sudo dmsetup reload encrypted-ram0We just “loaded” the new configuration, but for it to take effect, we need to suspend/resume the encrypted device:
我们只是“加载”了新配置,但是要使其生效,我们需要暂停/恢复加密设备:
$ sudo dmsetup suspend encrypted-ram0 && sudo dmsetup resume encrypted-ram0And now observe the result. We may go back to the other terminal running the fio job and look at the output, but to make things nicer, here's a snapshot of the observed read/write throughput in Grafana:
现在观察结果。 我们可能会回到另一个运行fio作业的终端并查看输出,但是为了使事情变得更好,这是在Grafana中观察到的读写吞吐量的快照 :
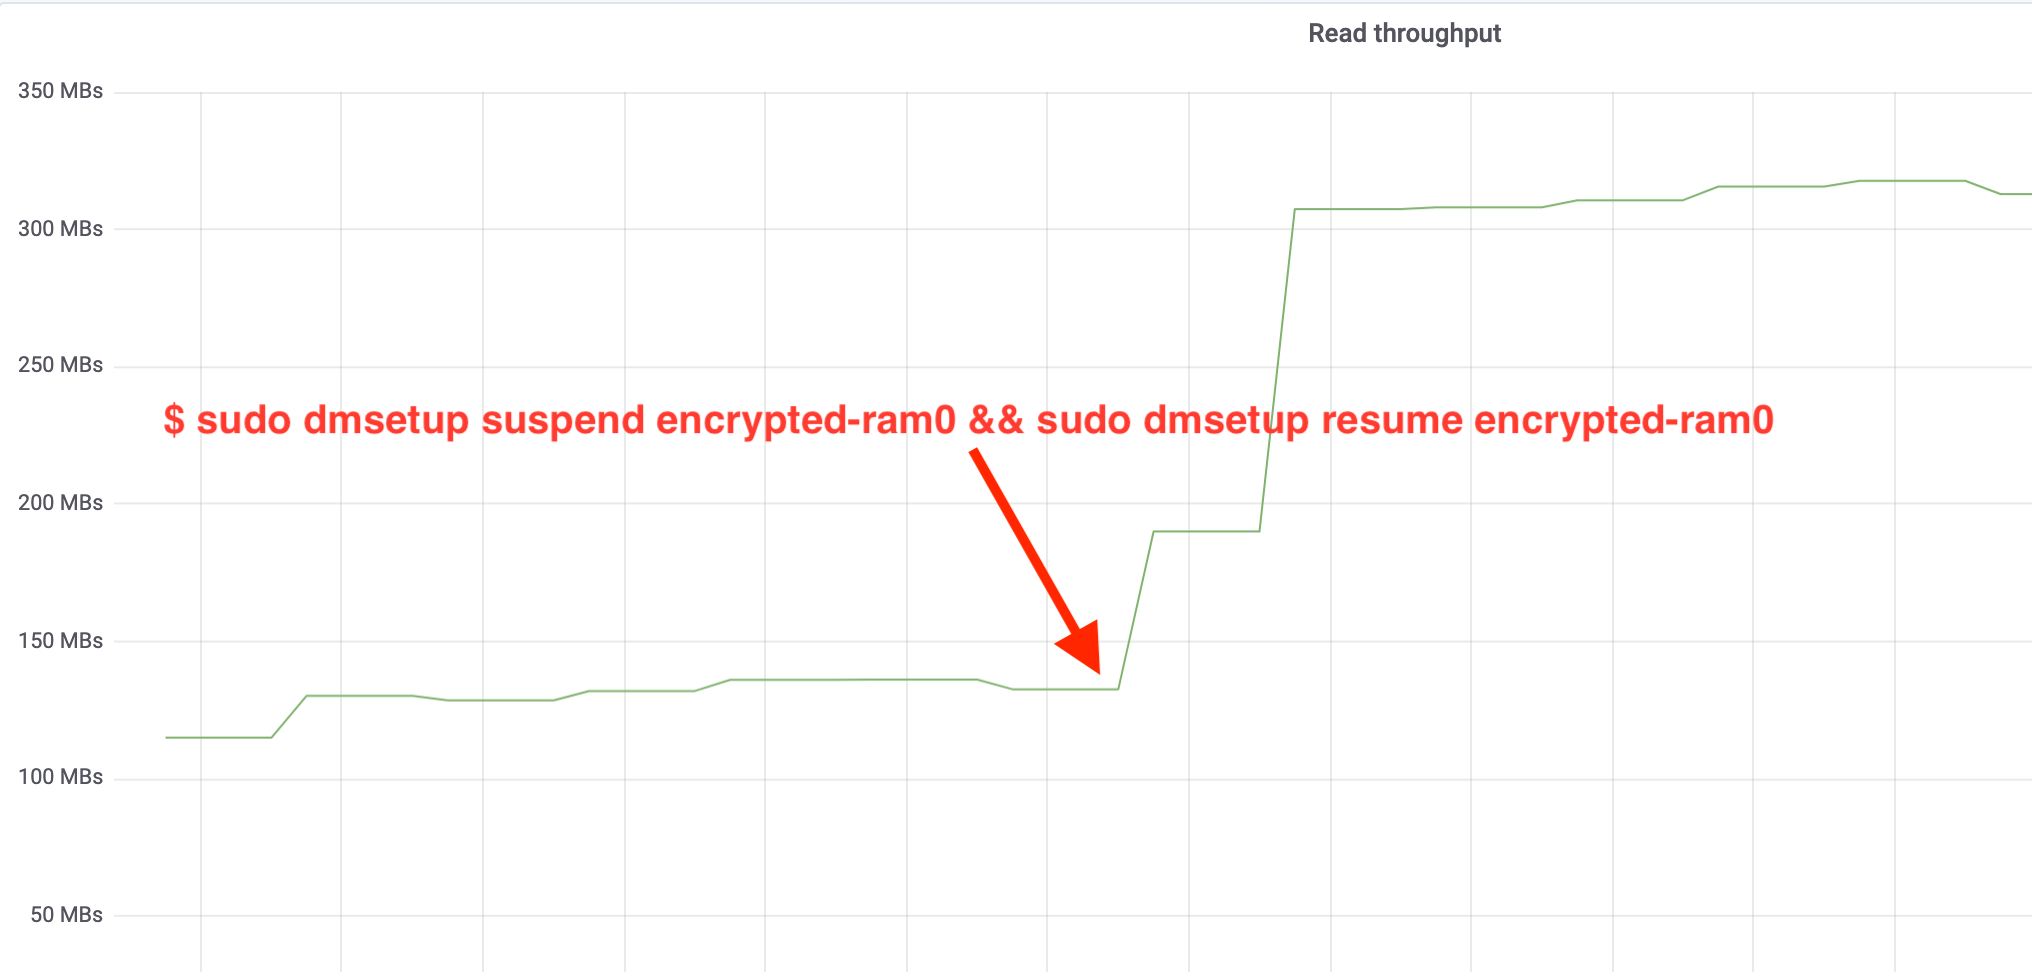
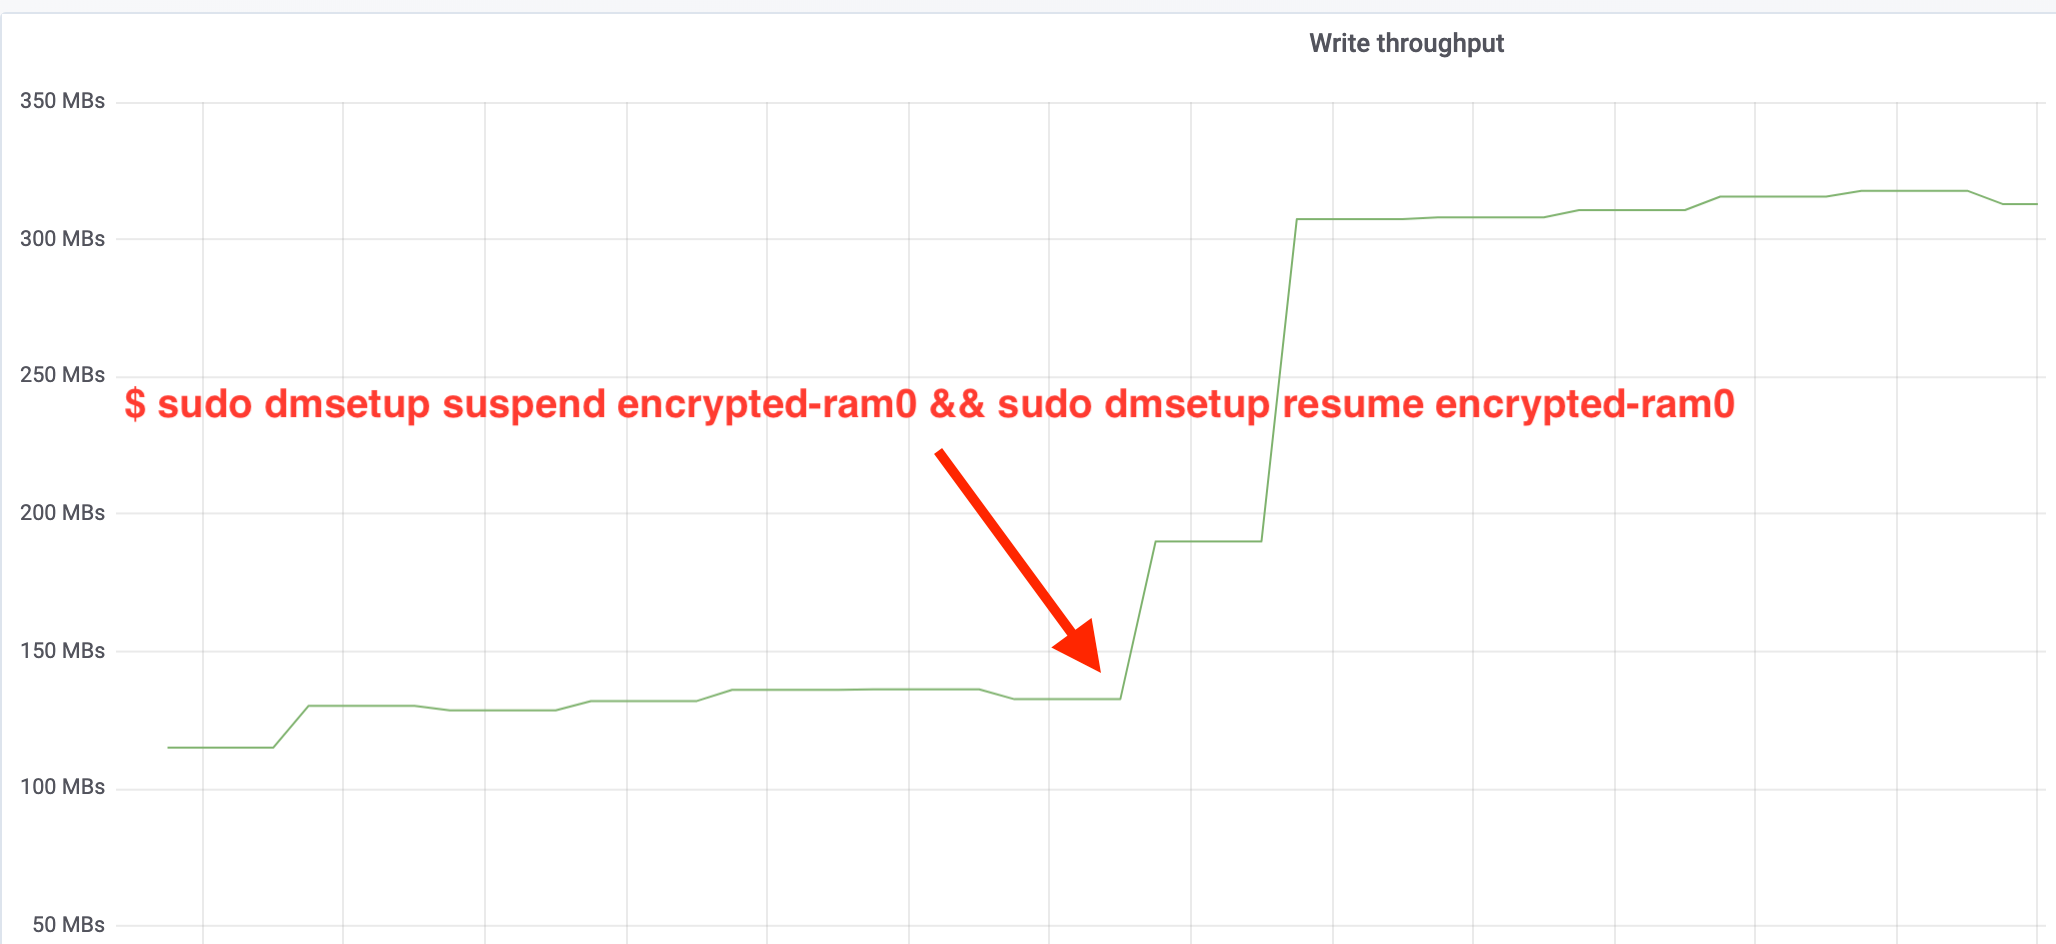
Wow, we have more than doubled the throughput! With the total throughput of ~640 MB/s we're now much closer to the expected ~696 MB/s from above. What about the IO latency? (The await statistic from the iostat reporting tool):
哇,我们的吞吐量增加了一倍以上! 总吞吐速率~640 MB/s我们现在已经离上面的预期值~696 MB/s更加近了。 IO延迟如何? (来自iostat报告工具的await统计):
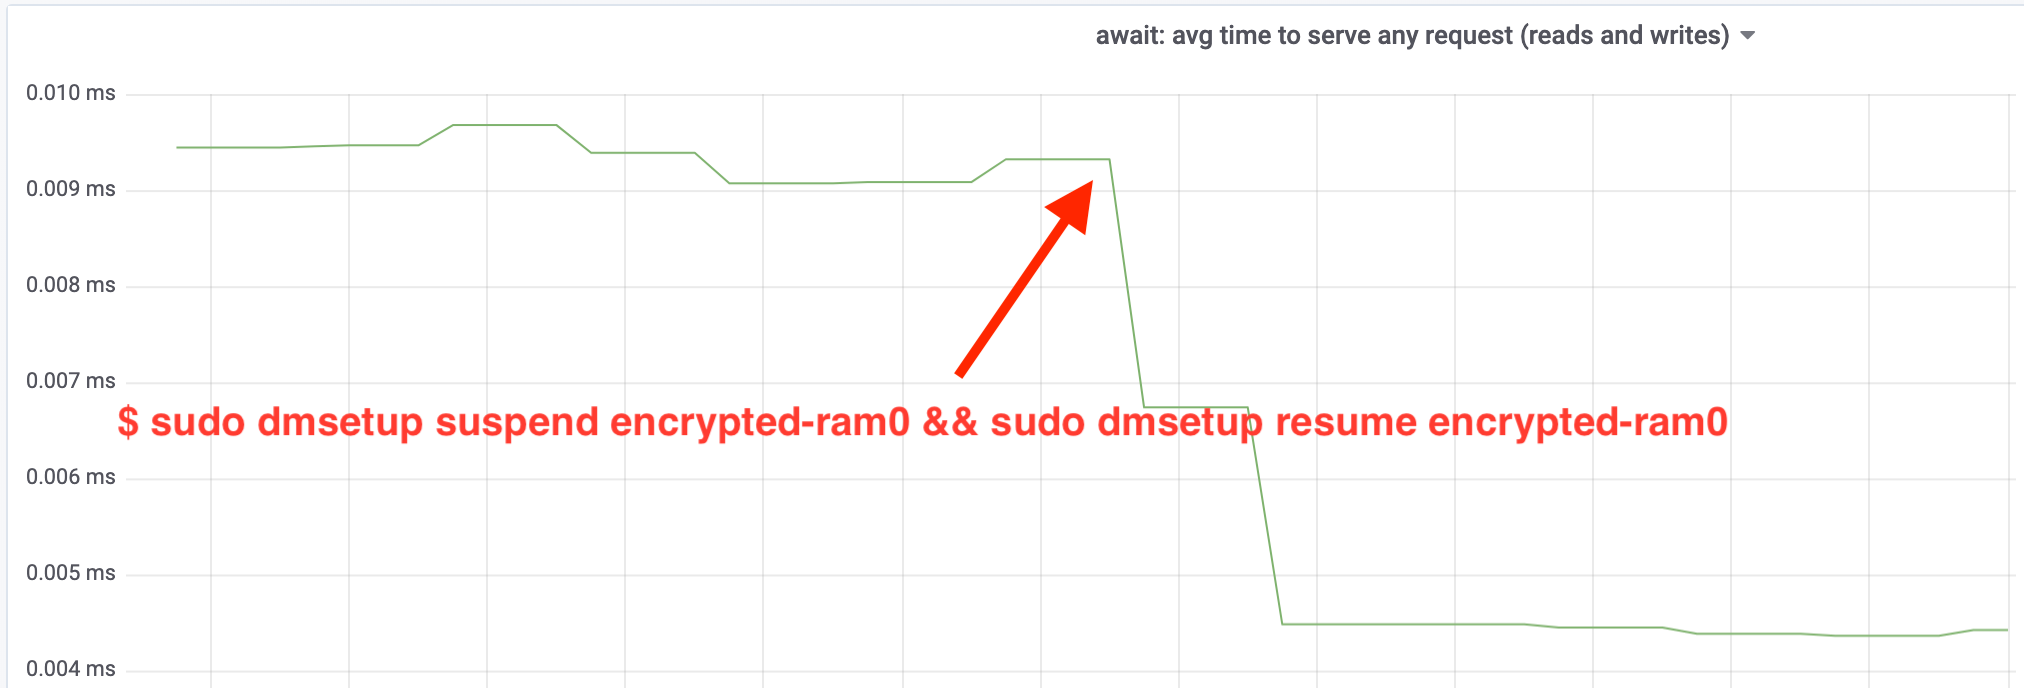
The latency has been cut in half as well!
延迟也减少了一半!
到生产 (To production)
So far we have been using a synthetic setup with some parts of the full production stack missing, like file systems, real hardware and most importantly, production workload. To ensure we’re not optimising imaginary things, here is a snapshot of the production impact these changes bring to the caching part of our stack:
到目前为止,我们一直在使用合成设置,而整个生产堆栈中的某些部分丢失了,例如文件系统,实际硬件,最重要的是生产工作量。 为了确保我们没有优化虚构的东西,以下是这些更改对堆栈缓存部分产生的生产影响的快照:

This graph represents a three-way comparison of the worst-case response times (99th percentile) for a cache hit in one of our servers. The green line is from a server with unencrypted disks, which we will use as baseline. The red line is from a server with encrypted disks with the default Linux disk encryption implementation and the blue line is from a server with encrypted disks and our optimisations enabled. As we can see the default Linux disk encryption implementation has a significant impact on our cache latency in worst case scenarios, whereas the patched implementation is indistinguishable from not using encryption at all. In other words the improved encryption implementation does not have any impact at all on our cache response speed, so we basically get it for free! That’s a win!
此图表示对我们其中一台服务器中的缓存命中的最坏情况下的响应时间(第99个百分位数)的三向比较。 绿线来自具有未加密磁盘的服务器,我们将其用作基准。 红线来自具有默认Linux磁盘加密实现的加密磁盘的服务器,蓝线来自具有加密磁盘并启用我们的优化的服务器。 正如我们所看到的,在最坏的情况下,默认的Linux磁盘加密实现对我们的缓存延迟有重大影响,而修补后的实现与根本不使用加密是无法区分的。 换句话说,改进的加密实现对我们的缓存响应速度根本没有任何影响,因此我们基本上是免费获得的! 那是胜利!
我们才刚刚开始 (We’re just getting started)
This post shows how an architecture review can double the performance of a system. Also we reconfirmed that modern cryptography is not expensive and there is usually no excuse not to protect your data.
这篇文章展示了架构审查如何使系统性能提高一倍。 我们还重申,现代加密技术并不昂贵 ,通常没有任何借口不保护您的数据。
We are going to submit this work for inclusion in the main kernel source tree, but most likely not in its current form. Although the results look encouraging we have to remember that Linux is a highly portable operating system: it runs on powerful servers as well as small resource constrained IoT devices and on many other CPU architectures as well. The current version of the patches just optimises disk encryption for a particular workload on a particular architecture, but Linux needs a solution which runs smoothly everywhere.
我们将提交此工作以将其包含在主内核源代码树中,但很可能不是当前形式。 尽管结果令人鼓舞,但我们必须记住Linux是一种高度可移植的操作系统:它可以在功能强大的服务器,受资源限制的小型IoT设备以及许多其他CPU架构上运行 。 当前版本的补丁程序仅针对特定体系结构上的特定工作负载优化了磁盘加密,但是Linux需要一种可在任何地方平稳运行的解决方案。
That said, if you think your case is similar and you want to take advantage of the performance improvements now, you may grab the patches and hopefully provide feedback. The runtime flag makes it easy to toggle the functionality on the fly and a simple A/B test may be performed to see if it benefits any particular case or setup. These patches have been running across our wide network of more than 200 data centres on five generations of hardware, so can be reasonably considered stable. Enjoy both performance and security from Cloudflare for all!
就是说,如果您认为您的情况相似,并且想要立即利用性能改进,则可以获取补丁并希望提供反馈。 运行时标志可以轻松地即时切换功能,并且可以执行简单的A / B测试以查看它是否有益于任何特定情况或设置。 这些补丁程序已经在五代硬件上的200多个数据中心的广泛网络中运行,因此可以合理地认为是稳定的。 所有人都可以享受Cloudflare的性能和安全性!

翻译自: https://levelup.gitconnected.com/speeding-up-linux-disk-encryption-5c56491201b2
linux加密磁盘
http://www.taodudu.cc/news/show-5603679.html
相关文章:
- 油漆面积 线段树+线扫描 蓝桥杯 java
- 005:Django Form请求
- 013:实战爬取三个翻译网站掌握Ajax表单提交
- 012:pyquery介绍与实战爬取糗事百科猫眼排行
- 006:开启Scrapy爬虫项目之旅
- capesandbox模拟登录案例
- Python协程理解、基于爬虫举例
- Python 爬虫瞎玩系列(1) —— Bilibili的前100个上古巨坟考古
- Android USB同时打开双路摄像头
- 婚恋交友小程序开发及解决方案
- PK光明顶?江湖上流传的几大消息队列门派,到底有什么本质的区别
- 张无忌决战光明顶
- 200多位阿里工程师齐聚“光明顶”_带你了解不一样的双11
- Java技术光明顶,这些阿里面试题你了解多少,你的功力有多深厚
- 一骑绝尘的大疆无人机,正在遭遇对手围攻光明顶?
- 功夫大会之微软项目管理,各路英雄齐聚光明顶!
- 光明顶开课了 JAVAscript 第一课(预解释)
- 23年找工作的心酸历程
- PPC系统内部和注册表的一些解释与修改
- E博士 答你所问
- (一)PPC的基础常识
- 教你入侵16
- pin技巧
- N95无线网络设置
- WinCE应用程序崩溃提示框的处理
- Javascript身份证号码验证
- LWN: Linux 5.3合入窗口进展 part 1
- Artistic Style 2.05.1
- 实战 - 谷粒商城项目:基础篇First
- 使用locust压力测试
加快Linux磁盘加密相关推荐
- dm-crypt——多功能 Linux 磁盘加密工具
dm-crypt--多功能 Linux 磁盘加密工具 ★"dm-crypt/cryptsetup"是啥玩意儿? 在某些技术文章中,"dm-crypt"和&quo ...
- Linux磁盘加密分析
数字安全越来越重要,因此黑客会从各种角度用各种方式来入侵服务器或存储设备,以获取公司重要的数据.从防御的角度来看,多种加密技术的实现,可以保护数据隐私免受这种侵犯.本文将讨论磁盘加密,从用途.类型以及 ...
- Linux 磁盘加密
1.磁盘加密 LUKS(Linux Unified Key Setup)为linux硬盘加密提供了一种标准,它不仅能通用于不同的Linux发行版本,还支持多用户/口令.因为它的加密密钥独立于口令,所以 ...
- linux磁盘加密bitlocker,亲身体验Windows 2008 Server R2下的BitLocker驱动器加密
微软新近推出的一款磁盘加密工具BitLocker驱动器加密(BitLocker Drive Encryption)听说功能非常强,即使你的磁盘不幸丢失了,也无须担心其中的隐私数据被别人看到,因为即使把 ...
- linux 磁盘加密
加密工具 crptsetup (默认已存在) 一.分区加密 1.创建分区 fdisk /dev/vdb partprobe fdisk -l 2.选择要加密的设备进行加密 cryptsetup lu ...
- 开发Linux系统下的磁盘加密方法详解
随着智能手机的计算能力和存储能力的提高,手机中将会存放越来越多的私有数据,这些数据的泄密可能造成严重后果.手机信息安全一直是我们的重点之一,对于一些重要的功能我们要求鉴权后才能使用,但这只能挡住初级的 ...
- Linux下的磁盘加密方法
Linux下的磁盘加密方法 转载时请注明出处和作者联系方式 作者联系方式:李先静 <xianjimli at hotmail dot com> 随着智能手机的计算能力和存储能力的提高,手机 ...
- linux u盘新建文件夹加密,linux磁盘的加密保护以及u盘加密的方法。
经常可以看到某些企业的服务器上插着一个优盘,用户一般称之为加密狗.不插入这个优盘无法访问某某数据等等.在linux中实现这个功能的软件名为cryptsetup-luks. 使用方法如下在系统中创建一个 ...
- linux系统硬盘设置密码,LUKS:Linux下磁盘加密
Linux下磁盘加密 LUKS(Linux Unified Key Setup)为Linux硬盘加密提供了一种标准,它不仅能通用于不同的Linux发行版本,还支持多用户/口令.因为它的加密密钥独立于口 ...
最新文章
- Python 之父谈 Python
- Dotnet Core下的Channel, 你用了吗?
- 干货整理:处理不平衡数据的技巧总结!收好不谢
- Thrift 异步模式
- 【声学基础】概述——振动学
- D3 datumdata
- MVC3学习第六章 排山倒海第二变----使用 Entity Framework Code-First 进行数据访问
- php 复选框 未选,php – 在表单发布时如何获取复选框元素中未选中复选框的值?...
- cluster(3)
- Excel中index和match函数的应用实例
- 奇怪:WINDOWS排序错了?
- 2022全新趣盒iapp源码带后台非常好看UI
- CommandArgument 与 CommandName 属性
- 产品经理常用的分析模型方法
- nmn对卵巢的作用,nmn吃多久对卵巢,女性知识!
- NewLand手持设备上条码扫描
- 计算机二级什么叫项目符号,项目符号
- [学习SLAM]数学中的几何变换-向量叉乘/旋转轴、旋转角度和旋转矩阵/坐标系变换
- JAVA基础_数组(一维数组)
- ROS2学习笔记(四)-- 用方向键控制小车行走
热门文章
- Android中如何获取手机屏幕大小
- UE4 C++(20) UnrealPak打包和打补丁
- finalize java,Java中Object对象finalize方法详细解析
- 清空stringBuilder
- 计算机在小学英语中的应用,信息技术在英语教学中的应用
- python函数分为哪几种_python常用函数
- 座位调整问题java_如何提出“调整座位”的要求
- [文献阅读笔记]Machine Learning DDoS Detection for Consumer Internet of Things Devices 2018 IEEE SPW
- 初识socket编程---教你正确分手哦!!!
- 2023.03.27更新大麦网PC端抢购软件和使用教程