与大多数台式机和移动广告软件说再见
Some time ago I wrote an article where I described — read it here — an easy way to get rid of advertisements on your smart TVs. Since I was recently struggling with Android apps containing pervasive adwares, I suddenly remembered this simple way to solve, in part at least, the problem: DNS change. Although, I’ve already briefly outlined what a DNS is in the above mentioned article, so I won’t repeat myself. Thus, this time I want to show you a couple of easy ways aimed to change your mobile devices’ DNS, without root permissions, in order to restrict those annoying ads which are showed in the wild in (almost) every free applications and in a lot of websites. In addiction, I will explain how to turn the matter around also in desktop and laptop devices as well, gathering these cases together with the rooted devices scenario. But, before going ahead, let me point out that by altering the DNS addresses, despite the ads put down, you could be exposed to some security and privacy related risks, as the Domain Name Server might address you to a malicious (but apparently safe) website and anyway it is also able to know which websites you browse - the latter should not surprise you because that’s just the DNS work.
前段时间,我写了一篇文章,描述并在这里阅读, 这是一种在智能电视上消除广告的简单方法。 自从我最近在尝试使用包含大量广告软件的Android应用程序时,我突然想起了这种简单的方法,至少可以部分解决以下问题: DNS更改 。 虽然,我已经在上述文章中简要概述了什么是DNS,所以我不再重复。 因此,这一次,我想向您展示一些简单的方法,旨在在没有root权限的情况下更改移动设备的DNS,以限制(几乎)每个免费应用程序和很多网站。 令人上瘾的是,我将说明如何在台式机和笔记本电脑设备中也解决此问题,并将这些案例与存在设备的情况一起收集。 但是,在继续之前,让我指出,尽管放下了广告,但通过更改DNS地址,您可能会面临一些与安全性和隐私相关的风险 ,因为域名服务器可能会向您发送恶意代码(但显然很安全)。 )网站,无论如何,它也能够知道您浏览了哪些网站-后者应该不会让您感到惊讶,因为那只是DNS的工作。
Basically, there are two — keep in mind that this first part is intended for non rooted phones — main methods to change the DNS values on an Android device. The first way consists of manually setting the WiFi configurations and unfortunately, as the “WiFi” term suggests, it can’t be applied on mobile data. For this purpose, the second method covers both WiFi and mobile data scenarios since it’s based on the use of a third-part application. Also, this second way is simpler than the former. Let’s proceed with order by describing these procedures.
基本上,有两种方法(请记住,第一部分适用于无根电话)是更改Android设备上DNS值的主要方法。 第一种方法包括手动设置WiFi配置 ,但不幸的是,正如“ WiFi”一词所暗示的,它不能应用于移动数据。 为此, 第二种方法涵盖了WiFi和移动数据场景,因为它基于第三方应用程序的使用。 同样,第二种方法比前一种更简单。 让我们通过描述这些过程来进行排序。
Android WiFi DNS设置 (Android WiFi DNS setting up)
When you connect to a WiFi network on an Android device, you can edit some interesting settings such as adding a proxy, setting a static IP address, et cetera. This little freedom of customization suits our aim, as we have to simply set up a static IP address in order to change the DNS values. For instance, let “MyPrettyWiFi” be your WiFi network. Thus, once you connected your device to the latter—note that you have to do this process on each WiFi network which you want to change the DNS values of — , just go in the WiFI settings and long press on “MyPrettyWiFi”. Then, just choose the Modify Network entry. At this point, check the Show advanced options box and you should have such a similar situation:
当您在Android设备上连接到WiFi网络时,您可以编辑一些有趣的设置,例如添加代理 ,设置静态IP地址等。 这种小的自定义自由符合我们的目标,因为我们必须简单地设置一个静态IP地址才能更改DNS值 。 例如,让“ MyPrettyWiFi ”成为您的WiFi网络。 因此,一旦将设备连接到后者(请注意,您必须在要更改DNS值的每个 WiFi网络上执行此过程),只需进入WiFI设置并长按“ MyPrettyWiFi ”。 然后,只需选择“ 修改网络”条目。 此时,选中显示高级选项框,您应该会遇到类似的情况:
Now by just changing the value DHCP to Static in the IP settings option, suddenly the following options should be displayed:
现在,只需在IP设置选项中将DHCP值更改为“ 静态” ,就应该突然显示以下选项:
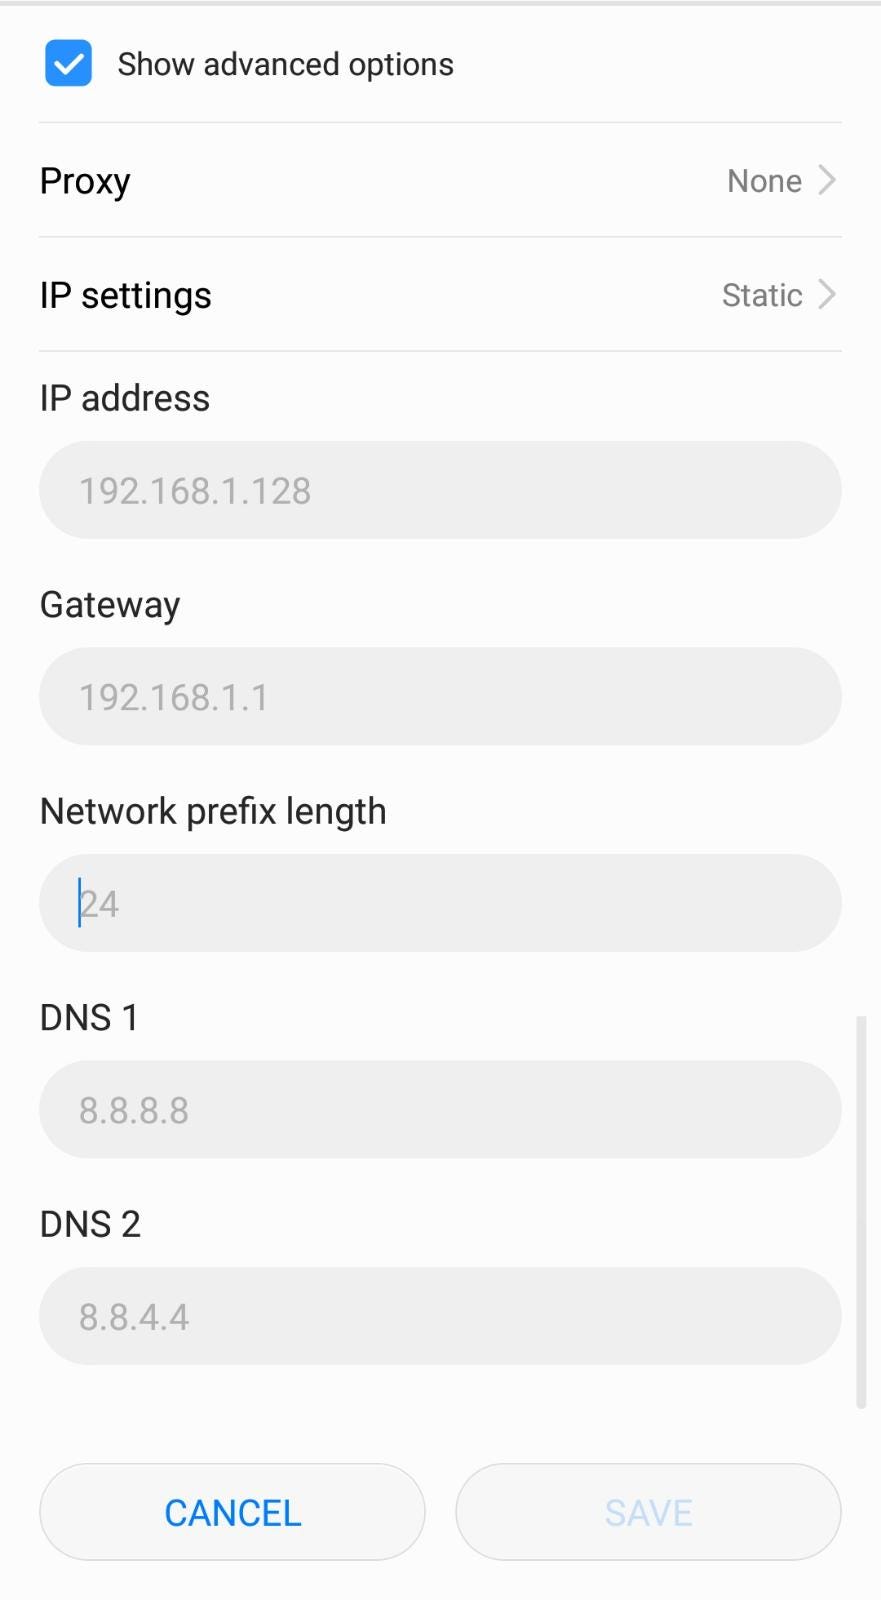
Finally that’s where magic will happen. So, you have to set a static IP address for your mobile device. But before doing that, you have to search for some network settings in your router — this kind of default info changes from model to model, but you could follow this guide whether you aren’t a networks expert — , such as your router’s IP (gateway) and your subnet mask (network prefix length). Once you got these values, just put them into their corresponding entries. In my case, Gateway = 192.168.1.1 and Network prefix length = 24. At this point, you can finally choose a static IP for your mobile device. Anyway, in order to avoid any kind of addresses collision, I’d suggest to opt for the same IP address which your router assigned to your device — this info is displayed at the top of the Modify network page — or, as an alternative, you could choose (considering the subnet configuration) the fourth value of the IP address in a range [15, 30], for example. Thus, your new static IP address should look like 192.168.1.4, which is the address I opted to keep. Therefore, since the final step consists of changing the DNS values to the AdGuard’s addresses, you have to set DNS 1 = 176.103.130.130 and DNS 2 = 176.103.130.131 and just press the “Save” button. And we’re done! These should be the conclusive configurations:
最终,这就是魔术发生的地方。 因此,您必须为移动设备设置一个静态IP地址。 但在此之前,您必须在路由器中搜索一些网络设置 -这种默认信息因型号而异,但是无论您不是网络专家,都可以按照本指南进行操作,例如路由器的IP( 网关 )和您的子网掩码( 网络前缀长度 )。 获得这些值后,只需将它们放入相应的条目中即可。 在我的情况下, Gateway = 192.168.1.1 和 Network prefix length = 24 。 至此,您最终可以为移动设备选择一个静态IP 。 无论如何,为了避免发生任何类型的地址冲突,我建议选择与路由器分配给设备的IP地址相同的地址(此信息显示在“ 修改网络”页面的顶部),或者,例如,您可以选择(考虑子网配置 )IP地址的第四个值,范围为[15,30]。 因此,您的新静态IP地址应类似于192.168.1.4 ,这是我选择保留的地址。 因此,由于最后一步是将DNS值更改为AdGuard的地址 ,因此您必须设置DNS 1 = 176.103.130.130和DNS 2 = 176.103.130.131 ,然后按“ 保存 ”按钮。 我们完成了! 这些应该是最终配置:
Alternatively, to add the “Family protection” provided from AdGuard you could opt for DNS 1 = 176.103.130.132 and DNS 2 = 176.103.130.134.
另外,要添加AdGuard提供的“ 家庭保护 ”,您可以选择DNS 1 = 176.103.130.132和DNS 2 = 176.103.130.134 。
移动数据DNS解决 (Mobile data DNS work around)
Unfortunately, as we forewarned in the introduction of this article, unrooted Android devices don’t allow us to change the DNS addresses for mobile data connections. Although, to turn this annoying problem around we can rely on some third-part applications which bypass the problem by creating a Virtual Private Network (VPN) — this way, unlike the former method we’ve just seen, you don’t have to repeat any procedure for each WiFi network or mobile data connection. Indeed, despite unrooted devices prevent the DNS changing, they allow the use of VPNs. DNS Changer is one of the best free apps I’ve tried till now. It provides lots of famous DNS addresses, such as Cloudfare DNS, Open DNS, Google DNS, and it also allows you to add your custom ones. Thus, you have to simply add manually the AdGuard’s DNS addresses and that’s it, problem solved!
不幸的是,正如我们在本文引言中所警告的那样, 无根的Android设备不允许我们更改移动数据连接的DNS地址 。 虽然,为了解决这个令人讨厌的问题,我们可以依靠一些第三方应用程序 ,这些应用程序通过创建虚拟专用网(VPN)来绕过该问题–与我们之前看到的前一种方法不同,这种方法不必对每个WiFi网络或移动数据连接重复任何过程。 确实,尽管无根设备阻止DNS更改,但它们仍允许使用VPN。 DNS Changer是我迄今为止尝试过的最好的免费应用程序之一。 它提供了许多著名的DNS地址,例如Cloudfare DNS , Open DNS , Google DNS ,并且还允许您添加自定义地址。 因此,您只需简单地手动添加AdGuard的DNS地址 ,就可以解决问题!
Once again, set DNS 1 = 176.103.130.130 and DNS 2 = 176.103.130.131 and press on the “Start” button. Also in this case, remember that alternatively you could opt for DNS 1 = 176.103.130.132 and DNS 2 = 176.103.130.134 to add the “Family protection” provided from AdGuard.
再次设置DNS 1 = 176.103.130.130和DNS 2 = 176.103.130.131 ,然后按“ 开始 ”按钮。 同样在这种情况下,请记住,您也可以选择DNS 1 = 176.103.130.132和DNS 2 = 176.103.130.134 添加AdGuard提供的“ 家庭保护 ”。
Please note that since DNS Changer is a free app, it contains adwares itself. But you have to deal with ads only when you press the “Start” button, because when the VPN will be created, the DNS changes will affect all the applications, including DNS Changer.
请注意,由于DNS Changer是免费的应用程序,因此它本身包含广告软件 。 但是您只需要按“ 开始 ”按钮就可以处理广告,因为创建VPN时,DNS更改将影响所有应用程序,包括DNS Changer。
台式机和笔记本电脑的通用方法 (A general method for Desktops and Laptops)
The most general way to change the DNS addresses on a device which hosts a Unix-like distro and MacOS consists of simply editing the /etc/resolv.conf file. Since this change is permanent, I’d suggest you to backup the file before adding the changes. Eventually, you can edit the file with a text editor and override its content with these two rows:
在装有Unix发行版和MacOS的设备上更改DNS地址的最通用方法是简单地编辑/etc/resolv.conf文件。 由于此更改是永久性的,因此建议您在添加更改之前先备份文件。 最终,您可以使用文本编辑器编辑文件 ,并使用以下两行覆盖其内容 :
nameserver 176.103.130.130nameserver 176.103.130.131Now save the changes and that’s all! For rooted Android devices you could try to edit /system/etc/resolv.conf. If that won’t work, then check out some of these methods. Note that perhaps a network restart might be needed whether you were not able to connect to the Internet firstly, though.
现在保存更改,仅此而已 ! 对于植根的 Android设备,您可以尝试编辑/system/etc/resolv.conf 。 如果那行不通,请检查其中一些方法 。 请注意,尽管您首先无法连接到Internet,也许可能需要重新启动网络 。
Windows OS设备 (Windows OS devices)
For devices which host Windows OS, you can change the DNS values by following this procedure:
对于承载Windows操作系统的设备,您可以按照以下步骤更改DNS值 :
Open Control Panel.
打开控制面板 。
Click on Network and Internet.
单击网络和Internet 。
Click on Network and Sharing Center.
单击网络和共享中心 。
Click the Change adapter settings option in the left pane.
单击左窗格中的更改适配器设置选项。
Right-click the network interface connected to the internet, and select the Properties option.
右键单击连接到Internet的网络接口,然后选择“ 属性”选项。
Select and check the Internet Protocol Version 4 (TCP/IPv4) option.
选择并选中“ Internet协议版本4(TCP / IPv4)”选项。
Click the Properties button.
单击属性按钮。
Click the Use the following DNS server addresses option.
单击“ 使用以下DNS服务器地址”选项。
- Set the values:设置值:
Preferred DNS Server = 176.103.130.130Alternate DNS Server = 176.103.130.131Now you can click on the “Ok” button and then “Close”.
现在,您可以单击“ 确定 ”按钮,然后单击“ 关闭 ”。
That’s all folks!
那是所有人!
结论 (Conclusions)
Adwares are such an annoying problem, especially on mobile devices. But we’ve just seen how some easy tricks based on DNS changing could help us to get rid of them. We can end this article by pointing out that this method of modifying the DNS addresses on a device to avoid lots and lots of unwanted advertisements, it’s based on a blacklist technique. Indeed, AdGuard blacklists all the known IP addresses related to ads services. This can be locally done by making our host resolve those “malicious” IP addresses with another arbitrary address or, simpler, the loopback address (127.0.0.1). In conclusion, this trick, together with some ad hoc router configuration settings, can be used to achieve a more effective solution to block adwares on your whole LAN.
广告软件是一个令人烦恼的问题 ,尤其是在移动设备上。 但是,我们已经看到了一些基于DNS更改的 简单技巧如何帮助我们摆脱它们。 我们可以通过指出该修改设备上的DNS地址以避免大量不必要的广告的方法来结束本文,该方法基于黑名单技术 。 实际上,AdGuard 将与广告服务相关的所有已知IP地址都列入了黑名单 。 这可以通过使我们的主机使用另一个任意地址或更简单的环回地址( 127.0.0.1 )解析那些“ 恶意 ” IP地址来本地完成。 总之,此技巧以及一些特殊的路由器配置设置可用于实现更有效的解决方案,以在整个LAN上阻止广告软件 。
翻译自: https://medium.com/swlh/say-goodbye-to-most-desktop-and-mobile-adwares-5ab4414af3c0
http://www.taodudu.cc/news/show-7027975.html
相关文章:
- scrum master_成为魔术师如何使我成为更好的Scrum Master。
- 魔术sql_魔术不会成为独角兽,这需要付出艰辛的努力
- webpack 入门_Webpack入门:模块捆绑魔术
- 前端面试问题总结(二)7.5
- Mac os壁纸提取
- 浏览器小知识之IE浏览器
- CSS 最后一个元素 不要border-bottom
- 通过css修改border-bottom的长度
- border-bottom 自定义长度
- BottomBar使用
- 安卓Bottom Navigation Activity的自定义使用,即常见错误的处理
- 设置不定长border-bottom
- Bottom-up Parsing
- 关于怎么改变border-bottom 的长度解决方法
- 目标检测之IoU(box:[top, left, bottom, right])
- 自底向上语法分析(bottom-up parsing)
- 改变border-bottom的长度
- css top与bottom属性
- 一致性挑战:微服务架构下的数据一致性解决方案
- apache下实现301永久性重定向
- IIS7 实现301永久重定向
- 云安全防护总体架构设计
- 【微服务】网站安全认证架构演进
- 安全架构中的前端安全防护研究
- 私有云安全云管平台关键技术与应用研究
- 企业云安全的6个最佳实践
- Velocity的基本介绍
- 使用Unity+HTC VIVE做VR时如何创建用户体验较强的菜单
- 自定义View和自定义ViewGroup一步到位
- Velocity官方指南-Velocity是如何工作的
与大多数台式机和移动广告软件说再见相关推荐
- 电脑有独显内存还被占用_内存条:独立显卡显存,正式再见
原标题:内存条:独立显卡显存,正式再见 因为电脑内存对于显卡显存来说使用面宽泛的多,自电脑诞生以来可以没有独立显存但是绝不能没有内存,到现在仍然有不少电脑只是使用CPU自带的核芯显卡,内存直接当作显存 ...
- 为什么现在台式计算机无光驱,为何现在大部分电脑(笔记本和台式机)都取消了光驱?...
1 办公室新来一女同事,有一天指着光驱问我这个是用来干啥的,我点开光驱告诉她,用来放茶杯的,她惊喜万分说,电脑这个设计太贴心了 2 很高兴回答你的问题我是快修侠,如果我的回答对你有帮助,欢迎给我留言点 ...
- 台式机win10关闭fn热键_win10惠普怎么取消fn win10惠普取消fn的简单方法
惠普笔记本怎么不按FN键而直接实现快捷键功能?每次都要按fn才能实现某种快捷键的功能,不按行吗?还真行,下面我们一起来看看实现方法,需要的朋友可以参考下 系统推荐:番茄花园win10系统下载 惠普笔记 ...
- 台式计算机网卡独立最低多少钱,不挑次的只挑好的 台式机千兆网卡应该买哪些?...
原标题:不挑次的只挑好的 台式机千兆网卡应该买哪些? 说起选购网卡,很多人会不由自主的在网上销售平台了解一番,但面对市场上琳琅满目的网卡哪些比较好呢?这期网卡推荐,小编推荐一些性价比极高的台式机网卡, ...
- 联想台式机增加内存条无法开机
想用一下家里的台式机,结果好慢,于是乎从京东买了条内存,但是插上之后电脑直接启动不起来.下面是客服记录: 用户,您好! 正在建立连接中,请耐心等待...... 欢迎进入在线支持中心,转接中,请稍候-- ...
- 荣耀30pro系统_荣耀30 pro:正式再见!
但随着市场竞争加剧,最近荣耀在价格上再次妥协,也是为了给新机开始让步,马上就是荣耀V40系列的发布会了,迭代荣耀30 pro+也不再坚挺,笔者从第三方平台上看到数据,荣耀30pro+这款手机大降520 ...
- 可以打游戏的计算机,还在用笔记本玩游戏?台式机才能给你极致享受
[PConline 游戏爆测]随着笔记本的性能越来越好,玩家对于游戏本的需求也越来越高了,再加上购买游戏笔记本并不需要额外购买显示器,就能享受到高刷新率高色域的屏幕,让玩家对于游戏台式机就更加不感兴趣 ...
- 神舟台式计算机图片,扩展性媲美台式机!神舟战神K780G拆机图赏
作为神舟战神K680E的升级进化版,战神K780G不仅拥有更大的17.3英寸屏幕,其独立显卡也从GeForce GTX 880M进化到了Maxwell核心的GTX980M独显,在游戏性能上有了长足的进 ...
- 台式计算机刚换的显示屏怎么设置,台式机怎么样切换显示器
我的台式机是双显示器,该怎么样去切换呢?下面由小编给你做出详细的台式机切换显示器方法介绍!希望对你有帮助! 台式机切换显示器方法一: 需要用到的硬件: 1.支持双视频信号输出的显卡.如一块显卡支持VG ...
最新文章
- Netty 粘包 拆包 编码 解码 序列化 介绍
- webuploader自己造的坑
- 11 12 13c语言编程,C语言编程
- 浅谈对主成分分析(PCA)算法的理解
- 关于线程执行顺序的问题
- activiti mysql 版本_Mysql8.0.17版本不能自动创建activiti表的坑
- 【转】DXErrorProvider与DxValidationProvider的使用
- Python基本语法[二],python入门到精通[四] (转)
- 可任意设置时间的ppt倒计时软件
- aboutface4 1-3 读书笔记 幕布 思维导图
- 量子笔记:酉矩阵(幺正矩阵)、量子门的可逆性
- 计算机无法识别语音输入,我的电脑每次启动语音识别总是显示“由于语言配置不受支持,无法启动语音识别”;...
- dfuse 新版 client-js 库发布
- Linux tac命令
- Linux运维遇到的基本问题解决大全
- Mongodb高级查询Aggregation聚合组件分页
- 洛谷 P1328 [NOIP2014 提高组] 生活大爆炸版石头剪刀布 题解 C/C++
- 2018美团点评编程题第一题
- vue开发环境、正式环境的配置及原理
- 中国汽车业发展令决策层喜忧参半