jenkins X实践系列(2) —— 基于jx的DevOps实践
jx是云原生CICD,devops的一个最佳实践之一,目前在快速的发展成熟中。最近调研了JX,这里为第2篇,使用已经安装好的jx来实践CICD,旨在让大家了解基于jx的DevOps是如何运转的,感兴趣的可以继续关注,下一篇介绍如何安装。
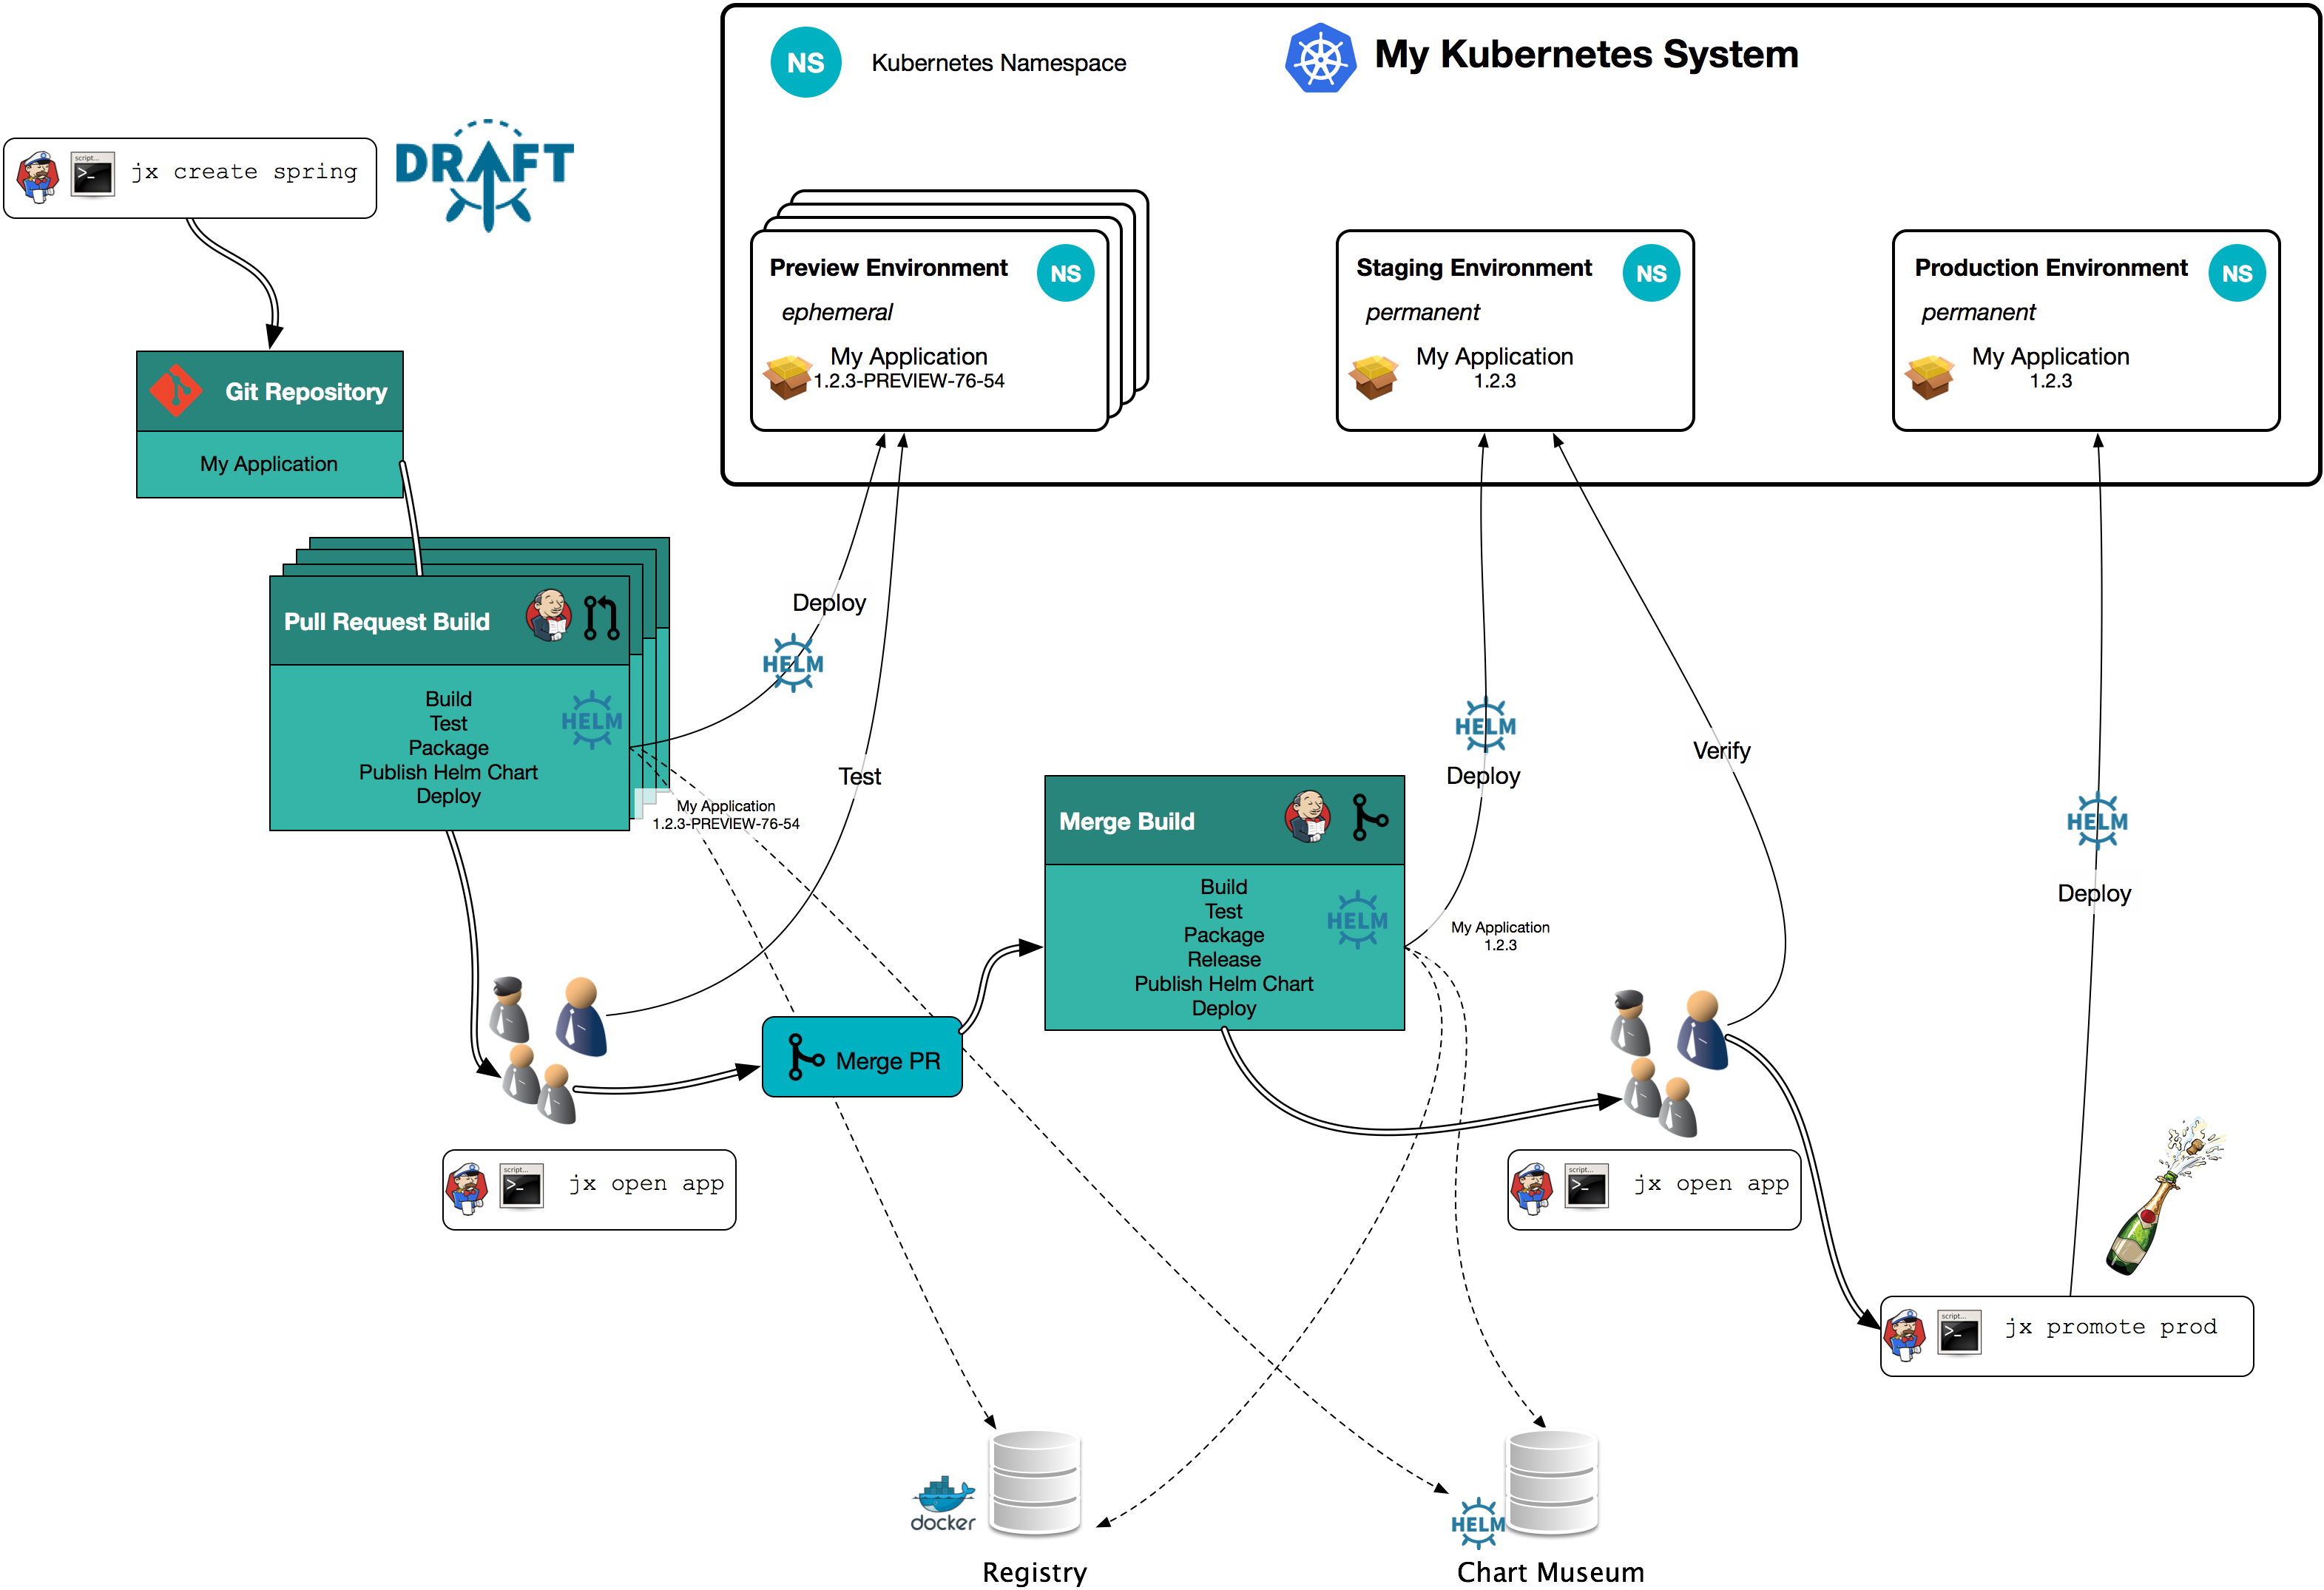
先上图:
一、windows 搭建开发环境(可选)
1. 安装kubectl
使用Chocolatey来安装,因此install Chocolatey:
安装Chocolatey
windows + X ,选择power shell 管理员模式,输入:
Set-ExecutionPolicy Bypass -Scope Process -Force; iex ((New-Object System.Net.WebClient).DownloadString('https://chocolatey.org/install.ps1'))或者cmd.exe(管理员):
@"%SystemRoot%\System32\WindowsPowerShell\v1.0\powershell.exe" -NoProfile -InputFormat None -ExecutionPolicy Bypass -Command "iex ((New-Object System.Net.WebClient).DownloadString('https://chocolatey.org/install.ps1'))" && SET "PATH=%PATH%;%ALLUSERSPROFILE%\chocolatey\bin"使用Chocolatey安装kubectl
使用脚本安装
choco install kubernetes-cli测试是否安装成功:
kubectl version创建配置文件,先转到%HOME% 目录:
For example:
cd C:\users\yourusername创建配置文件目录:
mkdir .kube转到配置目录:
cd .kube配置kubectl使用远程集群:
New-Item config -type file修改config文件,或者直接从集群拷贝配置文件过来
测试
C:\Users\jqpeng>kubectl get pods
NAME                                                READY   STATUS      RESTARTS   AGE
jenkins-bd94b5fb8-5t9kq                             1/1     Running     0          10d
jenkins-x-chartmuseum-75d45b6d7f-2hk99              1/1     Running     0          10d
jenkins-x-controllercommitstatus-675dbb9c86-kth6q   1/1     Running     71         10d
jenkins-x-controllerrole-5458874c-4lnwh             1/1     Running     0          10d
jenkins-x-controllerteam-7f965c8b9c-n4kfm           1/1     Running     0          10d
jenkins-x-controllerworkflow-7675c458d-sjbfd        1/1     Running     0          10d
2.安装helm
到下载页:
https://github.com/helm/helm/releases
下载最新的helm,选择windows-amd64
wget https://storage.googleapis.com/kubernetes-helm/helm-v2.11.0-windows-amd64.zip解压后,拷贝到C:\Windows\System32。
注意,需要Cross GFW,可以使用( https://azure.microsoft.com/zh-cn/free/ ) 免费一年。
初始化helm
服务端已经安装过tiller了,因此只需要client-only,另外stable repo指定本地的
helm init --client-only --stable-repo-url=http://charts.youdomain.com/---
Creating C:\Users\jqpeng\.helm
Creating C:\Users\jqpeng\.helm\repository
Creating C:\Users\jqpeng\.helm\repository\cache
Creating C:\Users\jqpeng\.helm\repository\local
Creating C:\Users\jqpeng\.helm\plugins
Creating C:\Users\jqpeng\.helm\starters
Creating C:\Users\jqpeng\.helm\cache\archive
Creating C:\Users\jqpeng\.helm\repository\repositories.yaml
Adding stable repo with URL: http://charts.youdomain.com/
Adding local repo with URL: http://127.0.0.1:8879/charts
$HELM_HOME has been configured at C:\Users\jqpeng\.helm.
Not installing Tiller due to 'client-only' flag having been set
Happy Helming!
3. 安装jx
到https://github.com/jenkins-x/jx/releases 下载最新的编译好的jx执行文件,选择jx-windows-amd64.zip下载,下载后解压,然后重新命名为jx.exe,拷贝到C:\Windows\System32。
测试:
C:\Users\jqpeng>jx version
Updated the team settings in namespace incubation
Updated the team settings in namespace incubation
NAME               VERSION
jx                 [32m1.3.572[0m
jenkins x platform [32m0.0.2871[0m
Kubernetes cluster [32mv1.12.2[0m
kubectl            [32mv1.12.1[0m
helm client        [32mv2.11.0+g2e55dbe[0m
helm server        [32mv2.11.0+g2e55dbe[0m
git                [32mgit version 2.19.1.windows.1[0m
将服务器上的.jx目录下相关配置信息下载到本地用户目录下的.jx文件夹。
二、快速开始
1.使用quickstart
作为演示用,可以直接使用jx create quickstart,会直接使用官方的quickstart项目,键入命令,然后按提示选择即可。
D:\Project>jx create quickstart
? select the quickstart you wish to create spring-boot-rest-prometheus
? Project name spring-boot-rest-prometheus
Generated quickstart at D:\Project\spring-boot-rest-prometheus
### NO charts folder D:\Project\spring-boot-rest-prometheus\charts\spring-boot-rest-prometheus
Created project at D:\Project\spring-boot-rest-prometheusUpdated the team settings in namespace incubation
? Which Git service do you wish to use https://github.com
No username defined for the current Git server!
? Do you wish to use jadepeng as the Git user name: Yes
The directory D:\Project\spring-boot-rest-prometheus is not yet using git
? Would you like to initialise git now? Yes
? Commit message:  Initial importGit repository created
Updated the team settings in namespace incubation
selected pack: C:\Users\jqpeng\.jx\draft\packs\github.com\jenkins-x\draft-packs\packs\maven
? Which organisation do you want to use? jadepeng
replacing placeholders in directory D:\Project\spring-boot-rest-prometheus
app name: spring-boot-rest-prometheus, git server: github.com, org: jadepeng, Docker registry org: jadepeng
skipping directory "D:\\Project\\spring-boot-rest-prometheus\\.git"
Using Git provider [32mgithub.com at https://github.com[0mAbout to create repository [32mspring-boot-rest-prometheus[0m on server [32mhttps://github.com[0m with user [32mjadepeng[0m
? Enter the new repository name:  spring-boot-rest-prometheusCreating repository [32mjadepeng/spring-boot-rest-prometheus[0m
Pushed Git repository to https://github.com/jadepeng/spring-boot-rest-prometheusUpdated the team settings in namespace incubation
? Do you wish to use jadepeng as the user name for the Jenkins Pipeline Yes
Created Jenkins Project: http://jenkins.incubation.youdomain.com/job/jadepeng/job/spring-boot-rest-prometheus/Watch pipeline activity via:    jx get activity -f spring-boot-rest-prometheus -w
Browse the pipeline log via:    jx get build logs jadepeng/spring-boot-rest-prometheus/master
Open the Jenkins console via    jx console
You can list the pipelines via: jx get pipelines
When the pipeline is complete:  jx get applicationsFor more help on available commands see: https://jenkins-x.io/developing/browsing/Note that your first pipeline may take a few minutes to start while the necessary images get downloaded!Creating GitHub webhook for jadepeng/spring-boot-rest-prometheus for url http://jenkins.incubation.youdomain.com/github-webhook/
创建过程:
- 自动创建了spring-boot-rest-prometheus项目,并提交到github(可以使用自己的git服务器),并自动创建GitHub webhook ,这样当新代码提交到github后,会自动触发构建。
- 将项目提交到jenkins,可以打开http://jenkins.incubation.youdomain.com/job/jadepeng/job/spring-boot-rest-prometheus/ 查看
- jenkins会自动进行构建,可以通过
jx get activity -f spring-boot-rest-prometheus -w查看构建活动 - 通过
jx get build logs jadepeng/spring-boot-rest-prometheus/master查看构建日志, - 通过
jx console打开jenkins bule
2.查看构建日志
我们查看构建日志:
jx get build logs jadepeng/spring-boot-rest-prometheus/master....+ jx step helm release
No $CHART_REPOSITORY defined so using the default value of: http://jenkins-x-chartmuseum:8080
Using helmBinary helm with feature flag: none
Adding missing Helm repo: jenkins-x http://chartmuseum.jenkins-x.io
Successfully added Helm repository jenkins-x.
Adding missing Helm repo: releases http://jenkins-x-chartmuseum:8080
Successfully added Helm repository releases.
No $CHART_REPOSITORY defined so using the default value of: http://jenkins-x-chartmuseum:8080
Uploading chart file spring-boot-rest-prometheus-0.0.1.tgz to http://jenkins-x-chartmuseum:8080/api/charts
Received 201 response: {"saved":true}
[Pipeline] sh
[spring-boot-rest-prometheus] Running shell script
++ cat ../../VERSION
+ jx promote -b --all-auto --timeout 1h --version 0.0.1
Using helmBinary helm with feature flag: none
Promoting app spring-boot-rest-prometheus version 0.0.1 to namespace incubation-staging
Created Pull Request: http://github.youdomain.com/jqpeng/environment-walkertabby-staging/pulls/34
3.部署到staging环境
可以看到已经构建成功,并停留在最后一步jx promote -b --all-auto --timeout 1h --version 0.0.1
jx promote 是jx的发布命令,将构建产物部署到k8s环境。回顾下文章开始的一个图,提交到master后的代码,自动构建后会部署到staging,由于采用的gitops,会往staging环境的git仓库 environment-walkertabby-staging推送一个pullrequest:

environment-walkertabby-staging其实就是一个charts项目:

每提交一个pullrequest,其实就是在requirements.yaml,将需要部署的项目作为-staging环境的依赖,比如刚提交的pullrequest就是增加了spring-boot-rest-prometheus依赖。
@@ -13,6 +13,9 @@ dependencies:
+- name: pailitaoservice
+repository: http://jenkins-x-chartmuseum:8080
+version: 0.0.3
+
+- name: spring-boot-rest-prometheus
+
+  repository: http://jenkins-x-chartmuseum:8080
+
+  version: 0.0.1
+- name: springboot-rest-demo
+repository: http://jenkins-x-chartmuseum:8080
+version: 0.0.4
我们来同意下合并pullrequest,这样当staging项目构建后就会自动部署spring-boot-rest-prometheus。合并完成后,再回到日志查看:
...
+ jx promote -b --all-auto --timeout 1h --version 0.0.1
Using helmBinary helm with feature flag: none
Promoting app spring-boot-rest-prometheus version 0.0.1 to namespace incubation-staging
Created Pull Request: http://github.youdomain.com/jqpeng/environment-walkertabby-staging/pulls/34Pull Request http://github.youdomain.com/jqpeng/environment-walkertabby-staging/pulls/34 is merged at sha 906a33b6eec14a49d248d8220e0d88416798ba6e
merge status: pending for URL http://github.youdomain.com/api/v1/jqpeng/environment-walkertabby-staging/statuses/906a33b6eec14a49d248d8220e0d88416798ba6e with target: http://jenkins.incubation.youdomain.com/job/jqpeng/job/environment-walkertabby-staging/job/master/display/redirect description: Build queued...
merge status: success for URL http://github.youdomain.com/api/v1/jqpeng/environment-walkertabby-staging/statuses/906a33b6eec14a49d248d8220e0d88416798ba6e with target: http://jenkins.incubation.youdomain.com/job/jqpeng/job/environment-walkertabby-staging/job/master/3/display/redirect description: This commit looks good
Merge status checks all passed so the promotion worked!
[Pipeline] }
[Pipeline] // container
[Pipeline] }
[Pipeline] // dir
[Pipeline] }
[Pipeline] // stage
[Pipeline] stage
[Pipeline] { (Declarative: Post Actions)
[Pipeline] cleanWs
[WS-CLEANUP] Deleting project workspace...[WS-CLEANUP] done
[Pipeline] }
[Pipeline] // stage
[Pipeline] }
[Pipeline] // withEnv
[Pipeline] }
[Pipeline] // withCredentials
[Pipeline] }
[Pipeline] // withEnv
[Pipeline] }
[Pipeline] // node
[Pipeline] End of Pipeline
jx已经检测到Pull Request已经通过,并且启动staging构建,直到构建结束。
这个时候,我们就可以通过jx get applications来查看部署好的应用。
D:\Project>jx get applications
APPLICATION                 EDIT PODS URL STAGING PODS URL                                                                    PRODUCTION PODS URL
spring-boot-rest-prometheus               0.0.1        http://spring-boot-rest-prometheus.incubation-staging.youdomain.com
PODS 为0,应该是容器启动有问题,我们可以看下:
kubectl -n=incubation-staging describe pod incubation-staging-spring-boot-rest-prometheus-66966b8cbb-8fvmf
---Events:Type Reason Age From Message---- ------ ---- ---- -------Normal Scheduled 6m51s default-scheduler Successfully assigned incubation-staging/incubation-staging-spring-boot-rest-prometheus-66966b8cbb-8fvmf to docker86-9Normal Pulling 6m44s kubelet, docker86-9 pulling image "registry.youdomain.com/jadepeng/spring-boot-rest-prometheus:0.0.1"Normal Pulled 6m38s kubelet, docker86-9 Successfully pulled image "registry.youdomain.com/jadepeng/spring-boot-rest-prometheus:0.0.1"Normal Created 5m27s (x3 over 6m37s) kubelet, docker86-9 Created containerNormal Started 5m27s (x3 over 6m37s) kubelet, docker86-9 Started containerWarning Unhealthy 5m1s (x9 over 6m31s) kubelet, docker86-9 Readiness probe failed: Get http://170.22.78.7:8080/actuator/health: dial tcp 170.22.78.7:8080: connect: connection refusedNormal Pulled 4m26s (x3 over 6m10s) kubelet, docker86-9 Container image "registry.youdomain.com/jadepeng/spring-boot-rest-prometheus:0.0.1" already present on machineWarning BackOff 97s (x15 over 5m41s) kubelet, docker86-9 Back-off restarting failed container问题在于Readiness probe failed, 来查看下容器日志:
kubectl -n=incubation-staging logs incubation-staging-spring-boot-rest-prometheus-66966b8cbb-8fvmf.   ____          _            __ _ _/\\ / ___'_ __ _ _(_)_ __  __ _ \ \ \ \
( ( )\___ | '_ | '_| | '_ \/ _` | \ \ \ \\\/  ___)| |_)| | | | | || (_| |  ) ) ) )'  |____| .__|_| |_|_| |_\__, | / / / /=========|_|==============|___/=/_/_/_/:: Spring Boot ::        (v2.0.4.RELEASE)2018-11-20 03:39:45.149  INFO 1 --- [           main] c.g.j.q.s.r.p.RestPrometheusApplication  : Starting RestPrometheusApplication v0.0.1 on incubation-staging-spring-boot-rest-prometheus-66966b8cbb-8fvmf with PID 1 (/opt/app.jar started by root in /opt)
2018-11-20 03:39:45.442  INFO 1 --- [           main] c.g.j.q.s.r.p.RestPrometheusApplication  : No active profile set, falling back to default profiles: default
2018-11-20 03:39:47.942  INFO 1 --- [           main] ConfigServletWebServerApplicationContext : Refreshing org.springframework.boot.web.servlet.context.AnnotationConfigServletWebServerApplicationContext@424c0bc4: startup date [Tue Nov 20 03:39:47 UTC 2018]; root of context hierarchy
原来java程序还没有启动成功,有可能是默认的资源限制问题,我们去掉相关限制,修改deployment.yaml,删除resources限制:

git push到仓库,等待自动构建完成,再次查看:
D:\Project>jx get applications
APPLICATION                 EDIT PODS URL STAGING PODS URL                                                                    PRODUCTION PODS URL
spring-boot-rest-prometheus               0.0.2   1/1  http://spring-boot-rest-prometheus.incubation-staging.youdomain.com D:\Project>curl -l http://spring-boot-rest-prometheus.incubation-staging.youdomain.com/
{"hello":"world"}
可以看到,自动构建了0.0.2版本,并且已经部署成功
4. 部署到正式环境
如果在staging测试没有问题,可以推送到正式环境(production)
jx promote spring-boot-rest-prometheus --version 0.0.2 --env production该命令会往production环境发送一个pullrequest,同意后会部署到正式环境。

jx promote spring-boot-rest-prometheus  --version 0.0.2 --env production
Promoting app spring-boot-rest-prometheus version 0.0.2 to namespace incubation-production
? Do you wish to use jqpeng as the user name to submit the Pull Request Yes
Created Pull Request: http://github.youdomain.com/jqpeng/environment-walkertabby-production/pulls/2pipeline jqpeng/environment-jx-dev/master
Pull Request http://github.youdomain.com/jqpeng/environment-walkertabby-production/pulls/2 is merged at sha 1f2ab843a8037f353020a81ad4289c9ede550447
merge status: pending for URL http://github.youdomain.com/api/v1/jqpeng/environment-walkertabby-production/statuses/1f2ab843a8037f353020a81ad4289c9ede550447 with target: http://jenkins.incubation.youdomain.com/job/jqpeng/job/environment-walkertabby-production/job/master/display/redirect description: Build queued...
然后再jx get applications
jx get applications
APPLICATION                 EDIT PODS URL STAGING PODS URL                                                                    PRODUCTION PODS URL
spring-boot-rest-prometheus               0.0.2   1/1  http://spring-boot-rest-prometheus.incubation-staging.youdomain.com 0.0.2      1/1  http://spring-boot-rest-prometheus.incubation-production.youdomain.com
可以看到0.0.2已经在PRODUCTIONS环境了,测试一下:
curl -l http://spring-boot-rest-prometheus.incubation-production.youdomain.com
{"hello":"world"}
三、为项目增加新功能
gitops提倡增加新功能,先在新的分支测试通过后,然后提交PR到master分支,因此我们先创建一个新分支jqpeng-dev。
git checkout -b jqpeng-dev
Switched to a new branch 'jqpeng-dev'
hello jx
修改RestPrometheusApplication.java
@GetMapping(path = "/", produces = "application/json")@ResponseBodypublic Map<String, Object> landingPage() {Counter.builder("mymetric").tag("foo", "bar").register(registry).increment();return singletonMap("hello", "world");}修改为
@GetMapping(path = "/", produces = "application/json")@ResponseBodypublic Map<String, Object> landingPage() {Counter.builder("mymetric").tag("foo", "bar").register(registry).increment();return singletonMap("hello", "jx");}保存,提交
git commit -a -m ''
git push origin jqpeng-dev
提交一个PR:
jx create pullrequest -t "#pr1 hello jx"
? Do you wish to use jadepeng as the user name to use for authenticating with git issues YesCreated PullRequest #1 at https://github.com/jadepeng/spring-boot-rest-prometheus/pull/1可以到https://github.com/jadepeng/spring-boot-rest-prometheus/pull/1/files查看代码变更。
提交PR后,jx会自动构建PR,并部署preview环境,可以打开jenkins查看:

或者通过命令查看:
jx get build log jadepeng/spring-boot-rest-prometheus/PR-1等自动构建完成,jx会在pr下面提交一个带预览地址的评论:

点看链接查看:

已经是hello jx了!
合并PR
打开PR页面,点击Merge pull request:

填写合并日志,提交:

PR1已经合并到master分支,等待自动构建完成,剩下的就和上面“二、快速开始”里的一样了,在staging环境进行测试,没问题的发布到生产环境。
四、小结
jx 良好的实现了gitops,利于团队协作,可以在团队进行推广实施。
作者:Jadepeng
出处:jqpeng的技术记事本--http://www.cnblogs.com/xiaoqi
您的支持是对博主最大的鼓励,感谢您的认真阅读。
本文版权归作者所有,欢迎转载,但未经作者同意必须保留此段声明,且在文章页面明显位置给出原文连接,否则保留追究法律责任的权利。
jenkins X实践系列(2) —— 基于jx的DevOps实践相关推荐
- 跨境时尚电商SHEIN基于Kubernetes的DevOps实践
SHEIN PaaS参考了很多优秀的社区实践方案,最终使用了基于GitLab + Jenkins + Kubernetes + Harbor 的一套CI/CD工具集,一年多以来,总结开发出了一套公司自 ...
- 《持续集成实践指南》第1章 DevOps实践简介
1.1 Devops概念 DevOps(英文Development和Operations的组合)是开发和运维一体一组过程.方法与系统的统称,用于促进开发(应用程序/软件工程).技术运营和质量保障(QA ...
- eBPF技术应用云原生网络实践系列之基于socket的service | 龙蜥技术
简介:如何使用 socket eBPF进一步提升Service 网络的转发性能? 背景介绍 Kubernetes 中的网络功能,主要包括 POD 网络,service 网络和网络策略组成.其中 POD ...
- PPmoney基于Kubernetes的DevOps实践
在微服务带来便利的同时产生了新的挑战,如何对所有微服务进行快速部署?本文将介绍PPmoney如何践行推广容器化,建立应用从开发测试到部署的DevOps流程,提高团队工作效率. 云平台介绍 先给大家看看 ...
- ASP.NET MVC实践系列9-filter原理与实践
filter实际上是一个特性(attribute),它提供了一种向controller 或 action中添加某些任务的方法,当controller 或 action被调用时,会触发filter中定义 ...
- [实践系列]Promises/A+规范
前言 [实践系列] 主要是让我们通过实践去加深对一些原理的理解. 实践系列-前端路由 实践系列-Babel原理 有兴趣的同学可以关注 实践系列 . 求star求follow~ 什么是Promise ? ...
- ASP.NET MVC实践系列11-FCKEditor和CKEditor的使用
FCKEditor是一款强大的在线编辑器,简单实用,多浏览器兼容,免费开源,应用十分广泛,据他的官方网站上称有三百多万的下载量,而且无数的知名大公司正在使用它.所以FCKEditor是很值得信赖的,现 ...
- 信创办公–基于WPS的PPT最佳实践系列 (将幻灯片组织成节的形式)
信创办公–基于WPS的PPT最佳实践系列 (将幻灯片组织成节的形式) 目录 应用背景 操作步骤 1.创建节 2.节的功能 应用背景 当在处理一份内容较多的演示文稿时,为了更好的整理和查阅,我们可以将幻 ...
- 信创办公–基于WPS的EXCEL最佳实践系列 (筛选重要数据)
信创办公–基于WPS的EXCEL最佳实践系列 (筛选重要数据) 目录 应用背景 操作步骤 1.筛选 2.高级筛选 应用背景 在WPS里,筛选有两种,一种是筛选,另外一种则是高级筛选. 操作步骤 1.筛 ...
最新文章
- Citrix 服务器虚拟化之二十八 XenApp6.5发布文档内容
- P1991 无线通讯网
- P3482 [POI2009]SLO-Elephants
- matlab矩阵连接图解
- 大数据计算平台Spark内核全面解读
- seo全攻略_SaaS 企业推广获客全攻略(2):如何做好企业官网?
- 想用最新追剧的影视图片作为手机壁纸桌面就到高图网
- 同时启动多个Tomcat服务器
- Composition or inheritance for delegating page methods?
- mysql父子节点分层_mysql 递归实例 父子节点层级递归
- MySQL用C访问的示例代码
- mysql 指定驱动表_了解MySQL联表查询中的驱动表,优化查询,以小表驱动大表
- mes系统和plc通讯案例_「MES系统 | 应用案例」奥松电子云MES系统项目启动大会顺利召开...
- javafx 时间输入框
- OpenCV官方教程节选
- iai控制器服务器ON信号,IAI控制器型号说明.pdf
- 中国大数据风控企业揭秘系列之航天信息
- ASP.NET Core 面试题整理
- 自定义流式布局的代码实现
- 前端实现旗帜飘动效果系列 (Ⅳ):webgl实现