在生产中提供Django静态和媒体文件
Serving static and media files directly from the Django server during production leaves room for rendering and incompatibility issues.
在生产期间直接从Django服务器提供静态文件和媒体文件会留下呈现和不兼容问题的空间。
This tutorial will provide instructions on how to use the Amazon S3 service and Amazon CloudFront to securely serve all Django static and media files during production.
本教程将提供有关如何使用Amazon S3服务和Amazon CloudFront在生产期间安全地提供所有Django静态文件和媒体文件的说明。
To begin, we will cover the AWS S3 and CloudFront setup then move on to connecting a Django project to a CloudFront domain. CloudFront is a content delivery network that can speed up the delivery of images and videos.
首先,我们将介绍AWS S3和CloudFront设置,然后继续将Django项目连接到CloudFront域。 CloudFront是一个内容交付网络,可以加快图像和视频的交付速度。
Note, we will not change any of the static Django template tags using this method. If you are unsure how to serve Django static files in the first place, check out the article Manage Django Static Files first.
请注意,我们不会使用此方法更改任何静态Django模板标签。 如果您不确定首先如何提供Django静态文件,请先阅读文章管理Django静态文件 。
创建一个AWS账户 (Create an AWS account)
Create an Amazon Web Services account at https://aws.amazon.com/free/. You may need to enter your billing and credit card information to create the account but you will not be charged unless you exceed the storage limit of the free tier.
通过https://aws.amazon.com/free/创建一个Amazon Web Services帐户。 您可能需要输入帐单和信用卡信息来创建帐户,但是除非超出免费套餐的存储限制,否则不会向您收费。
If you already have an AWS account, login.
如果您已经有一个AWS帐户,请登录 。

向用户添加S3权限 (Add S3 permissions to the user)
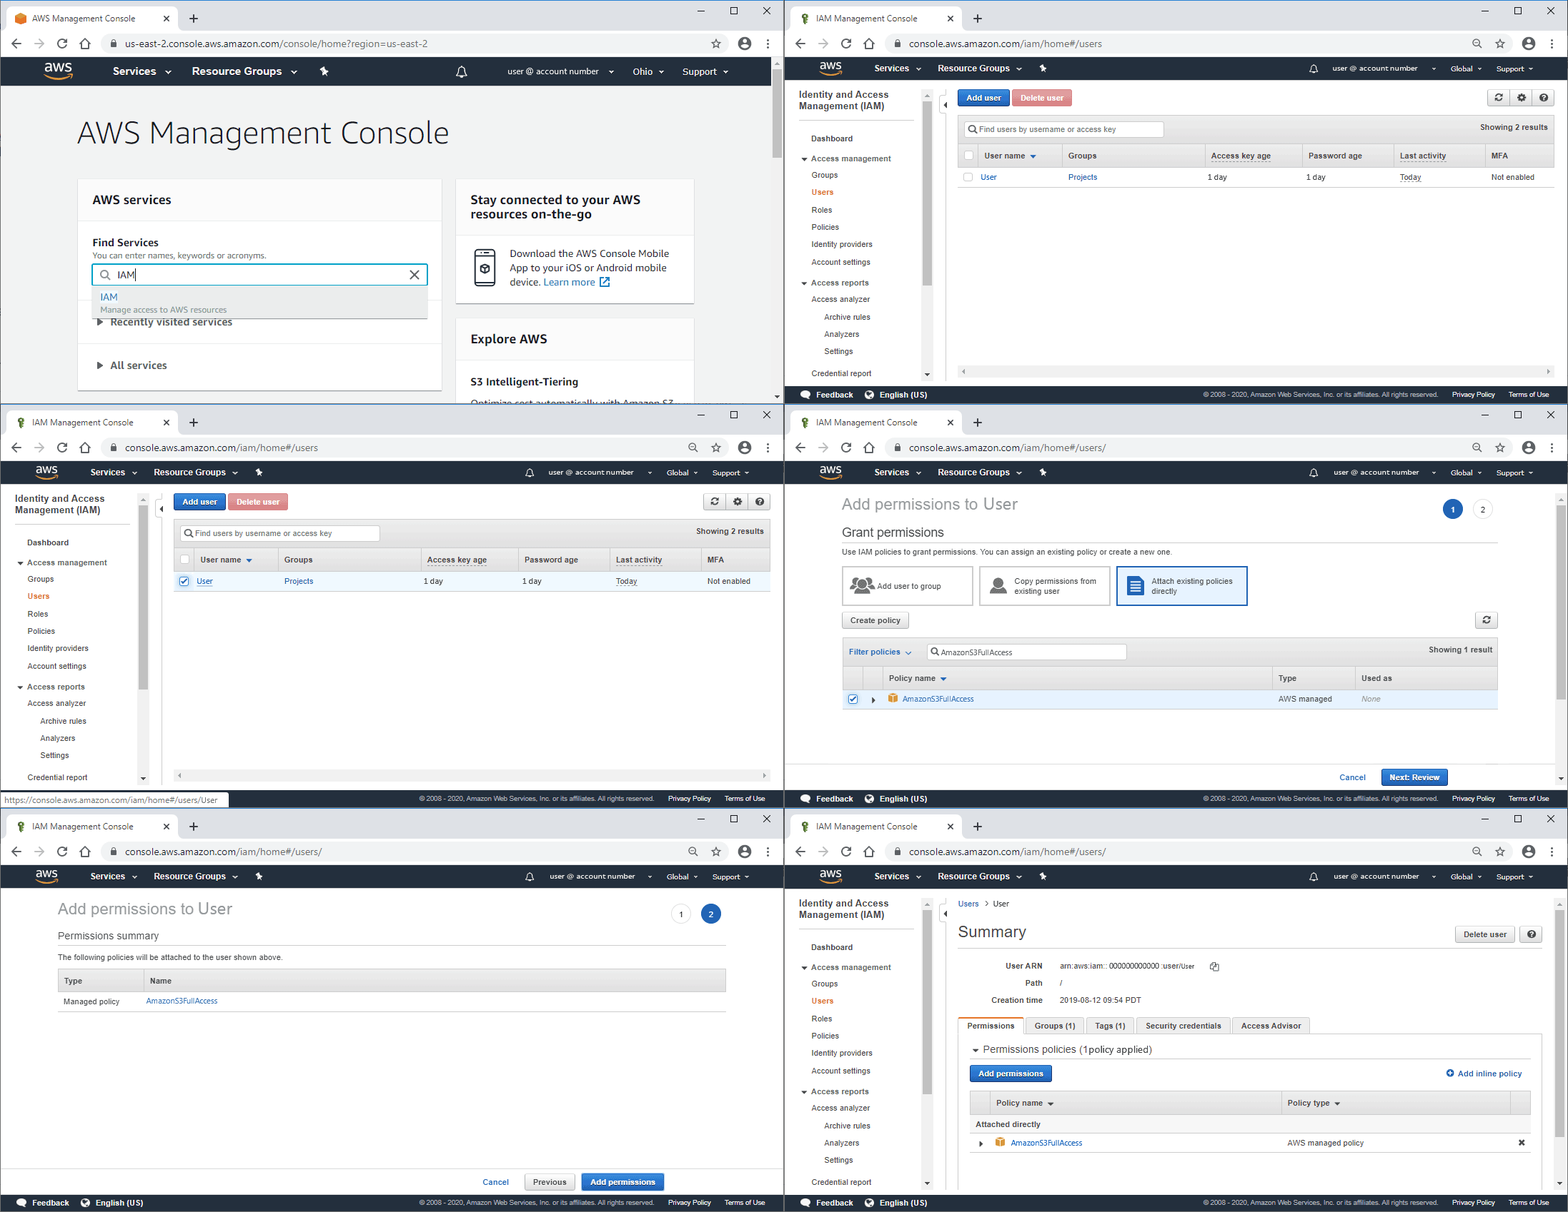
Once logged in, search for the IAM service to manage users’ access to AWS resources. Then go to the Users tab and click on one of the desired user name.
登录后,搜索IAM服务以管理用户对AWS资源的访问。 然后转到“ 用户”选项卡,然后单击所需的用户名之一。
Click the “Add permissions” button. Select the “Attach existing policies directly” option and type in “AmazonS3FullAccess”.
点击“添加权限”按钮。 选择“直接附加现有策略”选项,然后输入“ AmazonS3FullAccess”。
Select the policy “AmazonS3FullAccess” and then the “Next:Review” button at the bottom of the page. The Permissions summary page will appear and click the “Add permissions” button at the bottom of the page.
选择策略“ AmazonS3FullAccess”,然后选择页面底部的“下一步:查看”按钮。 将显示“权限摘要”页面,然后单击页面底部的“添加权限”按钮。
You will then be redirected to the User summary page with “AmazonS3FullAccess” listed under Permission policies.
然后,您将使用权限策略下列出的“ AmazonS3FullAccess”重定向到“用户摘要”页面。
创建一组访问密钥 (Create a set of access keys)
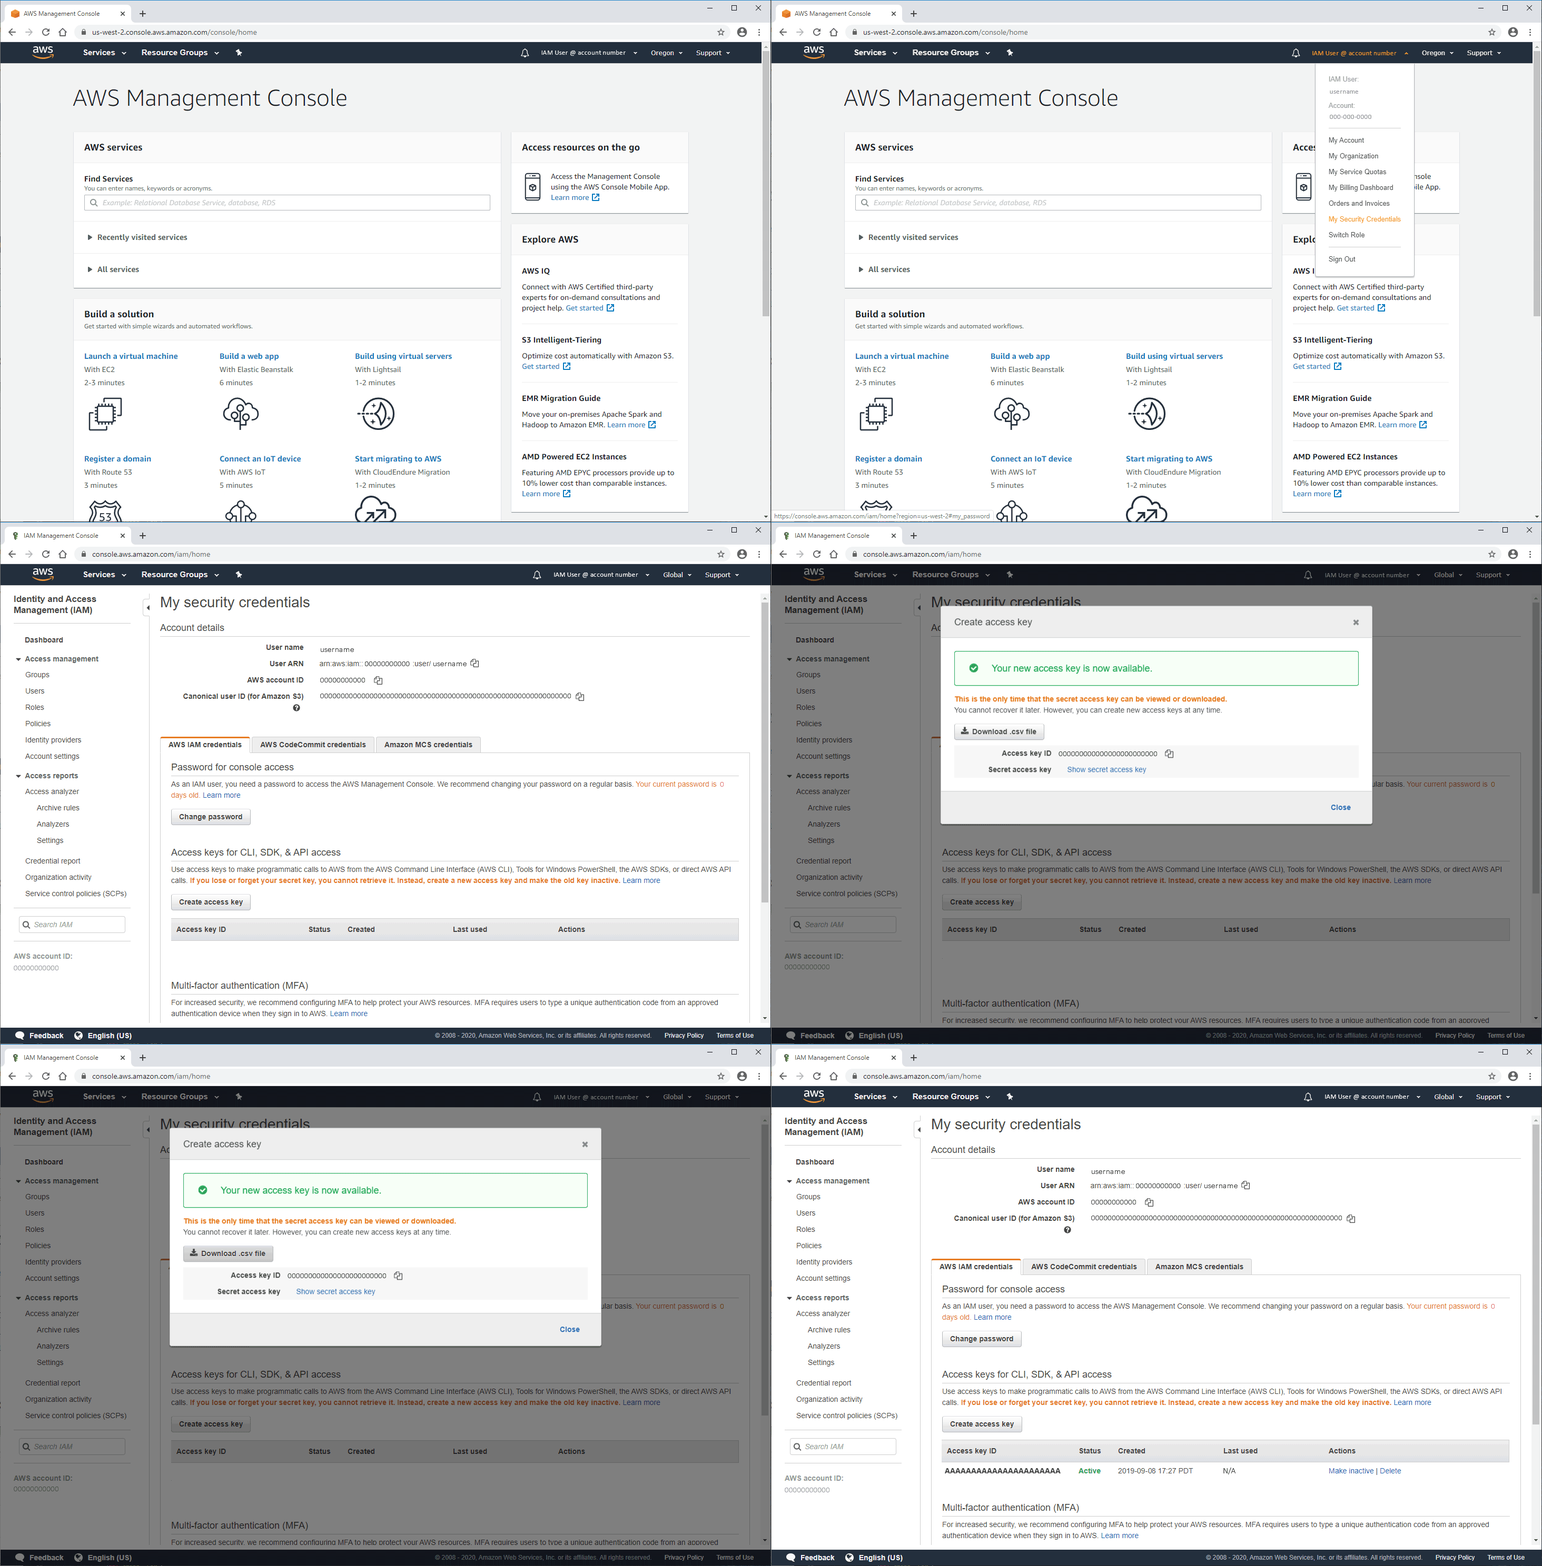
Click on your user name at the top of the page and in the drop down menu select “My Security Credentials”. Find “Access keys for CLI, SDK, & API access” then click on the “Create access key” button.
单击页面顶部的用户名,然后在下拉菜单中选择“我的安全证书”。 找到“用于CLI,SDK和API访问的访问键”,然后单击“创建访问键”按钮。
You will then see a popup that states “Your new access key is now available” with two keys listed below. The first is the Access key ID and the second is the Secret access key.
然后,您将看到一个弹出窗口,指出“您的新访问密钥现在可用”,下面列出了两个密钥。 第一个是访问密钥ID,第二个是秘密访问密钥。
Click the “Download .csv file” button and save the access keys in a safe location on your computer. You can only view the secret key once in this popup so make sure to download the .csv file before closing the menu.
单击“下载.csv文件”按钮,然后将访问密钥保存在计算机上的安全位置。 在此弹出窗口中,您只能查看一次密钥,因此请确保在关闭菜单之前下载.csv文件 。
If you already have a set of access keys, there is no need to create another set. If you’ve misplaced old access keys, create a new set.
如果您已经有一组访问密钥,则无需创建另一组访问密钥。 如果您放错了旧的访问密钥,请创建一个新的密钥。
创建一个S3存储桶 (Create an S3 bucket)
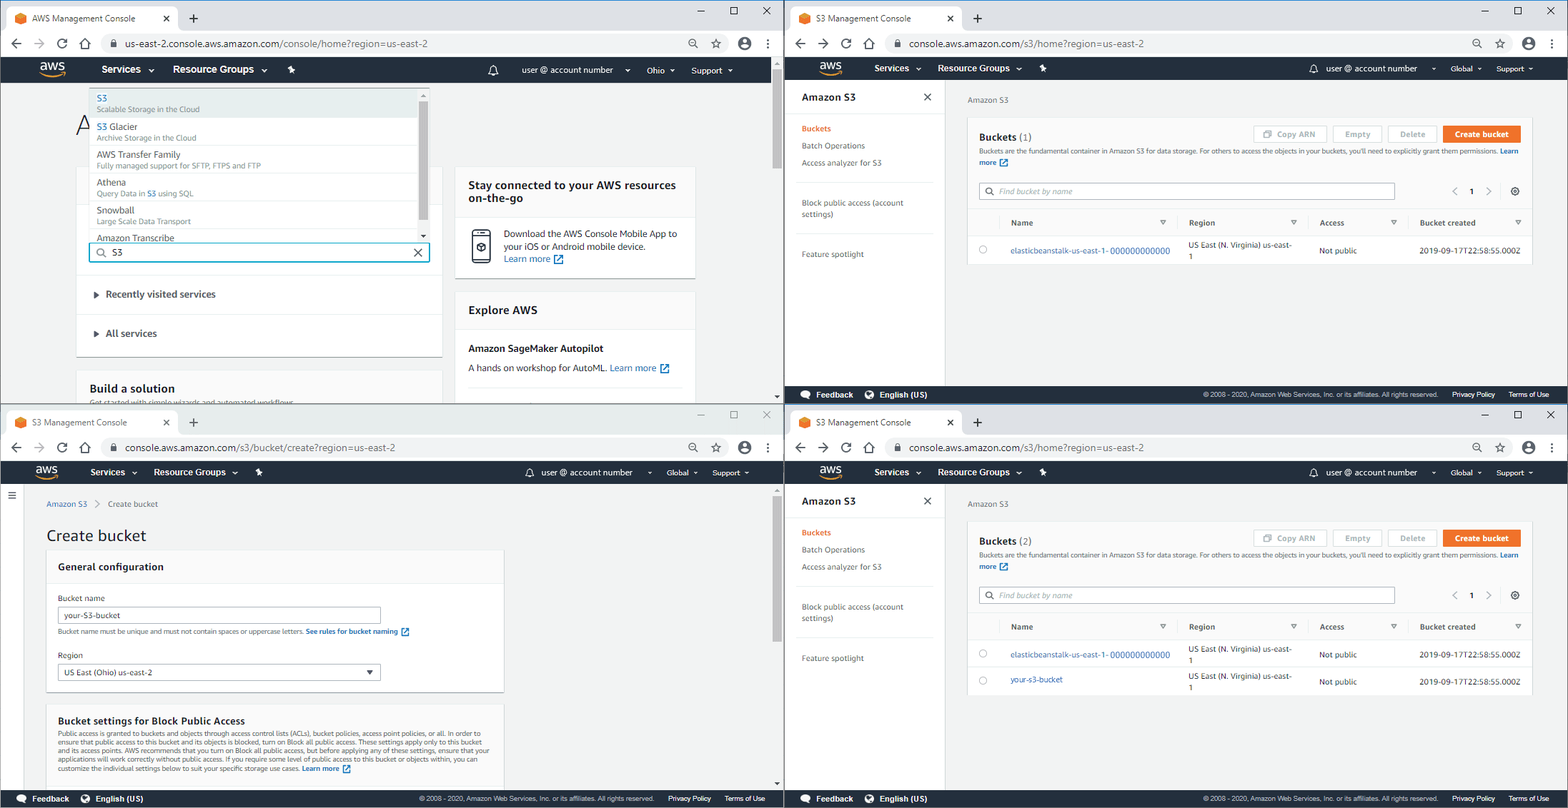
Return back to the AWS Management Console and search for the S3 service to manage data storage. Once on the page, click the “Create bucket” button at the top of the page.
返回AWS管理控制台并搜索S3服务以管理数据存储。 进入页面后,点击页面顶部的“创建存储桶”按钮。
Under General configuration, name the bucket something related to your website so it is easily identifiable. For region, select your region of choice. Leave everything else as the default.
在常规配置下 ,为存储桶命名与您的网站相关的名称,以便于识别。 对于区域,请选择您所选择的区域。 将其他所有内容保留为默认值。
Under Bucket settings for Block Public Access, make sure “Block all public access” is selected.
在“阻止公共访问权限”的存储桶设置下,确保选中“阻止所有公共访问权限”。
为S3存储桶添加CORS权限 (Add CORS permissions for the S3 bucket)
When your project is deployed, the Django admin will load stylesheets and files from the CloudFront domain, a different source than the deployed domain. This will cause a CORS or a cross-origin resource sharing error.
部署项目后,Django管理员将从CloudFront域加载样式表和文件,CloudFront域的来源与部署的域不同。 这将导致CORS或跨域资源共享错误。
To prevent this, select the bucket and go to the Permissions tab. Select the button “CORS configuration” and add the following. Replace the Allowed Origin with your production domain.
为防止这种情况,请选择存储桶并转到“ 权限”选项卡。 选择按钮“ CORS配置”并添加以下内容。 用您的生产域替换“允许的来源”。
<?xml version="1.0" encoding="UTF-8"?><CORSConfiguration xmlns="http://s3.amazonaws.com/doc/2006-03-01/"><CORSRule> <AllowedOrigin>https://your-domain.com</AllowedOrigin> <AllowedMethod>PUT</AllowedMethod> <AllowedMethod>POST</AllowedMethod> <AllowedMethod>DELETE</AllowedMethod> <AllowedHeader>*</AllowedHeader></CORSRule><CORSRule> <AllowedOrigin>*</AllowedOrigin> <AllowedMethod>GET</AllowedMethod></CORSRule></CORSConfiguration>The configurations will look like this in your browser. Be sure to save the changes.
配置将在您的浏览器中如下所示。 确保保存更改。

将您的S3存储桶连接到CloudFront域 (Connect your S3 bucket to a CloudFront domain)
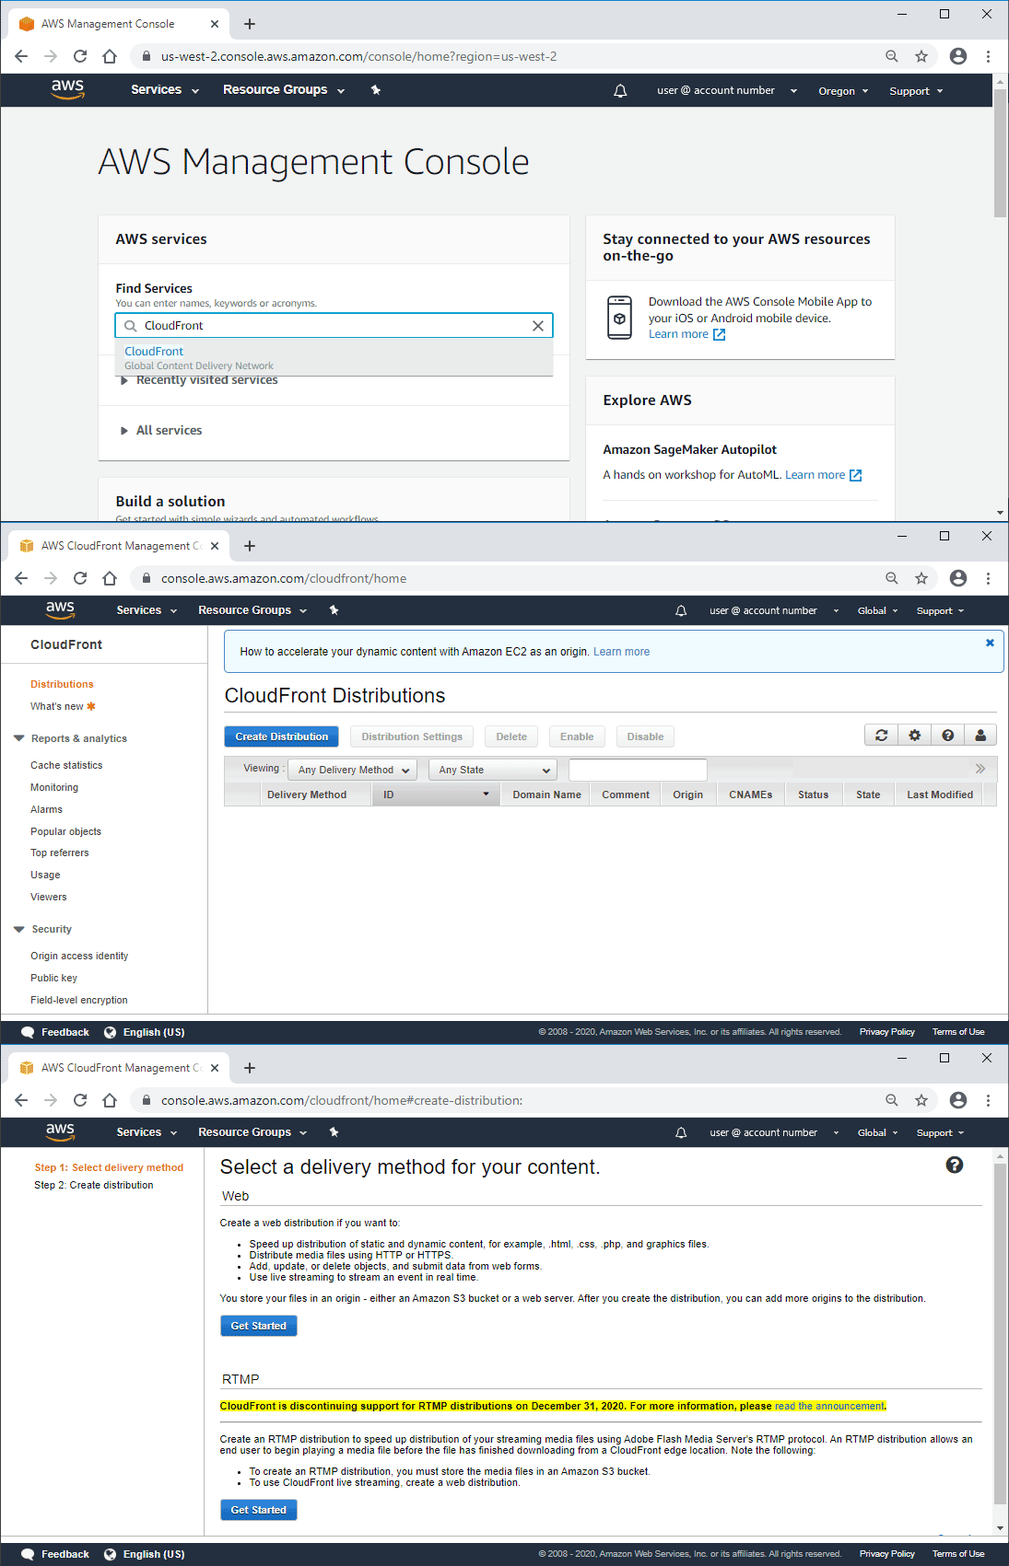
Return back to the AWS Management Console and search for the CloudFront service to serve your images hosted in a S3 bucket.
返回AWS管理控制台 ,搜索CloudFront服务以提供S3存储桶中托管的映像。
Under the Distributions tab, click the “Create Distribution” button.
在“ 分发”选项卡下,单击“创建分发”按钮。
Select the Web distribution delivery method for your content.
选择内容的Web分发交付方式。
Under Origin Settings:
在原点设置下 :
Select the name of your S3 bucket for Origin Domain Name.
为原始域名选择S3存储桶的名称。
Then select “Yes” for Restrict Bucket Access.
然后为“ 限制存储区访问 ”选择“是”。
For Origin Access Identify, select “Create a New Identify”. The Comment field should then auto populate with an access identity based on your S3 bucket name. If your CloudFront distribution was created before hand, you can select “Use an Existing Identity” and select your Identify from the dropdown menu (see image below).
对于“ 原始访问标识” ,选择“创建新的标识”。 然后,“ 注释”字段应根据您的S3存储桶名称自动填充访问标识。 如果您的CloudFront的分布手之前创建的,则可以选择“使用现有的身份”,然后从下拉菜单中选择确定 (见下图)。
For Grant Read Permissions on Bucket select “Yes”.
对于“ 存储桶上的授予读取权限”,选择“是”。
Keep everything else as the default in this section.
在本节中将其他所有内容保留为默认设置。

配置您的CloudFront域以接受CORS (Configure your CloudFront domain to accept CORS)
We have already added the CORS configurations to the S3 bucket, let’s do the same for CloudFront.
我们已经将CORS配置添加到了S3存储桶中,让我们对CloudFront进行相同的配置。
Under Default Cache Behavior Settings:
在“ 默认缓存行为设置”下 :
Change Allowed HTTP Methods to “GET, HEAD, OPTIONS”.
将“ 允许的HTTP方法 ”更改为“ GET,HEAD,OPTIONS”。
Select “Whitelist” for Cache Based on Selected Request Headers.
根据选定的请求标头为缓存选择“白名单”。
Click “Use legacy cache settings” for the Cache and origin request settings option
单击“使用旧版缓存设置”作为“ 缓存和原始请求设置”选项
Now, under the new option Cache Based on Selected Request Headers, select “Whiltelist” from the dropdown menu.
现在,在新选项“ 基于选定的请求头缓存 ”下,从下拉菜单中选择“ Whiltelist”。
For Whitelist Headers type “Access-Control-Allow-Origin” and click the “Add Custom >>” button for it to appear as whitelisted.
对于白名单标题,键入“ Access-Control-Allow-Origin”,然后单击“ Add Custom >>”按钮,将其显示为白名单。
Keep everything else as the default.
将其他所有内容保留为默认值。
Click “Create Distribution” at the bottom of the page to create the CloudFront distribution.
单击页面底部的“创建分发”以创建CloudFront分发。

The Distribution will then be created and start deploying. This will take a few minutes.
然后将创建发行版并开始部署。 这将需要几分钟。
While you wait, you can go to the next step and update the Django project settings.
等待期间,您可以转到下一步并更新Django项目设置。
Take note of the Domain Name given to the distribution. You will need to add this to your Django project in a few minutes.
记下分配给分发的域名 。 您需要在几分钟内将其添加到Django项目中。

安装AWS开发工具包和自定义Django存储后端 (Install the AWS SDK and the custom Django storage backend)
macOS Terminal
macOS终端
(env)User-Macbook:mysite user$ pip install boto3(env)User-Macbook:mysite user$ pip install django-storagesWindows Command Prompt
Windows命令提示符
(env) C:\Users\Owner\desktop\code\env\mysite>pip install boto3(env) C:\Users\Owner\desktop\code\env\mysite>pip install django-storagesOpen the CLI with your Django project and install the following Python packages: pip install boto3 and pip install django-storages. These packages will make it easier to upload and connect to your AWS S3 bucket and CloudFront distribution.
使用Django项目打开CLI,然后安装以下Python软件包: pip install boto3和pip install django-storages pip install boto3 。 这些软件包将使上传和连接到您的AWS S3存储桶和CloudFront分发更加容易。
将存储包添加到已安装的应用程序 (Add the storages package to installed apps)
env > mysite > main > settings.py
env> mysite> main> settings.py
# Application definitionINSTALLED_APPS = [ 'main.apps.MainConfig', ... ... 'storages',]Once the installations are complete, open settings.py and add storages to INSTALLED_APPS.
安装完成后,打开settings.py并将storages添加到INSTALLED_APPS 。
将静态配置添加到settings.py (Add the static configurations to settings.py)
env > mysite > mysite > settings.py
env> mysite> mysite> settings.py
# Static files (CSS, JavaScript, Images)# https://docs.djangoproject.com/en/2.1/howto/static-files/# STATIC_URL = '/static/'# STATICFILES_DIRS = [# os.path.join(BASE_DIR, 'static'),# ]AWS_ACCESS_KEY_ID = 'your-access-key-id'AWS_SECRET_ACCESS_KEY = 'your-secret-access-key'AWS_STORAGE_BUCKET_NAME = 'your-S3-bucket'AWS_S3_CUSTOM_DOMAIN = 'your-cloudfront-domain'AWS_LOCATION = 'static'STATICFILES_STORAGE = 'storages.backends.s3boto3.S3Boto3Storage'STATIC_URL = 'https://%s/%s/' % (AWS_S3_CUSTOM_DOMAIN, AWS_LOCATION)STATICFILES_DIRS = [ os.path.join(BASE_DIR, 'static'),]Comment out the original STATIC_URL and STATICFILES_DIRS.
注释掉原始的STATIC_URL和STATICFILES_DIRS 。
Then add the AWS configuration settings to the bottom of settings.py. Replaced the AWS Access key ID, Secret access key, AWS storage bucket name, and AWS S3 custom domain with your own AWS account information. Everything else can remain the same.
然后添加AWS配置设置settings.py的底部。 用您自己的AWS账户信息替换了AWS Access密钥ID,秘密访问密钥,AWS存储桶名称和AWS S3自定义域。 其他所有内容都可以保持不变。
As you can see there is sensitive configuration information, like your AWS access keys, located in this file. We highly recommend using Python Decouple to separate and secure this information.
如您所见,此文件中有敏感的配置信息,例如您的AWS访问密钥。 我们强烈建议使用Python Decouple来分隔和保护此信息。
添加媒体上传位置 (Add the media upload location)
env > mysite > mysite > (New File) storage_backends.py
env> mysite> mysite>(新文件)storage_backends.py
from storages.backends.s3boto3 import S3Boto3Storageclass MediaStorage(S3Boto3Storage): location = 'media' file_overwrite = TrueIf you created a media folder in your Django project, add a new file called storage_backends.py to the same folder containing settings.py.
如果您在Django项目中创建了一个媒体文件夹,请将一个名为storage_backends.py的新文件添加到包含settings.py的同一文件夹中。
Import boto3 configurations at the top of the page then create a media storage class. Specify the location of the media uploads and all file overwrite to prevent duplicate uploads. Save the file.
在页面顶部导入boto3配置,然后创建媒体存储类。 指定媒体上载的位置,并覆盖所有文件以防止重复上载。 保存文件。
将媒体配置添加到settings.py (Add the media configurations to settings.py)
env > mysite > mysite > settings.py
env> mysite> mysite> settings.py
# Static files (CSS, JavaScript, Images)# https://docs.djangoproject.com/en/2.1/howto/static-files/# STATIC_URL = '/static/'# MEDIA_URL = '/media/'# MEDIA_ROOT = os.path.join(BASE_DIR, 'media')AWS_ACCESS_KEY_ID = 'your-access-key-id'AWS_SECRET_ACCESS_KEY = 'your-secret-access-key'AWS_STORAGE_BUCKET_NAME = 'your-S3-bucket'AWS_S3_CUSTOM_DOMAIN = 'your-cloudfront-domain'AWS_LOCATION = 'static'STATICFILES_STORAGE = 'storages.backends.s3boto3.S3Boto3Storage'DEFAULT_FILE_STORAGE = 'mysite.storage_backends.MediaStorage' #add the media storage configurations to the settings.pySTATIC_URL = '/static/'STATICFILES_DIRS = [ os.path.join(BASE_DIR, 'static'),]If you configured media uploads, return back to settings.py and comment out MEDIA_URL and MEDIA_ROOT.
如果您配置了媒体上传,请返回settings.py并注释掉MEDIA_URL和MEDIA_ROOT 。
Then add the media assets configurations to the settings (i.e. 'mysite.storage_backends.MediaStorage').
然后将媒体资产配置添加到设置(即'mysite.storage_backends.MediaStorage' )。
There is no need to add this configuration if you are not uploading media files.
如果您不上传媒体文件,则无需添加此配置。
收集静态文件 (Collect the static files)
macOS Terminal
macOS终端
(env)User-Macbook:mysite user$ python manage.py collectstaticYou have requested to collect static files at the destinationlocation as specified in your settings: ...This will overwrite existing files!Are you sure you want to do this?Type 'yes' to continue, or 'no' to cancel: yesWindows Command Prompt
Windows命令提示符
(env)C:\Users\Owner\desktop\code\env\mysite> py manage.py collectstaticYou have requested to collect static files at the destinationlocation as specified in your settings: ...This will overwrite existing files!Are you sure you want to do this?Type 'yes' to continue, or 'no' to cancel: yesOpen the CLI again and run collectstatic to gather all of the static files to be served from the S3 bucket.
再次打开CLI,然后运行collectstatic来收集要从S3存储桶提供的所有静态文件。
Type yes when prompted.
出现提示时键入yes 。
Then wait for all of the static files will now uploaded to the S3 bucket.
然后等待所有静态文件立即上传到S3存储桶。
在mysite> urls.py中删除/注释if语句 (Delete/comment out the if statement in mysite > urls.py)
Before you can run the server again, you need to go into the mysite > urls.py and delete or comment out the if statement for media uploads.
在再次运行服务器之前,您需要进入mysite> urls.py并删除或注释掉if语句以进行媒体上载。
If you never configured your Django project for media uploads you can skip this step.
如果您从未为媒体上传配置Django项目,则可以跳过此步骤。
"""mysite URL ConfigurationThe `urlpatterns` list routes URLs to views. For more information please see: https://docs.djangoproject.com/en/2.1/topics/http/urls/Examples:Function views 1. Add an import: from my_app import views 2. Add a URL to urlpatterns: path('', views.home, name='home')Class-based views 1. Add an import: from other_app.views import Home 2. Add a URL to urlpatterns: path('', Home.as_view(), name='home')Including another URLconf 1. Import the include() function: from django.urls import include, path 2. Add a URL to urlpatterns: path('blog/', include('blog.urls'))"""from django.contrib import adminfrom django.urls import path, include# from django.conf import settings # from django.conf.urls.static import static urlpatterns = [ path('', include ('main.urls')), path('admin/', admin.site.urls),]# if settings.DEBUG: #add this# urlpatterns += static(settings.MEDIA_URL, document_root=settings.MEDIA_ROOT)查看从存储桶中投放的静态资产 (View the static asset served from the bucket)
Now you can run your server again.
现在,您可以再次运行服务器。
All of the static image URLs have not been changed. They are still called using the template tag {% static ‘img/example.png’ %}. But if you inspect the image in the browser, you will notice that it is serving from https://your-cloudfront-domain/static/img/example.png.
所有静态图像URL均未更改。 仍使用模板标签{%static'img / example.png'%}来调用它们。 但是,如果您在浏览器中检查图像,则会注意到该图像是从https://your-cloudfront-domain/static/img/example.png提供的 。
Now go to your media upload location and select a media file to upload. Upload a file and it should now be uploaded to your S3 bucket rather than media folder in your projects’s root directory.
现在转到媒体上载位置,然后选择要上载的媒体文件。 上载文件,现在应该将其上载到项目的根目录中的S3存储桶中,而不是上载到媒体文件夹中。
Then go to where your media file is rendering and inspect it. Although it is being called with the Django Template Language, it is serving from https://your-S3-bucket.s3.amazonaws.com/media/images/example.png.
然后转到您的媒体文件正在渲染的位置并进行检查。 尽管使用Django模板语言来调用它,但它是从https://your-S3-bucket.s3.amazonaws.com/media/images/example.png提供的 。
Originally published at https://www.ordinarycoders.com.
最初发布在 https://www.ordinarycoders.com上 。
翻译自: https://levelup.gitconnected.com/serve-django-static-and-media-files-in-production-348fe6c7781d
http://www.taodudu.cc/news/show-5365109.html
相关文章:
- POJ 3463 Sightseeing dijkstra
- poj3436——ACM Computer Factory
- python创建icon图标
- 1、小兔鲜icon图标制作
- html的小图标组件,JS组件系列之Bootstrap Icon图标选择组件
- 关于换了固态硬盘后装系统的两三事
- 换了固态硬盘需要重装系统吗?教你如何实现不重装系统!
- 固态硬盘+机械硬盘结合的笔记本的重装系统的方法
- windows安装第二个固态硬盘时重装系统的问题
- java全文检索word中的内容_对服务器上所有Word文件做全文检索的解决方案-Java
- Java使用模板导出Word文档
- java 使用xml生成word_Java+freemaker+xml生成word模板
- qt5_c++工业上位机自动扫码数据追溯
- 生鲜追溯超市达355家 扫二维码知道谁种的(中国商业重追溯管理平台)
- 古典密码学--移位密码
- 追溯查询系统-PDA扫码机无线手持追溯,产品跟踪
- 二维码追溯有什么作用 ?如何实现一物一码呢?
- 运动控制激光刻码扫码追溯源代码 生产实战源代码
- python字节码转换_python字节码(转)
- JAVA毕设项目双河市北疆红提追溯系统(java+VUE+Mybatis+Maven+Mysql)
- Http状态码 错误原因及解决方式(全)
- [码上追溯] vue项目启动出现cannot GET /服务错误
- 信息追溯系统为气瓶上“身份码”,守护居民的用气安全
- 【MODIS数据处理#15】分享一个自制的MODIS数据处理工具箱
- 大数据处理工具有哪些?
- 盘点:大数据处理必备的十大工具
- hbase 2.4 java.lang.NoSuchMethodError: java.nio.ByteBuffer.rewind()Ljava/nio/ByteBuffer
- eGalax电阻屏的Touch驱动
- C++使用IUIAutomation在Windows XP SP3中的问题
- 黑武器linux下载地址,酷毙了!暗黑版 Arch,BlackArch Linux 2017.03.01发布
在生产中提供Django静态和媒体文件相关推荐
- Django静态文件处理、中间件及Admin站点
Django静态文件处理.中间件及Admin站点 文章目录 Django静态文件处理.中间件及Admin站点 一.静态文件 1.简介 2.示例 3.配置静态文件 二.中间件 1.简介 2.示例 3.异 ...
- Django静态文件的管理
Django静态资源的路径主要通过STATIC_URL和STATICFILES_DIRS来设置,由此实现不同的管理方式. 管理方式 Django中管理静态资源一般有两种方式. 第一种是在每个应用(ap ...
- django媒体文件上传设置
setting.py STATIC_URL = '/static/' STATICFILES_DIRS=(os.path.join(BASE_DIR,"static"), ) ME ...
- 解决Django静态文件配置pycharm高光问题
就困扰了我半天的Django静态文件配置问题 更改了setting 文件后 文件参考问题总会高亮让然觉得又错误怪怪的 所以索性直接眼不见心不烦 具体操作如下图: 就这样就可以啦 大功告成! 也顺便提一 ...
- Django 静态文件处理
Django 静态文件处理 前言 配置 staticfiles STATIC_URL STATICFILES_DIRS STATIC_ROOT 前言 Django的静态文件不能像html那样直接放上图 ...
- 在生产中使用Java 11:需要了解的重要事项
来源:SpringForAll社区 如果您正考虑更新最新版本的Java,阅读本文以了解有关Oracle Java 11的最重要信息. 如果您及时了解Java社区的新闻,您可能听说Oracle改变了他们 ...
- mlflow_在生产中设置MLflow
mlflow This is the first article in my MLflow tutorial series: 这是我的MLflow教程系列的第一篇文章: Setup MLflow in ...
- ios开发 c语言打包.a文件,【转】IOS静态库a文件制作流程
原文网址:http://www.jianshu.com/p/3439598ea61f 1.新建Cocoa Touch Static Library工程 新建工程 2.Xcode的参数设置 " ...
- 读书笔记{11} VLAN及其在生产中的应用
1 LAN 简介 LAN,Local Area Network,直译为本地区域网,可能是因为为了方便传播,大家基本上都叫它局域网,既然大家都这么叫,如果我们搞特例那就是不明智了. 局域网这个词的侧重其 ...
最新文章
- Commons IO
- 高防服务器租用:DDoS保护关键主题与防御保护性质
- 【正一专栏】齐达内能熬过2018年的春天吗?
- numpy.empty详解
- ubuntu导入python的包_在ubuntu环境下怎么利用python将数据批量导入数据hbase
- select count(*)底层究竟干了啥么?
- 【转载】安卓开发者在使用deepin15.4时可能会遇到的问题
- CVPR 2019 | 近日新出论文汇总(含视频目标分割、GAN、度量学习、高效语义分割等主题)...
- Mybatis的动态拼接条件
- 虚拟机使用桥接模式设置Linux静态IP
- Leetcode 817.链表组件
- tomcat下部署activemq(转)
- 2021-08-22监听器实现在线客户端统计
- 椭圆形中间一个大写的v_Shift键在 Word 中的 9 个经典操作,第一个你可能就不知道!【Word教程】...
- jdk 6u45 下载地址
- cdrx8如何批量导出jpg_Coreldraw/CDR X8 存低版本打开问题 – 数码打印破图 – Coreldraw/CDR软件崩溃 – 渐变导位图角度变了...
- RestClient查询文档
- 大数据中数据清理怎么做的_大数据清洗的方法 数据清洗的基本流程 | 星云联动...
- 在ubuntu16.04上安装suitecrm
- springboot导出pdf文件(简历)
