使用Pytorch的LSTM文本分类

介绍 (Intro)
Welcome to this tutorial! This tutorial will teach you how to build a bidirectional LSTM for text classification in just a few minutes. If you haven’t already checked out my previous article on BERT Text Classification, this tutorial contains similar code with that one but contains some modifications to support LSTM. This article also gives explanations on how I preprocessed the dataset used in both articles, which is the REAL and FAKE News Dataset from Kaggle.
欢迎使用本教程! 本教程将教您如何在短短几分钟内构建用于文本分类的双向LSTM 。 如果您还没有签出我以前关于BERT文本分类的文章,那么本教程将包含与该文章相似的代码,但会进行一些修改以支持LSTM。 本文还提供了有关如何预处理这两篇文章中使用的数据集的说明,这是来自Kaggle 的REAL和FAKE News数据集 。
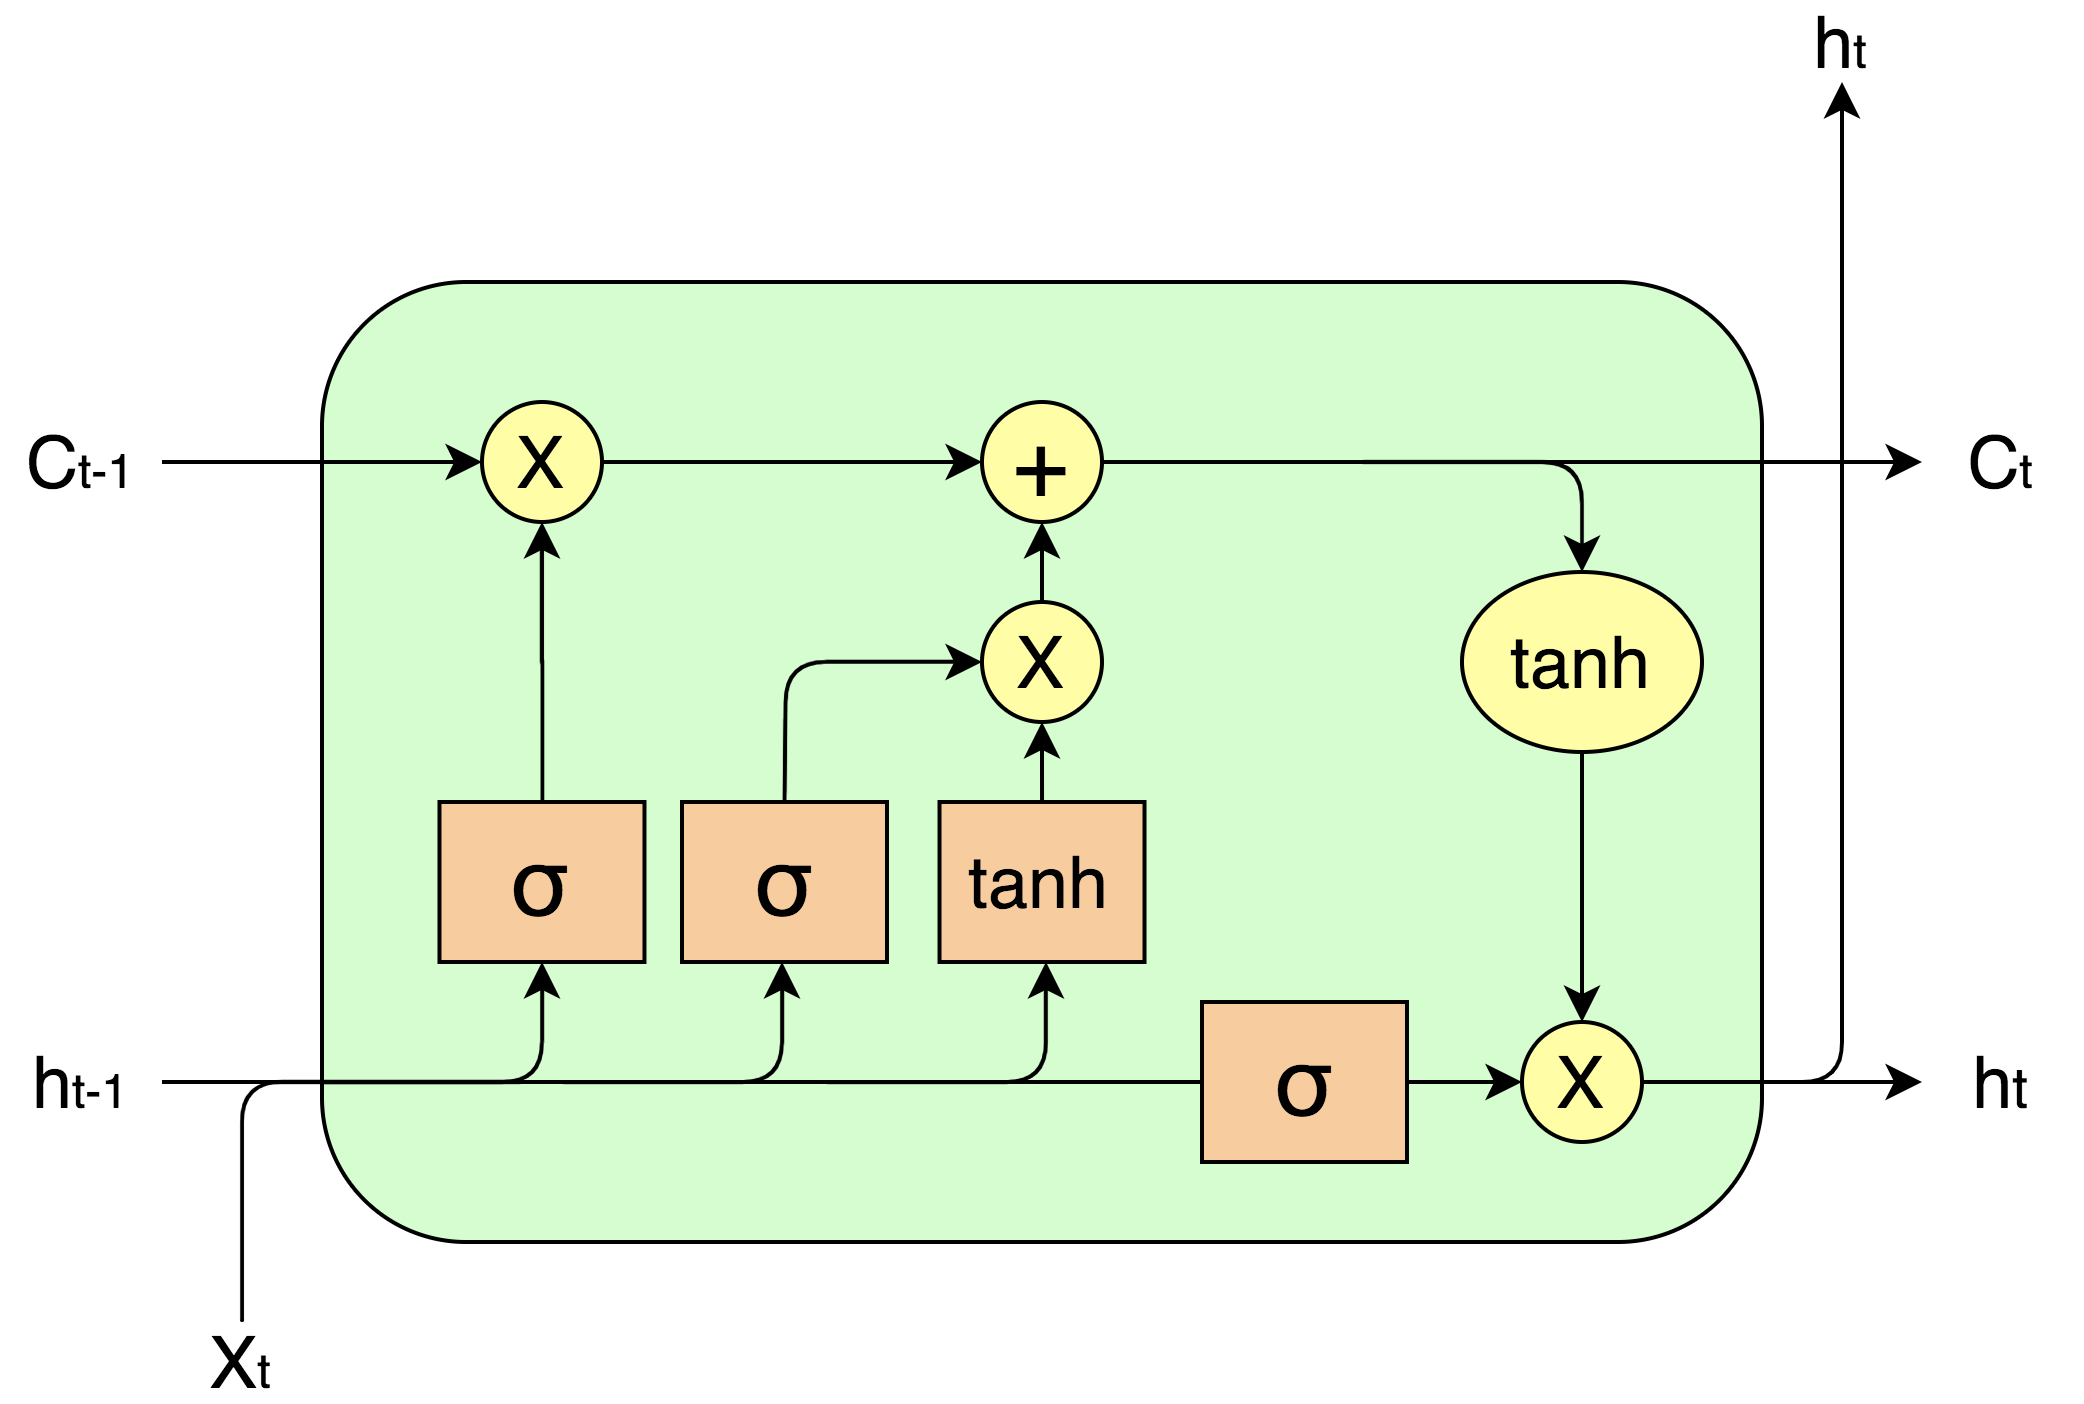
First of all, what is an LSTM and why do we use it? LSTM stands for Long Short-Term Memory Network, which belongs to a larger category of neural networks called Recurrent Neural Network (RNN). Its main advantage over the vanilla RNN is that it is better capable of handling long term dependencies through its sophisticated architecture that includes three different gates: input gate, output gate, and the forget gate. The three gates operate together to decide what information to remember and what to forget in the LSTM cell over an arbitrary time.
首先,什么是LSTM?为什么要使用它? LSTM代表长期短期记忆网络 ,它属于较大的神经网络类别,称为递归神经网络(RNN) 。 与香草RNN相比,它的主要优点是它具有复杂的体系结构,能够更好地处理长期依赖性,该体系结构包括三个不同的门:输入门,输出门和遗忘门。 这三个门共同操作,以决定在任意时间内在LSTM单元中要记住哪些信息和要忘记哪些信息。
Now, we have a bit more understanding of LSTM, let’s focus on how to implement it for text classification. The tutorial is divided into the following steps:
现在,我们对LSTM有了更多的了解,让我们集中于如何为文本分类实现它。 本教程分为以下步骤:
- Preprocess Dataset
预处理数据集 - Importing Libraries
导入库 - Load Dataset
加载数据集 - Build Model
建立模型 - Training
训练 - Evaluation
评价
Before we dive right into the tutorial, here is where you can access the code in this article:
在我们直接学习本教程之前,您可以在这里访问本文中的代码:
Preprocessing of Fake News Dataset
假新闻数据集的预处理
LSTM Text Classification Google Colab
LSTM文本分类Google Colab
步骤1:预处理数据集 (Step 1: Preprocess Dataset)
The raw dataset looks like the following:
原始数据集如下所示:
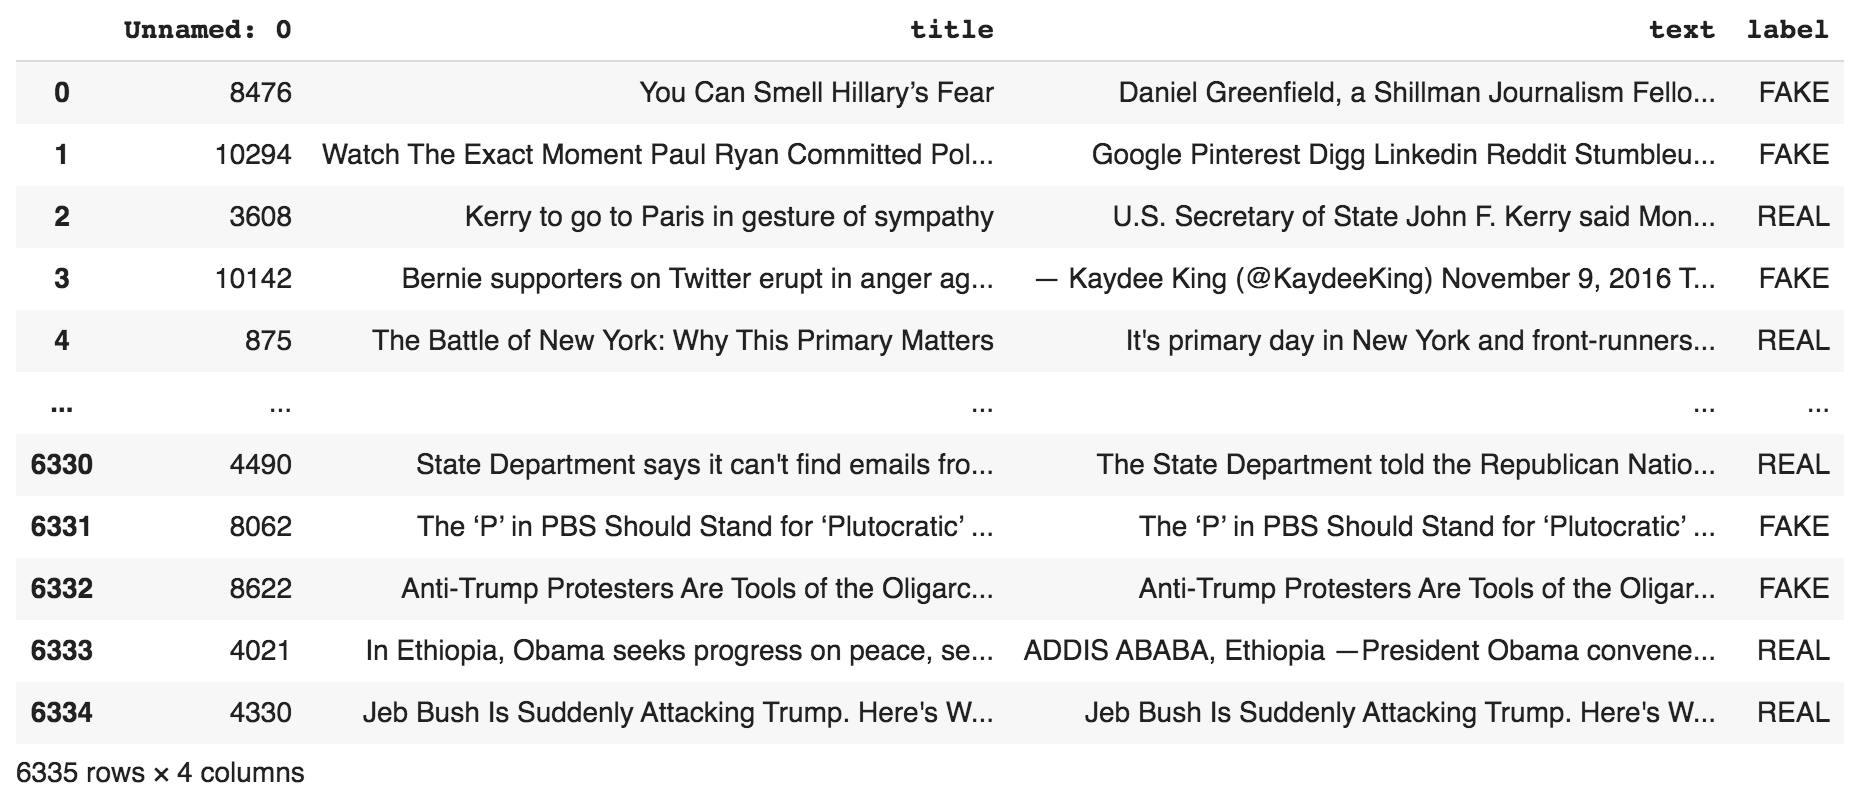
The dataset contains an arbitrary index, title, text, and the corresponding label.
数据集包含任意索引,标题,文本和相应的标签。
For preprocessing, we import Pandas and Sklearn and define some variables for path, training validation and test ratio, as well as the trim_string function which will be used to cut each sentence to the first first_n_words words. Trimming the samples in a dataset is not necessary but it enables faster training for heavier models and is normally enough to predict the outcome.
对于预处理,我们导入Pandas和Sklearn并定义一些变量,用于路径,训练验证和测试比率,以及trim_string函数,该函数将每个句子剪切为第一个first_n_words单词。 修剪数据集中的样本不是必需的,但是它可以为较重的模型提供更快的训练,并且通常足以预测结果。
Next, we convert REAL to 0 and FAKE to 1, concatenate title and text to form a new column titletext (we use both the title and text to decide the outcome), drop rows with empty text, trim each sample to the first_n_words , and split the dataset according to train_test_ratio and train_valid_ratio. We save the resulting dataframes into .csv files, getting train.csv, valid.csv, and test.csv.
接下来,我们将REAL转换为0,将FAKE转换为1,将标题和文本连接起来以形成新的列标题 文本 (我们使用标题和文本来确定结果),删除带有空文本的行,将每个样本修剪为first_n_words ,然后根据train_test_ratio和train_valid_ratio分割数据集。 我们将结果数据帧保存到.csv文件中,获得train.csv , valid.csv和test.csv 。
步骤2:导入库 (Step 2: Importing Libraries)
We import Pytorch for model construction, torchText for loading data, matplotlib for plotting, and sklearn for evaluation.
我们导入Pytorch用于模型构建,torchText用于加载数据,matplotlib用于绘图,而sklearn用于评估。
步骤3:载入资料集 (Step 3: Load Dataset)
First, we use torchText to create a label field for the label in our dataset and a text field for the title, text, and titletext. We then build a TabularDataset by pointing it to the path containing the train.csv, valid.csv, and test.csv dataset files. We create the train, valid, and test iterators that load the data, and finally, build the vocabulary using the train iterator (counting only the tokens with a minimum frequency of 3).
首先,我们使用torchText为数据集中的标签创建一个标签字段,并为title , text和titletext创建一个文本字段。 然后,我们通过将TabularDataset指向包含train.csv , valid.csv和test.csv数据集文件的路径来构建它。 我们创建用于加载数据的训练迭代器,有效迭代器和测试迭代器,最后,使用训练迭代器构建词汇表(仅计算最小频率为3的令牌)。
步骤4:建立模型 (Step 4: Build Model)
We construct the LSTM class that inherits from the nn.Module. Inside the LSTM, we construct an Embedding layer, followed by a bi-LSTM layer, and ending with a fully connected linear layer. In the forward function, we pass the text IDs through the embedding layer to get the embeddings, pass it through the LSTM accommodating variable-length sequences, learn from both directions, pass it through the fully connected linear layer, and finally sigmoid to get the probability of the sequences belonging to FAKE (being 1).
我们构造了从nn.Module继承的LSTM类。 在LSTM内部,我们构造了一个Embedding层,然后是bi-LSTM层,最后是一个完全连接的线性层。 在Forward函数中,我们将文本ID穿过嵌入层以获取嵌入,将其穿过LSTM容纳可变长度序列,从两个方向进行学习,将其穿过完全连接的线性层,最后再通过Sigmoid来获得属于FAKE的序列的概率(为1)。
步骤5:训练 (Step 5: Training)
Before training, we build save and load functions for checkpoints and metrics. For checkpoints, the model parameters and optimizer are saved; for metrics, the train loss, valid loss, and global steps are saved so diagrams can be easily reconstructed later.
在训练之前,我们为检查点和指标构建保存和加载功能。 对于检查点,将保存模型参数和优化器; 对于度量,可以保存火车损耗,有效损耗和全局步长,以便以后可以轻松地重建图表。
We train the LSTM with 10 epochs and save the checkpoint and metrics whenever a hyperparameter setting achieves the best (lowest) validation loss. Here is the output during training:
我们用10个时期训练LSTM,并在超参数设置达到最佳(最低)验证损失时保存检查点和度量。 这是训练期间的输出:

The whole training process was fast on Google Colab. It took less than two minutes to train!
在Google Colab上,整个培训过程非常快捷。 培训不到两分钟!
Once we finished training, we can load the metrics previously saved and output a diagram showing the training loss and validation loss throughout time.
完成训练后,我们可以加载先前保存的指标,并输出一个图表,显示整个时间的训练损失和验证损失。

步骤6:评估 (Step 6: Evaluation)
Finally for evaluation, we pick the best model previously saved and evaluate it against our test dataset. We use a default threshold of 0.5 to decide when to classify a sample as FAKE. If the model output is greater than 0.5, we classify that news as FAKE; otherwise, REAL. We output the classification report indicating the precision, recall, and F1-score for each class, as well as the overall accuracy. We also output the confusion matrix.
最后,为了进行评估,我们选择了先前保存的最佳模型,并根据测试数据集对其进行了评估。 我们使用默认阈值0.5来决定何时将样本分类为FAKE。 如果模型输出大于0.5,我们将该新闻分类为FAKE;否则,将其分类为FAKE。 否则为REAL。 我们输出分类报告,指示每个类别的精度,召回率和F1得分以及整体准确性。 我们还输出混淆矩阵。

We can see that with a one-layer bi-LSTM, we can achieve an accuracy of 77.53% on the fake news detection task.
我们可以看到,使用双层Bi-LSTM,我们可以在假新闻检测任务上达到77.53%的准确性。
结论 (Conclusion)
This tutorial gives a step-by-step explanation of implementing your own LSTM model for text classification using Pytorch. We find out that bi-LSTM achieves an acceptable accuracy for fake news detection but still has room to improve. If you want a more competitive performance, check out my previous article on BERT Text Classification!
本教程分步说明了如何使用Pytorch为文本分类实现您自己的LSTM模型。 我们发现bi-LSTM在伪造新闻检测方面达到了可接受的准确性,但仍有改进的空间。 如果您想获得更具竞争力的性能,请查看我以前关于BERT文本分类的文章!
If you want to learn more about modern NLP and deep learning, make sure to follow me for updates on upcoming articles :)
如果您想了解有关现代NLP和深度学习的更多信息,请确保关注我以获取即将发表的文章的更新:)
翻译自: https://towardsdatascience.com/lstm-text-classification-using-pytorch-2c6c657f8fc0
相关文章:
- 创建dqn的深度神经网络_深度Q网络(DQN)-III
- 数字社会的下一波浪潮_下一波创业浪潮是自然而然的
- acl自然语言处理_ACL 2020中自然语言处理中的知识图
- gan生成印刷体字母_字母GAN:AI生成英语字母!
- 点击量作弊真的可以检测吗_作弊道德可以使自动驾驶汽车可行吗?
- 欺骗神经网络_可以欺骗神经网络吗?
- 图像增强python_Python图像增强简介(第1部分)
- jio tomcat_透过Jio Glass看
- 用于无人驾驶技术的车道线_自动驾驶汽车可用于查找车道的4种技术
- q-learning_教计算机如何通过Q-Learning玩Snake
- 深度强化学习从入门到大师_深度学习大师的经验教训
- 自然语言处理 入门_自然语言处理入门指南
- 变形金刚图纸_变形金刚救援
- 传感器数据 数据库_丰富的数据,不良的数据:充分利用传感器
- 使用高德地图打车软件实现_强化学习:使用Q学习来打车!
- aws fargate_使用AWS Fargate部署PyCaret和Streamlit应用程序-无服务器基础架构
- ai-人工智能的本质和未来_带有人工智能的动画电子设备-带来难以想象的结果...
- 世界第一个聊天机器人源代码_这是世界上第一个“活着”的机器人
- pytorch深度学习入门_立即学习AI:01 — Pytorch入门
- 深度学习将灰度图着色_使用DeOldify着色和还原灰度图像和视频
- 深度神经网络 卷积神经网络_改善深度神经网络
- 采矿协议_采矿电信产品推荐
- 机器人控制学习机器编程代码_机器学习正在征服显式编程
- 强化学习在游戏中的作用_游戏中的强化学习
- 你在想什么?
- 如何识别媒体偏见_面部识别,种族偏见和非洲执法
- openai-gpt_GPT-3 101:简介
- YOLOv5与Faster RCNN相比。 谁赢?
- 句子匹配 无监督_在无监督的情况下创建可解释的句子表示形式
- 科技创新 可持续发展 论坛_可持续发展时间
使用Pytorch的LSTM文本分类相关推荐
- lstm 文本分类_带有lstm和单词嵌入的灾难推文上的文本分类
lstm 文本分类 This was my first Kaggle notebook and I thought why not write it on Medium too? Ť他是我第一次Kag ...
- 人工智能框架实战精讲:Keras项目-英文语料的DNN、Word2Vec、CNN、LSTM文本分类实战与调参优化
Keras项目-英文语料的文本分类实战 一.机器学习模型 1.1 数据简介 1.2 数据读取与预处理 1.3 数据切分与逻辑回归模型构建 二.全连接神经网络模型 2.1 模型训练 2.2 模型结果展示 ...
- 【代码实战】基于pytorch实现中文文本分类任务
点击上方,选择星标或置顶,不定期资源大放送! 阅读大概需要15分钟 Follow小博主,每天更新前沿干货 来自 | 知乎 地址 | https://zhuanlan.zhihu.com/p/73176 ...
- 【PyTorch】7 文本分类TorchText实战——AG_NEWS四类别新闻分类
使用 TorchText 进行文本分类 1.访问原始数据集迭代器 2. 准备数据处理管道 3. 生成数据批次和迭代器 4. 定义模型 5. 初始化一个实例 6. 定义训练模型和评估结果的函数 7. 拆 ...
- 毕业设计 word2vec 加lstm 文本分类
基于深度神经网路的文本分类 基于主流的lstm模型 原始的数据和中间的训练 模型 链接:https://pan.baidu.com/s/1jge-RGWc_YXvnOKxEr0pkg 提取码:u5i ...
- Pytorch Bert+BiLstm文本分类
文章目录 前言 一.运行环境 二.数据 三.模型结构 四.训练 五.测试及预测 前言 昨天按照该文章(自然语言处理(NLP)Bert与Lstm结合)跑bert+bilstm分类的时候,没成功跑起来,于 ...
- Pytorch之Bert文本分类(一)
本文主要是针对入门级别的Bert使用,先让模型能够实现文本分类,后续会讲解huggingface的Bert流程化的使用,包括英文文本分类和中文文本分类. 英文部分使用 BERT: Pre-traini ...
- karas 实现lstm 文本分类
# In[4]: #网址来源 #https://github.com/fchollet/keras/blob/master/examples/imdb_lstm.py from __future__ ...
- 独家 | 教你用Pytorch建立你的第一个文本分类模型!
作者:Aravind Pai 翻译:王威力 校对:张一豪 本文约3400字,建议阅读10+分钟 本文介绍了利用Pytorch框架实现文本分类的关键知识点,包括使用如何处理Out of Vocabula ...
- pytorch实现文本分类_使用变形金刚进行文本分类(Pytorch实现)
pytorch实现文本分类 'Attention Is All You Need' "注意力就是你所需要的" New deep learning models are introd ...
最新文章
- ArcGIS Engine生成等值线(C#)
- c++ 中__declspec 的用法
- 转载:k2pdfopt详细教程-让kindle看遍所有pdf
- python urllib3离线安装_全球Python库下载前10名
- 三探·模块拼装思想(静态链接)
- 重做实验七 寻址方式在结构化数据访问中的应用
- 【复习】原生Js实现文件上传
- python-练习-查找匹配-模拟数据库的查找-小例子
- ORACLE查询保留字
- Windows8中离线安装.Net 3.5的方法
- VB中PictureBox控件使用教程
- 为Node.js编写组件的几种方式
- 【转】灵格斯词霸怎样在 PDF 文档中取词?
- Verilog学习之异步复位的串联T触发器设计
- 炫酷又实用的发送邮箱链接修改密码
- HP惠普笔记本Microsoft ACPI-Compliant System未知设备的解决办法
- Android友盟统计
- DL | TensorFlow代码调试
- [读书笔记]多线程学习笔记
- 【学习笔记】[省选联考 2023] 填数游戏