gae怎么打开谷歌学术?_Google App Engine(GAE)Java API第3部分:API入门
gae怎么打开谷歌学术?
In a long break between posts, I hope you have setup your Eclipse environment and are excited to start learning about GAE APIs. There were some unavoidable delays, but now we will start and zoom into GAE! So let’s get our hand dirty with some code :)
在两篇文章之间的长时间休息中,我希望您已经设置了Eclipse环境,并很高兴开始学习GAE API。 不可避免地会有一些延迟,但是现在我们将开始并放大GAE! 因此,让我们开始编写一些代码吧:)
The approach we’re going to follow is learning about APIs with sample code. I will also provide links to demo and source code where applicable.
我们将采用的方法是通过示例代码学习API。 如果适用,我还将提供指向演示和源代码的链接。
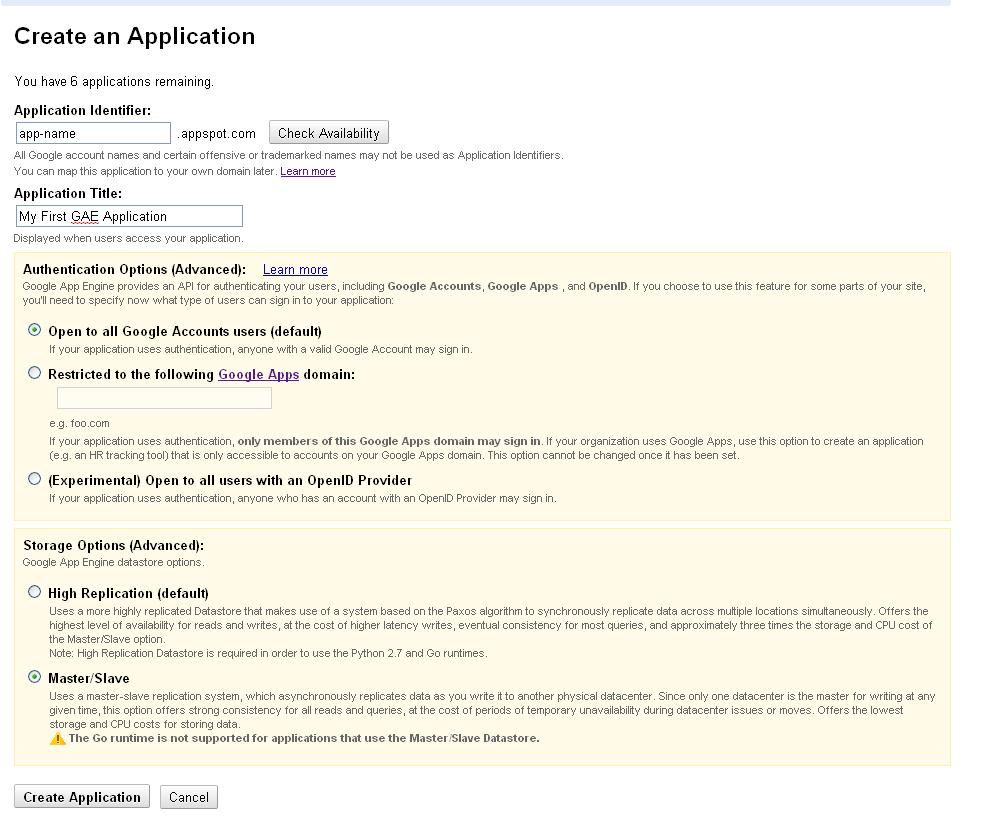
Before we get started on subject that we are interested in, let’s create the application we are going to work with. Login to https://appengine.google.com/ with your credentials and “Create Application”. In the following screen, fill in the app name and description, also choose “Master/Slave” by editing Storage options. High replication datastore would be ideal for scenarios where the data backup has to be immediate and consistency guarantee has to be higher.
在开始我们感兴趣的主题之前,让我们创建将要使用的应用程序。 使用您的凭据和“创建应用程序”登录https://appengine.google.com/ 。 在以下屏幕中,填写应用名称和说明,然后通过编辑存储选项选择“主/从”。 对于需要立即进行数据备份且一致性保证更高的方案,高复制数据存储区将是理想的选择。
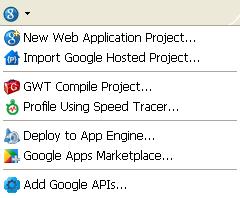
If you have installed the Eclipse plugin correctly, you should see Google icon like below in Eclipse, click on “New web application project.” This can also be done through the menu, File → New → Web application project.
如果您已正确安装了Eclipse插件,则应该在Eclipse中看到如下所示的Google图标,然后点击“新建Web应用程序项目”。 也可以通过菜单File→New→Web application project来完成。
In the new window that comes up, choose a name and base package name for your project. Make sure you uncheck “Use Google Web Toolkit” option before you proceed (Google Web Toolkit – GWT is an exciting new way of writing super clean and responsive web pages in Java, the GWT compiler turns Java into HTML & JavaScript). Also, enable “Generate sample code” so that you can use a sample project to begin with.
在出现的新窗口中,为您的项目选择一个名称和基本程序包名称。 在继续操作之前,请确保取消选中“使用Google Web Toolkit”选项(Google Web Toolkit – GWT是一种用Java编写超干净和响应式网页的令人兴奋的新方法,GWT编译器将Java转换为HTML和JavaScript)。 另外,启用“生成示例代码”,以便您可以使用示例项目开始。

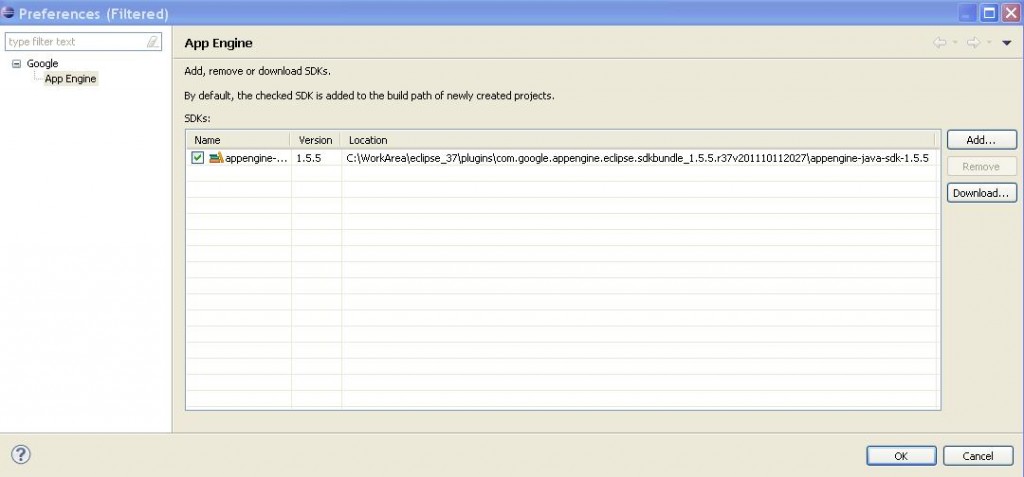
In case you have issues with the GAE SDK not being found, you can click on “Configure SDKs” next to “Use Google App Engine” and point to directory where the SDK is placed. In my case, the Eclipse plugin directory has the required SDK bundle, as seen in screen below
如果您在找不到GAE SDK时遇到问题,可以单击“使用Google App Engine”旁边的“配置SDK”,然后指向放置SDK的目录。 就我而言,Eclipse插件目录具有必需的SDK捆绑包,如下面的屏幕所示。
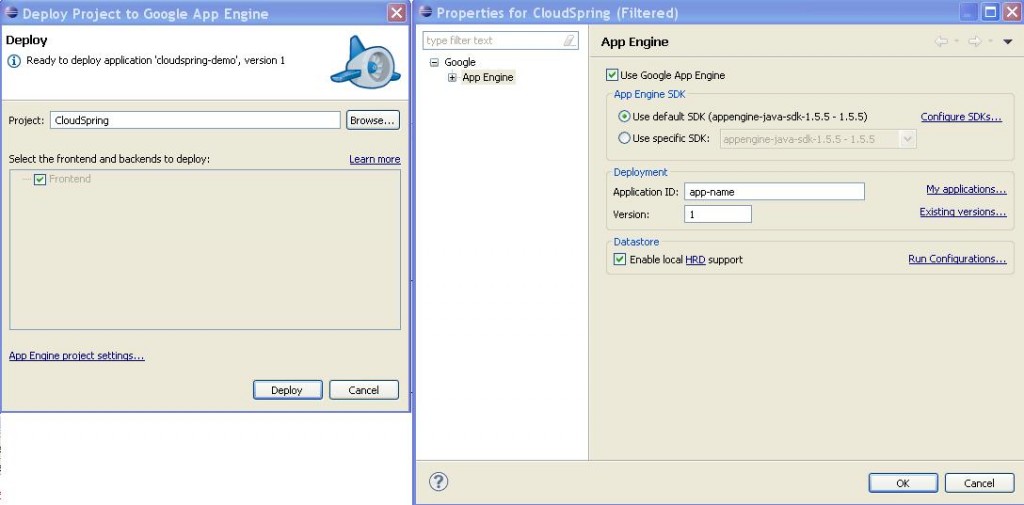
Now that your sample app is created locally, let’s deploy that to Google’s infrastructure. With the same menu that we used to create the app, choose “Deploy to App Engine”. Alternatively, right click on project and in “Google” choose to “Deploy to App Engine”. If you aren’t signed into Google, in Eclipse, it will ask for your credentials, and you can choose the same ID that we used to create our app earlier. Next, you will have to configure the “App name” which you created earlier by clicking on “App Engine project settings”. This isn’t required in subsequent deploys, unless you want to change the version to which app is deployed. As you can see, we are deploying the application to “app-name” . The app-name should be the one you chose when you created your application using “Create Application” at appengine.google.com
现在,您的示例应用程序是在本地创建的,让我们将其部署到Google的基础架构中。 使用与创建应用程序相同的菜单,选择“部署到App Engine”。 或者,右键单击项目,然后在“ Google”中选择“部署到App Engine”。 如果您未登录Google,则在Eclipse中,它将要求您提供凭据,并且可以选择与我们之前创建应用程序时使用的ID相同的ID。 接下来,您将必须通过单击“ App Engine项目设置”来配置先前创建的“ App名称”。 除非您想更改应用程序部署的版本,否则在后续部署中不需要这样做。 如您所见,我们正在将应用程序部署到“ app-name”。 应用名称应为您在appengine.google.com上使用“创建应用”创建应用时选择的名称 。
Once you deploy, your application is be ready to serve at APP_NAME.appspot.com – So we’ve deployed our first GAE app to the cloud. You can also run the same app locally by right clicking on project in Eclipse and choosing “Run as → Web Application”. The console will show the URL at which you can access locally. The app we have deployed by creating sample project has link to a simple servlet which prints “Hello, world” to your browser. You can check locally as well as on server to cross check you are on the right path so far. If you see a “Hello, World” Servlet as a result, continue otherwise I strongly suggest to have setup done appropriately to best understand rest of tutorials. In case of questions, Ask!
部署后,您的应用程序就可以在APP_NAME.appspot.com上进行服务了-因此,我们已经将第一个GAE应用程序部署到了云中。 您还可以通过右键单击Eclipse中的项目并选择“运行方式→Web应用程序”在本地运行相同的应用程序。 控制台将显示您可以在本地访问的URL。 我们通过创建示例项目部署的应用程序已链接到一个简单的servlet,该servlet将“ Hello,world”打印到您的浏览器。 您可以在本地以及在服务器上进行检查,以核对到目前为止您是否处在正确的路径上。 如果结果显示为“ Hello,World” Servlet,请继续执行其他操作,否则我强烈建议您进行适当的设置以最好地理解本教程的其余部分。 如有疑问,请询问!
用户和身份验证 (Users & Authentication)
As you might have noticed on the screen where we created our app on AppEngine, Google provides three mechanisms for authentication: Google Account, Google Apps domain, and OpenID. For purpose of this tutorial we are going to look at Google accounts only, but of course the API supports all three mechanisms. More on Google Apps and OpenID
您可能已经在我们在AppEngine上创建应用的屏幕上注意到了,Google提供了三种身份验证机制:Google帐户,Google Apps域和OpenID。 就本教程而言,我们将仅查看Google帐户,但是该API当然支持所有三种机制。 有关Google Apps和OpenID的更多信息
API for authentication is fairly simple, UserServiceFactory is used to get an instance of UserService. UserService is used to log the user in, and to retrieve User in addition to creating login and logout URLs. User object itself can be used to get User related information. Let’s look at a servlet: [sourcecode language=”java”] // CloudSpringAuthServlet .java import java.io.IOException; import javax.servlet.http.*; import com.google.appengine.api.users.UserService; import com.google.appengine.api.users.UserServiceFactory;
身份验证的API非常简单, UserServiceFactory用于获取UserService的实例。 UserService除了用于创建登录和注销URL外,还用于登录用户和检索User 。 用户对象本身可用于获取与用户相关的信息。 让我们看一下servlet:[sourcecode language =“ java”] // CloudSpringAuthServlet .java import java.io.IOException; 导入javax.servlet.http。*; 导入com.google.appengine.api.users.UserService; 导入com.google.appengine.api.users.UserServiceFactory;
@SuppressWarnings("serial") public class CloudSpringAuthServlet extends HttpServlet { public void doGet(HttpServletRequest req, HttpServletResponse resp) throws IOException {
@SuppressWarnings(“ serial”)公共类CloudSpringAuthServlet扩展了HttpServlet {public void doGet(HttpServletRequest req,HttpServletResponse resp)抛出IOException {
resp.setContentType("text/plain"); String baseURL = req.getRequestURI(); String loginURL=""; String logOutURL=""; UserService userService = UserServiceFactory.getUserService(); // By user service we are checking if the user is logged in, and if he is logged in // we are getting the information of user along with a link which can be sued to sign out if(userService.isUserLoggedIn()) { logOutURL = userService.createLogoutURL(baseURL); resp.getWriter().println("Hello CloudSpring-er, your email ID as detected by us is: "+ userService.getCurrentUser().getEmail()); resp.getWriter().println("To log out click on below link"); resp.getWriter().println("<a href=""+logOutURL+"">Log out</a>"); } // If the user is not logged in, we are redirecting him to Google login screen, which will // redirect user to original URL after authentication else{ resp.getWriter().println("<a href=""+userService.createLoginURL(baseURL)+"">Please sign in to proceed</a>"); }
resp.setContentType(“ text / plain”); 字符串baseURL = req.getRequestURI(); 字符串loginURL =“”; 字符串logOutURL =“”; UserService userService = UserServiceFactory.getUserService(); //通过用户服务,我们正在检查用户是否已登录,以及是否已经登录,//我们正在获取用户信息以及可用于注销if(userService.isUserLoggedIn()){ logOutURL = userService.createLogoutURL(baseURL); resp.getWriter()。println(“您好,CloudSpring-er,我们检测到的您的电子邮件ID为:” + userService.getCurrentUser()。getEmail()); resp.getWriter()。println(“要注销,请单击下面的链接”); resp.getWriter()。println(“ <a href=""+logOutURL+"">注销</a>”); } //如果用户未登录,我们会将其重定向到Google登录屏幕,//将在认证后将用户重定向到原始URL else {resp.getWriter()。println(“ <a href =”“ + userService .createLoginURL(baseURL)+“”>请登录以继续</a>“)); }
} } [/sourcecode]
} } [/源代码]
You can copy the above servlet in a locally created app in Eclipse, be sure to make appropriate changes for package name and mappings in web.xml, and run locally or remote.
您可以在Eclipse中本地创建的应用程序中复制上述servlet,确保对web.xml中的包名称和映射进行适当的更改,然后在本地或远程运行。
For purpose of local development with Eclipse, GAE SDK simulates the user authentication. User is presented with a login screen, without password. One can enter any email address and that email address will behave like a real user. While logging in, you can tick the checkbox if you would like to sign in as administrator.
为了使用Eclipse进行本地开发,GAE SDK模拟了用户身份验证。 将显示给用户一个没有密码的登录屏幕。 可以输入任何电子邮件地址,该电子邮件地址的行为就像真实用户一样。 登录时,如果您想以管理员身份登录,则可以选中该复选框。
邮件 (Mail)
GAE supports JavaMail for sending email messages. You don’t need to add an additional library for this. Let’s look at a simple example for sending messages using Google App Engine, before talking about receiving emails. As an exercise, create a servlet with the code snippet below by changing email ID to ID of the application user, configure the servlet for a URL in web.xml, and hit the URL, which will invoke this servlet.
GAE支持JavaMail发送电子邮件。 您不需要为此添加其他库。 在谈论接收电子邮件之前,让我们看一个使用Google App Engine发送消息的简单示例。 作为练习,通过将电子邮件ID更改为应用程序用户的ID,使用下面的代码片段创建servlet,在web.xml中为URL配置servlet,然后单击URL,这将调用该servlet。
[sourcecode language=”java”] //CloudSpringMailServlet.java import java.io.IOException; import java.io.UnsupportedEncodingException; import java.util.Properties;
[sourcecode language =“ java”] //CloudSpringMailServlet.java import java.io.IOException; 导入java.io.UnsupportedEncodingException; 导入java.util.Properties;
import javax.mail.Message; import javax.mail.MessagingException; import javax.mail.Multipart; import javax.mail.Session; import javax.mail.Transport; import javax.mail.internet.InternetAddress; import javax.mail.internet.MimeBodyPart; import javax.mail.internet.MimeMessage; import javax.mail.internet.MimeMultipart; import javax.servlet.http.HttpServlet; import javax.servlet.http.HttpServletRequest; import javax.servlet.http.HttpServletResponse; // Notice that out of all imports we have used -none of them is a GAE class public class CloudSpringMailServlet extends HttpServlet{ public void doGet(HttpServletRequest req, HttpServletResponse resp) throws IOException { String recipientEmailAddress = "your_emailId@gmail.com"; Properties props = new Properties(); Session session = Session.getDefaultInstance(props, null); Message msg = new MimeMessage(session); // We are creating multipart so that we can send multiple parts to Email Multipart mp = new MimeMultipart(); try { msg.setFrom(new InternetAddress("your_emailId@gmail.com", "Test Name")); msg.addRecipient(Message.RecipientType.TO, new InternetAddress( recipientEmailAddress, "Hello")); msg.setSubject("CloudSpring test"); MimeBodyPart htmlPart = new MimeBodyPart(); htmlPart.setContent("This is just a test email from CloudSpring!", "text/html"); // We are composing multipart with various parts of email, before we send mp.addBodyPart(htmlPart); msg.setContent(mp); Transport.send(msg); } catch (MessagingException e) { e.printStackTrace(); } catch (UnsupportedEncodingException e) { e.printStackTrace(); } resp.getWriter().println("Email has been sent");
导入javax.mail.Message; 导入javax.mail.MessagingException; 导入javax.mail.Multipart; 导入javax.mail.Session; 导入javax.mail.Transport; 导入javax.mail.internet.InternetAddress; 导入javax.mail.internet.MimeBodyPart; 导入javax.mail.internet.MimeMessage; 导入javax.mail.internet.MimeMultipart; 导入javax.servlet.http.HttpServlet; 导入javax.servlet.http.HttpServletRequest; 导入javax.servlet.http.HttpServletResponse; // //注意,在我们使用的所有导入中,没有一个是GAE类公共类CloudSpringMailServlet扩展了HttpServlet {public void doGet(HttpServletRequest req,HttpServletResponse resp)throws IOException {String receiveEmailAddress =“ your_emailId@gmail.com”; 属性props = new Properties(); 会话会话= Session.getDefaultInstance(props,null); 消息msg =新的MimeMessage(会话); //我们正在创建多部分,以便可以将多个部分发送到Email Multipart mp = new MimeMultipart(); 尝试{msg.setFrom(new InternetAddress(“ your_emailId@gmail.com”,“测试名称”)); msg.addRecipient(Message.RecipientType.TO,new InternetAddress(receiveEmailAddress,“ Hello”)); msg.setSubject(“ CloudSpring test”); MimeBodyPart htmlPart =新的MimeBodyPart(); htmlPart.setContent(“这只是CloudSpring发出的测试电子邮件!”,“ text / html”); //在发送mp.addBodyPart(htmlPart);之前,我们将电子邮件的各个部分组成多部分 msg.setContent(mp); Transport.send(msg); } catch(MessagingException e){e.printStackTrace(); } catch(UnsupportedEncodingException e){e.printStackTrace(); } resp.getWriter()。println(“电子邮件已发送”);
}
}
} [/sourcecode]
} [/源代码]
On the local development environment, the mail is not actually sent, but the documentation states that they are shown in logs ( Somehow I could not see the mail in logs on local system, but it worked fine on GAE server, let me know if you get that right!).
在本地开发环境中,实际上并未发送邮件,但文档指出它们显示在日志中(以某种方式,我无法在本地系统上的日志中看到邮件,但在GAE服务器上工作正常,请告诉我您是否弄对了!)。
收到的邮件 (Incoming mail)
Incoming mail works a little differently. As mentioned in the previous article, the inbound service has to be enabled. Secondly all incoming emails are received as HTTP POST request at /_ah/mail/<address> where address can be any_string@app-name.appspotmail.com.
接收邮件的方式略有不同。 如上一篇文章中所述,必须启用入站服务。 其次,所有传入电子邮件都作为HTTP POST请求接收到/ _ah / mail / <address>,其中地址可以是any_string@app-name.appspotmail.com。
From an application perspective, you will have to configure one or more servlet for URL pattern “/_ah/mail/*”. The servlet can use MimeMessage as shown below. The line number 3 gets the POST data from request object. Further operations for getting data from email follow JavaMail APIs
从应用程序的角度来看,您将必须为URL模式“ / _ah / mail / *”配置一个或多个servlet。 servlet可以使用MimeMessage,如下所示。 行号3从请求对象获取POST数据。 从电子邮件获取数据的进一步操作遵循JavaMail API
[sourcecode language=”java”] Properties props = new Properties(); Session sess = Session.getDefaultInstance(props, null); MimeMessage mailMessage = new MimeMessage(sess, req.getInputStream()); [/sourcecode]
[源代码语言=“ java”]属性props = new Properties(); 会话sess = Session.getDefaultInstance(props,null); MimeMessage mailMessage =新的MimeMessage(sess,req.getInputStream()); [/源代码]
We have created our basic GAE app and deployed to cloud with click of a button. We have also used authentication and mail APIs to do few basic tasks in our mini project. We have set the ground, and are ready to take a deep dive into other areas of GAE! Keep watching for the next part in this series.
我们已经创建了基本的GAE应用,只需单击一下按钮即可将其部署到云中。 我们还使用身份验证和邮件API在我们的小型项目中完成了一些基本任务。 我们已奠定基础,并准备深入探究GAE的其他领域! 继续关注本系列的下一部分。
翻译自: https://www.sitepoint.com/google-app-engine-gae-java-api-part-3-getting-started-with-apis/
gae怎么打开谷歌学术?
gae怎么打开谷歌学术?_Google App Engine(GAE)Java API第3部分:API入门相关推荐
- gae怎么打开谷歌学术?_了解Google App Engine(GAE)Java API第2部分:设置和简介
gae怎么打开谷歌学术? In the first part of this series, we went through the basic environment GAE offers the ...
- google app engine for java 的web应用程序
在IT业步入"云"时代的时候,Google App Engine无疑是引领"云"技术潮流的一支生力军.但在App Engine诞生后的很长一段时间里,它都只支持 ...
- app mvc框架_Google App Engine上的Spring MVC和REST
app mvc框架 前段时间,我写了一篇关于如何使用Spring MVC实现Restful Web API的文章 . 阅读我以前的文章以了解它. 在那篇文章中,它开发了一个简单的Rest示例. 为了测 ...
- Google App Engine(GAE)入门教程翻译
简介 介绍什么是Google App Engine 开发环境 如何下载并安装SDK包,如何配置调试环境 Hello World 开始编写Hello world程序,帮助你初步了解Google App ...
- Google App Engine for Java下的URL编码转换问题
URL编码问题 此部分参考英文资料: http://www.blooberry.com/indexdot/html/topics/urlencoding.htm http://www.w3school ...
- 申请Google App Engine并创建appid
转载地址:http://www.ccav1.com/gae-2.html 一.申请Google App Engine并创建appid 申请注册一个Google App Engine账号https:// ...
- Google App Engine教程
Google App Engine是一个用于在现有Google基础架构中托管Web应用程序的云计算平台,它易于扩展,管理和免费使用多达预定义的已消耗资源,并且支持Java. 有关其他费用,请参阅此GA ...
- 谷歌搜索、谷歌学术、谷歌邮箱和谷歌地图的使用方法
谷歌搜索.谷歌学术.谷歌邮箱和谷歌地图的使用方法 国内最近时间谷歌很多服务被墙,的确令人头疼,尤其是当谷歌学术(Google Scholar)失灵以后,对文献的查找带来相当麻烦.虽然,微软学术.百度学 ...
- 闭关纪要17.Google app engine的简单应用
在上面用了十一篇博客的文章详细的介绍了,Step1账户登录系统之后,从现在开始,继续写闭关纪要,因为Step1账户登录系统也是闭关工作的一部分,因此保留序号,这篇纪要在上次的闭关纪要5.WML,UTF ...
最新文章
- 一张图看懂微软人工智能
- Maven国内镜像 Maven阿里云镜像
- Mybatis-plus详解
- Robots.txt 协议详解及使用说明
- 收藏 | Kaggle神器LightGBM最全解读!
- html图片自动替换图片,十种图片替换文本CSS方法
- Java乔晓松-android中调用系统拍照功能并显示拍照的图片
- PowerBuilder 2017R3安装指南2021最新
- 【Linux】Linux设备驱动开发详解:基于最新的Linux 4.0内核
- C# Socket简单例子(服务器与客户端通信)【转】
- 科技巨头们以 A 取名的时尚潮流
- 上取整与下取整的解析
- 如何在云栖社区显示一个QAP DEMO
- oracle数据库新建表增加表序列,设置id自增
- 共享单车、公交车辆位置、地铁等50+个交通数据集
- Keil MDK使用第11篇---keil炫酷颜色主题
- 星火支付/USDT承兑系统
- 交换机常用命令(1)
- 开源应用中心|Discuz!X全新PC社区体验,多种场景一站解决
- python的模块,面向对象,封装
热门文章
- 艾司博讯:拼多多物流单号填错了有办法改吗
- 2019年北京市土地成交市场分析——基于Excel的分析与可视化
- 在牛客网爆火的Java岗25大技术栈!(含答案)
- 树莓派实现拨号上网(充当路由器)
- 四川师范大学计算机学院冯林,李晓宁(四川师范大学计算机科学学院副教授)_百度百科...
- SVG互动排版公众号图文『路径动画与描边动画』模板代码
- Element-plus Notification 自定义动态图标
- 【mba项目管理论文】热力集团公司供热工程目项目管理研究(节选)
- win7发现不了无线网络_XP及WIN7系统原因导致蓝牙耳机与蓝牙5.0适配器不能正常工作...
- XSKY星辰天合荣获环球网“年度科技优秀创新案例”