使用uiautomator的python封装进行android的UI测试
基本的需求是这样的,安装被测试的应用,启动并退出,然后安装测试样本,检测是否有相应的弹窗拦截
考虑到市面上的各种测试框架与自已熟悉的编程语言,最后选择了google自家的uiautomator来搞,借助于前人对其进行了python封装,所以一开始还是挺顺利的,但是整个过程中还是有很多需要注意的地方
https://github.com/xiaocong/uiautomator 这个是xiaocong对其进行的python封装,也是这个小测试用例使用的,膜拜下
准备:python27,不能使用python26,安装urllib3与uiautomator,可以使用easy_install命令,安装android SDK,配置好adb的环境变量,这些应该都是作为android测试人员最基本的环境配置,要测试的应用是360手机急救箱,可以从http://jijiu.360.cn/ 这个网址下载
下面是基本的测试流程
# 需要配置好adb 环境变量
# 1.先确定有几台手机
# 2.再确定有多少个应用
# 3.先安装mkiller,启动mkiller
# 4.再安装测试的样本
# 5.检查是否有取消安装的按钮出现,出现说明测试通过,没出现说明测试失败
既然要采用自动化,就不能手机测试那样,一台一台的跑,应该可以同时跑多台手机,我的想法就是启用多线程来跑,每个手机用一个线程来跑
确定有几台手机,我封了一个方法
def finddevices():rst = util.exccmd('adb devices')devices = re.findall(r'(.*?)\s+device',rst)if len(devices) > 1:deviceIds = devices[1:]logger.info('共找到%s个手机'%str(len(devices)-1))for i in deviceIds: logger.info('ID为%s'%i)return deviceIdselse:logger.error('没有找到手机,请检查')return下面来说说uiautomator在python中的使用,其实github中的readme.md写的挺清楚,但是实践起来还是有一些问题
uiautomator在使用的时候都要初始化一个d对象,单个手机可以通过
from uiautomator import device as d多台手机可以
from uiautomator import Device然后通过 d=Device(Serial)的方式初始化d对象,以后的操作基本上都是操作这个d对象,可以想象每个d对应着一台手机
我觉得这个设计有点不大好,我现在还经常在device的大小写上犯迷糊
基本的点击操作
# press home key
d.press.home()
# press back key
d.press.back()
# the normal way to press back key
d.press("back")
# press keycode 0x07('0') with META ALT(0x02) on
d.press(0x07, 0x02)
首先安装启动应用,安装采用adb install 命令,启动采用adb shell am start 命令
手机急救箱的launchable-activity是'com.qihoo.mkiller.ui.index.AppEnterActivity',第一次启动会弹出使用协议要用户来点击”同意并使用”

我这里采用了watcher来监视并且点击,基本的watcher方法是
d.watcher('agree').when(text=u'同意并使用').click(text=u'同意并使用')
先给watcher起一个名字,随便起,我这里叫agree,when里面写条件,我这里就是当text为’同意并使用’,后面写当符合这些条件的时候进行的操作,我这里就是click(text=u'同意并使用'),这里有一个坑,我之前写watcher的时候,就直接写click() 我以为里面不写内容默认就会点击前面找到的元素,但是后来发现这样是不行的,必须要写上要点击哪个对象
其实对于这种只出现一次的view可以不用写在watcher里,可以直接写d(text=u'同意并使用').click(),但是考虑到这个界面出现之前会有一些延迟,各种手机的性能不同,也不好加time.sleep()时间,所以我建议像这种一律写到watcher里,什么时候出现就什么时候点击。
由于这个应用会请求root权限,所以有时第三方的root工具会弹相应的授权提示框,我想大部分的root工具应该都是有”允许”这个按钮的,于是我就加了一个watcher
d.watcher('allowroot').when(text=u'允许').click(text=u'允许')
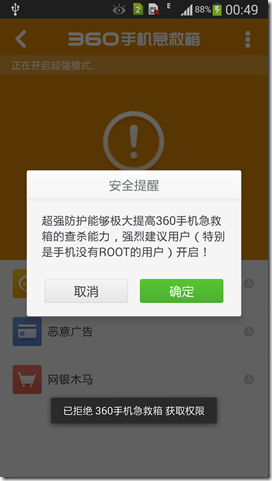
点击同意后会再弹一个开启超强模式的弹框,这里我要点击的是取消

d.watcher('cancel').when(text=u'取消').click(text=u'取消')
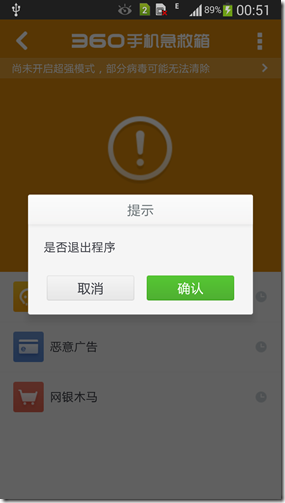
之后要点击一下back键,这时又会弹一个是否退出的框,这次我要点击“确认”

这个确认我是后面单独处理的,其实也可以放在watcher里,只是我的考虑是有时点击back键的时候不一定会弹出来这个框,所以我会尝试多点击几次,直到这个框出来
但现在就有一个问题了,刚才写了一个d.watcher('cancel').when(text=u'取消').click(text=u'取消'),这时当弹出这个框的时候,watcher就要起作用了,就会先去点击取消,这不是我想要的,所以我将之前点击取消的加了一个限制条件
d.watcher('cancel').when(text=u'取消').when(textContains=u'超强防护能够极大提高').click(text=u'取消')
textContains的意思就是和包含里面的文字,上面的意思就是当界面中text是“取消”的同时还要有一个view的text中要包含u'超强防护能够极大提高',这样的话就限制的点击“取消”的条件,再遇到退出时的提示框就不会再会点击”取消”了
尽可能的想到可能出现的弹框,比较在小米手机中安装应用会弹一个小米的安装确认界面,使用下面的watcher来进行监测点击
d.watcher('install').when(text=u'安装').when(textContains=u'是否要安装该应用程序').click(text=u'安装',className='android.widget.Button')
总的watcher就是下面的样子
d.watcher('allowroot').when(text=u'允许').click(text=u'允许')d.watcher('install').when(text=u'安装').when(textContains=u'是否要安装该应用程序').click(text=u'安装',className='android.widget.Button') #专门为小米弹出的安装拦截d.watcher('cancel').when(text=u'取消').when(textContains=u'超强防护能够极大提高').click(text=u'取消')d.watcher('confirm').when(text=u'确认').when(textContains=u'应用程序许可').click(text=u'确认')d.watcher('agree').when(text=u'同意并使用').click(text=u'同意并使用')d.watcher('weishiuninstall').when(textContains=u'暂不处理').click(textContains=u'暂不处理')然后使用d.watchers.run()来启动watcher
但是在实际的watcher中,我发现这个watcher并没有想象的那样好用,有时经常是明明有相应的view但是就是点击不上,经过多次尝试,我发现,当界面已经出现的时候,这时我再强行的使用run()方法来启动watchers,这时它就能很好的点击了,所以基于此,我写了一个循环来来无限的调用run方法,times限制了次数,根据项目的实际进行调整吧,sleep时间也可以相应的调整
def runwatch(d,data):times = 120while True:if data == 1: return True# d.watchers.reset()d.watchers.run() times -= 1if times == 0:breakelse:time.sleep(0.5)监视的时候又不能只跑监视程序,还要跑相应的测试步骤,所以这里我把这个runwatch方法放到一个线程中去跑,起一个线程用作监视,脚本的测试方法放在另外的线程上跑
线程函数
#线程函数
class FuncThread(threading.Thread):def __init__(self, func, *params, **paramMap):threading.Thread.__init__(self)self.func = funcself.params = paramsself.paramMap = paramMapself.rst = Noneself.finished = Falsedef run(self):self.rst = self.func(*self.params, **self.paramMap)self.finished = Truedef getResult(self):return self.rstdef isFinished(self):return self.finisheddef doInThread(func, *params, **paramMap):t_setDaemon = Noneif 't_setDaemon' in paramMap:t_setDaemon = paramMap['t_setDaemon']del paramMap['t_setDaemon']ft = FuncThread(func, *params, **paramMap)if t_setDaemon != None:ft.setDaemon(t_setDaemon)ft.start()return ft
所以这里启动线程来跑runwatcher的调用就是
data = 0
doInThread(runwatch,d,data,t_setDaemon=True)
基本的思路就是这样,这样当脚本都写完了以后在单个手机上运行很好,但是一旦插入多个手机就会出现一个问题,所有watcher只在一台手机上有效,另外的手机就只能傻傻的不知道点击,这个问题困扰了很久,我在github上也给作者发issue,但是后来我自已找到了解决的办法,就是在d=Device(Serial)的时候加上local_port端口号,让每台手机使用不同的local_port端口号,这样各自运行各自的,都很完好
以下了测试脚本的代码
mkiller.py,主测试脚本文件
#coding:gbkimport os,sys,time,re,csv
import log
import util
from uiautomator import Device
import traceback
import log,logging
import multiprocessingoptpath = os.getcwd()                      #获取当前操作目录
imgpath = os.path.join(optpath,'img')      #截图目录def cleanEnv():os.system('adb kill-server')needClean = ['log.log','img','rst']pwd = os.getcwd()for i in needClean:delpath = os.path.join(pwd,i)if os.path.isfile(delpath):cmd = 'del /f/s/q "%s"'% delpathos.system(cmd)elif os.path.isdir(delpath):cmd = 'rd /s/q "%s"' %delpathos.system(cmd)if not os.path.isdir('rst'):os.mkdir('rst')def runwatch(d,data):times = 120while True:if data == 1:                return True# d.watchers.reset()d.watchers.run()        times -= 1if times == 0:breakelse:time.sleep(0.5)def installapk(apklist,d,device):sucapp = []errapp = []# d = Device(device)#初始化一个结果文件d.screen.on()rstlogger = log.Logger('rst/%s.log'%device,clevel = logging.DEBUG,Flevel = logging.INFO)#先安装mkillermkillerpath = os.path.join(os.getcwd(),'MKiller_1001.apk')cmd = 'adb -s %s install -r %s'% (device,mkillerpath)util.exccmd(cmd)def checkcancel(d,sucapp,errapp):times = 10while(times):if d(textContains = u'取消安装').count:print d(textContains = u'取消安装',className='android.widget.Button').info['text']d(textContains = u'取消安装',className='android.widget.Button').click()rstlogger.info(device+'测试成功,有弹出取消安装对话框')breakelse:time.sleep(1)times -= 1if times == 0:rstlogger.error(device+'测试失败,没有弹出取消安装对话框')try:        d.watcher('allowroot').when(text=u'允许').click(text=u'允许')d.watcher('install').when(text=u'安装').when(textContains=u'是否要安装该应用程序').click(text=u'安装',className='android.widget.Button') #专门为小米弹出的安装拦截d.watcher('cancel').when(text=u'取消').when(textContains=u'超强防护能够极大提高').click(text=u'取消')d.watcher('confirm').when(text=u'确认').when(textContains=u'应用程序许可').click(text=u'确认')d.watcher('agree').when(text=u'同意并使用').click(text=u'同意并使用')d.watcher('weishiuninstall').when(textContains=u'暂不处理').click(textContains=u'暂不处理')# d.watchers.run()data = 0util.doInThread(runwatch,d,data,t_setDaemon=True)#启动急救箱并退出急救箱cmd = 'adb -s %s shell am start com.qihoo.mkiller/com.qihoo.mkiller.ui.index.AppEnterActivity'% deviceutil.exccmd(cmd)time.sleep(5)times = 3while(times):d.press.back()if d(text=u'确认').count:d(text=u'确认').click()breakelse:time.sleep(1)times -=1for item in apklist:apkpath = itemif not os.path.exists(apkpath):logger.error('%s的应用不存在,请检查'%apkpath)continue if not device:cmd = 'adb install -r "%s"' % apkpathelse:cmd = 'adb -s %s install -r "%s"'%(device,apkpath)util.doInThread(checkcancel,d,sucapp,errapp)rst = util.exccmd(cmd)except Exception, e:logger.error(traceback.format_exc())data = 1data = 1return sucappdef finddevices():rst = util.exccmd('adb devices')devices = re.findall(r'(.*?)\s+device',rst)if len(devices) > 1:deviceIds = devices[1:]logger.info('共找到%s个手机'%str(len(devices)-1))for i in deviceIds:            logger.info('ID为%s'%i)return deviceIdselse:logger.error('没有找到手机,请检查')return #needcount:需要安装的apk数量,默认为0,既安所有
#deviceids:手机的列表
#apklist:apk应用程序的列表
def doInstall(deviceids,apklist):count = len(deviceids)port_list = range(5555,5555+count)for i in range(len(deviceids)):d = Device(deviceids[i],port_list[i])util.doInThread(installapk,apklist,d,deviceids[i])#结束应用
def uninstall(deviceid,packname,timeout=20):cmd = 'adb -s %s uninstall %s' %(deviceid,packname) ft = util.doInThread(os.system,cmd,t_setDaemon=True)while True:if ft.isFinished():return Trueelse:time.sleep(1)timeout -= 1if timeout == 0:return False# 需要配置好adb 环境变量
# 1.先确定有几台手机
# 2.再确定有多少个应用
# 3.先安装mkiller,启动mkiller
# 4.再安装测试的样本
# 5.检查是否有取消安装的按钮出现,出现说明测试通过,没出现说明测试失败if __name__ == "__main__":cleanEnv()logger = util.loggerdevicelist = finddevices()if devicelist:       apkpath = os.path.join(os.getcwd(),'apk')apklist = util.listFile(apkpath)doInstall(devicelist,apklist) #每个手机都要安装apklist里的apk
util.py 线程与执行cmd脚本函数文件
#coding:gbk
import os,sys
import log
import logging
import threading
import multiprocessing
import timelogger = log.Logger('log.log',clevel = logging.DEBUG,Flevel = logging.INFO)def exccmd(cmd):try:return os.popen(cmd).read()except Exception:return None#遍历目录内的文件列表
def listFile(path, isDeep=True):_list = []if isDeep:try:for root, dirs, files in os.walk(path):for fl in files:_list.append('%s\%s' % (root, fl))except:passelse:for fn in glob.glob( path + os.sep + '*' ):if not os.path.isdir(fn):_list.append('%s' % path + os.sep + fn[fn.rfind('\\')+1:])return _list#线程函数
class FuncThread(threading.Thread):def __init__(self, func, *params, **paramMap):threading.Thread.__init__(self)self.func = funcself.params = paramsself.paramMap = paramMapself.rst = Noneself.finished = Falsedef run(self):self.rst = self.func(*self.params, **self.paramMap)self.finished = Truedef getResult(self):return self.rstdef isFinished(self):return self.finisheddef doInThread(func, *params, **paramMap):t_setDaemon = Noneif 't_setDaemon' in paramMap:t_setDaemon = paramMap['t_setDaemon']del paramMap['t_setDaemon']ft = FuncThread(func, *params, **paramMap)if t_setDaemon != None:ft.setDaemon(t_setDaemon)ft.start()return ft
log.py log相应的函数文件
#coding=gbk
import logging,os
import ctypesFOREGROUND_WHITE = 0x0007
FOREGROUND_BLUE = 0x01 # text color contains blue.
FOREGROUND_GREEN= 0x02 # text color contains green.
FOREGROUND_RED  = 0x04 # text color contains red.
FOREGROUND_YELLOW = FOREGROUND_RED | FOREGROUND_GREENSTD_OUTPUT_HANDLE= -11
std_out_handle = ctypes.windll.kernel32.GetStdHandle(STD_OUTPUT_HANDLE)
def set_color(color, handle=std_out_handle):bool = ctypes.windll.kernel32.SetConsoleTextAttribute(handle, color)return boolclass Logger:def __init__(self, path,clevel = logging.DEBUG,Flevel = logging.DEBUG):self.logger = logging.getLogger(path)self.logger.setLevel(logging.DEBUG)fmt = logging.Formatter('[%(asctime)s] [%(levelname)s] %(message)s', '%Y-%m-%d %H:%M:%S')#设置CMD日志sh = logging.StreamHandler()sh.setFormatter(fmt)sh.setLevel(clevel)#设置文件日志fh = logging.FileHandler(path)fh.setFormatter(fmt)fh.setLevel(Flevel)self.logger.addHandler(sh)self.logger.addHandler(fh)def debug(self,message):self.logger.debug(message)def info(self,message):self.logger.info(message)def war(self,message,color=FOREGROUND_YELLOW):set_color(color)self.logger.warn(message)set_color(FOREGROUND_WHITE)def error(self,message,color=FOREGROUND_RED):set_color(color)self.logger.error(message)set_color(FOREGROUND_WHITE)def cri(self,message):self.logger.critical(message)if __name__ =='__main__':logyyx = Logger('yyx.log',logging.WARNING,logging.DEBUG)logyyx.debug('一个debug信息')logyyx.info('一个info信息')logyyx.war('一个warning信息')logyyx.error('一个error信息')logyyx.cri('一个致命critical信息')
这个小测试应用虽然比较简单,但是由于刚刚接触uiautomator的python封装,所以还是遇到了一些麻烦,不过还好,最终的结果是很好的解决了相应的问题,这里也算是抛砖引玉吧,这个uiautomator还有很多好玩的值得探索的地方,待以后慢慢发现~
基本的需求是这样的,安装被测试的应用,启动并退出,然后安装测试样本,检测是否有相应的弹窗拦截
考虑到市面上的各种测试框架与自已熟悉的编程语言,最后选择了google自家的uiautomator来搞,借助于前人对其进行了python封装,所以一开始还是挺顺利的,但是整个过程中还是有很多需要注意的地方
https://github.com/xiaocong/uiautomator 这个是xiaocong对其进行的python封装,也是这个小测试用例使用的,膜拜下
准备:python27,不能使用python26,安装urllib3与uiautomator,可以使用easy_install命令,安装android SDK,配置好adb的环境变量,这些应该都是作为android测试人员最基本的环境配置,要测试的应用是360手机急救箱,可以从http://jijiu.360.cn/ 这个网址下载
下面是基本的测试流程
# 需要配置好adb 环境变量
# 1.先确定有几台手机
# 2.再确定有多少个应用
# 3.先安装mkiller,启动mkiller
# 4.再安装测试的样本
# 5.检查是否有取消安装的按钮出现,出现说明测试通过,没出现说明测试失败
既然要采用自动化,就不能手机测试那样,一台一台的跑,应该可以同时跑多台手机,我的想法就是启用多线程来跑,每个手机用一个线程来跑
确定有几台手机,我封了一个方法
def finddevices():rst = util.exccmd('adb devices')devices = re.findall(r'(.*?)\s+device',rst)if len(devices) > 1:deviceIds = devices[1:]logger.info('共找到%s个手机'%str(len(devices)-1))for i in deviceIds: logger.info('ID为%s'%i)return deviceIdselse:logger.error('没有找到手机,请检查')return下面来说说uiautomator在python中的使用,其实github中的readme.md写的挺清楚,但是实践起来还是有一些问题
uiautomator在使用的时候都要初始化一个d对象,单个手机可以通过
from uiautomator import device as d多台手机可以
from uiautomator import Device然后通过 d=Device(Serial)的方式初始化d对象,以后的操作基本上都是操作这个d对象,可以想象每个d对应着一台手机
我觉得这个设计有点不大好,我现在还经常在device的大小写上犯迷糊
基本的点击操作
# press home key
d.press.home()
# press back key
d.press.back()
# the normal way to press back key
d.press("back")
# press keycode 0x07('0') with META ALT(0x02) on
d.press(0x07, 0x02)
首先安装启动应用,安装采用adb install 命令,启动采用adb shell am start 命令
手机急救箱的launchable-activity是'com.qihoo.mkiller.ui.index.AppEnterActivity',第一次启动会弹出使用协议要用户来点击”同意并使用”

我这里采用了watcher来监视并且点击,基本的watcher方法是
d.watcher('agree').when(text=u'同意并使用').click(text=u'同意并使用')
先给watcher起一个名字,随便起,我这里叫agree,when里面写条件,我这里就是当text为’同意并使用’,后面写当符合这些条件的时候进行的操作,我这里就是click(text=u'同意并使用'),这里有一个坑,我之前写watcher的时候,就直接写click() 我以为里面不写内容默认就会点击前面找到的元素,但是后来发现这样是不行的,必须要写上要点击哪个对象
其实对于这种只出现一次的view可以不用写在watcher里,可以直接写d(text=u'同意并使用').click(),但是考虑到这个界面出现之前会有一些延迟,各种手机的性能不同,也不好加time.sleep()时间,所以我建议像这种一律写到watcher里,什么时候出现就什么时候点击。
由于这个应用会请求root权限,所以有时第三方的root工具会弹相应的授权提示框,我想大部分的root工具应该都是有”允许”这个按钮的,于是我就加了一个watcher
d.watcher('allowroot').when(text=u'允许').click(text=u'允许')
点击同意后会再弹一个开启超强模式的弹框,这里我要点击的是取消

d.watcher('cancel').when(text=u'取消').click(text=u'取消')
之后要点击一下back键,这时又会弹一个是否退出的框,这次我要点击“确认”

这个确认我是后面单独处理的,其实也可以放在watcher里,只是我的考虑是有时点击back键的时候不一定会弹出来这个框,所以我会尝试多点击几次,直到这个框出来
但现在就有一个问题了,刚才写了一个d.watcher('cancel').when(text=u'取消').click(text=u'取消'),这时当弹出这个框的时候,watcher就要起作用了,就会先去点击取消,这不是我想要的,所以我将之前点击取消的加了一个限制条件
d.watcher('cancel').when(text=u'取消').when(textContains=u'超强防护能够极大提高').click(text=u'取消')
textContains的意思就是和包含里面的文字,上面的意思就是当界面中text是“取消”的同时还要有一个view的text中要包含u'超强防护能够极大提高',这样的话就限制的点击“取消”的条件,再遇到退出时的提示框就不会再会点击”取消”了
尽可能的想到可能出现的弹框,比较在小米手机中安装应用会弹一个小米的安装确认界面,使用下面的watcher来进行监测点击
d.watcher('install').when(text=u'安装').when(textContains=u'是否要安装该应用程序').click(text=u'安装',className='android.widget.Button')
总的watcher就是下面的样子
d.watcher('allowroot').when(text=u'允许').click(text=u'允许')d.watcher('install').when(text=u'安装').when(textContains=u'是否要安装该应用程序').click(text=u'安装',className='android.widget.Button') #专门为小米弹出的安装拦截d.watcher('cancel').when(text=u'取消').when(textContains=u'超强防护能够极大提高').click(text=u'取消')d.watcher('confirm').when(text=u'确认').when(textContains=u'应用程序许可').click(text=u'确认')d.watcher('agree').when(text=u'同意并使用').click(text=u'同意并使用')d.watcher('weishiuninstall').when(textContains=u'暂不处理').click(textContains=u'暂不处理')然后使用d.watchers.run()来启动watcher
但是在实际的watcher中,我发现这个watcher并没有想象的那样好用,有时经常是明明有相应的view但是就是点击不上,经过多次尝试,我发现,当界面已经出现的时候,这时我再强行的使用run()方法来启动watchers,这时它就能很好的点击了,所以基于此,我写了一个循环来来无限的调用run方法,times限制了次数,根据项目的实际进行调整吧,sleep时间也可以相应的调整
def runwatch(d,data):times = 120while True:if data == 1: return True# d.watchers.reset()d.watchers.run() times -= 1if times == 0:breakelse:time.sleep(0.5)监视的时候又不能只跑监视程序,还要跑相应的测试步骤,所以这里我把这个runwatch方法放到一个线程中去跑,起一个线程用作监视,脚本的测试方法放在另外的线程上跑
线程函数
#线程函数
class FuncThread(threading.Thread):def __init__(self, func, *params, **paramMap):threading.Thread.__init__(self)self.func = funcself.params = paramsself.paramMap = paramMapself.rst = Noneself.finished = Falsedef run(self):self.rst = self.func(*self.params, **self.paramMap)self.finished = Truedef getResult(self):return self.rstdef isFinished(self):return self.finisheddef doInThread(func, *params, **paramMap):t_setDaemon = Noneif 't_setDaemon' in paramMap:t_setDaemon = paramMap['t_setDaemon']del paramMap['t_setDaemon']ft = FuncThread(func, *params, **paramMap)if t_setDaemon != None:ft.setDaemon(t_setDaemon)ft.start()return ft
所以这里启动线程来跑runwatcher的调用就是
data = 0
doInThread(runwatch,d,data,t_setDaemon=True)
基本的思路就是这样,这样当脚本都写完了以后在单个手机上运行很好,但是一旦插入多个手机就会出现一个问题,所有watcher只在一台手机上有效,另外的手机就只能傻傻的不知道点击,这个问题困扰了很久,我在github上也给作者发issue,但是后来我自已找到了解决的办法,就是在d=Device(Serial)的时候加上local_port端口号,让每台手机使用不同的local_port端口号,这样各自运行各自的,都很完好
以下了测试脚本的代码
mkiller.py,主测试脚本文件
#coding:gbkimport os,sys,time,re,csv
import log
import util
from uiautomator import Device
import traceback
import log,logging
import multiprocessingoptpath = os.getcwd()                      #获取当前操作目录
imgpath = os.path.join(optpath,'img')      #截图目录def cleanEnv():os.system('adb kill-server')needClean = ['log.log','img','rst']pwd = os.getcwd()for i in needClean:delpath = os.path.join(pwd,i)if os.path.isfile(delpath):cmd = 'del /f/s/q "%s"'% delpathos.system(cmd)elif os.path.isdir(delpath):cmd = 'rd /s/q "%s"' %delpathos.system(cmd)if not os.path.isdir('rst'):os.mkdir('rst')def runwatch(d,data):times = 120while True:if data == 1:                return True# d.watchers.reset()d.watchers.run()        times -= 1if times == 0:breakelse:time.sleep(0.5)def installapk(apklist,d,device):sucapp = []errapp = []# d = Device(device)#初始化一个结果文件d.screen.on()rstlogger = log.Logger('rst/%s.log'%device,clevel = logging.DEBUG,Flevel = logging.INFO)#先安装mkillermkillerpath = os.path.join(os.getcwd(),'MKiller_1001.apk')cmd = 'adb -s %s install -r %s'% (device,mkillerpath)util.exccmd(cmd)def checkcancel(d,sucapp,errapp):times = 10while(times):if d(textContains = u'取消安装').count:print d(textContains = u'取消安装',className='android.widget.Button').info['text']d(textContains = u'取消安装',className='android.widget.Button').click()rstlogger.info(device+'测试成功,有弹出取消安装对话框')breakelse:time.sleep(1)times -= 1if times == 0:rstlogger.error(device+'测试失败,没有弹出取消安装对话框')try:        d.watcher('allowroot').when(text=u'允许').click(text=u'允许')d.watcher('install').when(text=u'安装').when(textContains=u'是否要安装该应用程序').click(text=u'安装',className='android.widget.Button') #专门为小米弹出的安装拦截d.watcher('cancel').when(text=u'取消').when(textContains=u'超强防护能够极大提高').click(text=u'取消')d.watcher('confirm').when(text=u'确认').when(textContains=u'应用程序许可').click(text=u'确认')d.watcher('agree').when(text=u'同意并使用').click(text=u'同意并使用')d.watcher('weishiuninstall').when(textContains=u'暂不处理').click(textContains=u'暂不处理')# d.watchers.run()data = 0util.doInThread(runwatch,d,data,t_setDaemon=True)#启动急救箱并退出急救箱cmd = 'adb -s %s shell am start com.qihoo.mkiller/com.qihoo.mkiller.ui.index.AppEnterActivity'% deviceutil.exccmd(cmd)time.sleep(5)times = 3while(times):d.press.back()if d(text=u'确认').count:d(text=u'确认').click()breakelse:time.sleep(1)times -=1for item in apklist:apkpath = itemif not os.path.exists(apkpath):logger.error('%s的应用不存在,请检查'%apkpath)continue if not device:cmd = 'adb install -r "%s"' % apkpathelse:cmd = 'adb -s %s install -r "%s"'%(device,apkpath)util.doInThread(checkcancel,d,sucapp,errapp)rst = util.exccmd(cmd)except Exception, e:logger.error(traceback.format_exc())data = 1data = 1return sucappdef finddevices():rst = util.exccmd('adb devices')devices = re.findall(r'(.*?)\s+device',rst)if len(devices) > 1:deviceIds = devices[1:]logger.info('共找到%s个手机'%str(len(devices)-1))for i in deviceIds:            logger.info('ID为%s'%i)return deviceIdselse:logger.error('没有找到手机,请检查')return #needcount:需要安装的apk数量,默认为0,既安所有
#deviceids:手机的列表
#apklist:apk应用程序的列表
def doInstall(deviceids,apklist):count = len(deviceids)port_list = range(5555,5555+count)for i in range(len(deviceids)):d = Device(deviceids[i],port_list[i])util.doInThread(installapk,apklist,d,deviceids[i])#结束应用
def uninstall(deviceid,packname,timeout=20):cmd = 'adb -s %s uninstall %s' %(deviceid,packname) ft = util.doInThread(os.system,cmd,t_setDaemon=True)while True:if ft.isFinished():return Trueelse:time.sleep(1)timeout -= 1if timeout == 0:return False# 需要配置好adb 环境变量
# 1.先确定有几台手机
# 2.再确定有多少个应用
# 3.先安装mkiller,启动mkiller
# 4.再安装测试的样本
# 5.检查是否有取消安装的按钮出现,出现说明测试通过,没出现说明测试失败if __name__ == "__main__":cleanEnv()logger = util.loggerdevicelist = finddevices()if devicelist:       apkpath = os.path.join(os.getcwd(),'apk')apklist = util.listFile(apkpath)doInstall(devicelist,apklist) #每个手机都要安装apklist里的apk
util.py 线程与执行cmd脚本函数文件
#coding:gbk
import os,sys
import log
import logging
import threading
import multiprocessing
import timelogger = log.Logger('log.log',clevel = logging.DEBUG,Flevel = logging.INFO)def exccmd(cmd):try:return os.popen(cmd).read()except Exception:return None#遍历目录内的文件列表
def listFile(path, isDeep=True):_list = []if isDeep:try:for root, dirs, files in os.walk(path):for fl in files:_list.append('%s\%s' % (root, fl))except:passelse:for fn in glob.glob( path + os.sep + '*' ):if not os.path.isdir(fn):_list.append('%s' % path + os.sep + fn[fn.rfind('\\')+1:])return _list#线程函数
class FuncThread(threading.Thread):def __init__(self, func, *params, **paramMap):threading.Thread.__init__(self)self.func = funcself.params = paramsself.paramMap = paramMapself.rst = Noneself.finished = Falsedef run(self):self.rst = self.func(*self.params, **self.paramMap)self.finished = Truedef getResult(self):return self.rstdef isFinished(self):return self.finisheddef doInThread(func, *params, **paramMap):t_setDaemon = Noneif 't_setDaemon' in paramMap:t_setDaemon = paramMap['t_setDaemon']del paramMap['t_setDaemon']ft = FuncThread(func, *params, **paramMap)if t_setDaemon != None:ft.setDaemon(t_setDaemon)ft.start()return ft
log.py log相应的函数文件
#coding=gbk
import logging,os
import ctypesFOREGROUND_WHITE = 0x0007
FOREGROUND_BLUE = 0x01 # text color contains blue.
FOREGROUND_GREEN= 0x02 # text color contains green.
FOREGROUND_RED  = 0x04 # text color contains red.
FOREGROUND_YELLOW = FOREGROUND_RED | FOREGROUND_GREENSTD_OUTPUT_HANDLE= -11
std_out_handle = ctypes.windll.kernel32.GetStdHandle(STD_OUTPUT_HANDLE)
def set_color(color, handle=std_out_handle):bool = ctypes.windll.kernel32.SetConsoleTextAttribute(handle, color)return boolclass Logger:def __init__(self, path,clevel = logging.DEBUG,Flevel = logging.DEBUG):self.logger = logging.getLogger(path)self.logger.setLevel(logging.DEBUG)fmt = logging.Formatter('[%(asctime)s] [%(levelname)s] %(message)s', '%Y-%m-%d %H:%M:%S')#设置CMD日志sh = logging.StreamHandler()sh.setFormatter(fmt)sh.setLevel(clevel)#设置文件日志fh = logging.FileHandler(path)fh.setFormatter(fmt)fh.setLevel(Flevel)self.logger.addHandler(sh)self.logger.addHandler(fh)def debug(self,message):self.logger.debug(message)def info(self,message):self.logger.info(message)def war(self,message,color=FOREGROUND_YELLOW):set_color(color)self.logger.warn(message)set_color(FOREGROUND_WHITE)def error(self,message,color=FOREGROUND_RED):set_color(color)self.logger.error(message)set_color(FOREGROUND_WHITE)def cri(self,message):self.logger.critical(message)if __name__ =='__main__':logyyx = Logger('yyx.log',logging.WARNING,logging.DEBUG)logyyx.debug('一个debug信息')logyyx.info('一个info信息')logyyx.war('一个warning信息')logyyx.error('一个error信息')logyyx.cri('一个致命critical信息')
这个小测试应用虽然比较简单,但是由于刚刚接触uiautomator的python封装,所以还是遇到了一些麻烦,不过还好,最终的结果是很好的解决了相应的问题,这里也算是抛砖引玉吧,这个uiautomator还有很多好玩的值得探索的地方,待以后慢慢发现~
使用uiautomator的python封装进行android的UI测试相关推荐
- Android ui 单元测试 覆盖率,Android单元测试/Ui测试+JaCoCo覆盖率统计
Android单元测试/Ui测试+JaCoCo覆盖率统计 参考资料1 参考资料2 背景说明 单元测试 从源代码着手,对源码中的最小可测试单元进行检查和验证,在对源代码有较深的理解下,编写测试单元,工作 ...
- 关于Android的UI测试
Android 测试主要分为3个类型: 单元测试(Unit Test) 区分UI代码和功能代码在Android开发中尤其困难.因为有时Activity既有Controller的功能,又有View的功能 ...
- python开发安卓程序-python可以编写android程序吗?
python可以编写android程序吗?答案是肯定的.Android不直接支持使用python开发应用,需要使用其它中间件或者库.PythonForAndroid.CLE以及Wrapandroid ...
- python利器怎么编程-bluepy 一款python封装的BLE利器简单介绍
1.bluepy 简介 bluepy 是github上一个很好的蓝牙开源项目,其地址在 LINK-1, 其主要功能是用python实现linux上BLE的接口. This is a project t ...
- python封装sql脚本 github_Github 大牛封装 Python 代码,实现自动发送邮件只需三行代码...
原标题:Github 大牛封装 Python 代码,实现自动发送邮件只需三行代码 在运维开发中,使用 Python 发送邮件是一个非常常见的应用场景.今天一起来探讨一下,GitHub 的大牛门是如何使 ...
- 开源自己用python封装的一个Windows GUI(UI Automation)自动化工具,支持MFC,Windows Forms,WPF,Metro,Qt...
首先,大家可以看下这个链接 Windows GUI自动化测试技术的比较和展望 . 这篇文章介绍了Windows中GUI自动化的三种技术:Windows API, MSAA - Microsoft Ac ...
- python的底层实现,Python封装底层实现原理详解(通俗易懂)
事实上,Python 封装特性的实现纯属"投机取巧",之所以类对象无法直接调用以双下划线开头命名的类属性和类方法,是因为其底层实现时,Python 偷偷改变了它们的名称. 前面章节 ...
- python封装概念_Python封装及解构
python封装及解构 Python的封装与其他语言的封装箱不同,python中没有装箱的概念,一切皆对象 将多个值使用逗号进行分割,本质上是返回元组 In [1]: a = 1,2 In [2]: ...
- android 开发 python_用python语言开发android应用程序(1) - 格物致知的博客空间 - 中国移动开发者社区 - Powered by X-Space...
对于不熟悉Java语言,又想进入android开发领域的人来说,似乎有两个选择,一个是重新开始学习Java语言,然后开始学习android开发,一个就是到处求方问药:在android上可不使用XXX语 ...
最新文章
- mkdir 创建多级目录_linux中的目录功能和文件文件管理
- c++引用专题之普通引用
- C/C++中的##用法
- windows python文件拷贝到linux上执行问题
- EL表达式和JSTL的介绍以及基本使用
- 行业大数据产品发展趋势
- Easyrecovery12.0.0.2 官方版下载
- 秒杀系统的设计思维导图
- 律动荆棘皇冠 Crown of Thorns
- 看相识人的顶级学问--《冰鉴》
- WampServer 3.1.0 所需VC运行库下载及安装说明
- 鼠标指针乱跑的解决方案
- Win7电脑如何关闭智能卡服务功能--win10专业版
- 痱子和湿疹的区别在哪里?
- 基于Mysql+Servlet+JSP的作业提交系统
- HDU2037:今年暑假不AC
- 8月22日看多摩川花火大会
- Java版吃豆游戏及源码
- 面对CUDA报错的种种解决办法
- Halcon视觉检测——PCB板处理:获取焊点及线路端点
