iOS-MultipeerConnectivity框架开发(二)
原文地址:http://www.appcoda.com/intro-ios-multipeer-connectivity-programming/
编者:在iOS-MultipeerConnectivity框架开发(一)中,我们给出了MultipeerConnectivity框架的介绍和演示应用程序内置的聊天功能。MultipeerConnectivity框架是一个许多新的框架介绍了iOS 7。正如在iOS-MultipeerConnectivity框架开发(一)中所看到的,该框架允许开发人员可以轻松地建立附近的设备之间的通信和实现数据交换的功能。在本系列的第2部分,让我们继续探索Multipeer连接框架和如何实现文件共享功能。
进入教程
设置用户文件共享界面
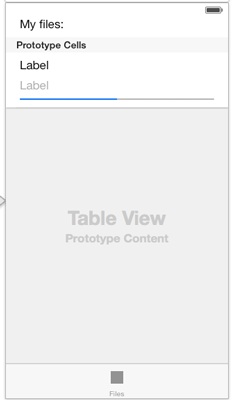
Frame: X=20, Y=20, Width=280, Height=21
Text: My files:
UITableView
Frame: X=0, Y=49, Width=320, Height=519
Frame: X=20, Y=8, Width=280, Height=21
Tag: 100
UILabel
Frame: X=20, Y=37, Width=280, Height=21
Tag: 200
Color: Light Gray
UIProgressView
Frame: X=20, Y=66, Width=280, Height=2
Tag: 300
现在,让我们创建一个IBOutlet属性连接到表格视图。打开secondviewcontroller .h文件并添加下一个声明:
@interface SecondViewController : UIViewController
@property (weak, nonatomic) IBOutlet UITableView *tblFiles;
@end
另外,在这个文件里面,我们需要执行一些代理协议,如下所示:
@interface SecondViewController : UIViewController <UITableViewDelegate, UITableViewDataSource, UIActionSheetDelegate>回到 Interface Builder界面 连接tblFiles属性表的视图。
分享文件
#import "AppDelegate.h"下一步,将一个对象声明为接口的私有部分:
@interface SecondViewController ()
@property (nonatomic, strong) AppDelegate *appDelegate;
@end
最后,实例化的viewDidLoad方法:
|
1
2
3
4
5
6
|
- ( void ) viewDidLoad
{
[ super viewDidLoad ] ;
_appDelegate = ( AppDelegate * ) [ [ UIApplication sharedApplication ] delegate ] ;
}
|
创建示例文件sample_file1.txt和sample_file2.txt,然后将它们添加到项目中。
|
1
2
3
4
5
6
7
8
|
@interface SecondViewController ( )
. . .
@property ( nonatomic , strong ) NSString *documentsDirectory ;
- ( void ) copySampleFilesToDocDirIfNeeded ;
@end
|
让我们现在去执行:
|
1
2
3
4
5
6
7
8
9
10
11
12
13
14
15
16
17
18
19
20
21
22
23
24
25
26
27
28
29
30
31
|
- ( void ) copySampleFilesToDocDirIfNeeded {
NSArray *paths = NSSearchPathForDirectoriesInDomains ( NSDocumentDirectory , NSUserDomainMask , YES ) ;
_documentsDirectory = [ [ NSString alloc ] initWithString : [ paths objectAtIndex : 0 ] ] ;
NSString *file1Path = [ _documentsDirectory stringByAppendingPathComponent : @"sample_file1.txt" ] ;
NSString *file2Path = [ _documentsDirectory stringByAppendingPathComponent : @"sample_file2.txt" ] ;
NSFileManager *fileManager = [ NSFileManager defaultManager ] ;
NSError *error ;
if ( ! [ fileManager fileExistsAtPath :file1Path ] || ! [ fileManager fileExistsAtPath :file2Path ] ) {
[ fileManager copyItemAtPath : [ [ NSBundle mainBundle ] pathForResource : @"sample_file1" ofType : @"txt" ]
toPath :file1Path
error : & error ] ;
if ( error ) {
NSLog ( @"%@" , [ error localizedDescription ] ) ;
return ;
}
[ fileManager copyItemAtPath : [ [ NSBundle mainBundle ] pathForResource : @"sample_file2" ofType : @"txt" ]
toPath :file2Path
error : & error ] ;
if ( error ) {
NSLog ( @"%@" , [ error localizedDescription ] ) ;
return ;
}
}
}
|
首先,我们指定和保持文件目录路径的documentsdirectory对象。这是必要的,因为我们需要它几次。下一步,指定样本文件的目标路径,如果它们中的每一个存在于文档目录中。如果他们没有找到,那么他们被复制到 documents ,如果出现任何错误(希望不是),我们只需记录它的描述。
|
1
2
3
4
5
|
- ( void ) viewDidLoad
{
. . .
[ self copySampleFilesToDocDirIfNeeded ] ;
}
|
关于表视图,我们希望它能够显示所有现有的文件,所以我们能够利用它们,并将它们发送给其他对等节点。这意味着随后,我们需要使用一个数组作为表视图的数据源,该数组必须包含在文件目录中存在的所有文件。所以,让我们去声明一个nsmutablearray对象:
|
1
2
3
4
5
|
@interface SecondViewController ( )
. . .
@property ( nonatomic , strong ) NSMutableArray *arrFiles ;
@end
|
我们应该如何添加对象到arrfiles阵列?简单地通过读取文件目录的所有文件,并得到他们的名字。因为这个原因,我们需要一个更私人的方法来做这。让我们声明它:
|
1
2
3
4
5
6
|
@interface SecondViewController ( )
. . .
- ( NSArray * ) getAllDocDirFiles ;
@end
|
一直往前走,它的实现,我们将使用一个nsfilemanager对象来获取文件的目录的所有内容作为一个NSArray对象,然后返回这个数组:
|
1
2
3
4
5
6
7
8
9
10
11
12
|
- ( NSArray * ) getAllDocDirFiles {
NSFileManager *fileManager = [ NSFileManager defaultManager ] ;
NSError *error ;
NSArray *allFiles = [ fileManager contentsOfDirectoryAtPath : _documentsDirectory error : & error ] ;
if ( error ) {
NSLog ( @"%@" , [ error localizedDescription ] ) ;
return nil ;
}
return allFiles ;
}
|
这种方法没有什么困难。如果出现任何错误,我们只是向日志显示描述。现在,是时候将对象添加到第一次的arrfiles阵列,这将发生在viewDidLoad方法。
|
1
2
3
4
5
|
- ( void ) viewDidLoad
{
. . .
_arrFiles = [ [ NSMutableArray alloc ] initWithArray : [ self getAllDocDirFiles ] ] ;
}
|
我们已准备在表格视图上显示数据。首先,让我们自行委托和数据源,在viewDidLoad:
|
1
2
3
4
5
6
|
- ( void ) viewDidLoad
{
. . .
[ _tblFiles setDelegate :self ] ;
[ _tblFiles setDataSource :self ] ;
}
|
让我们的样本文件出现在表格视图的视图控制器的负载,我们需要迫使它做我们的arrfiles阵后有其价值。因此,仅仅增加了这条线在viewDidLoad方法:
|
1
2
3
4
5
|
- ( void ) viewDidLoad
{
. . .
[ _tblFiles reloadData ] ;
}
|
在你运行和测试,我们在这个视图控制器做了这么远,你需要执行的委托和数据源所需的表格视图的方法。所以,他们在这里:
|
1
2
3
4
5
6
7
8
9
10
11
12
13
14
15
16
17
18
19
20
21
22
23
24
25
26
27
28
29
30
31
|
- ( NSInteger ) numberOfSectionsInTableView : ( UITableView * ) tableView {
return 1 ;
}
- ( NSInteger ) tableView : ( UITableView * ) tableView numberOfRowsInSection : ( NSInteger ) section {
return [ _arrFiles count ] ;
}
- ( UITableViewCell * ) tableView : ( UITableView * ) tableView cellForRowAtIndexPath : ( NSIndexPath * ) indexPath {
UITableViewCell *cell ;
cell = [ tableView dequeueReusableCellWithIdentifier : @"CellIdentifier" ] ;
if ( cell == nil ) {
cell = [ [ UITableViewCell alloc ] initWithStyle :UITableViewCellStyleDefault reuseIdentifier : @"CellIdentifier" ] ;
[ cell setAccessoryType :UITableViewCellAccessoryDisclosureIndicator ] ;
}
cell . textLabel . text = [ _arrFiles objectAtIndex :indexPath . row ] ;
[ [ cell textLabel ] setFont : [ UIFont systemFontOfSize : 14.0 ] ] ;
return cell ;
}
- ( CGFloat ) tableView : ( UITableView * ) tableView heightForRowAtIndexPath : ( NSIndexPath * ) indexPath {
return 60.0 ;
}
|
如果你想,运行应用程序来测试它,但你现在看到的唯一的东西是示例文件的列表。
让我们继续以使应用程序发送一个文件,一旦它被选中。我们实际上要发生的事情,是在点击一个表视图行时,一个列表中的所有对等点出现,所以我们选择的对等点,选择的文件应该被发送到。为便于我们在这个例子中,我们将使用UIActionSheet的对象,每个按钮,它将代表一个同伴。我们希望这个动作片每次都出现在一排,让我们看看这是怎么做的:
|
1
2
3
4
5
6
7
8
9
10
11
12
13
14
15
16
17
18
19
|
- ( void ) tableView : ( UITableView * ) tableView didSelectRowAtIndexPath : ( NSIndexPath * ) indexPath {
NSString *selectedFile = [ _arrFiles objectAtIndex :indexPath . row ] ;
UIActionSheet *confirmSending = [ [ UIActionSheet alloc ] initWithTitle :selectedFile
delegate :self
cancelButtonTitle :nil
destructiveButtonTitle :nil
otherButtonTitles :nil ] ;
for ( int i = 0 ; i < [ [ _appDelegate . mcManager . session connectedPeers ] count ] ; i ++ ) {
[ confirmSending addButtonWithTitle : [ [ [ _appDelegate . mcManager . session connectedPeers ] objectAtIndex :i ] displayName ] ] ;
}
[ confirmSending setCancelButtonIndex : [ confirmSending addButtonWithTitle : @"Cancel" ] ] ;
[ confirmSending showInView :self . view ] ;
_selectedFile = [ _arrFiles objectAtIndex :indexPath . row ] ;
_selectedRow = indexPath . row ;
}
|
我们开始实施:TableView didselectrowatindexpath:通过创建一个行动表对象的方法,为选定的文件名作为标题。可能看起来很奇怪,我们设置了无价值的所有按钮的标题,但这是在目的。如果我们能够创建一个无终止的字符串,它将包含所有的对等显示名称,并将它们设为按钮标题,这样的话,我们将非常少量,但不幸的是,没有办法做到这一点。因此,有一个循环,在这里我们添加每个单点的一个由一个作为一个按钮的动作片。右后,我们设置了取消按钮,这是必要的情况下,我们只想关闭的动作片,最后我们显示它。
使用最后的2行,我们将在2个私有成员中保留选定的文件名和选定行,因为我们需要知道这些值之后。Xcode将抛出一个错误,因为我们还没有宣布他们,所以让我们现在就做:
|
1
2
3
4
5
|
@interface SecondViewController ( )
. . .
@property ( nonatomic , strong ) NSString *selectedFile ;
@property ( nonatomic ) NSInteger selectedRow ;
@end
|
现在每次选择文件的时候,都会出现一个action,包含每个点的名字,所以我们可以选择文件的收件人。但是在我们有一个同行选择的行动表后,会发生什么?嗯,没有,因为我们还没有实施任何行为。
我们需要实现actionsheet:clickedbuttonatindex:委托方法(这也是为什么我们采取uiactionsheetdelegate协议之前)。在那里,有检查,对等名称已被挖掘并没有取消按钮后,我们将调用另一个新的美国Multipeer连接框架,采用sendresourceaturl:withname:withcompletionhandler等:。其实,这是一个类的方法的mcsession。在完成处理程序中,我们将检查在发送过程中是否发生错误,或者如果该文件已成功发送。在任何情况下,我们会让我们知道结果。
要来这里的一个重要的事实是,这个方法返回一个nsprogress对象。nsprogress是iOS 7的一个新类,所以参观苹果的文档,如果你想知道更多关于它。无论如何,我们关心的结果的方法,因为这是我们唯一的方式来跟踪发送进度和更新我们的用户界面显示一个百分比值完成的整个过程。然而,这里有一个大陷阱,这就是我们的接口将冻结,如果我们调用这个方法的主要线程。不要担心,因为这是一个容易的障碍,克服。我们只会做我们的整个工作在一个dispatch_async块,所以我们的界面将在发送文件保持响应。
在我们看到它的实施之前,我们只需要一个最后的说明。因为这是一个演示程序,我们想知道什么文件来自其他同行,所以我们确保我们的代码真的工作。因此,当你在执行权的下一个,我们稍微修改文件名,通过增加对等的显示名称。
|
1
2
3
4
5
6
7
8
9
10
11
12
13
14
15
16
17
18
19
20
21
22
23
24
25
26
27
28
29
30
31
32
33
|
- ( void ) actionSheet : ( UIActionSheet * ) actionSheet clickedButtonAtIndex : ( NSInteger ) buttonIndex {
if ( buttonIndex != [ [ _appDelegate . mcManager . session connectedPeers ] count ] ) {
NSString *filePath = [ _documentsDirectory stringByAppendingPathComponent : _selectedFile ] ;
NSString *modifiedName = [ NSString stringWithFormat : @"%@_%@" , _appDelegate . mcManager . peerID . displayName , _selectedFile ] ;
NSURL *resourceURL = [ NSURL fileURLWithPath :filePath ] ;
dispatch_async ( dispatch_get_main_queue ( ) , ^ {
NSProgress *progress = [ _appDelegate . mcManager . session sendResourceAtURL :resourceURL
withName :modifiedName
toPeer : [ [ _appDelegate . mcManager . session connectedPeers ] objectAtIndex :buttonIndex ]
withCompletionHandler : ^ ( NSError *error ) {
if ( error ) {
NSLog ( @"Error: %@" , [ error localizedDescription ] ) ;
}
else {
UIAlertView *alert = [ [ UIAlertView alloc ] initWithTitle : @"MCDemo"
message : @"File was successfully sent."
delegate :self
cancelButtonTitle :nil
otherButtonTitles : @"Great!" , nil ] ;
[ alert performSelectorOnMainThread : @selector ( show ) withObject :nil waitUntilDone :NO ] ;
[ _arrFiles replaceObjectAtIndex : _selectedRow withObject : _selectedFile ] ;
[ _tblFiles performSelectorOnMainThread : @selector ( reloadData )
withObject :nil
waitUntilDone :NO ] ;
}
} ] ;
} ) ;
}
}
|
让我点一些关于这个代码片段的东西:
1.任何错误说明都只是记录,但在成功发送的情况下,我们向用户显示一个警告视图。请注意,此代码在第二队列运行,所以我们在应用程序的主线程上显示了警告视图。
2.你可能会想知道这条线是什么,只是正确的后,警惕的看法:
|
1
2
|
[ _arrFiles replaceObjectAtIndex : _selectedRow withObject : _selectedFile ] ;
[ _tblFiles performSelectorOnMainThread : @selector ( reloadData ) withObject :nil waitUntilDone :NO ] ;
|
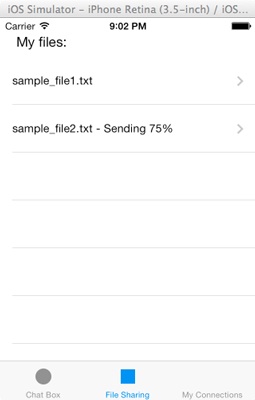
好的,正如你会发现自己的,正如我已经说过的,一个百分比值将显示在发送过程中选择的文件名旁边,表示整个过程。发送完成后,我们需要再次显示文件名,所以这就是我们在这里做的。我们只需更新数组和表视图,然后将合并的文件名和进度值替换为单个文件名。更进一步,这显然表明为什么我们把选中的行和文件名的selectedrow和selectedfile成员分别。
|
1
2
3
4
5
6
7
8
9
10
11
12
13
14
|
- ( void ) actionSheet : ( UIActionSheet * ) actionSheet clickedButtonAtIndex : ( NSInteger ) buttonIndex {
if ( buttonIndex != [ [ _appDelegate . mcManager . session connectedPeers ] count ] ) {
. . .
dispatch_async ( dispatch_get_main_queue ( ) , ^ {
NSProgress *progress = . . .
[ progress addObserver :self
forKeyPath : @"fractionCompleted"
options :NSKeyValueObservingOptionNew
context :nil ] ;
} ) ;
}
}
|
用这种方法,我们注册我们的类与进展对象,所以我们可以观察到任何变化。
现在,执行下一个,所以我们通知的fractioncompleted属性值的变化。
|
1
2
3
4
5
6
7
8
9
10
|
- ( void ) observeValueForKeyPath : ( NSString * ) keyPath ofObject : ( id ) object change : ( NSDictionary * ) change context : ( void * ) context {
NSString *sendingMessage = [ NSString stringWithFormat : @"%@ - Sending %.f%%" ,
_selectedFile ,
[ ( NSProgress * ) object fractionCompleted ] * 100
] ;
[ _arrFiles replaceObjectAtIndex : _selectedRow withObject :sendingMessage ] ;
[ _tblFiles performSelectorOnMainThread : @selector ( reloadData ) withObject :nil waitUntilDone :NO ] ;
}
|
正如你看到的,我们创建了一个新的字符串值,该值包含选定的文件名和当前进展的百分比值。该字符串将在数组中的特定索引替换现有的对象,并且在主线程上更新了表视图,所以它反映了发送进度。
如果你感觉如此,去给它一个尝试。发送文件和观看它工作。接收方也不会接受任何东西,因为我们已经实现了发送者的一面,但不是接收器的时间。
打开mcmanager。M文件,并定位会话:didstartreceivingresourcewithname:frompeer:withprogress:委托方法。它的名字清楚地说明它的目的,我们将使用它来跟踪进展情况,而新的文件正在接收。在这里,我们将采取行动,就像我们在前两届代表的方法,只需到NSDictionary对象中添加参数值和发布新的通知。
有更多的东西,我们会在这里做的。我们想看的是收到的文件的进度和相应地更新我们的进展,我们将与该参数的nsprogress对象注册类,所以我们可以观察到任何变化的fractioncompleted财产所在地。其实,我们要做的同样的事情,在文件发送功能的实现,我们以前,我们还观察fractioncompleted更改代码。所以,在这里:
|
1
2
3
4
5
6
7
8
9
10
11
12
13
14
15
16
17
18
19
|
- ( void ) session : ( MCSession * ) session didStartReceivingResourceWithName : ( NSString * ) resourceName fromPeer : ( MCPeerID * ) peerID withProgress : ( NSProgress * ) progress {
NSDictionary *dict = @ { @"resourceName" : resourceName ,
@"peerID" : peerID ,
@"progress" : progress
} ;
[ [ NSNotificationCenter defaultCenter ] postNotificationName : @"MCDidStartReceivingResourceNotification"
object :nil
userInfo :dict ] ;
dispatch_async ( dispatch_get_main_queue ( ) , ^ {
[ progress addObserver :self
forKeyPath : @"fractionCompleted"
options :NSKeyValueObservingOptionNew
context :nil ] ;
} ) ;
}
|
如你所见,我们也使用dispatch_async块观察进展。
现在,实施下一个方法,所以我们会通知任何进展情况的变化:
|
1
2
3
4
5
|
- ( void ) observeValueForKeyPath : ( NSString * ) keyPath ofObject : ( id ) object change : ( NSDictionary * ) change context : ( void * ) context {
[ [ NSNotificationCenter defaultCenter ] postNotificationName : @"MCReceivingProgressNotification"
object :nil
userInfo : @ { @"progress" : ( NSProgress * ) object } ] ;
}
|
每一次进步都会改变,我们会发布一个新的通知。
让我们回到secondviewcontroller。M文件,现在,让我们与这两个新的通知的处理。在viewDidLoad方法添加下一个代码段:
|
1
2
3
4
5
6
7
8
9
10
11
12
13
|
- ( void ) viewDidLoad
{
. . .
[ [ NSNotificationCenter defaultCenter ] addObserver :self
selector : @selector ( didStartReceivingResourceWithNotification : )
name : @"MCDidStartReceivingResourceNotification"
object :nil ] ;
[ [ NSNotificationCenter defaultCenter ] addObserver :self
selector : @selector ( updateReceivingProgressWithNotification : )
name : @"MCReceivingProgressNotification"
object :nil ] ;
}
|
didstartreceivingresourcewithnotification:和updatereceivingprogresswithnotification:都是私人的方法,我们将实施右下。让我们先将它们声明为接口的私有部分:
|
1
2
3
4
5
|
@interface SecondViewController ( )
. . .
- ( void ) didStartReceivingResourceWithNotification : ( NSNotification * ) notification ;
- ( void ) updateReceivingProgressWithNotification : ( NSNotification * ) notification ;
@end
|
让我们来实现这些方法:
|
1
2
3
4
|
- ( void ) didStartReceivingResourceWithNotification : ( NSNotification * ) notification {
[ _arrFiles addObject : [ notification userInfo ] ] ;
[ _tblFiles performSelectorOnMainThread : @selector ( reloadData ) withObject :nil waitUntilDone :NO ] ;
}
|
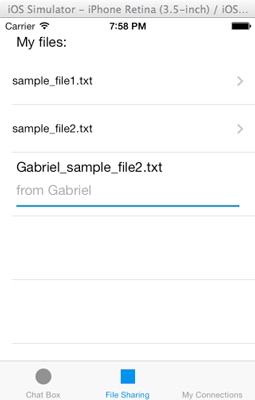
我们在这里做什么是很清楚的:我们将通知用户信息字典作为对象的arrfiles阵列,我们加载表格视图的数据,新的文件名,发送者和项目被显示的初始值。但他们真的会被展示吗?答案是直到我们更新TableView:cellForRowAtIndexPath:表格视图的方法,因为它是目前能够显示的字符串值在默认的细胞类型。让我们先看看代码:
|
1
2
3
4
5
6
7
8
9
10
11
12
13
14
15
16
17
18
19
20
21
22
23
24
25
26
27
28
29
30
|
- ( UITableViewCell * ) tableView : ( UITableView * ) tableView cellForRowAtIndexPath : ( NSIndexPath * ) indexPath {
UITableViewCell *cell ;
if ( [ [ _arrFiles objectAtIndex :indexPath . row ] isKindOfClass : [ NSString class ] ] ) {
cell = [ tableView dequeueReusableCellWithIdentifier : @"CellIdentifier" ] ;
if ( cell == nil ) {
cell = [ [ UITableViewCell alloc ] initWithStyle :UITableViewCellStyleDefault reuseIdentifier : @"CellIdentifier" ] ;
[ cell setAccessoryType :UITableViewCellAccessoryDisclosureIndicator ] ;
}
cell . textLabel . text = [ _arrFiles objectAtIndex :indexPath . row ] ;
[ [ cell textLabel ] setFont : [ UIFont systemFontOfSize : 14.0 ] ] ;
}
else {
cell = [ tableView dequeueReusableCellWithIdentifier : @"newFileCellIdentifier" ] ;
NSDictionary *dict = [ _arrFiles objectAtIndex :indexPath . row ] ;
NSString *receivedFilename = [ dict objectForKey : @"resourceName" ] ;
NSString *peerDisplayName = [ [ dict objectForKey : @"peerID" ] displayName ] ;
NSProgress *progress = [ dict objectForKey : @"progress" ] ;
[ ( UILabel * ) [ cell viewWithTag : 100 ] setText :receivedFilename ] ;
[ ( UILabel * ) [ cell viewWithTag : 200 ] setText : [ NSString stringWithFormat : @"from %@" , peerDisplayName ] ] ;
[ ( UIProgressView * ) [ cell viewWithTag : 300 ] setProgress :progress . fractionCompleted ] ;
}
return cell ;
}
|
这里是交易:我们的策略是检查该类中的每个对象的arrfiles阵列存在。如果它是一个NSString的价值,那么我们已经写好的代码执行。然而,如果数组的即将被处理的对象是NSDictionary类,然后我们将原型细胞使用标识符建立在界面生成器,然后根据每个子视图的标签值添加到它,我们把字典值,让他们从字典对象提取后。
除此之外,还改变了以下的方法:
|
1
2
3
4
5
6
7
8
|
- ( CGFloat ) tableView : ( UITableView * ) tableView heightForRowAtIndexPath : ( NSIndexPath * ) indexPath {
if ( [ [ _arrFiles objectAtIndex :indexPath . row ] isKindOfClass : [ NSString class ] ] ) {
return 60.0 ;
}
else {
return 80.0 ;
}
}
|
这是必要的,所以最后一行有适当的高度时,一个文件被接收,一切都要正确显示。
如果你运行这个应用程序,你会看到,当一个文件开始被接收,一个新的行出现在表视图,但你会注意到,有没有任何进展。那是因为我们还没有实现的updatereceivingprogresswithnotification:私有方法呢,现在是正确的时间去做它。
|
1
2
3
4
5
6
7
8
9
10
11
12
13
14
15
16
|
- ( void ) updateReceivingProgressWithNotification : ( NSNotification * ) notification {
NSProgress *progress = [ [ notification userInfo ] objectForKey : @"progress" ] ;
NSDictionary *dict = [ _arrFiles objectAtIndex : ( _arrFiles . count - 1 ) ] ;
NSDictionary *updatedDict = @ { @"resourceName" : [ dict objectForKey : @"resourceName" ] ,
@"peerID" : [ dict objectForKey : @"peerID" ] ,
@"progress" : progress
} ;
[ _arrFiles replaceObjectAtIndex : _arrFiles . count - 1
withObject :updatedDict ] ;
[ _tblFiles performSelectorOnMainThread : @selector ( reloadData ) withObject :nil waitUntilDone :NO ] ;
}
|
如果你运行它,你会看到,当一个文件被接收到的进展视图完美显示的进展。
最后一件事是要做的,就是在文件目录下保存文件。在本教程的最后一次,让我们打开mcmanager。M文件和我们走到会话:didfinishreceivingresourcewithname:frompeer:aturl:误:委托方法。当一个资源被接收时,这一个被调用,并且像往常一样,我们将发布一个新的通知。
|
1
2
3
4
5
6
7
8
9
10
11
12
|
- ( void ) session : ( MCSession * ) session didFinishReceivingResourceWithName : ( NSString * ) resourceName fromPeer : ( MCPeerID * ) peerID atURL : ( NSURL * ) localURL withError : ( NSError * ) error {
NSDictionary *dict = @ { @"resourceName" : resourceName ,
@"peerID" : peerID ,
@"localURL" : localURL
} ;
[ [ NSNotificationCenter defaultCenter ] postNotificationName : @"didFinishReceivingResourceNotification"
object :nil
userInfo :dict ] ;
}
|
让我们回到secondviewcontroller。M文件,让我们的课堂能够观察这个通知在viewDidLoad方法:
|
1
2
3
4
5
6
7
|
{
. . .
[ [ NSNotificationCenter defaultCenter ] addObserver :self
selector : @selector ( didFinishReceivingResourceWithNotification : )
name : @"didFinishReceivingResourceNotification"
object :nil ] ;
}
|
同样的方法让我们实现方法: didFinishReceivingResourceWithNotification: method:
|
1
2
3
4
|
@interface SecondViewController ( )
. . .
- ( void ) didFinishReceivingResourceWithNotification : ( NSNotification * ) notification ;
@end
|
正如您将看到的,我们复制的文件(一般的资源)从临时被存储到文件目录。在方法结束时,我们将所有的物体从arrfiles阵列,我们重新读取整个文件目录内容。没有什么特别的,应该进一步讨论,所以在这里它是:
|
1
2
3
4
5
6
7
8
9
10
11
12
13
14
15
16
17
18
19
20
21
22
23
|
- ( void ) didFinishReceivingResourceWithNotification : ( NSNotification * ) notification {
NSDictionary *dict = [ notification userInfo ] ;
NSURL *localURL = [ dict objectForKey : @"localURL" ] ;
NSString *resourceName = [ dict objectForKey : @"resourceName" ] ;
NSString *destinationPath = [ _documentsDirectory stringByAppendingPathComponent :resourceName ] ;
NSURL *destinationURL = [ NSURL fileURLWithPath :destinationPath ] ;
NSFileManager *fileManager = [ NSFileManager defaultManager ] ;
NSError *error ;
[ fileManager copyItemAtURL :localURL toURL :destinationURL error : & error ] ;
if ( error ) {
NSLog ( @"%@" , [ error localizedDescription ] ) ;
}
[ _arrFiles removeAllObjects ] ;
_arrFiles = nil ;
_arrFiles = [ [ NSMutableArray alloc ] initWithArray : [ self getAllDocDirFiles ] ] ;
[ _tblFiles performSelectorOnMainThread : @selector ( reloadData ) withObject :nil waitUntilDone :NO ] ;
}
|
文件共享功能已经完成,这也意味着我们的演示程序已经完全准备好了!
编译和运行APP
总结
iOS-MultipeerConnectivity框架开发(二)相关推荐
- iOS AFN框架(二)的使用和有关序列化器的问题--缓存机制------
AFHTTPRequestOperationManager:内部封装的是 NSUrlConnection,网络请求管理类,用来负责发送网络请求,是使用最多的一个类. AFHTTPSessionMana ...
- iOS音视频开发七:视频采集
将通过拆解采集 → 编码 → 封装 → 解封装 → 解码 → 渲染流程并实现 Demo 来向大家介绍如何在 iOS/Android 平台上手音视频开发. 这里是第七篇:iOS 视频采集 Demo.这个 ...
- iOS音视频开发八:视频编码,H.264 和 H.265 都支持
我们将通过拆解采集 → 编码 → 封装 → 解封装 → 解码 → 渲染流程并实现 Demo 来向大家介绍如何在 iOS/Android 平台上手音视频开发. 这里是第八篇:iOS 视频编码 Demo. ...
- iOS - 常用的iOS Mac框架和库以及常用的中文开发博客
对于iOS以及Mac开发中常用到的一些框架,以及比较好的技术博客做了总结: 主要内容如下: UI 下拉刷新 模糊效果 AutoLayout 富文本 图表 表相关 隐藏与显示 HUD与Toast 对话框 ...
- 《SpringBoot框架开发技术整合》笔记(二)
文章目录 前言 第五章 SpringBoot配置全局的异常捕获 一. 页面跳转形式 二. ajax形式 三. 统一返回异常的形式 参考 前言 笔者近期在慕课网上学习了<Springboo ...
- iOS开发-二维码扫描和应用跳转
iOS开发-二维码扫描和应用跳转 序言 前面我们已经调到过怎么制作二维码,在我们能够生成二维码之后,如何对二维码进行扫描呢? 在iOS7之前,大部分应用中使用的二维码扫描是第三方的扫描框架,例如Z ...
- iOS开发—二维码扫描-郭宏志-专题视频课程
iOS开发-二维码扫描-3869人已学习 课程介绍 本课程由扣丁学堂教学总监郭宏志老师讲授,主要讲解了iOS开发专题中的二维码扫描这一专题,内容包含了二维码扫描中的全部知识,让学员更多 ...
- 小米手环iOS开发实战(一):iOS蓝牙框架CoreBluetooth
小米手环iOS开发实战(一):iOS蓝牙框架CoreBluetooth 本项目为对小米手环进行二次开发,利用了小米手环蓝牙连接并不安全的特性,连接后可以获取手环数据,并可修改数据. 本实例使用Swif ...
- PHP框架开发:二、从何处开始?URL
PHP框架开发:二.从何处开始?URL 注:草稿性质的文章,会不断进行修改完善,故请抱着怀疑的态度阅读 所谓万事开头难,我们的框架应该从何处开始"着笔"呢? 让我们来分析一下... ...
最新文章
- 关于jquery的$.fn和$
- (DCA)Decision Curve Analysis画图及意义
- 浅析网络营销外包中如何实现网络营销外包中的图片推广?
- 视频 + PPT | 数字化运营,从理论到实践
- 技术解析:如何用pyecharts绘制时间轮播图
- 计算机教师专业发展规划,信息技术教师成长规划_信息技术教师专业成长浅谈...
- Box2D的Edge Shape的碰撞处理
- 美国湾区2016年科技行业就业增长率出现骤降
- 打造自己的 nodejs 静态文件服务器(帖子内容,直接复制别人的)
- Crisis of HDU(母函数)
- TQ WP7 Starter
- 【图像检索】基于matlab GUI综合颜色和形状特征图像检索【含Matlab源码 395期】
- 免费好用的划词搜题神器插件
- window里dig命令跟踪域名DNS解析
- SysWow64没有权限解决办法
- oracle11g 测试io,IO性能测试 1:Oracle ORION
- 语音信号调制matlab,第二章 语音信号的数字模型 数字语音处理及MATLAB仿真 教学课件.ppt...
- java期末李鹤_Willike
- 怎么获取网络舆情舆论数据的三大技术解决方法
- win7计算机浏览记录怎么删除,Win7旗舰版系统删除本地浏览记录的技巧