以太坊区块浏览器怎么使用_使用以太坊专用网络管理器Puppeth
以太坊区块浏览器怎么使用
We’ve previously written about Geth, one of the most popular Ethereum nodes.
我们之前已经写过关于最流行的以太坊节点之一的Geth的文章。
When you install Geth with helper tools, it comes with a handy tool called Puppeth, which you can use to maintain and install various helper tools for managing and deploying your private blockchain. Puppeth can also be installed independently if you have Go installed, with the following command:
当您使用助手工具安装Geth时,它附带了一个名为Puppeth的便捷工具,您可以使用它维护和安装各种助手工具,以管理和部署私有区块链。 如果已安装Go,还可以使用以下命令独立安装Puppeth:
go get github.com/ethereum/go-ethereum/cmd/puppethLet’s take a look at the tool.
让我们看一下该工具。
Note: this tutorial will require you to have two remote machines at your disposal. Whether that is a virtual machine like Homestead Improved or an actual server on your network, or a combination of the two, doesn’t matter. We’ll go through the setup procedure with VMs in this tutorial.
注意:本教程将要求您使用两台远程计算机。 那是像Homestead Improvementd这样的虚拟机还是网络上的实际服务器,还是两者的结合都没有关系。 在本教程中,我们将介绍虚拟机的设置过程。
Note: due to a bug in Puppeth, this approach might not work if your virtual machines (see below) are too small. Either make bigger VMs (more RAM) or wait for a fix if that’s not an option.
注意:由于Puppeth中的错误,如果您的虚拟机(请参阅下文)太小,则此方法可能不起作用。 制作更大的VM(更多的RAM),或者如果无法解决,请等待修复。
自举 (Bootstrapping)
We’ll follow this process to get two virtual machines up and running. We need two machines because we’ll be running two Ethereum nodes, each on its own IP address.
我们将按照此过程来启动和运行两个虚拟机。 我们需要两台机器,因为我们将运行两个以太坊节点,每个节点都有自己的IP地址。
Note: This is a limitation of Puppeth, as it’s not possible to deploy a sealing node on the same machine using this tool.
注意:这是Puppeth的局限性,因为无法使用此工具在同一台机器上部署密封节点。
If you don’t know what Vagrant is, and what tools we’re using here, we recommend you read this introduction to Vagrant, which breaks it down in a newbie-friendly way.
如果您不知道Vagrant是什么,以及我们在这里使用的是什么工具,我们建议您阅读Vagrant的简介 ,以一种新手友好的方式对其进行分解。
mkdir my_project; cd my_project
git clone https://github.com/swader/homestead_improved hi_puppeth1
git clone https://github.com/swader/homestead_improved hi_puppeth2
Change the IP address of the second clone by going into the hi_puppeth2 folder and modifying the IP address field to be 192.168.10.11 instead of 192.168.10.10.
通过进入更改第二个克隆的IP地址hi_puppeth2文件夹,并修改IP address字段设置为192.168.10.11 ,而不是192.168.10.10 。
Next, open up some ports on the VMs by modifying each clone’s Homestead.yaml’s final section, like so:
接下来,通过修改每个克隆的Homestead.yaml的最后部分,在VM上打开一些端口,如下所示:
ports:
- send: 8545
to: 8545
- send: 30301
to: 30301
- send: 30302
to: 30302
- send: 30303
to: 30303
- send: 30304
to: 30304
- send: 30305
to: 30305
- send: 30306
to: 30306
Don’t forget to add these virtual hosts into your host machine’s /etc/hosts file as well. Otherwise the VMs won’t be accessible by their domain name!
不要忘记将这些虚拟主机也添加到主机的/etc/hosts文件中。 否则,将无法通过其域名访问虚拟机!
192.168.10.10 homestead.test
192.168.10.11 puppethnode.test
Note: change the IP addresses if the addresses of your VMs differ.
注意:如果您的VM的地址不同,请更改IP地址。
Finally, run vagrant up; vagrant ssh to boot each machine and SSH into it. Remember to run this from two separate tabs so you can keep both machines open and running.
最后, vagrant up; vagrant ssh vagrant up; vagrant ssh来启动每台机器并通过SSH进入它。 记住要从两个单独的选项卡运行此程序,以便可以保持两台计算机均处于打开状态并运行。
先决条件 (Prerequisites)
Now let’s install the prerequisite software on each machine.
现在,让我们在每台计算机上安装必备软件。
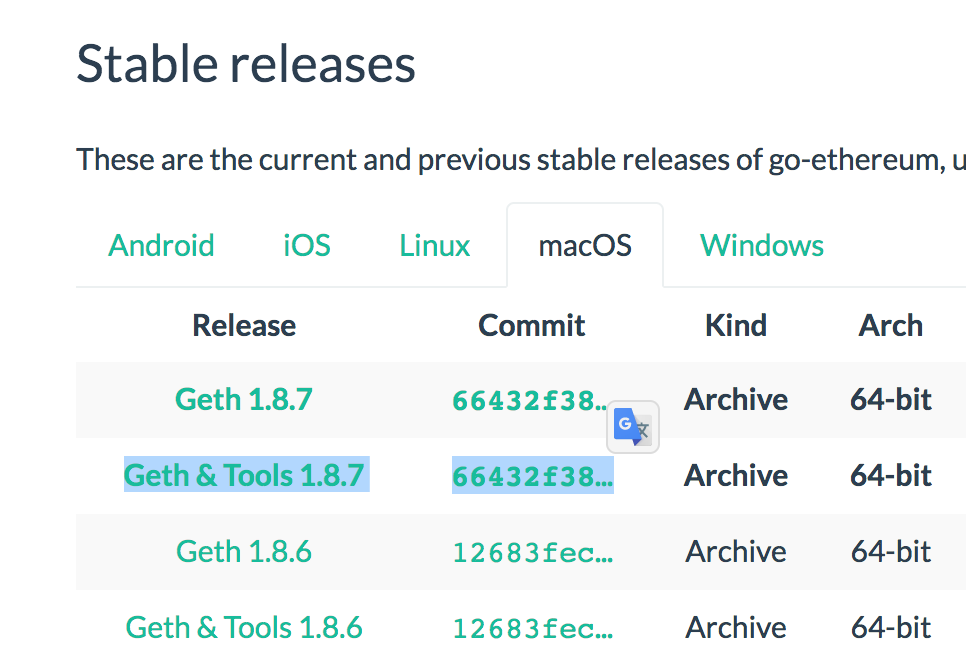
Puppeth runs helper applications and Ethereum nodes for you in Docker containers, so we need Docker. It’s also useful to install Geth itself.
Puppeth在Docker容器中为您运行辅助应用程序和以太坊节点,因此我们需要Docker。 安装Geth本身也很有用。
sudo add-apt-repository -y ppa:ethereum/ethereum
sudo apt-get update
sudo apt-get install \
apt-transport-https \
ca-certificates \
curl \
software-properties-common \
ethereum \
docker.io \
docker-compose
All other prerequisites will be pulled in by Puppeth through docker itself, but we need to make sure the current user is allowed to operate Docker commands first:
Puppeth将通过Docker本身引入所有其他先决条件,但我们需要确保首先允许当前用户操作Docker命令:
sudo usermod -a -G docker $USEROn the host machine (outside the VMs), we should create new Ethereum accounts in the folder where we’re running our project.
在主机上(VM外部),我们应该在运行项目的文件夹中创建新的以太坊帐户。
If you’re using the VMs as suggested above, that can be in myproject if myproject is the parent folder which contains hi_puppeth1 and hi_puppeth2.
如果您按照上述建议使用VM,并且myproject是包含hi_puppeth1和hi_puppeth2的父文件夹,则可以在myproject 。
mkdir node1 node2
geth --datadir node1 account new
geth --datadir node2 account new
Make a note of the addresses generated by this process:
记下此过程生成的地址:
$ mkdir node1 node2
$ geth --datadir node1 account new
INFO [05-20|10:27:20] Maximum peer count                       ETH=25 LES=0 total=25
Your new account is locked with a password. Please give a password. Do not forget this password.
Passphrase:
Repeat passphrase:
Address: {aba88be2dc16eaed464e3991eed5a1eaa5e7b11b}
$ geth --datadir node2 account new
INFO [05-20|10:27:35] Maximum peer count                       ETH=25 LES=0 total=25
Your new account is locked with a password. Please give a password. Do not forget this password.
Passphrase:
Repeat passphrase:
Address: {655a6ea9950cdf9f8a8175fda639555f17277bdf}
We need two accounts because at least two signers are needed in a Proof of Authority blockchain (more on that later).
我们需要两个帐户,因为在权限证明区块链中至少需要两个签名者 (稍后会详细介绍)。
布佩斯 (Puppeth)
Now that our VMs are running and our accounts are initialized, let’s see what Puppeth offers. With the remote servers/VMs still running, in a new tab on your host machine run Puppeth with puppeth.
现在我们的虚拟机正在运行并且我们的帐户已初始化,让我们看看Puppeth提供了什么。 在远程服务器/ VM仍在运行的情况下,在主机上的新选项卡中运行Puppeth with puppeth 。
The first thing it’ll ask for is the network name. This is useful for identifying various blockchains if you’re running several on your local machine. We’ll use “puptest” here.
它首先要求的是网络名称。 如果您在本地计算机上运行多个区块链,这对于识别各种区块链很有用。 我们将在此处使用“ puptest”。
Please specify a network name to administer (no spaces or hyphens, please)
> puptest
Sweet, you can set this via --network=puptest next time!
INFO [05-20|10:32:15] Administering Ethereum network           name=puptest
WARN [05-20|10:32:15] No previous configurations found         path=/Users/swader/.puppeth/puptest
Now let’s connect to our “remote” servers so that Puppeth has them in the list and can do operations on them.
现在,让我们连接到我们的“远程”服务器,以便Puppeth在列表中包含它们并可以对其进行操作。
跟踪新的远程服务器 (Track new remote server)
Using this option lets you connect to the server where your blockchain-related services will be running. Select option 3, then enter the values as follows:
使用此选项,您可以连接到将运行与区块链相关的服务的服务器。 选择选项3,然后输入如下值:
Please enter remote server's address:
> vagrant@192.168.10.10
What's the decryption password for /Users/swader/.ssh/id_rsa? (won't be echoed)
>
The authenticity of host '192.168.10.10:22 (192.168.10.10:22)' can't be established.
SSH key fingerprint is 38:53:d3:c2:85:cf:77:54:a5:54:26:3b:93:5b:6f:09 [MD5]
Are you sure you want to continue connecting (yes/no)? yes
What's the login password for vagrant at 192.168.10.10:22? (won't be echoed)
>
INFO [05-20|10:39:53] Starting remote server health-check      server=vagrant@192.168.10.10
+-----------------------+---------------+---------+--------+-------+
|        SERVER         |    ADDRESS    | SERVICE | CONFIG | VALUE |
+-----------------------+---------------+---------+--------+-------+
| vagrant@192.168.10.10 | 192.168.10.10 |         |        |       |
+-----------------------+---------------+---------+--------+-------+
Puppeth will ask for your SSH key’s passphrase just in case SSH is used to connect to the server. If not, it will ask for the SSH password (as it does in the example above). The default SSH password for the user vagrant on the VM in question is vagrant.
Puppeth会要求您提供SSH密钥的密码,以防万一使用SSH连接到服务器。 如果不是,它将要求提供SSH密码(如上例所示)。 该VM上用户vagrant的默认SSH密码为vagrant 。
The output at the end echoes the “health” status of the remote server. Since it has no services running, it will just list the IP. You can see the same result by selecting option 1: Show network stats.
最后的输出将回显远程服务器的“运行状况”状态。 由于没有正在运行的服务,因此只会列出IP。 通过选择选项1: Show network stats您可以看到相同的结果。
Repeat the process for the other VM, so both appear in the health status screen.
对其他VM重复该过程,因此两者都将显示在运行状况屏幕中。
新世纪 (New Genesis)
To start our blockchain, we should configure a new genesis file. A genesis file is a file from which the first (genesis) block is built, and on which each subsequent block grows.
要启动我们的区块链,我们应该配置一个新的创世纪文件。 创世文件是从中构建第一个(创世)块的文件,随后的每个块都在该文件上增长。
Select option 2, Configure new genesis, and populate the options like so:
选择选项2, Configure new genesis ,然后像下面那样填充选项:
Which consensus engine to use? (default = clique)
1. Ethash - proof-of-work
2. Clique - proof-of-authority
> 2
How many seconds should blocks take? (default = 15)
> 10
Which accounts are allowed to seal? (mandatory at least one)
> 0xaba88be2dc16eaed464e3991eed5a1eaa5e7b11b
> 0x655a6ea9950cdf9f8a8175fda639555f17277bdf
> 0x
Which accounts should be pre-funded? (advisable at least one)
> 0x655a6ea9950cdf9f8a8175fda639555f17277bdf
> 0xaba88be2dc16eaed464e3991eed5a1eaa5e7b11b
> 0x
Specify your chain/network ID if you want an explicit one (default = random)
>
INFO [05-20|11:25:55] Configured new genesis block
You can find out about the difference between PoW and PoA here. PoW wastes a lot of computing power and is impractical to run on a local machine, so we’ll pick PoA here. We reduce the block time to 10 seconds so that our transactions confirm faster, and we add the addresses we generated previously as allowed sealers and as pre-funded. Being sealers means that they’re allowed to create new blocks. Since there are no mining rewards in PoA, we also pre-fund them with almost infinite ether so we can test our transactions with those accounts.
您可以在此处了解PoW和PoA之间的区别。 PoW浪费了大量的计算能力,并且在本地计算机上运行是不切实际的,因此我们在这里选择PoA。 我们将封锁时间减少到10秒,以便我们的交易确认更快,并且我们将先前生成的地址添加为允许的盖章者和预付款项。 成为封闭者意味着他们可以创建新的块。 由于PoA中没有采矿奖励,因此我们也将以几乎无限的以太币预先为其提供资金,因此我们可以使用这些帐户测试交易。
The genesis file is now generated, and for backup purposes you can export it into an external file if you wish by selecting option 2 again. This isn’t necessary for now.
现在生成了创世文件,并且出于备份目的,如果愿意,可以再次选择选项2将其导出到外部文件中。 目前没有必要。
Now let’s deploy some blockchain components!
现在让我们部署一些区块链组件!
部署网络组件 (Deploying Network Components)
Puppeth deploys these components in separate docker containers using the docker-compose tool. Docker as a tool is outside the scope of this post, but you don’t need to be familiar with it to use this anyway. Let’s start with the first component, Ethstats.
Puppeth使用docker docker-compose工具将这些组件部署在单独的docker容器中。 Docker作为一种工具不在本文讨论范围之内,但是您无论如何都不需要熟悉它。 让我们从第一个组件Ethstats开始。
ethstats (Ethstats)
Installing Ethstats installs and runs a local version of the ethstats.net website. Select the first option.
安装Ethstats将安装并运行ethstats.net网站的本地版本。 选择第一个选项。
Which server do you want to interact with?
1. vagrant@192.168.10.10
2. Connect another server
> 1
Which port should ethstats listen on? (default = 80)
> 8081
Allow sharing the port with other services (y/n)? (default = yes)
>
INFO [05-20|11:43:32] Deploying nginx reverse-proxy            server=192.168.10.10         port=8081
Building nginx
Step 1/1 : FROM jwilder/nginx-proxy
---> e143a63bea4b
Successfully built e143a63bea4b
Recreating puptest_nginx_1
Proxy deployed, which domain to assign? (default = 192.168.10.10)
> homestead.test
What should be the secret password for the API? (must not be empty)
> internet2
Found orphan containers (puptest_nginx_1) for this project. If you removed or renamed this service in your compose file, you can run this command with the --remove-orphans flag to clean it up.
Building ethstats
Step 1/2 : FROM puppeth/ethstats:latest
We select the first previously added server. Then we add a port on which to deploy this software, and then name the domain through which we’ll access the app. Finally, we generate a simple “secret” for accessing the API of the app. Docker then takes over and builds the software for us.
我们选择第一个先前添加的服务器。 然后,我们添加一个用于部署此软件的端口,然后命名将用来访问该应用程序的域。 最后,我们生成一个简单的“秘密”来访问应用程序的API。 然后,Docker接管并为我们构建软件。
The end result should be another health screen output, but this time the table will have another entry: it will also list the ethstats app with its configuration details:
最终结果应该是另一个运行状况屏幕输出,但是这次表将有另一个条目:它还将列出ethstats应用程序及其配置详细信息:
INFO [05-20|11:44:23] Starting remote server health-check server=vagrant@192.168.10.10
+-----------------------+---------------+----------+-----------------------+----------------+
| SERVER | ADDRESS | SERVICE | CONFIG | VALUE |
+-----------------------+---------------+----------+-----------------------+----------------+
| vagrant@192.168.10.10 | 192.168.10.10 | ethstats | Banned addresses | [] |
| | | | Login secret | internet2 |
| | | | Website address | homestead.test |
| | | | Website listener port | 8081 |
| | | | --------------------- | -------------- |
| | | nginx | Shared listener port | 8081 |
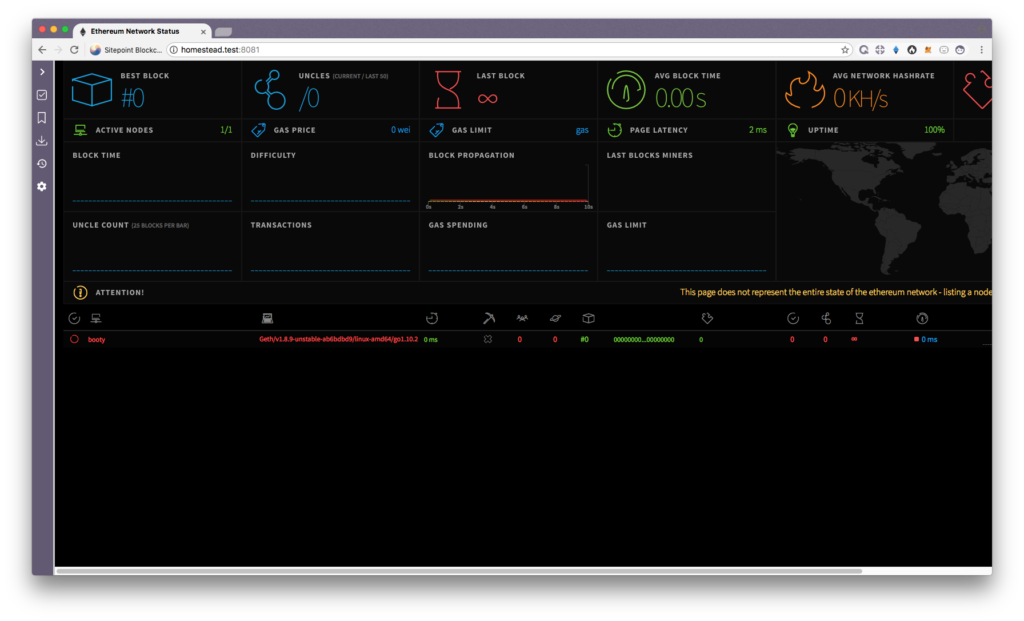
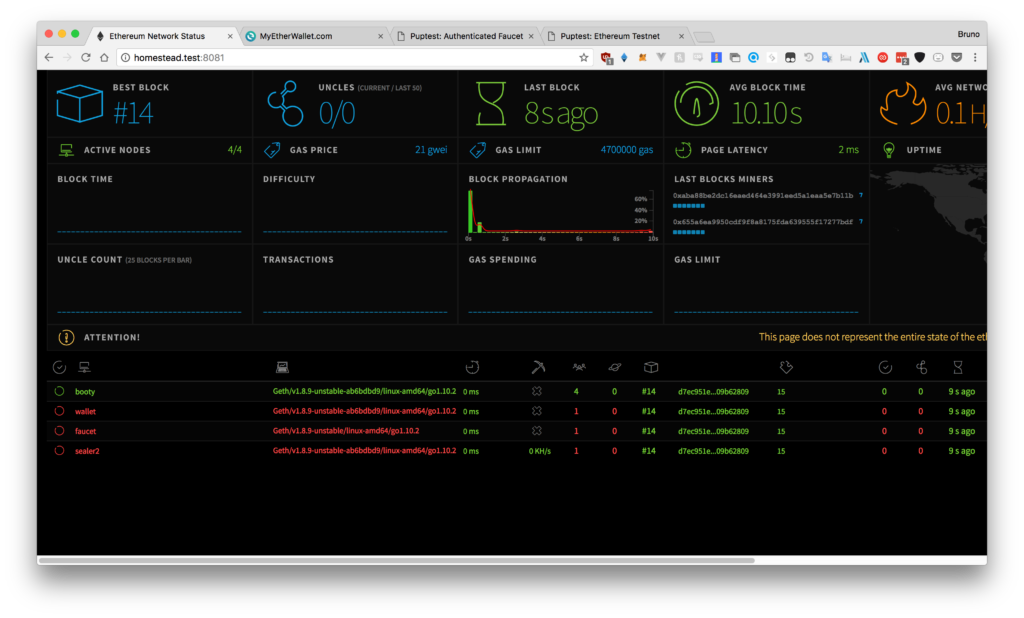
+-----------------------+---------------+----------+-----------------------+----------------+Visiting the URL homestead.test:8081 in the browser should show a screen like the following:
在浏览器中访问URL homestead.test:8081应该显示如下屏幕:

This application is currently useless: we need to deploy at least one node for this app to start showing something!
该应用程序目前无用:我们需要至少部署一个节点才能使该应用程序开始显示内容!
引导节点 (Bootnode)
Let’s deploy a bootnode.
让我们部署一个引导节点。
A bootnode is a node which serves just as the first connection point through which an Ethereum node connects to other nodes. It’s basically a relayer of information helping nodes connect.
引导节点是充当第一个连接点的节点 ,以太坊节点通过该连接点连接到其他节点。 它基本上是信息帮助节点连接的中继器。
Pick option 2 to deploy the bootnode. Again, deploy on the same remote server and pick some defaults, then give the node a name for the “health stats” table:
选择选项2来部署引导节点。 同样,在同一台远程服务器上部署并选择一些默认值,然后为节点指定“运行状况统计信息”表的名称:
Which server do you want to interact with?
1. vagrant@192.168.10.10
2. vagrant@192.168.10.11
3. Connect another server
> 1
Where should data be stored on the remote machine?
> /home/vagrant/mychain
Which TCP/UDP port to listen on? (default = 30303)
>
How many peers to allow connecting? (default = 512)
>
How many light peers to allow connecting? (default = 256)
>
What should the node be called on the stats page?
> booty
Docker will build the node and run it. The location where to store data on the remote machine is arbitrary. We picked the vagrant user’s home directory.
Docker将构建并运行该节点。 在远程计算机上存储数据的位置是任意的。 我们选择了vagrant用户的主目录。
If you revisit the ethstats page now (homestead.test:8081) you’ll notice that booty is in the list of nodes!
如果现在重新访问ethstats页面( homestead.test:8081 ),您会发现booty在节点列表中!
Note: if this is not the case and your bootnode is listed as offline in the healthcheck, reboot the remote server (with the VM, that’s vagrant reload) and then check again.
注意:如果不是这种情况,并且您的引导节点在运行状况检查中被列为脱机状态,请重新引导远程服务器(使用VM,即是vagrant reload ),然后再次进行检查 。
Sealnode (Sealnode)
A seal node is a node which can serve as the miner of new blocks. Let’s deploy that next:
密封节点是可以用作新块矿工的节点。 让我们接下来部署它:
Which server do you want to interact with?
1. vagrant@192.168.10.10
2. vagrant@192.168.10.11
3. Connect another server
> 1
Where should data be stored on the remote machine?
> /home/vagrant/mychainsealer
Which TCP/UDP port to listen on? (default = 30303)
> 30301
How many peers to allow connecting? (default = 50)
>
How many light peers to allow connecting? (default = 0)
>
What should the node be called on the stats page?
> sealer
Please paste the signer's key JSON:
> {"address":"655a6ea9950cdf9f8a8175fda639555f17277bdf","crypto":{"cipher":"aes-128-ctr","ciphertext":"9278db9216e3c58380864bb53edcec245c5bc919a51733333410fe4b22818914","cipherparams":{"iv":"ca6579d08e97c25f46e127e026bafadb"},"kdf":"scrypt","kdfparams":{"dklen":32,"n":262144,"p":1,"r":8,"salt":"93e5f080d76e50c0e08add15d3fdd9b143295d0ccaeec9dae89446e0478ba4a1"},"mac":"28fcdaaf6008d82a0fe22ac60de3398f12a47e471a21618b2333fe15d8d6c9c3"},"id":"20ae40fe-ebf9-4047-8203-711bf67213e9","version":3}
What's the unlock password for the account? (won't be echoed)
>
What gas limit should empty blocks target (MGas)? (default = 4.700)
>
What gas price should the signer require (GWei)? (default = 18.000)
>
All defaults, except location to store data and name of the node. For JSON, grab the content from the file we generated previously when creating new Ethereum accounts. That’s going to be in my_project/node1/keystore. The full contents of that file should be pasted here, and Puppeth will then ask for the password to unlock that wallet. Everything else from then on is automatic again.
所有默认值,除了用于存储数据和节点名称的位置。 对于JSON,请在创建新的以太坊账户时从我们先前生成的文件中获取内容。 那将在my_project/node1/keystore 。 该文件的完整内容应粘贴在此处,然后Puppeth将要求输入密码以解锁该钱包。 从那时起,所有其他一切都将自动恢复。
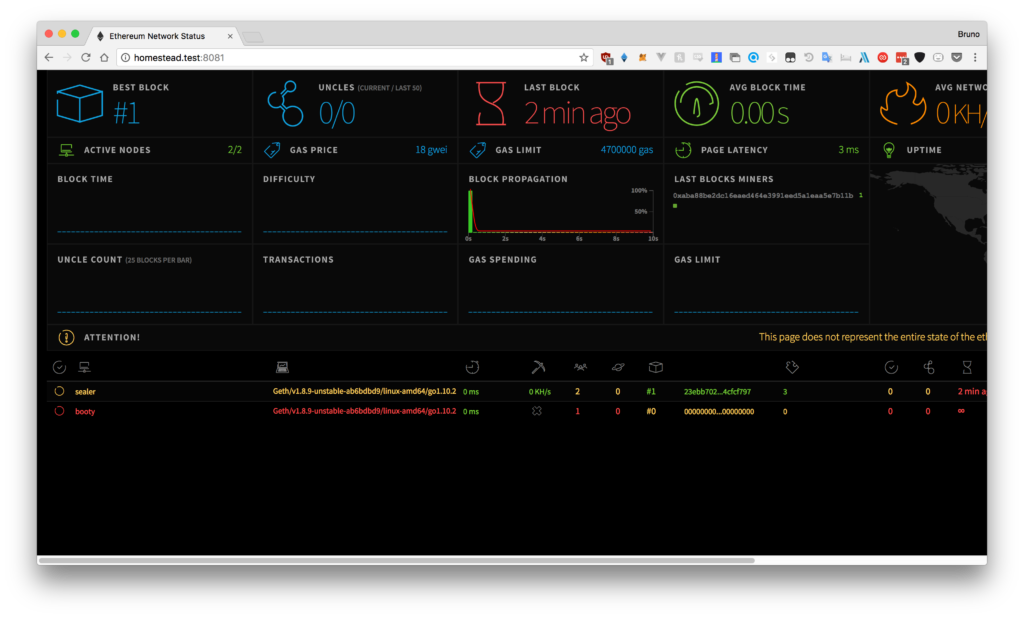
The health screen should show the node as working and it should appear in the Ethstats screen under the name you gave it.
运行状况屏幕应显示该节点正在工作,并且应在您为其指定的名称下的“ Ethstats”屏幕中显示该节点。
Next, repeat the process for the other machine (the one with the IP address 192.168.10.11). Give that node a different name, and use the other keystore file. In other words, set the other account we created as the sealer in this node.
接下来,对另一台机器(IP地址为192.168.10.11台机器)重复该过程。 给该节点起一个不同的名称,然后使用另一个密钥库文件。 换句话说,在此节点中将我们创建的另一个帐户设置为密封者。
Your nodes will now be running and mining together. You should be able to see some progress on the Ethstats screen you deployed in the previous step.
您的节点现在将一起运行和挖掘。 您应该能够在上一步中部署的Ethstats屏幕上看到一些进度。
Note: if the status isn’t changing or a single block gets mined and then nothing happens, the nodes locked up . This can happen on fresh installations. Reboot the VMs and it will work fine.
注意:如果状态没有改变或单个块被开采,然后什么也没有发生,则节点锁定。 在全新安装中可能会发生这种情况。 重新启动虚拟机,它将正常运行。
钱包 (Wallet)
To be able to easily send Ether and custom tokens around, you can deploy your own version of MyEtherWallet using Puppeth.
为了能够轻松发送以太币和自定义令牌,您可以使用Puppeth部署自己的MyEtherWallet版本。
Select Wallet in the selection of components to deploy and populate the options as follows:
在要部署的组件中选择Wallet,然后如下所示填充选项:
Which port should the wallet listen on? (default = 80)
> 8083
Allow sharing the port with other services (y/n)? (default = yes)
> no
Where should data be stored on the remote machine?
> /home/vagrant/wallet
Which TCP/UDP port should the backing node listen on? (default = 30303)
> 30304
Which port should the backing RPC API listen on? (default = 8545)
>
What should the wallet be called on the stats page?
> wallet
The wallet should be available and auto-connected to your test network.
钱包应该可用并自动连接到您的测试网络。
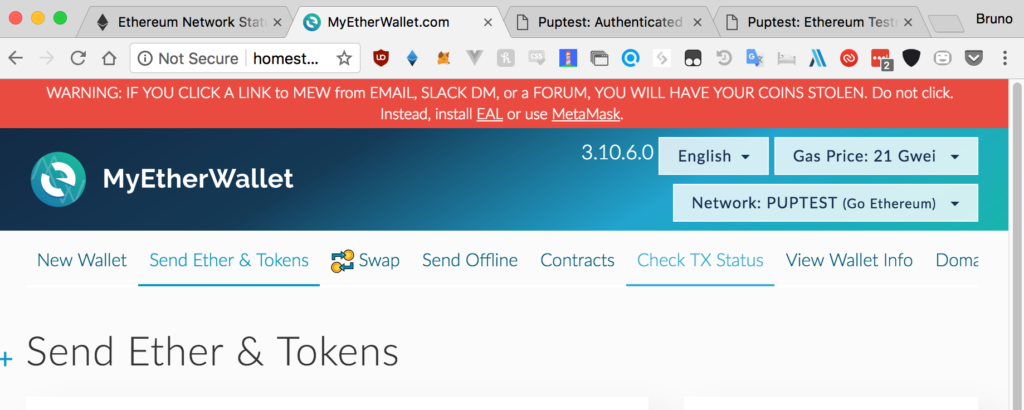
You can open a wallet by selecting JSON file as the means of unlocking it and pointing to one of the JSON files we generated earlier in the my_project/nodeX/keystore folders. Then enter the password, and you’ll have trillions of ether to send. You can use this local version of the wallet to create accounts on your private blockchain and thoroughly test everything. Go ahead and send some ether!
您可以通过选择JSON文件作为解锁钱包的方式打开钱包,并指向我们之前在my_project/nodeX/keystore文件夹中生成的JSON文件之一。 然后输入密码,您将有数以亿计的以太币要发送。 您可以使用此本地版本的钱包在您的私有区块链上创建帐户并彻底测试所有内容。 继续发送一些乙醚!
龙头 (Faucet)
A Faucet is a site on which a user can easily request some test ether. Publicly accessible faucets like the Rinkeby Faucet have protection mechanisms against spam, but our local faucet can be much less secure since it’s a test blockchain.
水龙头是一个站点,用户可以在该站点上轻松请求一些测试用醚。 像Rinkeby水龙头这样的可公开访问的水龙头具有防止垃圾邮件的保护机制,但我们的本地水龙头由于是测试区块链,因此其安全性可能要低得多。
Which port should the faucet listen on? (default = 80)
> 8084
Allow sharing the port with other services (y/n)? (default = yes)
> no
How many Ethers to release per request? (default = 1)
>
How many minutes to enforce between requests? (default = 1440)
> 1
How many funding tiers to feature (x2.5 amounts, x3 timeout)? (default = 3)
>
Enable reCaptcha protection against robots (y/n)? (default = no)
>
WARN [05-20|12:51:13] Users will be able to requests funds via automated scripts
Where should data be stored on the remote machine?
> /home/vagrant/faucet
Which TCP/UDP port should the light client listen on? (default = 30303)
> 30305
What should the node be called on the stats page?
> faucet
Please paste the faucet's funding account key JSON:
> {"address":"655a6ea9950cdf9f8a8175fda639555f17277bdf","crypto":{"cipher":"aes-128-ctr","ciphertext":"9278db9216e3c58380864bb53edcec245c5bc919a51733333410fe4b22818914","cipherparams":{"iv":"ca6579d08e97c25f46e127e026bafadb"},"kdf":"scrypt","kdfparams":{"dklen":32,"n":262144,"p":1,"r":8,"salt":"93e5f080d76e50c0e08add15d3fdd9b143295d0ccaeec9dae89446e0478ba4a1"},"mac":"28fcdaaf6008d82a0fe22ac60de3398f12a47e471a21618b2333fe15d8d6c9c3"},"id":"20ae40fe-ebf9-4047-8203-711bf67213e9","version":3}
What's the unlock password for the account? (won't be echoed)
>
Permit non-authenticated funding requests (y/n)? (default = false)
> y
Once these services have all been added, you should be able to see them in the Ethstats list.
一旦添加了所有这些服务,您就应该能够在Ethstats列表中看到它们。
仪表板 (Dashboard)
Finally, Puppeth offers the “Dashboard”, a web interface which combines all the interfaces we’ve launched so far. The deployment process is equally simple: just follow the steps, and when asked about linking to existing components, select those that we already booted up. The final result should look something like this:
最后,Puppeth提供了“仪表板”,它是一个Web界面,结合了我们到目前为止已启动的所有界面。 部署过程也同样简单:只需按照以下步骤操作,然后在被问及链接到现有组件时,选择我们已经启动的组件。 最终结果应如下所示:
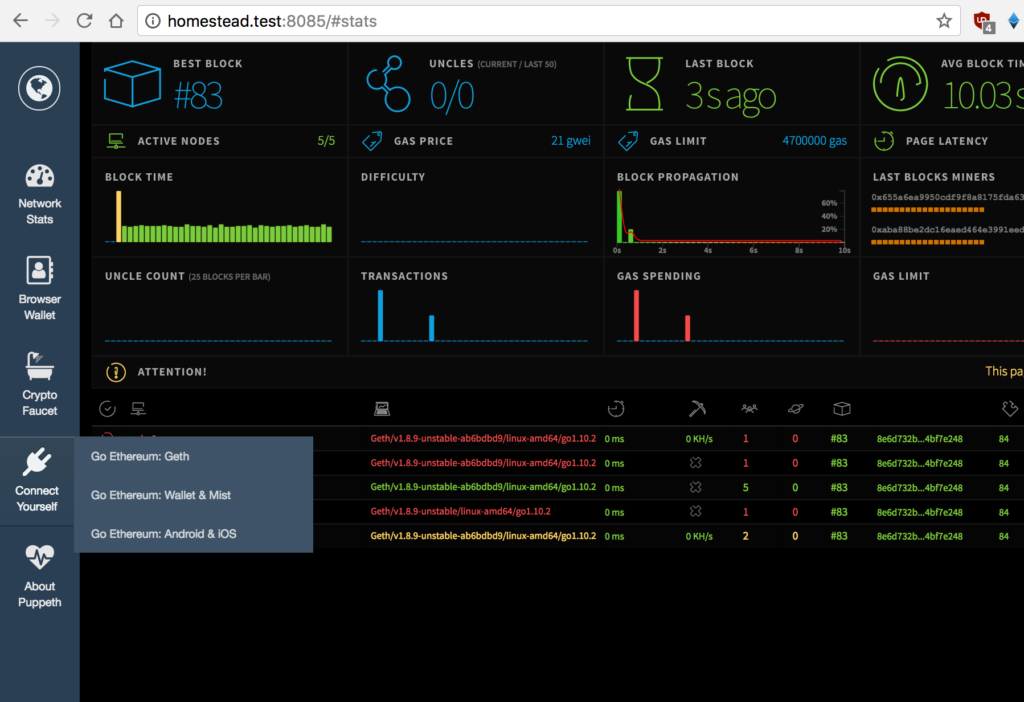
The dashboard is a collection of all the tools we’ve deployed so far, plus some instructions on how to manually connect to the blockchain we had built.
仪表板是到目前为止我们已部署的所有工具的集合,以及有关如何手动连接到我们已构建的区块链的一些说明。
结论 (Conclusion)
You can now start developing your smart contracts with ease, and deploy them to your test blockchain through your local version of MyEtherWallet or the MetaMask integration of Remix, or any other combination.
现在,您可以轻松地开始开发智能合约,并通过本地版本的MyEtherWallet或Remix的MetaMask集成或任何其他组合将它们部署到测试区块链。
Puppeth is a one-stop shop of blockchain service management tools. It’s very handy when you’re doing blockchain development often, but can be complicated to wrap one’s head around. Hopefully this guide has helped you understand what it does and how it does it, and will assist you in your future blockchain endeavors.
Puppeth是区块链服务管理工具的一站式商店。 当您经常进行区块链开发时,这非常方便,但是将其束缚起来可能会很复杂。 希望本指南能帮助您了解它的作用以及它的作用方式,并将对您将来的区块链工作有所帮助。
The Docker containers that run the components are configured to auto-run on boot, so rebooting either of the VMs will not require any reconfiguration, but you’ll need to re-add the servers into Puppeth if you want to further tweak some components or install new ones.
运行这些组件的Docker容器被配置为在引导时自动运行,因此重新引导这两个VM都不需要任何重新配置,但是如果您想进一步调整某些组件或虚拟机,则需要将服务器重新添加到Puppeth中。安装新的。
Any questions? Ping the author on Twitter!
任何问题? 在Twitter上平作者!
翻译自: https://www.sitepoint.com/puppeth-introduction/
以太坊区块浏览器怎么使用
以太坊区块浏览器怎么使用_使用以太坊专用网络管理器Puppeth相关推荐
- 以太坊区块链也拥堵_后以太坊1.0众生相:DeFi拥堵,突围Layer2
不知不觉,我们已经走到了一个「后ETH1.0时代」.从使用体验上,ETH1.0已经不能很好地满足用户的需求:仅仅是DeFi应用,就让其走向了史无前例的.不可忍受的拥堵.然而,孕育了数年的ETH2.0却 ...
- 工具教程第九讲:以太坊区块浏览器使用
这里是王团长区块链学院,与最优秀的区块链人一起成长! 今天给大家讲讲以太坊 区块浏览器如何使用. 点击观看视频教程:工具教程第九讲:以太坊区块浏览器使用 以太坊区块浏览器可以查询所有基于 以太坊 的 ...
- 以太坊区块链也拥堵_以太坊开发人员:EOS刻意拥堵以太坊网络 推高交易费到1美元...
金色财经 比特币7月16日讯根据一些DApp开发人员表示,EOS正在攻击以太坊,试图将交易费提高到1美元.据悉,相关开发人员指责EOS通过随机代币"空投"造成以太坊网络堵塞,而且这 ...
- 以太坊区块链也拥堵_以太坊开发人员怀疑EOS刻意拥堵网络,ETH和EOS大战即将开启?...
原标题:以太坊开发人员怀疑EOS刻意拥堵网络,ETH和EOS大战即将开启? DappVision|7月16日 星期一 [行情] BTC 现价 ¥¥42,594.44 涨跌幅 1.57% ETH 现价 ...
- 以太坊区块链也拥堵_厉害了区块链丨以太坊拥堵的元凶找到了,竟然是它!
最近,EOS疑似操纵以太坊交易造成网路拥堵问题,交易费直线飙升!于是乎以太坊创始人V神不得不站出来讨个说法,但EOS创始人BM却否认了故意攻击,并称这种手段太低级. 这件事情 神奇的是这些代币暂未找到 ...
- 以太坊区块链_以太坊区块链搭建与使用(一)-私有链
步骤 一.下载go语言,并配置环境变量 //以太坊源代码依赖的编译与运行环境 二.通过git clone以太坊源码(go-ethereum),并编译 一.go安装 step1:下载 官方(一般打不开) ...
- 如何搭建socks5和ss节点_以太坊区块链搭建与使用(三)-联盟链
首先对以下概念说明下: 一.以太坊大家都知道比特币使用的技术是区块链技术,比特币也是区块链技术的代表. 即比特币=区块链1.0随着区块链技术的发展以太坊也诞生了,也就是我们说的 区块链2.0.为什么说 ...
- solidity payable_以太坊区块链搭建与使用(五)-智能合约Solidity
一.智能合约Solidity开发工具 1.remix-ide http://remix.ethereum.org/ 在线版本,也可以去github下载安装到本地.开发.编译.发布.执行.测试 2.re ...
- 区块链开发(五)搭建以太坊区块链浏览器
经过前面文章介绍,已经搭建以太坊的区块链环境,但是没有一个界面能查看到区块链的块数等信息,不是很直观,本篇搭建以太坊区块链浏览器. 下载区块链浏览器代码 uiran@cuiran:~/ethereum ...
最新文章
- 加密算法 AES MD5 SHA1
- 【网络流专练一】UVA五题(UVA12125,UVA11082,UVA10983,UVA1306,UVA10735)
- 用EnumMaps映射枚举键
- 携程试点每周两天居家办公反响热烈,76%的员工主动报名
- 支付宝二面微服务、分布式架构?太真实了!
- cron java_cron表达式
- NHibernate初学者指南(15):使用LINQ to NHibernate提供程序查询数据
- JAVA反射系列之Method,java.lang.reflect.Method的使用。
- java 完全背包问题算法_算法笔记(c++)--完全背包问题
- 计算机考试策略,计算机等级考试应试的策略.doc
- Glide圆角和centerCrop()的那些坑
- Tumblr营销大法(三)
- egret 使用EUI开发UI界面
- Word 标题前添加一颜色竖线条
- Python基础—简介、变量、运算符
- SpringBoot工程使用shiro 进行MD5加密
- mongodb 复制集部署(主从升级版)
- ERR wrong number of arguments for 'sadd' command
- 约瑟夫环问题(丢手绢问题)
- iphone 微信网页自动播放音频解决办法