tf 风格迁移 任意内容 固定风格 vgg19
原文链接: tf 风格迁移 任意内容 固定风格 vgg19
上一篇: tf 风格迁移 固定内容 固定风格 vgg19
下一篇: tf scipy misc 模块 tf image 模块 图片 padding 和 剪裁
参考
https://blog.csdn.net/hungryof/article/details/53981959
https://www.cnblogs.com/subic/p/8110478.html
效果
https://www.bilibili.com/video/av42703481/
优化
使用slim模块构建生成网络模块
对图片先进行padding,然后在进行slice,可以去除效果不好的问题 tf.image.crop_to_bounding_box 和 tf.pad
对图片进行平滑处理,去除噪点 tf.image.total_variation
style_loss 中 计算gram矩阵时,需要将每个批次的gram矩阵分割出来,使用 tf.
# styled_net 输出图片风格网络
# style_nets 目标图片风格网络
# batch_size 只在训练中有效,所以可以固化
# 不然gram 矩阵会reshape失败
def sum_style_losses(styled_net, style_nets):with tf.variable_scope('sum_style'):total_style_loss = 0.for net, img_weight in zip(style_nets, STYLE_WEIGHTS):style_loss = 0.for layer, weight in zip(STYLE_LAYERS, STYLE_LAYER_WEIGHTS):a = net[layer]# x = styled_net[layer]for x in tf.split(styled_net[layer], BATCH_SIZE):print('sum_style_losses ', a.shape, x.shape)style_loss += style_layer_loss(a, x) * weightstyle_loss /= float(len(STYLE_LAYERS))total_style_loss += (style_loss * img_weight)total_style_loss /= float(len(style_nets))total_style_loss /= BATCH_SIZEreturn total_style_loss
网络结构
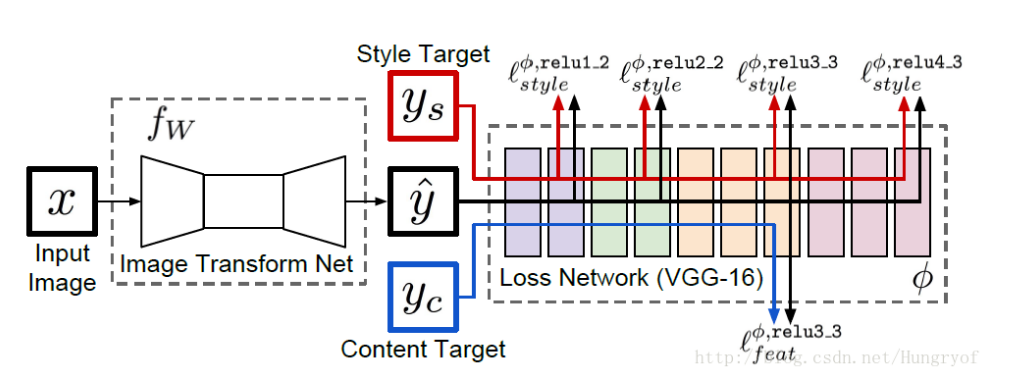
X为输入图片
fw 风格迁移的网络
yc就是X
ys是风格后的图片
y帽为输入图片X经过 fw 风格迁移的网络生成的图片 y帽在内容上与 yc相类似,在风格上与ys相类似。
Fast Style Transfer的训练步骤如下:
1 输入一张图片x到fw中得到结果 y帽
2 将 y帽与yc输入到loss network(VGG-16)中,计算它的relu3_3的输出,并计算它们的均方误差作为content loss
3 将 y帽与ys输入到 loss network(VGG-16)中, 计算它的relu1_2, relu2_2, relu3_3, relu4_3 的输出,再计算它们的Gram Matrix的均方误差作为style loss
4 两个损失相加,并反向传播。更新 fw的参数,固定loss network不动。
5 回到第一步,重新训练fw.
1.1 背后原理简介
深度学习技术可谓无孔不入,在计算机视觉领域尤为明显,图像分类、识别、定位、超分辨率、转换、迁移、描述等等都已经可以使用深度学习技术实现。其背后的技术可以一言以蔽之:卷积网络具有超强的图像特征提取能力
其中,风格迁移算法的成功,其主要基于以下两点:
两张图像经过预训练好的分类网络,若提取出的高维特征(high−levelhigh−level)之间的欧氏距离越小,则这两张图像内容越相似
两张图像经过与训练好的分类网络,若提取出的低维特征(low−levellow−level)在数值上基本相等,则这两张图像越相似,换句话说,两张图像相似等价于二者特征的GramGram矩阵具有较小的弗罗贝尼乌斯范数。
基于这两点,就可以设计合适的损失函数优化网络。
1.2 原理解读
对于深度网络来讲,深度卷积分类网络具有良好的特征提取能力,不同层提取的特征具有不同的含义,每一个训练好的网络都可以视为是一个良好的特征提取器,另外,深度网络由一层层的非线性函数组成,可以视为是复杂的多元非线性函数,此函数完成输入图像到输出的映射,因此,完全可以使用训练好的深度网络作为一个损失函数计算器。
GramGram矩阵的数学形式如下:Gj(x)=A∗ATGj(x)=A∗AT
Gram矩阵实际上是矩阵的内积运算,在风格迁移算法中,其计算的是feature map之间的偏心协方差,在feature map 包含着图像的特征,每个数字表示特征的强度,Gram矩阵代表着特征之间的相关性,因此,Gram矩阵可以用来表示图像的风格,因此可以通过Gram矩阵衡量风格的差异性。
网络代码
import tensorflow as tf
import tensorflow.contrib.slim as slimdef conv2d_slim(x, filter_num, kernel_size, strides, name):return slim.conv2d(x, filter_num, [kernel_size, kernel_size], stride=strides,weights_regularizer=slim.l2_regularizer(1e-6), biases_regularizer=slim.l2_regularizer(1e-6),padding='SAME', activation_fn=None, scope=name)def instance_norm(x):epsilon = 1e-9mean, var = tf.nn.moments(x, [1, 2], keep_dims=True)return tf.div(tf.subtract(x, mean), tf.sqrt(tf.add(var, epsilon)))def residual(x, filter_num, kernel_size, strides, name):with tf.variable_scope(name):conv1 = conv2d_slim(x, filter_num, kernel_size, strides, 'conv1')conv2 = conv2d_slim(tf.nn.relu(conv1), filter_num, kernel_size, strides, 'conv2')residual = x + conv2return residualdef resize_conv2d(x, filters_num, kernel_size, strides, training, name):with tf.variable_scope(name):height = x.get_shape()[1].value if training else tf.shape(x)[1]width = x.get_shape()[2].value if training else tf.shape(x)[2]new_height = height * strides * 2new_width = width * strides * 2x_resized = tf.image.resize_images(x, [new_height, new_width], tf.image.ResizeMethod.NEAREST_NEIGHBOR)return conv2d_slim(x_resized, filters_num, kernel_size, strides, 'conv1')def generator(image, training):# image = tf.pad(image, [[0, 0], [10, 10], [10, 10], [0, 0]], mode='REFLECT')with tf.variable_scope('generator', reuse=tf.AUTO_REUSE):conv1 = tf.nn.relu(instance_norm(conv2d_slim(image, 32, 9, 1, 'conv1')))conv2 = tf.nn.relu(instance_norm(conv2d_slim(conv1, 64, 3, 2, 'conv2')))conv3 = tf.nn.relu(instance_norm(conv2d_slim(conv2, 128, 3, 2, 'conv3')))res1 = residual(conv3, 128, 3, 1, 'res1')res2 = residual(res1, 128, 3, 1, 'res2')res3 = residual(res2, 128, 3, 1, 'res3')res4 = residual(res3, 128, 3, 1, 'res4')res5 = residual(res4, 128, 3, 1, 'res5')deconv1 = tf.nn.relu(instance_norm(resize_conv2d(res5, 64, 3, 1, training, 'deconv1')))deconv2 = tf.nn.relu(instance_norm(resize_conv2d(deconv1, 32, 3, 1, training, 'deconv2')))deconv3 = tf.nn.tanh(instance_norm(conv2d_slim(deconv2, 3, 9, 1, 'deconv3')))# re-vlaue to [0, 255]y = (deconv3 + 1.0) * 127.5print(y)# height = tf.shape(y)[1]# width = tf.shape(y)[2]# y = tf.slice(y, [0, 10, 10, 0], tf.stack([-1, height - 20, width - 20, -1]))# print(y)# y = tf.reshape(y, (None, 224, 224, 3))# print(y)return y
单文件网络生成训练代码
import tensorflow as tf
import numpy as np
import scipy.io
import time
import cv2 as cv
import matplotlib.pyplot as plt
import tensorflow.contrib.slim as slim
import tensorflow.contrib.slim.nets as nets
from style_model import generator
import dataVGG19_MAT_PATH = r"D:\迅雷下载\imagenet-vgg-verydeep-19.mat"
STYLE_IMAGE_PATHS = [# './styled_images/starry.jpg','./styled_images/feathers.jpg',# './styled_images/paojie.jpg',# './styled_images/candy.jpg',# './styled_images/tree.jpg',]
STYLE_WEIGHTS = [1., 1., 1.]
STYLE_LAYERS = ['vgg_19/conv1/conv1_1','vgg_19/conv2/conv2_1','vgg_19/conv3/conv3_1','vgg_19/conv4/conv4_1','vgg_19/conv5/conv5_1',
]
STYLE_LAYER_WEIGHTS = [.1, .1, .1, .1, .1, ]
CONTENT_LAYERS = ['vgg_19/conv1/conv1_2','vgg_19/conv2/conv2_2','vgg_19/conv3/conv3_2','vgg_19/conv4/conv4_2','vgg_19/conv5/conv5_2',
]
# CONTENT_LAYERS = ['relu4_2']
CONTENT_LAYER_WEIGHTS = [.1, .1, .1, .1, .1, ]
LEARNING_RATE = .0005
MEAN_PIXEL = np.array([123.68, 116.779, 103.939]).reshape((1, 1, 1, 3))
TRAIN_STEP = 9000
SHOW_STEP = 100
SAMPLE_STEP = 3
CONTENT_IMAGE_PATH = './images/xjtu2.jpg'
MAX_IMAGE_SIZE = 512
VIDEO_PATH = './video/out2.mp4'
FPS = 30CONTENT_WEIGHT = 1.
STYLE_WEIGHT = .0001
TV_WEIGHT = .0001
VGG19_CKPT_PATH = r"D:\data\tf_models\vgg19\vgg_19.ckpt"
RECORD_ROOT = r'D:\data\tf_models\style_transfer'#  1000
# Single image elapsed time: 191.359792470932# TV_WEIGHT = 0
def build_model(in_x):with tf.variable_scope('', reuse=tf.AUTO_REUSE):_, net = nets.vgg.vgg_19(in_x, spatial_squeeze=False)net['input'] = in_xreturn netdef content_layer_loss(p, x):_, h, w, d = p.get_shape()M = h.value * w.valueN = d.value# K = 1. / (2. * N ** 0.5 * M ** 0.5)K = 1. / (N * M)#     K = 1. / 2.loss = K * tf.reduce_sum(tf.pow((x - p), 2))return lossdef style_layer_loss(a, x):_, h, w, d = a.get_shape()M = h.value * w.valueN = d.valueA = gram_matrix(a, M, N)G = gram_matrix(x, M, N)loss = (1. / (4 * N ** 2 * M ** 2)) * tf.reduce_sum(tf.pow((G - A), 2))return lossdef gram_matrix(x, area, depth):F = tf.reshape(x, (area, depth))G = tf.matmul(tf.transpose(F), F)return Gdef sum_style_losses(styled_net, style_nets):with tf.variable_scope('sum_style'):total_style_loss = 0.for net, img_weight in zip(style_nets, STYLE_WEIGHTS):style_loss = 0.for layer, weight in zip(STYLE_LAYERS, STYLE_LAYER_WEIGHTS):a = net[layer]x = styled_net[layer]a = tf.convert_to_tensor(a)style_loss += style_layer_loss(a, x) * weightstyle_loss /= float(len(STYLE_LAYERS))total_style_loss += (style_loss * img_weight)total_style_loss /= float(len(style_nets))return total_style_lossdef sum_content_losses(styled_net, content_net):with tf.variable_scope('sum_content'):content_loss = 0.for layer, weight in zip(CONTENT_LAYERS, CONTENT_LAYER_WEIGHTS):p = content_net[layer]x = styled_net[layer]p = tf.convert_to_tensor(p)content_loss += content_layer_loss(p, x) * weightcontent_loss /= float(len(CONTENT_LAYERS))return content_lossdef preprocess(img):img = img.copy()[..., ::-1]img = img[np.newaxis, :, :, :]# img -= MEAN_PIXELreturn imgdef stylize(style_imgs):# bgr -> rgbcontent_image = cv.imread(CONTENT_IMAGE_PATH)[...,::-1]content_image = cv.resize(content_image, (224, 224))content_image = np.expand_dims(content_image, 0).astype(np.float32)with tf.Session() as sess:in_x = tf.placeholder(tf.float32, (None, 224, 224, 3))net = build_model(in_x - MEAN_PIXEL)sess.run(tf.global_variables_initializer())variables_to_restore = slim.get_variables_to_restore(include=['vgg_19'])restorer = tf.train.Saver(variables_to_restore)restorer.restore(sess, VGG19_CKPT_PATH)style_nets = [sess.run(net, {in_x: img})for img in style_imgs]content_net = netstyled_image = generator(in_x, training=True)# styled_image = tf.Variable(content_img)print(styled_image.shape)styled_net = build_model(styled_image - MEAN_PIXEL)# style lossL_style = sum_style_losses(styled_net, style_nets)# content lossL_content = sum_content_losses(styled_net, content_net)# denoising lossL_tv = tf.image.total_variation(styled_net['input'])[0]# L_tv = 0# total lossL_total = tf.reduce_sum([CONTENT_WEIGHT * L_content, STYLE_WEIGHT * L_style, TV_WEIGHT * L_tv])var_list = slim.get_variables('generator')train_op = tf.train.AdamOptimizer(LEARNING_RATE).minimize(L_total, var_list=var_list)sess.run(tf.global_variables_initializer())# tf.summary.FileWriter('./log', sess.graph)variables_to_restore = slim.get_variables_to_restore(include=['vgg_19'])restorer = tf.train.Saver(variables_to_restore)restorer.restore(sess, VGG19_CKPT_PATH)# tf.summary.FileWriter('./log', sess.graph)# images = []for iterations in range(1, 1 + TRAIN_STEP):# image_val = sess.run(image_batch)# image_val = np.concatenate([#     preprocess(i)#     for i in image_val# ], axis=0)# print(iterations, image_val.shape,image_val.dtype)sess.run(train_op, {in_x: content_image})if not iterations % SHOW_STEP:lt, ls, lc = sess.run([L_total, L_style, L_content], {in_x: content_image})print(iterations, lt, ls, lc)# print(iterations, L_total.eval(), L_style.eval(), L_content.eval(), L_tv.eval())output_img = sess.run(styled_image, {in_x: content_image})print(output_img.shape)output_img = np.clip(output_img, 0, 255).astype(np.uint8)[0]print(output_img.shape)# output_img = postprocess(output_img)[..., ::-1]plt.imshow(output_img)plt.show()# shape = (content_img.shape[2] * 2, content_img.shape[1] * 2)# save_video(images, shape)def save_video(images, shape):fourcc = cv.VideoWriter_fourcc(*"mp4v")# 设置输出文件路径和大小out_file = cv.VideoWriter(VIDEO_PATH, fourcc, FPS, shape)for frame in images:frame = cv.pyrUp(frame)out_file.write(frame)def get_style_images(shape):style_imgs = []for path in STYLE_IMAGE_PATHS:# bgr imageimg = cv.imread(path, cv.IMREAD_COLOR)img = cv.resize(img, dsize=shape, interpolation=cv.INTER_AREA)img = img.astype(np.float32)img = preprocess(img)style_imgs.append(img)return style_imgsdef render_single_image():# content_img = get_content_image(CONTENT_IMAGE_PATH)# shape = (content_img.shape[2], content_img.shape[1])shape = (224, 224)style_images = get_style_images(shape)for i in style_images:print(i.shape)with tf.Graph().as_default():st = time.time()stylize(style_images)ed = time.time()print('Single image elapsed time: {}'.format(ed - st))if __name__ == '__main__':render_single_image()
多文件批次训练使用tf.data
import tensorflow as tf
import numpy as np
import time
import cv2 as cv
import matplotlib.pyplot as plt
import tensorflow.contrib.slim as slim
import tensorflow.contrib.slim.nets as nets
from style_model import generator
import data
from config import BATCH_SIZE
from tensorflow.python.framework import graph_utilSAVE_PATH = './pb/starry.pb'VGG19_MAT_PATH = r"D:\迅雷下载\imagenet-vgg-verydeep-19.mat"
STYLE_IMAGE_PATHS = [# './styled_images/starry.jpg',# './styled_images/feathers.jpg','./styled_images/feathers.jpg',# './styled_images/scream.jpg',# './styled_images/candy.jpg',# './styled_images/tree.jpg',]
STYLE_WEIGHTS = [1., 1., 1.]
STYLE_LAYERS = ['vgg_19/conv1/conv1_1','vgg_19/conv2/conv2_1','vgg_19/conv3/conv3_1','vgg_19/conv4/conv4_1','vgg_19/conv5/conv5_1',
]
STYLE_LAYER_WEIGHTS = [.1, .1, .1, .1, .1, ]
CONTENT_LAYERS = [# 'vgg_19/conv1/conv1_2',# 'vgg_19/conv2/conv2_2',# 'vgg_19/conv3/conv3_2','vgg_19/conv4/conv4_2',# 'vgg_19/conv5/conv5_2',
]
# CONTENT_LAYERS = ['relu4_2']
CONTENT_LAYER_WEIGHTS = [.1, .1, .1, .1, .1, ]
LEARNING_RATE = .0005
MEAN_PIXEL = np.array([123.68, 116.779, 103.939]).reshape((1, 1, 1, 3))
TRAIN_STEP = 5000
SHOW_STEP = 100
SAMPLE_STEP = 3
CONTENT_IMAGE_PATH = './images/xjtu2.jpg'
MAX_IMAGE_SIZE = 512
VIDEO_PATH = './video/out2.mp4'
FPS = 30CONTENT_WEIGHT = 1.
STYLE_WEIGHT = .0005
TV_WEIGHT = .00001
VGG19_CKPT_PATH = r"D:\data\tf_models\vgg19\vgg_19.ckpt"
RECORD_ROOT = r'D:\data\tf_models\style_transfer'#  1000
# Single image elapsed time: 191.359792470932# TV_WEIGHT = 0
def build_model(in_x):with tf.variable_scope('', reuse=tf.AUTO_REUSE):_, net = nets.vgg.vgg_19(in_x, spatial_squeeze=False)net['input'] = in_xreturn netdef content_layer_loss(p, x):_, h, w, d = p.get_shape()M = h.value * w.valueN = d.value# K = 1. / (2. * N ** 0.5 * M ** 0.5)K = 1. / (N * M)#     K = 1. / 2.loss = K * tf.reduce_sum(tf.pow((x - p), 2))return lossdef style_layer_loss(a, x):_, h, w, d = a.get_shape()M = h.value * w.valueN = d.valueprint('style_layer_loss ', a.shape, x.shape)A = gram_matrix(a, M, N)G = gram_matrix(x, M, N)loss = (1. / (4 * N ** 2 * M ** 2)) * tf.reduce_sum(tf.pow((G - A), 2))return lossdef gram_matrix(x, area, depth):F = tf.reshape(x, (area, depth))G = tf.matmul(tf.transpose(F), F)print('gram_matrix ', G.shape)return G# styled_net 输出图片风格网络
# style_nets 目标图片风格网络
# batch_size 只在训练中有效,所以可以固化
# 不然gram 矩阵会reshape失败
def sum_style_losses(styled_net, style_nets):with tf.variable_scope('sum_style'):total_style_loss = 0.for net, img_weight in zip(style_nets, STYLE_WEIGHTS):style_loss = 0.for layer, weight in zip(STYLE_LAYERS, STYLE_LAYER_WEIGHTS):a = net[layer]# x = styled_net[layer]for x in tf.split(styled_net[layer], BATCH_SIZE):print('sum_style_losses ', a.shape, x.shape)style_loss += style_layer_loss(a, x) * weightstyle_loss /= float(len(STYLE_LAYERS))total_style_loss += (style_loss * img_weight)total_style_loss /= float(len(style_nets))total_style_loss /= BATCH_SIZEreturn total_style_loss# def sum_style_losses(styled_net, style_nets):
#     with tf.variable_scope('sum_style'):
#         total_style_loss = 0.
#         for net, img_weight in zip(style_nets, STYLE_WEIGHTS):
#             style_loss = 0.
#             for layer, weight in zip(STYLE_LAYERS, STYLE_LAYER_WEIGHTS):
#                 a = net[layer]
#                 x = styled_net[layer]
#                 a = tf.convert_to_tensor(a)
#                 print('sum_style_losses ', a.shape, x.shape)
#                 style_loss += style_layer_loss(a, x) * weight
#             style_loss /= float(len(STYLE_LAYERS))
#             total_style_loss += (style_loss * img_weight)
#         total_style_loss /= float(len(style_nets))
#         return total_style_lossdef sum_content_losses(styled_net, content_net):with tf.variable_scope('sum_content'):content_loss = 0.for layer, weight in zip(CONTENT_LAYERS, CONTENT_LAYER_WEIGHTS):p = content_net[layer]x = styled_net[layer]print('sum_content_losses ', p.shape, x.shape)content_loss += content_layer_loss(p, x) * weightcontent_loss /= float(len(CONTENT_LAYERS))return content_lossdef preprocess(img):img = img.copy()[..., ::-1]img = img[np.newaxis, :, :, :]# img -= MEAN_PIXELreturn imgdef stylize(style_imgs):# bgr -> rgbcontent_image = cv.imread(CONTENT_IMAGE_PATH)[..., ::-1]content_image = cv.resize(content_image, (224, 224))content_image = np.expand_dims(content_image, 0).astype(np.float32)iterator = data.get_iterator(record_root=RECORD_ROOT)image_batch = iterator.get_next()config = tf.ConfigProto()config.gpu_options.allow_growth = Truewith tf.Session(config=config) as sess:sess.run(iterator.initializer)in_x = tf.placeholder(tf.float32, (None, 224, 224, 3),name='in_x')style_nets = [build_model(tf.constant(img) - MEAN_PIXEL)for img in style_imgs]styled_image = generator(in_x, training=True)print(styled_image.name, styled_image.shape)styled_net = build_model(styled_image - MEAN_PIXEL)content_net = build_model(in_x - MEAN_PIXEL)# style lossL_style = sum_style_losses(styled_net, style_nets)# content lossL_content = sum_content_losses(styled_net, content_net)# denoising lossL_tv = tf.image.total_variation(styled_net['input'])[0]# total lossL_total = tf.reduce_sum([CONTENT_WEIGHT * L_content, STYLE_WEIGHT * L_style, TV_WEIGHT * L_tv])var_list = slim.get_variables('generator')train_op = tf.train.AdamOptimizer(LEARNING_RATE).minimize(L_total, var_list=var_list)sess.run(tf.global_variables_initializer())for i in tf.global_variables():print(i.name, i.shape)# tf.summary.FileWriter('./log', sess.graph)variables_to_restore = slim.get_variables_to_restore(include=['vgg_19'])restorer = tf.train.Saver(variables_to_restore)restorer.restore(sess, VGG19_CKPT_PATH)# tf.summary.FileWriter('./log', sess.graph)# images = []for iterations in range(1, 1 + TRAIN_STEP):image_val = sess.run(image_batch)image_val = np.stack([i.reshape(224, 224, 3).astype(np.float32)for i in image_val], axis=0)# print('image_val ', image_val.shape)sess.run(train_op, {in_x: image_val})if not iterations % SHOW_STEP:lt, ls, lc = sess.run([L_total, L_style, L_content], {in_x: image_val})print(iterations, lt, ls, lc)# print(iterations, L_total.eval(), L_style.eval(), L_content.eval(), L_tv.eval())output_img = sess.run(styled_image, {in_x: image_val})# print(output_img.shape)output_img = np.clip(output_img, 0, 255).astype(np.uint8)[0]# print(output_img.shape)# output_img = postprocess(output_img)[..., ::-1]up = np.concatenate([image_val[0].astype(np.uint8), output_img],axis=1)output_img = sess.run(styled_image, {in_x: content_image})output_img = np.clip(output_img, 0, 255).astype(np.uint8)[0]down = np.concatenate([content_image[0], output_img],axis=1).astype(np.uint8)show_image = np.concatenate([up, down],axis=0)plt.imshow(show_image)plt.show()constant_graph = graph_util.convert_variables_to_constants(sess, sess.graph_def, ['generator/mul'])with tf.gfile.FastGFile(SAVE_PATH, mode='wb') as f:f.write(constant_graph.SerializeToString())# shape = (content_img.shape[2] * 2, content_img.shape[1] * 2)# save_video(images, shape)def save_video(images, shape):fourcc = cv.VideoWriter_fourcc(*"mp4v")# 设置输出文件路径和大小out_file = cv.VideoWriter(VIDEO_PATH, fourcc, FPS, shape)for frame in images:frame = cv.pyrUp(frame)out_file.write(frame)def get_style_images(shape):style_imgs = []for path in STYLE_IMAGE_PATHS:# bgr imageimg = cv.imread(path, cv.IMREAD_COLOR)img = cv.resize(img, dsize=shape, interpolation=cv.INTER_AREA)img = img.astype(np.float32)img = preprocess(img)style_imgs.append(img)return style_imgsdef render_single_image():# content_img = get_content_image(CONTENT_IMAGE_PATH)# shape = (content_img.shape[2], content_img.shape[1])shape = (224, 224)style_images = get_style_images(shape)for i in style_images:print(i.shape)with tf.Graph().as_default():st = time.time()stylize(style_images)ed = time.time()print('Single image elapsed time: {}'.format(ed - st))if __name__ == '__main__':render_single_image()
tf 风格迁移 任意内容 固定风格 vgg19相关推荐
- tf 风格迁移 固定内容 固定风格 vgg19
原文链接: tf 风格迁移 固定内容 固定风格 vgg19 上一篇: tf data 切换数据集 使用并行提高效率 下一篇: tf 风格迁移 任意内容 固定风格 vgg19 效果 开始时会有很大的噪声 ...
- 图像迁移风格保存模型_CV之NS:图像风格迁移(Neural Style 图像风格变换)算法简介、关键步骤配图、案例应用...
CV之NS:图像风格迁移(Neural Style 图像风格变换)算法简介.过程思路.关键步骤配图.案例应用之详细攻略 目录 图像风格迁移算法简介 图像风格迁移算法过程思路 1.VGG对比NS 图像风 ...
- CV之NS:图像风格迁移(Neural Style 图像风格变换)算法简介、过程思路、关键步骤配图、案例应用之详细攻略
CV之NS:图像风格迁移(Neural Style 图像风格变换)算法简介.过程思路.关键步骤配图.案例应用之详细攻略 目录 图像风格迁移算法简介 图像风格迁移算法过程思路 1.VGG对比NS 图像风 ...
- 可逆网络风格迁移-解决内容泄漏问题 [CVPR 2021] ArtFlow: Unbiased Image Style Transfer via Reversible Neural Flows
[CVPR 2021] ArtFlow: Unbiased Image Style Transfer via Reversible Neural Flows Jie An1∗ Siyu Huang ...
- 图像风格迁移cvpr2020_浅谈风格迁移(二)任意风格迁移
-- 本文来自于VIP Lab的黄宇杰同学撰稿 (接上篇)AdaIN 在17年ICCV中,AdaIN [10]横空出世,完成了任意风格迁移.AdaIN的思路不同于之前的想法,它致力于从一张图片由VGG ...
- python图片风格迁移毕设_神经风格迁移是如何运作的概述及Python实现
神经风格迁移是如何运作的概述及Python实现 作者:PHPYuan 时间:2019-03-26 03:40:37 深度学习可以捕获一个图像的内容并将其与另一个图像的风格相结合,这种技术称为神经风格迁 ...
- cnn风格迁移_快速图像风格迁移思想在无线通信中的另类应用:算法拟合
在本文中,并不是介绍最新的一些论文,而是回顾自己在很早(半年前?)读过的几篇文章.[1]Learning to optimize: Training deep neural networks for ...
- keras神经风格迁移_深度神经风格迁移
介绍(由于近期准备校招,博客暂时不更新) 神经风格迁移是我研一研二时期主要的研究方向,而从最初的风格迁移出现已经有较长一段时间了.之所以现在写这个博客,第一是因为我的毕业论文定的方向是风格迁移+情感分 ...
- java图像风格迁移_Python+OpenCV 图像风格迁移(模仿名画)
现在很多人都喜欢拍照(自拍).有限的滤镜和装饰玩多了也会腻,所以就有 APP 提供了模仿名画风格的功能,比如 prisma.versa 等,可以把你的照片变成 梵高.毕加索.蒙克 等大师的风格. 这种 ...
最新文章
- 网站性能优化的常用方法
- excel两个指标相关性分析_Excel实操分析函数,投资决策指标的假设分析,就是那么简单...
- 兔子繁殖MATLAB,2011-2012数学建模题
- query判断值是否为空,针对前台提交数据的校验
- 注册assembly的问题
- android手机用户,[信息图]Android手机用户如何使用自己的设备?
- 企业的IT 建设的三个过程
- [个人笔记]HCIP-Routing Switching-IERS/H12-221
- 微信小游戏开发之使用云开发作为后台服务
- OSChina 周一乱弹 ——连自己老婆的双胞胎妹妹都不放过
- 百度百科爬虫爬人物信息
- 【工程经济学】各章计算题合集
- sql网上书店项目的实现
- UE角色以及角色动画超详细流程干货!这次是step by step!
- access 报表隔行底纹_excel中如何隔行填充底纹
- 可控源音频大地电磁理论基础
- OPPO 后端开发 一、二、HR 面面经 (已 OC)
- R语言常微分方程数值解海强作业
- 调用Feign接口报错:HttpMessageNotReadableException:JSON parse error:Illegal character ((CTRL-CHAR, code 31)
- vba批量合并指定的sheet_Excel VBA 多个工作表合并方法