卷积神经网络pytorch_使用PyTorch和卷积神经网络进行动物分类
卷积神经网络pytorch
介绍 (Introduction)
PyTorch is a deep learning framework developed by Facebook’s AI Research lab (FAIR). Thanks to its C++ and CUDA backend, the N-dimensional arrays called Tensors can be used in GPU as well.
PyTorch是由Facebook的AI研究实验室(FAIR)开发的深度学习框架。 由于其C ++和CUDA后端,称为Tensors的N维数组也可以在GPU中使用。
A Convolutional Neural Network (ConvNet/CNN) is a Deep Learning which takes an input image and assigns importance(weights and biases) to various features to help in distinguishing images.
卷积神经网络(ConvNet / CNN)是一种深度学习,它接受输入图像并为各种功能分配重要性(权重和偏差),以帮助区分图像。
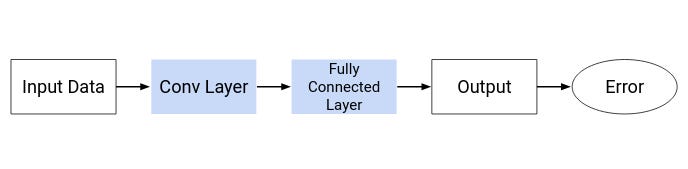
A Neural Network is broadly classified into 3 layers:
神经网络大致分为三层:
- Input Layer输入层
- Hidden Layer (can consist of one or more such layers)隐藏层(可以包含一个或多个这样的层)
- Output Layer输出层
The Hidden layer can be further divided mainly into 2 layers-
隐藏层主要可以进一步分为2层-
- Convolution Layer: this extracts features from the given input images.卷积层:这将从给定的输入图像中提取特征。
- Full Connected Dense Layers: it assigns importance to the features from the convolution layer to generate output.完全连接的密集层:它赋予卷积层要素以生成输出的重要性。
A convolutional neural network process generally involves two steps-
卷积神经网络过程通常包括两个步骤:
- Forward Propagation: the weights and biases are randomly initialized and this generates the output at the end.正向传播:权重和偏差被随机初始化,并最终生成输出。
- Back Propagation: the weights and biases are randomly initialized in the beginning and depending on the error, the values are updated. Forward propagation happens with these updated values again and again for newer outputs to minimize the error.+反向传播:权重和偏差在开始时就随机初始化,并根据误差来更新值。 对于这些更新的值,一次又一次地进行正向传播,以使更新的输出最小化误差。
Activation functions are mathematical equations assigned to each neuron in the neural network and determine whether it should be activated or not depending on its importance(weight) in the image.
激活函数是分配给神经网络中每个神经元的数学方程式,并根据其在图像中的重要性(权重)确定是否应激活它。
There are two types of activation functions:
有两种类型的激活功能:
- Linear Activation Functions: It takes the inputs, multiplied by the weights for each neuron, and creates an output signal proportional to the input. However, the problem with Linear Activation Functions is that it gives the output as a constant thus making it impossible for backpropagation to be used as there is no relation to the input. Further, it collapses all layers into a single layer thus turning the neural network into a single layer network.线性激活函数:它采用输入乘以每个神经元的权重,并生成与输入成比例的输出信号。 但是,线性激活函数的问题在于,它以恒定的形式给出输出,因此由于与输入无关,因此无法使用反向传播。 此外,它将所有层折叠成单层,从而将神经网络变成单层网络。
- Non-Linear Activation Functions: These create complex mappings between the different layers which help in better learning modelling of data. Few of the non-linear activation functions are - sigmoid, tanh, softmax, ReLU (Rectified Linear Units), Leaky ReLU etc.非线性激活功能:这些功能在不同层之间创建复杂的映射,有助于更好地学习数据建模。 很少有非线性激活函数-S型,tanh,softmax,ReLU(整流线性单位),泄漏ReLU等。
Enough theory, let’s get started.
足够的理论,让我们开始吧。
Github (Github)
If you are familiar with Github, check out my repository for the code and dataset.
如果您熟悉Github,请查看我的存储库中的代码和数据集。
数据集 (Dataset)
To train a model, the first order of business is to find a dataset. For the project, the dataset used is a modified version of the original dataset from Kaggle:
要训练模型,首先要找到数据集。 对于项目,使用的数据集是Kaggle原始数据集的修改版本:
Original dataset: https://www.kaggle.com/c/swdl2020/overview
原始数据集: https : //www.kaggle.com/c/swdl2020/overview
Customized dataset: https://drive.google.com/file/d/1KRqqs2hi2KagfGAcTdWQPQUZO6RX2VE6/view?usp=sharing
自定义数据集: https : //drive.google.com/file/d/1KRqqs2hi2KagfGAcTdWQPQUZO6RX2VE6/view?usp=sharing
There are 3 classes in the dataset corresponding to the three animals: Tiger, Hyena and Cheetah.
数据集中有3个类别,分别对应于以下三种动物:老虎,鬣狗和猎豹。

The dataset has already been divided into 2 folders namely training and validation. The training folder contains 2700 images — 900 each in separate folders and validation folder contains 300 images — 100 each in separate folders corresponding to each animal.
数据集已经分为两个文件夹,即训练和验证。 训练文件夹包含2700张图像-在单独的文件夹中分别包含900张图像,而验证文件夹包含300张图像-在与每个动物相对应的单独文件夹中包含100张图像。
导入库 (Importing the Libraries)
If you have not yet installed the PyTorch library you use the following commands:
如果尚未安装PyTorch库,请使用以下命令:
If you are running on Anaconda, then once you are on the virtual environment, run the command-
如果您在Anaconda上运行,那么在虚拟环境中后,请运行命令-
conda install pytorch torchvision cudatoolkit=10.1 -c pytorchIf you want to locally install it using pip, the following command will open a wheel file for download-
如果您想使用pip在本地安装,则以下命令将打开一个wheel文件供下载-
pip install torch==1.5.0+cu101 torchvision==0.6.0+cu101 -f了解数据集 (Understanding the Dataset)
Once we have imported the required libraries, let’s import the dataset and understand it.
导入所需的库后,让我们导入数据集并了解它。
As we can see, there are a total of 3 classes, each representing a particular animal. data_dir is the path where the dataset is stored. If working in an online environment, then the dataset needs to be either uploaded onto the environment locally or saved onto the drive as in case of Google Colab. If you are working on a local environment, then insert your local dataset path here.
如我们所见,总共有3个类别,每个类别代表一种特定的动物。 data_dir是数据集的存储路径。 如果在在线环境中工作,则数据集需要要么上载到本地环境中,要么像Google Colab一样保存到驱动器中。 如果您在本地环境中工作,请在此处插入本地数据集路径。
Now let's convert the dataset into an N-Dimensional Tensor.
现在,让我们将数据集转换为N维张量。
Now the variable dataset is a tensor containing all the images for training. As stated, the size of the dataset is 2700.
现在变量数据集是一个张量,其中包含所有要训练的图像。 如前所述,数据集的大小为2700。
We shall now use the validation folder as the testing folder. The size of the test dataset is 300.
现在,我们将使用验证文件夹作为测试文件夹。 测试数据集的大小为300。
Now let’s check the dataset.
现在让我们检查数据集。
Each image is of the shape 3x400x400 indication 400x400 as the image dimensions and 3 denoted the colour channels RGB.
每个图像的形状均为3x400x400,表示图像尺寸为400x400,3表示颜色通道RGB。
Let us now display a few of the images in the dataset.
现在让我们显示数据集中的一些图像。
准备训练数据集 (Preparing the Dataset for Training)
We shall now split the training set into two for training and validation.
现在,我们将训练集分为两部分进行训练和验证。
For this, we will use the random_split() function.
为此,我们将使用random_split()函数。
Let’s keep the batch size at 32 and load the data.
让我们将批处理大小保持为32并加载数据。
Let's look at the batch.
让我们看看批处理。
Now that we have finished with the preparations, let’s move onto the model.
现在我们已经完成了准备工作,让我们进入模型。
建立模型 (Building the Model)
Over here, we use cross_entropy or log loss as the loss function. In the case of multiclass classification, the cross_entropy formula is:
在这里,我们使用cross_entropy或log loss作为损失函数。 对于多类分类,cross_entropy公式为:

Now let's check if a GPU is available and use it if available.
现在,让我们检查GPU是否可用,如果可用,请使用它。
GPU has been selected now. If ‘cuda’ is not available, then do check your settings if you working locally. If you are working on Kaggle, then ensure no other GPU sessions are active and that you haven’t used up the free monthly quota of 30 hours.
现在已选择GPU。 如果“ cuda”不可用,请在本地工作时检查设置。 如果您使用的是Kaggle,请确保没有其他GPU会话处于活动状态,并且没有用完30个小时的免费每月配额。
We shall now define the layers of the convolution network.
现在我们将定义卷积网络的层。
We have defined 3 hidden layers. For the activation function, we are using ReLU (Rectified Linear Units).
我们定义了3个隐藏层。 对于激活功能,我们使用ReLU(整流线性单位)。
Now that we have built a basic model, let’s try to fit it with various learning rates and epochs and check the accuracy.
现在,我们已经建立了基本模型,让我们尝试将其与各种学习率和时期相适应,并检查准确性。
Let us now analyze the model.
现在让我们分析模型。
And let us finally evaluate the model.
最后让我们评估模型。
As you can see, the accuracy is very low at just around 50.9%. This is because we haven’t added any convolution layers to the model yet.
如您所见,准确性非常低,仅为50.9%。 这是因为我们尚未在模型中添加任何卷积层。
Let us now build the convolution layers using Resnet-18.
现在让我们使用Resnet-18构建卷积层。
Resnet or Residual Network is a convolutional neural network having the powerful representational ability that makes it possible to train up to hundreds or even thousands of layers and still achieves compelling performance. We are going to use Resnet-18 which indicates the network is 18 layers deep.
Resnet或残差网络是一种卷积神经网络,具有强大的表示能力,可以训练多达数百甚至数千个层,并且仍可实现出色的性能。 我们将使用Resnet-18,它指示网络深18层。
Let us now define the convolution layers.
现在让我们定义卷积层。
We shall now use a pre-trained Resnet-18 model.
现在,我们将使用预先训练的Resnet-18模型。
Let us now see the output shape.
现在让我们看一下输出形状。
Check if GPU is available and assign it as the device.
检查GPU是否可用并将其分配为设备。
Confirm that the device type is GPU.
确认设备类型为GPU。
Load the data for training and testing.
加载数据以进行培训和测试。
Assign the model.
分配模型。
Let us now check the initial loss and accuracy.
现在让我们检查初始损失和准确性。
The accuracy initially is at 35%. Let us now set the hyperparameters and starting training the model.
最初的精度为35%。 现在让我们设置超参数并开始训练模型。
Opt_func stands for Optimizer Function. They tie together the loss function and model parameters by updating the model in response to the output of the loss function. The function that we are going to use is Adam optimizer. Adam is an optimization algorithm that can be used instead of the classical stochastic gradient descent procedure to update network weights iterative based in training data. It realizes the benefits of both AdaGrad(Adaptive Gradient Algorithm) and RMSProp(Root Mean Square Propagation).
Opt_func代表优化器功能。 通过响应于损失函数的输出来更新模型,他们将损失函数和模型参数联系在一起。 我们将要使用的功能是Adam优化器。 亚当(Adam)是一种优化算法,可以代替经典的随机梯度下降过程来基于训练数据更新网络权重迭代。 它同时实现了AdaGrad(自适应梯度算法)和RMSProp(均方根传播)的好处。
Let us now analyze the model.
现在让我们分析模型。
And now, let us finally evaluate the model.
现在,让我们最终评估模型。
分析 (Analysis)
As we can see, the application of Convolution layers helped increase the accuracy to 89.5%. The accuracy can further be increased by having a larger training dataset and by further tuning the hyperparameters.
如我们所见,卷积图层的应用有助于将准确性提高到89.5%。 通过拥有更大的训练数据集并进一步调整超参数,可以进一步提高准确性。
结论 (Conclusion)
We have successfully built a Convolutional Neural Network model to classify zoo animals. There are quite a lot of similar classification datasets that one can get acquainted with to get familiarized with Convolution Neural Network, PyTorch and other concepts.
我们已经成功建立了卷积神经网络模型来对动物园动物进行分类。 您可以熟悉很多相似的分类数据集,以熟悉卷积神经网络,PyTorch和其他概念。
翻译自: https://towardsdatascience.com/animal-classification-using-pytorch-and-convolutional-neural-networks-78f2c97ca160
卷积神经网络pytorch
http://www.taodudu.cc/news/show-5162434.html
相关文章:
- 牛顿法求解1-100的平方根python_使用牛顿-拉弗森法定义平方根函数(Newton-Raphson method Square Root Python)...
- 牛顿迭代法实现平方根函数sqrt
- 计算机关机时间设置方法,电脑定时关机的设置方法
- 设置计算机每天定时自动开关机,如何设置电脑每天定时关机
- 计算机关机时间设置方法,win7电脑如何设置关机时间,win7电脑设置关机时间的操作方法...
- Windows应用之——设置定时关机
- 计算机控制面板 关机时间,电脑设置关机时间_电脑怎么设置关机时间
- 服务器系统 设置开关机,服务器开关机设置方法
- 台式计算机如何定时关机,电脑在哪设置定时关机
- 发审委新股审核进程
- 2016第三届科学数据大会——科学数据与创新发展会议日程
- 不良生活习惯汇总+高比例人群疾病(持续更新中)
- [无线路由器] 如何启用Asus路由器上的硬盘休眠功能?
- armbian/debian/linux 硬盘休眠
- 防止硬盘休眠
- kvm直通sata_「图」Proxmox VE下黑群晖硬盘休眠问题(不直通SATA控制器)[解决方案]_高清时代论坛...
- 防止移动硬盘休眠脚本
- 媒体服务器保持唤醒状态,[已解决]向大家请教一下,正常的硬盘休眠日志是什么样的?...
- 树莓派:硬盘休眠
- 群晖 硬盘休眠检测 也适用于Linux
- 威联通硬盘休眠并添加开机自启动
- pve安装黑群晖直通硬盘_完美解决Proxmox VE下黑群晖硬盘休眠问题(不直通SATA控制器)...
- macos阻止硬盘休眠
- linux 硬盘空闲时休眠,OPENWRT 硬盘休眠(hd-idle无法正常休眠的可以试试这个软件)...
- linux硬盘休眠怎么设置密码,OMV查询硬盘休眠状态(Linux通用)
- 还在用ImageNet预训练?你的网络可能对形状一无所知!谈神经网络的形状偏见
- SadTalker: Learning Realistic 3D Motion Coefficients for Stylized Audio-Driven Single Image Talking
- 【MM32F5270开发板试用】移植Google Chrome小恐龙游戏到MM32F5270
- Chrome 的小恐龙游戏,被我破解了...
- 【Pygame小游戏】Chrome上的小恐龙竟可以用代码玩儿了?它看起来很好玩儿的样子~
卷积神经网络pytorch_使用PyTorch和卷积神经网络进行动物分类相关推荐
- pytorch卷积可视化_使用Pytorch可视化卷积神经网络
pytorch卷积可视化 Filter and Feature map Image by the author 筛选和特征图作者提供的图像 When dealing with image's and ...
- Educoder 机器学习 神经网络 第四关:使用pytorch搭建卷积神经网络识别手写数字
任务描述 相关知识 卷积神经网络 为什么使用卷积神经网络 卷积 池化 全连接网络 卷积神经网络大致结构 pytorch构建卷积神经网络项目流程 数据集介绍与加载数据 构建模型 训练模型 保存模型 加载 ...
- 一维卷积filter_从零开始学Pytorch(七)之卷积神经网络
卷积神经网络基础 我们介绍卷积神经网络的卷积层和池化层,并解释填充.步幅.输入通道和输出通道的含义. import torch from torch.autograd import Variable ...
- 【深度学习】基于Pytorch的卷积神经网络概念解析和API妙用(一)
[深度学习]基于Pytorch的卷积神经网络API妙用(一) 文章目录 1 不变性 2 卷积的数学分析 3 通道 4 互相关运算 5 图像中目标的边缘检测 6 基于Pytorch的卷积核 7 特征映射 ...
- 【深度学习】基于Pytorch的卷积神经网络概念解析和API妙用(二)
[深度学习]基于Pytorch的卷积神经网络API妙用(二) 文章目录1 Padding和Stride 2 多输入多输出Channel 3 1*1 Conv(笔者在看教程时,理解为降维和升维) 4 池 ...
- pytorch卷积神经网络_知识干货-动手学深度学习(pytorch)-06 卷积神经网络基础
卷积神经网络基础 本节我们介绍卷积神经网络的基础概念,主要是卷积层和池化层,并解释填充.步幅.输入通道和输出通道的含义. 二维卷积层 本节介绍的是最常见的二维卷积层,常用于处理图像数据. 二维互相关运 ...
- 用PyTorch搭建卷积神经网络
用PyTorch搭建卷积神经网络 本篇是加拿大McGill本科,Waterloo硕士林羿实习时所作的工作.发文共享,主要是面对PyTorch的初学者. 本篇文章是一篇基础向的PyTorch教程,适合有 ...
- (论文加源码)基于DEAP和MABHOB数据集的二分类脑电情绪识别(pytorch深度神经网络(DNN)和卷积神经网络(CNN))代码解析
论文解析见个人主页: https://blog.csdn.net/qq_45874683/article/details/130000469?csdn_share_tail=%7B%22type%22 ...
- (论文加源码)基于DEAP和MABHOB数据集的二分类脑电情绪识别(pytorch深度神经网络(DNN)和卷积神经网络(CNN))
该论文发表于2021年的顶级期刊.(pytorch框架) 代码解析部分在个人主页: https://blog.csdn.net/qq_45874683/article/details/13000797 ...
最新文章
- Blender写实建筑场景制作学习教程 Exterior Visualization in Blender 2.9
- linux命令 upower -e,分享|如何在 Linux 终端下检查笔记本电池状态
- 如何制作linux系统硬盘,教你制作Linux操作系统的Boot/Root盘
- Bootstrap3基础 input-group-btn 按钮与输入框 横向组合
- nowcoder 河 我 车 题 错 天 乐 赛 倍增处理
- linux xargs命令,xargs 命令教程
- 前端学习(2168):url的hash和html的history
- Servlet常用操作(基础)
- Bailian2680 化验诊断【入门】
- super 关键字的使用及说明
- PPT文件如何大幅度瘦身、减小所占空间、提高播放速度?
- 最有效的更改linux 系统时区的方法
- adb 驱动安装说明文档
- 网络营销-渠道、公关
- 未能从dhcp服务器获得ip地址,当出现无法从DHCP服务器中获得地址的常见处理步骤...
- 看板(Kanban)与Scrum区别
- 第一章 计算机基础知识
- 三子棋小游戏(超详细)
- html5学生dw网页设计大作业,hbuilder仿茅台集团网页设计成品模板,图片轮播网页设计模板
- 基于联发科(MTK)MT8735平台的安卓4G全网通核心板