Effective Source Insight
s into Source Insight
Source Insight can integrate different kinds of source control tool into it, this document only describe how to integrate ClearCase as an example.
Step 1:
Options→Custom Commands…
Step 2:
Select ‘Check Out’ command and edit new command “cleardlg /checkout %f” in the ‘Run’ field:
Step 3:
If you want to use the source control icon in the tool bar, you can select it as following:
View→Toolbars→Source Control
Figure 2 - Show Source Control Toolbar
The following toolbar will be added to the GUI:
Figure 3 – The Source Control Toolbar
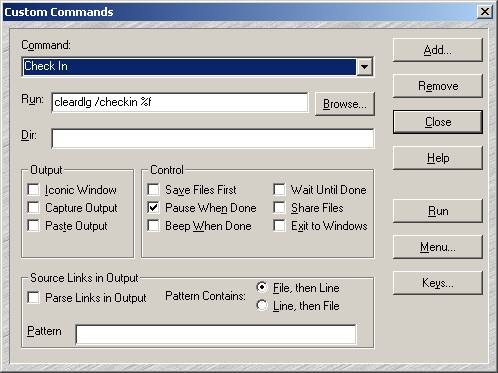
Select ‘Check In’ command and edit new command “cleardlg /checkin %f” in the ‘Run’ field:
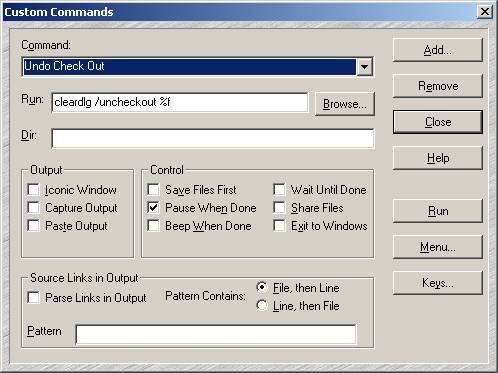
Select ‘Undo Check Out’ command and edit new command “cleardlg /uncheckout %f” in the ‘Run’ field:
Select ‘Sync File to Source Control Project’ command and edit new command “clearviewupdate -pname %r” in the ‘Run’ field:
Select ‘Sync to Source Control Project’ command and edit new command “clearviewupdate -pname %j” in the ‘Run’ field:
There is no ‘Version Tree’ command in the default custom commands. We need to add it manually.
Step 1:
Options→Custom Commands…→Add…
Step 2:
Edit new command name ‘Version Tree’ in the field:
Figure 8 - Add New Custom Command
Select ‘Version Tree’ command and edit new command “clearvtree %f” in the ‘Run’ field:
- Configure the Version Tree Command
Step 4:
If you want run the new command in the ‘Work’ menu, please click the ‘Menu…’ button in the dialog of Figure 9, or do it as following:
Options→Menu Assignments…
Step 5:
1. Select ‘Custom Cmd: Version Tree’ in the ‘Command’ field
2. Select ‘Work’ in the ‘Menu’ field
3. Click ‘Insert’ button (need click the ‘Menu Contents’ field first)
4. Use ‘Up’ or ‘Down’ to set the menu’s position
- Configure the Work Menu
outs
Previous Version
Figure 16 - Configure the Properties of Element Command
For more information about ClearCase’s cleardlg, you can run command “cleardlg /?” in DOS prompt:
The following table shows all the custom commands, just for copy and paste.
Table 1 Custom Commands
Command
Run
1
Clear Case Explorer
clearexplorer
2
Find Checkouts
clearfindco
3
Check Out
cleardlg /checkout %f
4
Check In
cleardlg /checkin %f
5
Undo Check Out
cleardlg /uncheckout %f
6
History
clearhistory %f
7
Version Tree
clearvtree %f
8
Compare with Previous Version
cleardlg /diffpred %f
9
Properties of Version
cleardescribe %f
10
Properties of Element
cleardescribe %f@@
11*
Sync File to Source Control Project
clearviewupdate -pname %r
12*
Sync to Source Control Project
clearviewupdate -pname %j
* is for snapshot view only
The default tool used to compare files in ClearCase is cleardiffmrg.exe, if you want to use some other software to do the same job, here is how to configure it:
Step 1:
Open file: “C:/Program Files/Rational/ClearCase/lib/mgrs/map”
Step 2:
Find the line:
text_file_delta xcompare ../../bin/cleardiffmrg.exe
And edit the tool’s path like following:
text_file_delta xcompare C:/Software/r-Beyond.Compare/BC2.exe
Note:
C:/Software/r-Beyond.Compare/BC2.exe is my compare tool’s path, and you should set the correct path of yourself.
Shift + F8
Ctrl + o
Esc to close the dialog box
Ctrl + /
Ctrl + m
F5
F9
F10
Options→Document Options…
In the Coding Style for ECDS [2], indentation should be made with spaces rather than with tab characters. Source Insight could expand tab to spaces automatically by selecting ‘Expand tabs’ and setting ‘Tab width’ like following:
In the Coding Style for ECDS [2], it is recommended that line length should no longer than 79 characters. Source Insight could show the margin by selecting ‘Show right margin’ and setting ‘Margin width’ like following:
Options→Preferences…
Options→Document Options…→Auto Indent…
It is suggested that select ‘Smart’ in the ‘Auto Indent Type’ field, and do not select the ‘Indent Open Brace’ and ‘Indent Close Brace’ options in the ‘Smart Indent Options’ field.
Like the VBA for Word or Excel, Source Insight provides a C-like macro language, which is useful for scripting commands, inserting specially formatted text, and automating editing operations.
This document only introduces a simple way of how to edit the macro file and run macros by shortcut key.
and utils.em file
The Base project is automatically created when the first time you run Source Insight. And the Base project is a good place to add your favorite Source Insight editor macro files.
The default file in the Base project is utils.em, open the file and add following codes to it. The function is open the corresponding .cpp or .h file of current file.
1: // Open the corresponding .cpp or .h file2: macro OpenCorrespondingCppOrHFile()3: {4: hCurrentBuf = GetCurrentBuf ()5: bname = GetBufName (hCurrentBuf)6: len = strlen (bname)7:8: if (".cpp" == strmid (bname, len-4, len))9: {10: filename = strmid (bname, 0, len-4)#".h"11: }12: else if (".h" == strmid (bname, len-2, len))13: {14: filename = strmid (bname, 0, len-2)#".cpp"15: }16: else17: {18: filename = Nil19: }20: if (filename != Nil)21: {22: hbufnext = OpenBuf (filename)23: if (hbufnext != hNil)24: {25: SetCurrentBuf (hbufnext)26: }27: }28: }
Options→Key Assignments…
Choose the “Macro: OpenCorrespondingCppOrHFile” in the Command field and press “Assign New Key…” button. I suggest assigning “Alt + ~” to this macro.
After these setting, you can open another project and test the “Alt + ~” shortcut key then.
[1] Source Insight Help
Effective Source Insight相关推荐
- Source Insight 基本使用(1)-使用Source Insight查看Android Framework 源码
一.下载framework源码: google已经把framework源码托管在了gitHub上: https://github.com/android/platform_frameworks_ba ...
- Source Insight 经典教程
Source Insight实质上是一个支持多种开发语言(java,c ,c 等等)的编辑器,只不过由于其查找.定位.彩色显示等功能的强大,常被我们当成源代码阅读工具使用. 作为一个开放源代码的操作系 ...
- Source Insight 有用设置配置
转:http://blog.csdn.net/goldfighter/article/details/7847168 目录 source insight代码对齐Tab键终极版 source insig ...
- Source Insight技巧收集
Source Insight技巧收集 1.背景色选择 要改变背景色Options->preference->windows background->color设置背景色 2. ...
- source insight 里编辑的时候,每次粘贴后,光标停留在粘贴内容的左面
在source insight 里编辑的时候,每次粘贴后,光标停留在粘贴内容的左面. 我想把它设定为 粘贴后,光标移动倒粘贴内容的右面. 该怎么做? 这是个设置问题,按照下面的步骤设定就可以了. Op ...
- Source Insight乱码的解决方案,SI不支持UTF-8字符编码乱码
最近使用source insight查看一些开源代码,显示中文就乱码,据说是因为source insight不支持utf-8编码,默认编码方式为ANSI码.所以需要将utf-8等非ANSI码的文件转换 ...
- Source Insight 3.X 标签插件v1.0发布
Source Insight可以说是一款程序员必备的开发/阅读源码工具,美中不足的是SI没有标签栏,多个源码之间切换很不方便,于是我就乘闲暇之余写了该作品sihook:标签插件;不过严格意义上来说si ...
- 介绍linux下Source Insight强大代码编辑器sublime_text_3
Centos6.4下安装Sublime Text 3 背景 1 一. 运行环境 1 二.安装环境配置 1 三.创建快捷方式 1 四.配置全局环境 2 五.操作界面 3 背景 在windows操作系统系 ...
- source insight快捷键及使用技巧
2019独角兽企业重金招聘Python工程师标准>>> 原文转自http://lucjn.blog.163.com/blog/static/925911520091116843548 ...
最新文章
- 【错误记录】Android Studio 运行报错 ( There is not enough memory to perform the requested operation. )
- JZOJ 5183. 【NOIP2017提高组模拟6.29】小T的钢琴
- 【Python】简约而不简单|值得收藏的Numpy小抄表(含主要语法、代码)
- sqlserver的触发器练习实例
- C++STL的map/ multimap容器
- linux mysql操作知识--收藏
- js高级 — ES6
- 02.并发编程(2)Thread类源码分析
- 用户与系统(unix)
- YOLOv3的批量图片检测以及批量输出(windows下)
- Android Tombstone/Crash的log分析和定位(墓碑文件)
- 如何配置线上生产服务器环境(密匙登录、防火墙 、Node、Nginx、MongoDB、Redis、Mysql、PHP、JDK、Tomcat等)
- Win7 文件加密存储操作后,如何在事后备份证书、秘钥
- DateTime.ToString()的用法
- php文件更名,php如何批量给文件改名
- 【MMDetection 源码解读之yolov3】Neck - FPN
- 2021.03.27_网易云登录params、encSecKey参数详解
- HTTP - get/post请求详解与本质区别总结
- 保持健康和活力 - 腰间盘突出康复指南
- requireJs笔记