颜色空间以及如何在OpenCV和Python中使用它们
It may be the era of deep learning and big data, where complex algorithms analyze images by being shown millions of them, but color spaces are still surprisingly useful for image analysis. Simple methods can still be powerful.
可能是深度学习和大数据时代,复杂的算法通过向其展示数百万个图像来分析图像,但是色彩空间仍然令人惊讶地对图像分析有用。 简单的方法仍然很强大。
In this article, you will learn how to simply segment an object from an image based on color in Python using OpenCV. A popular computer vision library written in C/C++ with bindings for Python, OpenCV provides easy ways of manipulating color spaces.
在本文中,您将学习如何使用OpenCV在Python中基于颜色简单地从图像中分割对象。 OpenCV是使用C / C ++编写的流行的计算机视觉库,带有Python绑定,它提供了操作颜色空间的简便方法。
While you don’t need to be already familiar with OpenCV or the other helper packages used in this article, it is assumed that you have at least a basic understanding of coding in Python.
尽管您不需要已经熟悉OpenCV或本文中使用的其他帮助程序包,但是假定您至少具有Python编码的基本知识。
Free Bonus: Click here to get the Python Face Detection & OpenCV Examples Mini-Guide that shows you practical code examples of real-world Python computer vision techniques.
免费红利: 单击此处以获得Python人脸检测和OpenCV示例迷你指南 ,该指南向您展示了现实世界中Python计算机视觉技术的实用代码示例。
什么是色彩空间? (What Are Color Spaces?)
In the most common color space, RGB (Red Green Blue), colors are represented in terms of their red, green, and blue components. In more technical terms, RGB describes a color as a tuple of three components. Each component can take a value between 0 and 255, where the tuple (0, 0, 0) represents black and (255, 255, 255) represents white.
在最常见的颜色空间RGB(红色绿色蓝色)中,颜色以红色,绿色和蓝色分量表示。 用更专业的术语来说,RGB将颜色描述为三个组成部分的元组。 每个分量可以取0到255之间的值,其中元组(0, 0, 0)表示黑色,而(255, 255, 255)表示白色。
RGB is considered an “additive” color space, and colors can be imagined as being produced from shining quantities of red, blue, and green light onto a black background.
RGB被认为是“加法”颜色空间 ,可以想象颜色是由大量红色,蓝色和绿色的光照射到黑色背景上产生的。
Here are a few more examples of colors in RGB:
以下是RGB颜色的更多示例:
| Color | 颜色 | RGB value | RGB值 |
|---|---|---|---|
| Red | 红 | 255, 0, 0 | 255,0,0 |
| Orange | 橙子 | 255, 128, 0 | 255、128、0 |
| Pink | 粉 | 255, 153, 255 | 255、153、255 |
RGB is one of the five major color space models, each of which has many offshoots. There are so many color spaces because different color spaces are useful for different purposes.
RGB是五个主要色彩空间模型之一,每个模型都有许多分支。 颜色空间太多,因为不同的颜色空间可用于不同的目的 。
In the printing world, CMYK is useful because it describes the color combinations required to produce a color from a white background. While the 0 tuple in RGB is black, in CMYK the 0 tuple is white. Our printers contain ink canisters of cyan, magenta, yellow, and black.
在印刷领域, CMYK很有用,因为它描述了从白色背景产生颜色所需的颜色组合。 RGB中的0元组为黑色,而CMYK中的0元组为白色。 我们的打印机包含青色,品红色,黄色和黑色的墨水罐。
In certain types of medical fields, glass slides mounted with stained tissue samples are scanned and saved as images. They can be analyzed in HED space, a representation of the saturations of the stain types—hematoxylin, eosin, and DAB—applied to the original tissue.
在某些类型的医学领域中,装有载有污渍的组织样本的载玻片会被扫描并保存为图像。 可以在HED空间中对它们进行分析,这是应用于原始组织的污渍类型(苏木精,曙红和DAB)的饱和度的表示。
HSV and HSL are descriptions of hue, saturation, and brightness/luminance, which are particularly useful for identifying contrast in images. These color spaces are frequently used in color selection tools in software and for web design.
HSV和HSL是色调,饱和度和亮度/亮度的描述,对于识别图像的对比度特别有用。 这些色彩空间经常用于软件的颜色选择工具和网页设计中。
In reality, color is a continuous phenomenon, meaning that there are an infinite number of colors. Color spaces, however, represent color through discrete structures (a fixed number of whole number integer values), which is acceptable since the human eye and perception are also limited. Color spaces are fully able to represent all the colors we are able to distinguish between.
实际上,颜色是一种连续现象,这意味着有无限多种颜色。 但是,颜色空间通过离散结构(固定数量的整数整数值)表示颜色,这是可以接受的,因为人眼和感知也受到限制。 颜色空间完全能够代表我们能够区分的所有颜色。
Now that we understand the concept of color spaces, we can go on to use them in OpenCV.
现在我们了解了色彩空间的概念,我们可以继续在OpenCV中使用它们。
使用色彩空间的简单分割 (Simple Segmentation Using Color Spaces)
To demonstrate the color space segmentation technique, we’ve provided a small dataset of images of clownfish in the Real Python materials repository here for you to download and play with. Clownfish are easily identifiable by their bright orange color, so they’re a good candidate for segmentation. Let’s see how well we can find Nemo in an image.
为了演示颜色空间分割技术,我们在此处的Real Python材料存储库中提供了一个小丑鱼图像的小数据集,供您下载和使用。 小丑鱼的亮橙色很容易识别,因此很适合分割。 让我们看看如何在图像中找到Nemo。
The key Python packages you’ll need to follow along are NumPy, the foremost package for scientific computing in Python, Matplotlib, a plotting library, and of course OpenCV. This articles uses OpenCV 3.2.0, NumPy 1.12.1, and Matplotlib 2.0.2. Slightly different versions won’t make a significant difference in terms of following along and grasping the concepts.
您需要遵循的关键Python软件包是NumPy,这是Python中用于科学计算的最重要的软件包,Matplotlib,绘图库,当然还有OpenCV。 本文使用OpenCV 3.2.0,NumPy 1.12.1和Matplotlib 2.0.2。 在遵循和掌握概念方面,稍有不同的版本不会产生重大差异。
If you are not familiar with NumPy or Matplotlib, you can read about them in the official NumPy guide and Brad Solomon’s excellent article on Matplotlib.
如果您不熟悉NumPy或Matplotlib,则可以在NumPy官方指南和Brad Solomon 在Matplotlib上的出色文章中了解它们 。
OpenCV中的色彩空间和读取图像 (Color Spaces and Reading Images in OpenCV)
First, you will need to set up your environment. This article will assume you have Python 3.x installed on your system. Note that while the current version of OpenCV is 3.x, the name of the package to import is still cv2:
首先,您需要设置环境。 本文将假定您在系统上安装了Python3.x。 请注意,尽管当前的OpenCV版本是3.x,但是要导入的软件包的名称仍然是cv2 :
 >>> >>> import import cv2
cv2
If you haven’t previously installed OpenCV on your computer, the import will fail until you do that first. You can find a user-friendly tutorial for installing on different operating systems here, as well as OpenCV’s own installation guide. Once you’ve successfully imported OpenCV, you can look at all the color space conversions OpenCV provides, and you can save them all into a variable:
如果您以前未在计算机上安装过OpenCV,则导入将失败,直到您先执行该操作。 您可以在此处找到用于在不同操作系统上进行安装的用户友好教程以及OpenCV自己的安装指南 。 成功导入OpenCV后,您可以查看OpenCV提供的所有色彩空间转换,并将它们全部保存到变量中:
The list and number of flags may vary slightly depending on your version of OpenCV, but regardless, there will be a lot! See how many flags you have available:
根据您的OpenCV版本,标记的列表和数量可能会略有不同,但是无论如何,会有很多! 查看您有多少个标志:
 >>> >>> lenlen (( flagsflags )
)
258
258
>>> >>> flagsflags [[ 4040 ]
]
'COLOR_BGR2RGB'
'COLOR_BGR2RGB'
The first characters after COLOR_ indicate the origin color space, and the characters after the 2 are the target color space. This flag represents a conversion from BGR (Blue, Green, Red) to RGB. As you can see, the two color spaces are very similar, with only the first and last channels swapped.
COLOR_之后的第一个字符表示原色空间,而2之后的字符是目标颜色空间。 此标志表示从BGR(蓝色,绿色,红色)到RGB的转换。 如您所见,两个颜色空间非常相似,只交换了第一个和最后一个通道。
You will need matplotlib.pyplot for viewing the images, and NumPy for some image manipulation. If you do not already have Matplotlib or NumPy installed, you will need to pip3 install matplotlib and pip3 install numpy before attempting the imports:
您将需要使用matplotlib.pyplot查看图像,并需要使用NumPy进行某些图像处理。 如果尚未安装Matplotlib或NumPy,则在尝试导入之前,需要先pip3 install matplotlib和pip3 install numpy :
Now you are ready to load and examine an image. Note that if you are working from the command line or terminal, your images will appear in a pop-up window. If you are working in a Jupyter notebook or something similar, they will simply be displayed below. Regardless of your setup, you should see the image generated by the show() command:
现在,您可以加载和检查图像了。 请注意,如果您在命令行或终端上工作,则图像将出现在弹出窗口中。 如果您正在使用Jupyter笔记本电脑或类似产品,它们将仅显示在下面。 无论您进行何种设置,都应该看到show()命令生成的图像:
 >>> >>> nemo nemo = = cv2cv2 .. imreadimread (( './images/nemo0.jpg''./images/nemo0.jpg' )
)
>>> >>> pltplt .. imshowimshow (( nemonemo )
)
>>> >>> pltplt .. showshow ()
()
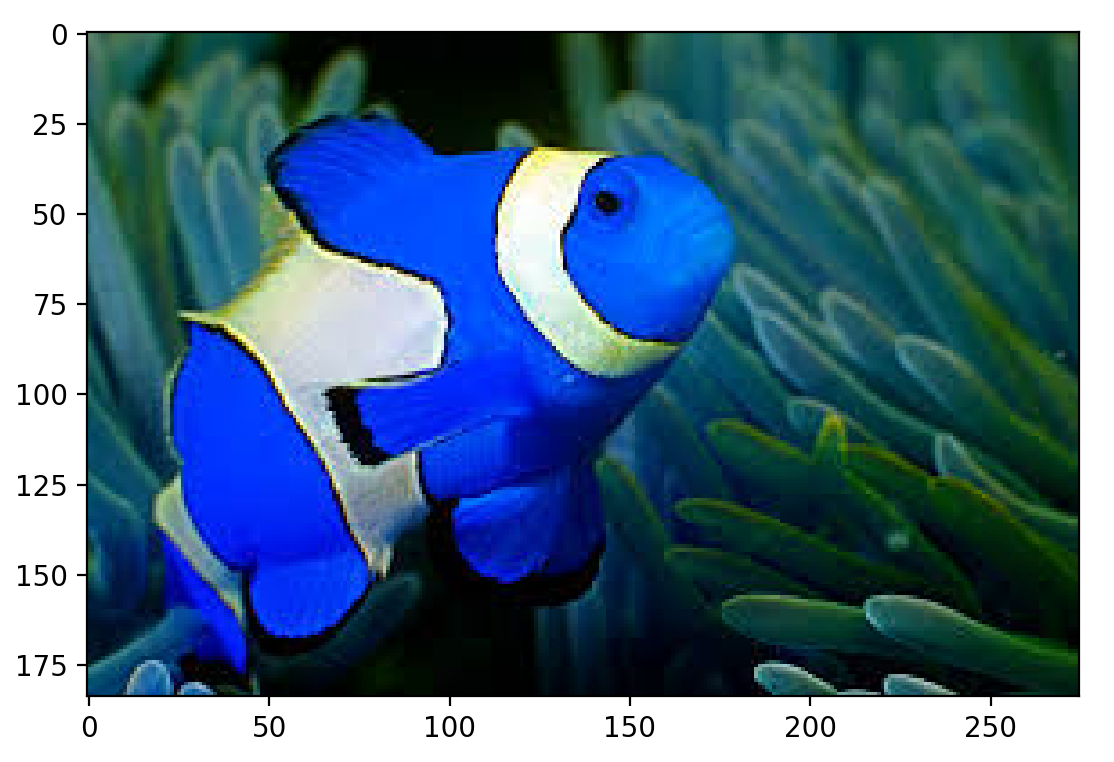
Hey, Nemo…or Dory? You’ll notice that it looks like the blue and red channels have been mixed up. In fact, OpenCV by default reads images in BGR format. You can use the cvtColor(image, flag) and the flag we looked at above to fix this:
嘿,尼莫(Nemo)还是多莉(Dory)? 您会注意到,蓝色和红色通道似乎混合在一起了。 实际上, 默认情况下 , OpenCV读取BGR格式的图像。 您可以使用cvtColor(image, flag)和我们在上面查看的标志来解决此问题:
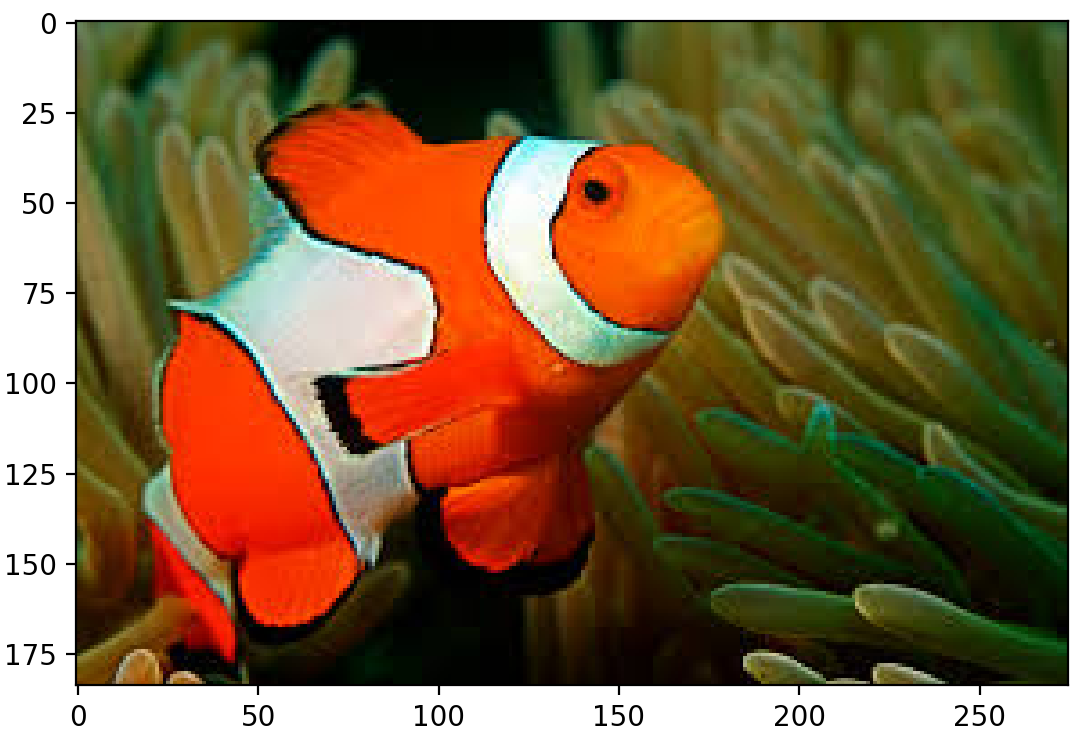
Now Nemo looks much more like himself.
现在,尼莫看起来更像他自己。
在RGB颜色空间中可视化Nemo (Visualizing Nemo in RGB Color Space)
HSV is a good choice of color space for segmenting by color, but to see why, let’s compare the image in both RGB and HSV color spaces by visualizing the color distribution of its pixels. A 3D plot shows this quite nicely, with each axis representing one of the channels in the color space. If you want to know how to make a 3D plot, view the collapsed section:
HSV是用于按颜色分割的颜色空间的不错选择,但是要了解为什么,让我们通过可视化其像素的颜色分布来比较RGB和HSV颜色空间中的图像。 3D图很好地显示了这一点,每个轴代表色彩空间中的一个通道。 如果您想知道如何制作3D图,请查看折叠部分:
How to Make a Colored 3D Scatter Plot Show/Hide
如何 显示/隐藏 彩色3D散点图
To make the plot, you will need a few more Matplotlib libraries:
要进行绘图,您将需要更多的Matplotlib库:
 >>> >>> from from mpl_toolkits.mplot3d mpl_toolkits.mplot3d import import Axes3D
Axes3D
>>> >>> from from matplotlib matplotlib import import cm
cm
>>> >>> from from matplotlib matplotlib import import colors
colors
Those libraries provide the functionalities you need for the plot. You want to place each pixel in its location based on its components and color it by its color. OpenCV split() is very handy here; it splits an image into its component channels. These few lines of code split the image and set up the 3D plot:
这些库提供了绘图所需的功能。 您要根据其成分将每个像素放置在其位置,并通过其颜色对其进行着色。 OpenCV split()在这里非常方便; 它将图像分成其组成通道。 以下几行代码拆分图像并设置3D图:
Now that you have set up the plot, you need to set up the pixel colors. In order to color each pixel according to its true color, there’s a bit of reshaping and normalization required. It looks messy, but essentially you need the colors corresponding to every pixel in the image to be flattened into a list and normalized, so that they can be passed to the facecolors parameter of Matplotlib scatter().
现在,您已经设置了绘图,您需要设置像素颜色。 为了根据每个像素的真实颜色对它们进行着色,需要进行一些调整和归一化处理。 它看起来很杂乱,但实际上您需要将与图像中每个像素对应的颜色展平到一个列表中并进行规范化,以便可以将它们传递给Matplotlib scatter()的facecolors参数。
Normalizing just means condensing the range of colors from 0-255 to 0-1 as required for the facecolors parameter. Lastly, facecolors wants a list, not an NumPy array:
规范化只是意味着按照facecolors参数的要求压缩从0-255到0-1的颜色范围。 最后, facecolors一个列表,而不是NumPy数组:
 >>> >>> pixel_colors pixel_colors = = nemonemo .. reshapereshape (((( npnp .. shapeshape (( nemonemo )[)[ 00 ]] ** npnp .. shapeshape (( nemonemo )[)[ 11 ], ], 33 ))
))
>>> >>> norm norm = = colorscolors .. NormalizeNormalize (( vminvmin =-=- 1.1. ,, vmaxvmax == 1.1. )
)
>>> >>> normnorm .. autoscaleautoscale (( pixel_colorspixel_colors )
)
>>> >>> pixel_colors pixel_colors = = normnorm (( pixel_colorspixel_colors )) .. tolisttolist ()
()
Now we have all the components ready for plotting: the pixel positions for each axis and their corresponding colors, in the format facecolors expects. You can build the scatter plot and view it:
现在,我们已经准备好绘制所有组件:每个轴的像素位置及其对应的颜色,以facecolors期望的格式。 您可以构建散点图并查看它:
Here is the colored scatter plot for the Nemo image in RGB:
这是RGB中Nemo图像的彩色散点图:
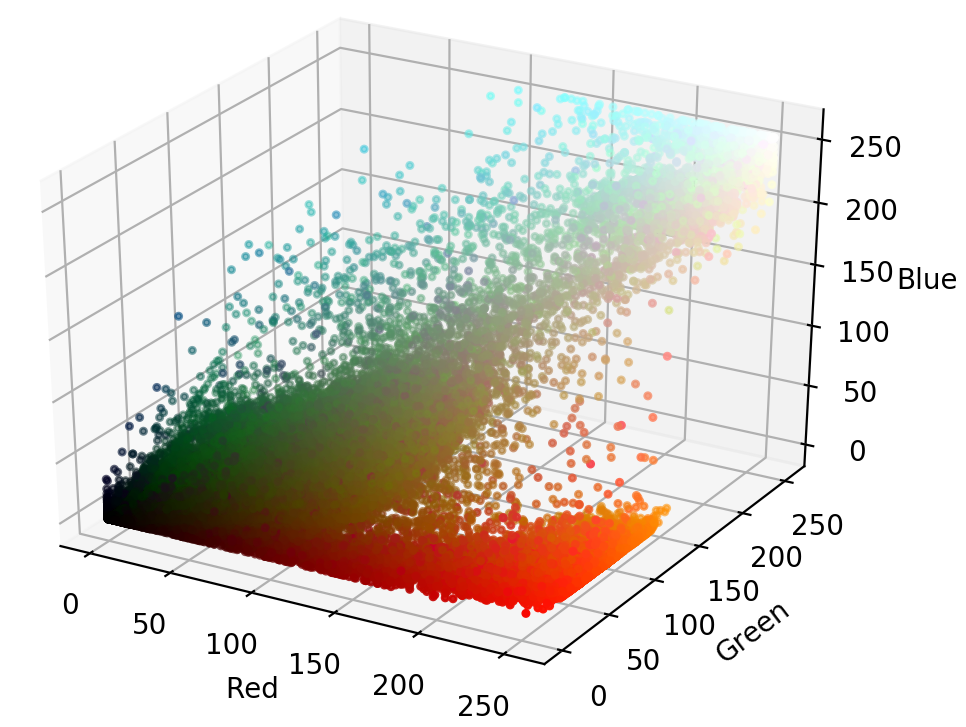
From this plot, you can see that the orange parts of the image span across almost the entire range of red, green, and blue values. Since parts of Nemo stretch over the whole plot, segmenting Nemo out in RGB space based on ranges of RGB values would not be easy.
从该图可以看到,图像的橙色部分几乎覆盖了红色,绿色和蓝色值的整个范围。 由于Nemo的各个部分在整个图上延伸,因此根据RGB值的范围在RGB空间中分割Nemo并不容易。
在HSV颜色空间中可视化Nemo (Visualizing Nemo in HSV Color Space)
We saw Nemo in RGB space, so now let’s view him in HSV space and compare.
我们在RGB空间中看到了Nemo,所以现在让我们在HSV空间中查看他并进行比较。
As mentioned briefly above, HSV stands for Hue, Saturation, and Value (or brightness), and is a cylindrical color space. The colors, or hues, are modeled as an angular dimension rotating around a central, vertical axis, which represents the value channel. Values go from dark (0 at the bottom) to light at the top. The third axis, saturation, defines the shades of hue from least saturated, at the vertical axis, to most saturated furthest away from the center:
如上所述, HSV代表色相,饱和度和值(或亮度) ,并且是圆柱形的色彩空间。 颜色或色调建模为围绕中心垂直轴旋转的角度尺寸,该轴代表值通道。 值从暗(底部为0)到顶部亮。 第三个轴是饱和度,它定义了从垂直轴上的最小饱和度到离中心最远的最大饱和度的色调阴影:
To convert an image from RGB to HSV, you can use cvtColor():
要将图像从RGB转换为HSV,可以使用cvtColor() :
 >>> >>> hsv_nemo hsv_nemo = = cv2cv2 .. cvtColorcvtColor (( nemonemo , , cv2cv2 .. COLOR_RGB2HSVCOLOR_RGB2HSV )
)
Now hsv_nemo stores the representation of Nemo in HSV. Using the same technique as above, we can look at a plot of the image in HSV, generated by the collapsed section below:
现在, hsv_nemo将Nemo的表示hsv_nemo存储在HSV中。 使用与上述相同的技术,我们可以查看由以下折叠部分生成的HSV中的图像图:
Generating the Colored 3D Scatter Plot for the Image in HSV Show/Hide
在HSV 显示/隐藏中 为图像生成彩色3D散点图
The code to show the image in HSV is the same as for RGB. Note that you use the same pixel_colors variable for coloring the pixels, since Matplotlib expects the values to be in RGB:
在HSV中显示图像的代码与RGB相同。 请注意,您使用相同的pixel_colors变量为像素着色,因为Matplotlib期望值以RGB表示:

In HSV space, Nemo’s oranges are much more localized and visually separable. The saturation and value of the oranges do vary, but they are mostly located within a small range along the hue axis. This is the key point that can be leveraged for segmentation.
在HSV空间中,Nemo的橙子更加本地化并且在视觉上可分离。 橙子的饱和度和值确实会有所不同,但它们大多位于沿色相轴的较小范围内。 这是可以用于细分的关键点。
挑选范围 (Picking Out a Range)
Let’s threshold Nemo just based on a simple range of oranges. You can choose the range by eyeballing the plot above or using a color picking app online such as this RGB to HSV tool. The swatches chosen here are a light orange and a darker orange that is almost red:
让我们仅根据简单的橙色范围来设定Nemo的阈值。 您可以通过注视上方的图或使用在线选色应用程序(例如RGB to HSV工具)来选择范围。 此处选择的色板是浅橙色和几乎是红色的深橙色:
 >>> >>> light_orange light_orange = = (( 11 , , 190190 , , 200200 )
)
>>> >>> dark_orange dark_orange = = (( 1818 , , 255255 , , 255255 )
)
If you want to use Python to display the colors you chose, click on the collapsed section:
如果要使用Python显示所选颜色,请单击折叠部分:
Displaying the HSV Colors Chosen Show/Hide
显示选择 显示/隐藏 的HSV颜色
A simple way to display the colors in Python is to make small square images of the desired color and plot them in Matplotlib. Matplotlib only interprets colors in RGB, but handy conversion functions are provided for the major color spaces so that we can plot images in other color spaces:
在Python中显示颜色的一种简单方法是制作所需颜色的小正方形图像,然后在Matplotlib中进行绘制。 Matplotlib仅解释RGB中的颜色,但是为主要颜色空间提供了方便的转换功能,以便我们可以在其他颜色空间中绘制图像:
Then, build the small 10x10x3 squares, filled with the respective color. You can use NumPy to easily fill the squares with the color:
然后,构建一个10x10x3的小正方形,并填充相应的颜色。 您可以使用NumPy轻松用颜色填充正方形:
 >>> >>> lo_square lo_square = = npnp .. fullfull (((( 1010 , , 1010 , , 33 ), ), light_orangelight_orange , , dtypedtype == npnp .. uint8uint8 ) ) / / 255.0
255.0
>>> >>> do_square do_square = = npnp .. fullfull (((( 1010 , , 1010 , , 33 ), ), dark_orangedark_orange , , dtypedtype == npnp .. uint8uint8 ) ) / / 255.0
255.0
Finally, you can plot them together by converting them to RGB for viewing:
最后,您可以将它们转换为RGB以进行查看,从而将它们绘制在一起:
That produces these images, filled with the chosen colors:
产生这些图像,并填充所选的颜色:
Once you get a decent color range, you can use cv2.inRange() to try to threshold Nemo. inRange() takes three parameters: the image, the lower range, and the higher range. It returns a binary mask (an ndarray of 1s and 0s) the size of the image where values of 1 indicate values within the range, and zero values indicate values outside:
一旦获得合适的色彩范围,就可以使用cv2.inRange()尝试对Nemo设置阈值。 inRange()具有三个参数: image,较低的范围和较高的range 。 它返回图像大小的二进制掩码(1和0的ndarray ),其中值1表示范围内的值,零值表示范围外的值:
 >>> >>> mask mask = = cv2cv2 .. inRangeinRange (( hsv_nemohsv_nemo , , light_orangelight_orange , , dark_orangedark_orange )
)
To impose the mask on top of the original image, you can use cv2.bitwise_and(), which keeps every pixel in the given image if the corresponding value in the mask is 1:
要将遮罩强cv2.bitwise_and()原始图像的顶部,可以使用cv2.bitwise_and() ,如果遮罩中的对应值为1 ,则它将保留给定图像中的每个像素:
To see what that did exactly, let’s view both the mask and the original image with the mask on top:
要查看确切的功能,让我们同时查看蒙版和原始图像(蒙版位于顶部):
 >>> >>> pltplt .. subplotsubplot (( 11 , , 22 , , 11 )
)
>>> >>> pltplt .. imshowimshow (( maskmask , , cmapcmap == "gray""gray" )
)
>>> >>> pltplt .. subplotsubplot (( 11 , , 22 , , 22 )
)
>>> >>> pltplt .. imshowimshow (( resultresult )
)
>>> >>> pltplt .. showshow ()
()
There you have it! This has already done a decent job of capturing the orange parts of the fish. The only problem is that Nemo also has white stripes… Fortunately, adding a second mask that looks for whites is very similar to what you did already with the oranges:
你有它! 这已经在捕获鱼的橙色部分方面做得不错。 唯一的问题是Nemo也有白色条纹……幸运的是,添加第二个看起来像白色的面具与您对橘子所做的非常相似:
Once you’ve specified a color range, you can look at the colors you’ve chosen:
指定颜色范围后,可以查看选择的颜色:
Displaying the Whites Show/Hide
显示白人 表演/隐藏
To display the whites, you can take the same approach as we did previously with the oranges:
要显示白色,可以采用与之前使用橙色相同的方法:
 >>> >>> lw_square lw_square = = npnp .. fullfull (((( 1010 , , 1010 , , 33 ), ), light_whitelight_white , , dtypedtype == npnp .. uint8uint8 ) ) / / 255.0
255.0
>>> >>> dw_square dw_square = = npnp .. fullfull (((( 1010 , , 1010 , , 33 ), ), dark_whitedark_white , , dtypedtype == npnp .. uint8uint8 ) ) / / 255.0255.0>>> >>> pltplt .. subplotsubplot (( 11 , , 22 , , 11 )
)
>>> >>> pltplt .. imshowimshow (( hsv_to_rgbhsv_to_rgb (( lw_squarelw_square ))
))
>>> >>> pltplt .. subplotsubplot (( 11 , , 22 , , 22 )
)
>>> >>> pltplt .. imshowimshow (( hsv_to_rgbhsv_to_rgb (( dw_squaredw_square ))
))
>>> >>> pltplt .. showshow ()
()
The upper range I’ve chosen here is a very blue white, because the white does have tinges of blue in the shadows. Let’s create a second mask and see if it captures Nemo’s stripes. You can build a second mask the same way as you did the first:
我在这里选择的上限是非常蓝的白色,因为白色的阴影中确实有蓝色。 让我们创建第二个蒙版,看看它是否捕获了Nemo的条纹。 您可以像制作第一个面具一样制作第二个面具:
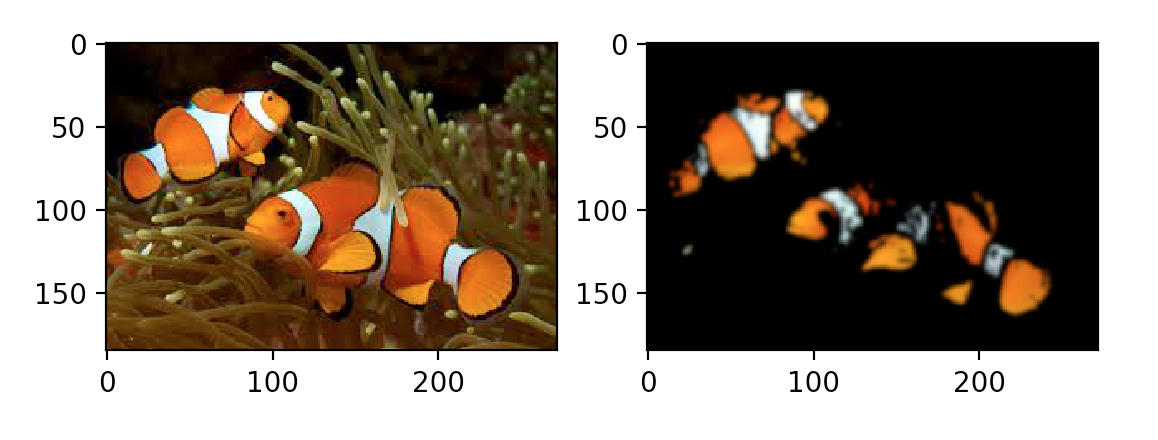
Not bad! Now you can combine the masks. Adding the two masks together results in 1 values wherever there is orange or white, which is exactly what is needed. Let’s add the masks together and plot the results:
不错! 现在,您可以结合使用口罩了。 将两个蒙版加在一起会在橙色或白色的任何地方得到1值,这正是需要的值。 让我们将蒙版加在一起并绘制结果:
 >>> >>> final_mask final_mask = = mask mask + + mask_whitemask_white>>> >>> final_result final_result = = cv2cv2 .. bitwise_andbitwise_and (( nemonemo , , nemonemo , , maskmask == final_maskfinal_mask )
)
>>> >>> pltplt .. subplotsubplot (( 11 , , 22 , , 11 )
)
>>> >>> pltplt .. imshowimshow (( final_maskfinal_mask , , cmapcmap == "gray""gray" )
)
>>> >>> pltplt .. subplotsubplot (( 11 , , 22 , , 22 )
)
>>> >>> pltplt .. imshowimshow (( final_resultfinal_result )
)
>>> >>> pltplt .. showshow ()
()
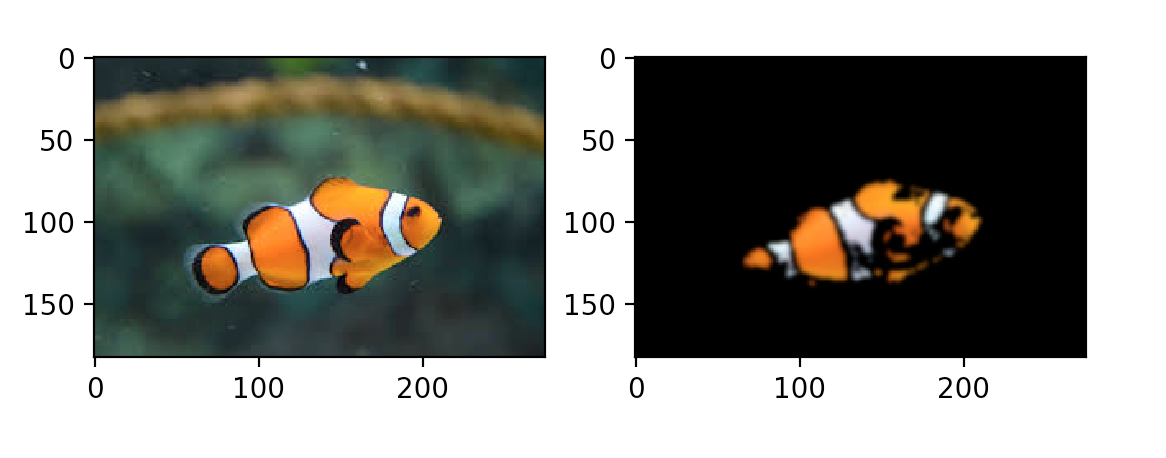
Essentially, you have a rough segmentation of Nemo in HSV color space. You’ll notice there are a few stray pixels along the segmentation border, and if you like, you can use a Gaussian blur to tidy up the small false detections.
本质上,您在HSV颜色空间中对Nemo进行了粗略的细分。 您会注意到在分割边界上有一些杂散像素,并且如果您愿意,可以使用高斯模糊来整理小的错误检测。
A Gaussian blur is an image filter that uses a kind of function called a Gaussian to transform each pixel in the image. It has the result of smoothing out image noise and reducing detail. Here’s what applying the blur looks like for our image:
高斯模糊是一种图像过滤器,它使用一种称为高斯的函数来变换图像中的每个像素。 其结果是消除图像噪声并减少细节。 这是为我们的图像应用模糊效果的样子:
这种细分是否推广到Nemo的亲戚? (Does This Segmentation Generalize to Nemo’s Relatives?)
Just for fun, let’s see how well this segmentation technique generalizes to other clownfish images. In the repository, there’s a selection of six images of clownfish from Google, licensed for public use. The images are in a subdirectory and indexed nemoi.jpg, where i is the index from 0-5.
只是为了好玩,让我们看看这种分割技术在其他小丑鱼图像中的适用性如何。 在存储库中,有六种来自Google的小丑鱼图像可供选择,这些图像已获得公共使用许可。 图像位于子目录中,并被索引为nemoi.jpg,其中i是0-5的索引。
First, load all Nemo’s relatives into a list:
首先,将所有Nemo的亲戚加载到列表中:
 path path = = "./images/nemo""./images/nemo"nemos_friends nemos_friends = = []
[]
for for i i in in rangerange (( 66 ):):friend friend = = cv2cv2 .. cvtColorcvtColor (( cv2cv2 .. imreadimread (( path path + + strstr (( ii ) ) + + ".jpg"".jpg" ), ), cv2cv2 .. COLOR_BGR2RGBCOLOR_BGR2RGB ))nemos_friendsnemos_friends .. appendappend (( friendfriend )
)
You can combine all the code used above to segment a single fish into a function that will take an image as input and return the segmented image. Expand this section to see what that looks like:
您可以将上面使用的所有代码组合起来,以将一条鱼分割成一个函数,该函数将图像作为输入并返回分割后的图像。 展开本节以查看外观:
The Segment Fish Function Show/Hide
段鱼功能 显示/隐藏
Here is the segment_fish() function:
这是segment_fish()函数:
With that useful function, you can then segment all the fish:
有了这个有用的功能,您就可以分割所有鱼了:
 results results = = [[ segment_fishsegment_fish (( friendfriend ) ) for for friend friend in in nemos_friendsnemos_friends ]
]
Let’s view all the results by plotting them in a loop:
让我们将它们绘制成一个循环来查看所有结果:
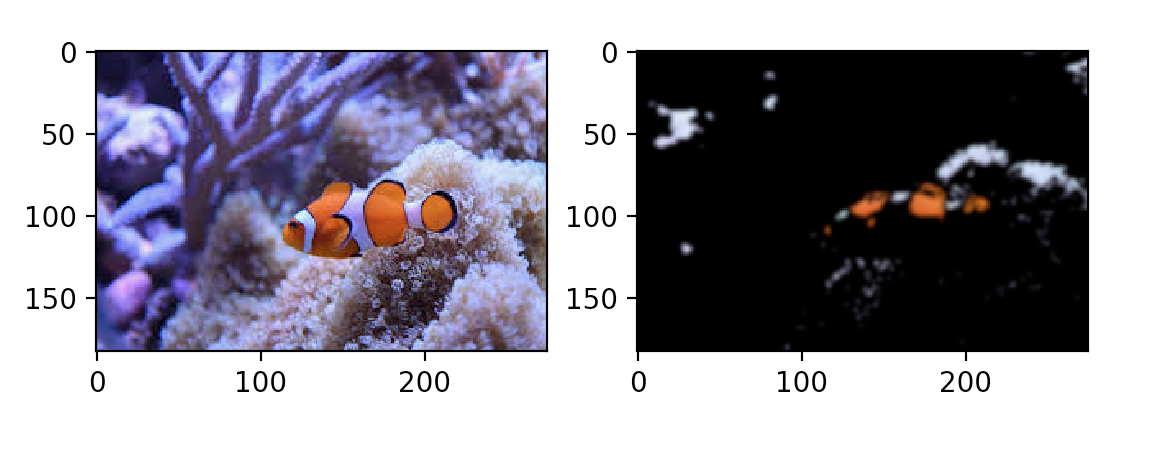
The foreground clownfish has orange shades darker than our range.
前景小丑鱼的橙色阴影比我们的范围深。
The shadowed bottom half of Nemo’s nephew is completely excluded, but bits of the purple anemone in the background look awfully like Nemo’s blue tinged stripes…
Nemo侄子的阴影下半部分被完全排除,但背景中的紫色海葵碎片看起来非常像Nemo的蓝色条纹……
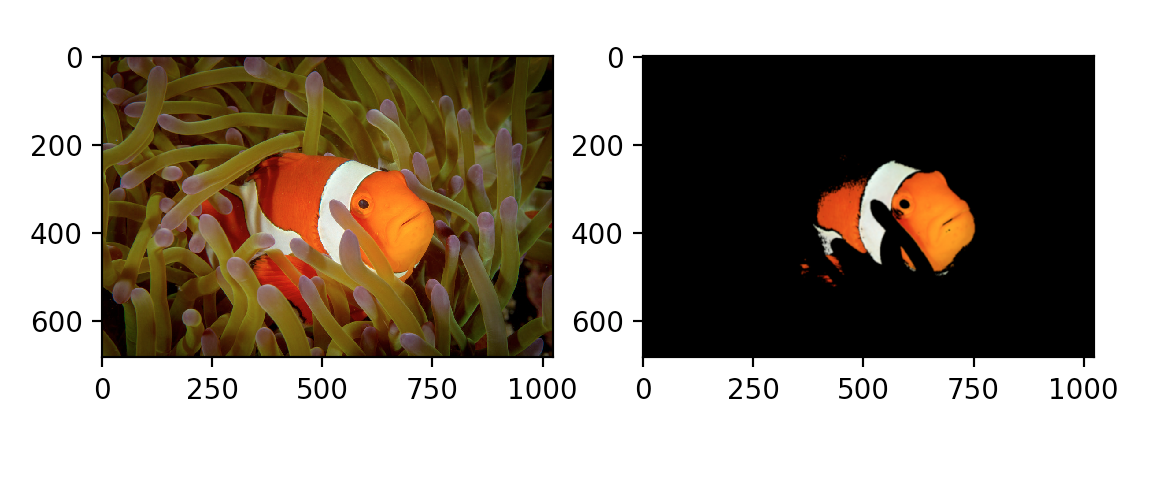
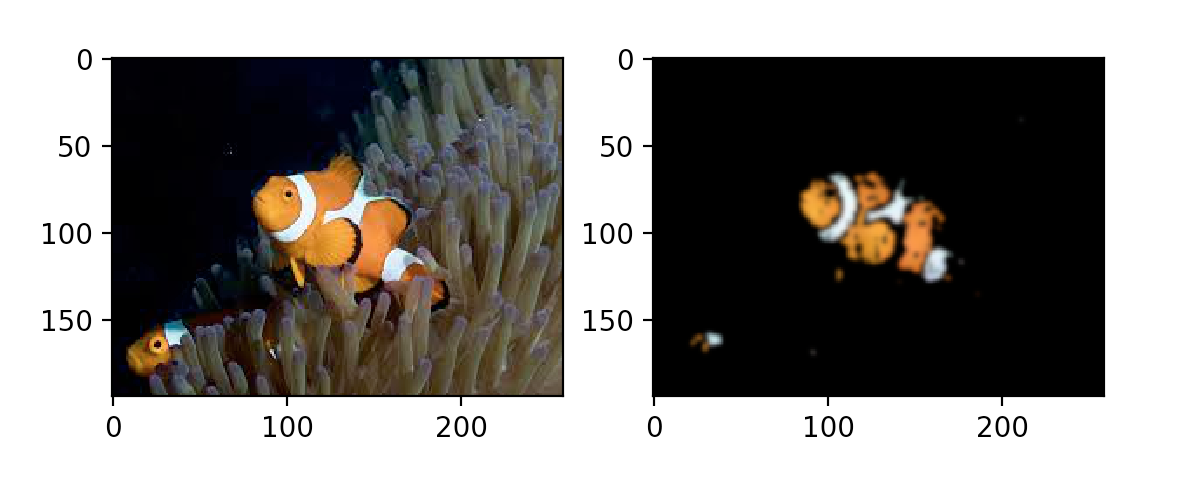
Overall, this simple segmentation method has successfully located the majority of Nemo’s relatives. It is clear, however, that segmenting one clownfish with particular lighting and background may not necessarily generalize well to segmenting all clownfish.
总体而言,这种简单的细分方法已成功定位了Nemo的大多数亲戚。 但是很明显,用特定的光照和背景分割一个小丑鱼不一定能很好地推广到所有小丑鱼的分割。
结论 (Conclusion)
In this tutorial, you’ve seen what a few different color spaces are, how an image is distributed across RGB and HSV color spaces, and how to use OpenCV to convert between color spaces and segment out ranges.
在本教程中,您已经了解了几种不同的色彩空间,如何在RGB和HSV色彩空间中分布图像,以及如何使用OpenCV在色彩空间之间进行转换并划分出范围。
Altogether, you’ve learned how a basic understanding of how color spaces in OpenCV can be used to perform object segmentation in images, and hopefully seen its potential for doing other tasks as well. Where lighting and background are controlled, such as in an experimental setting or with a more homogeneous dataset, this segmentation technique is simple, fast, and reliable.
总体而言,您已经了解了如何基本了解如何使用OpenCV中的色彩空间在图像中执行对象分割,并希望看到它也可以执行其他任务。 在控制光照和背景的情况下(例如在实验环境中或使用更均匀的数据集),这种分割技术既简单,快速又可靠。
翻译自: https://www.pybloggers.com/2018/09/color-spaces-and-how-to-use-them-with-opencv-and-python/
颜色空间以及如何在OpenCV和Python中使用它们相关推荐
- 使用opencv和python进行智能图像处理_使用OpenCV在Python中进行图像处理
编辑推荐: 本文将先讨论一些图像处理,然后再继续介绍可以方便使用图像处理的不同应用程序/场景,希望对您的学习有所帮助. 本文来自于tecdat ,由火龙果软件Alice编辑.推荐. 介绍 在本教程中, ...
- 如何用OpenCV在Python中实现人脸检测
选自towardsdatascience 作者:Maël Fabien 机器之心编译 参与:高璇.张倩.淑婷 本教程将介绍如何使用 OpenCV 和 Dlib 在 Python 中创建和运行人脸检测算 ...
- 使用OpenCV在Python中进行人脸和眼睛检测
Modules Used: 使用的模块: python-opencv(cv2) python-opencv(cv2) python-opencv(cv2) Opencv(Open source com ...
- 使用 OpenCV 在 Python 中检测图像中的形状
OpenCV 是一个开源库,主要用于处理图像和视频以识别形状.对象.文本等.它主要与 python 一起使用.在本文中,我们将了解如何检测图像中的形状.为此,我们需要OpenCV 的cv2.findC ...
- Opencv或python中图像与三维数组原理
炒鸡详细的图像原理以及成像原理讲解,不仅仅是python 一个OpenCV小白的自我成长之路(^_*) 1.光--可见光 我们日常见到的光五颜六色,赤橙黄绿青蓝紫,谁持彩练当空舞.不好意思,情不自禁啊 ...
- python监控linux运行程序_如何在linux/tcl/python中监控正在打开或启动的应用程序?...
我正在尝试构建一个面板应用程序,类似于avant window navigator或UbuntuUnity.在 我的问题是,一旦我用预先定义好的应用程序构建了面板,当应用程序打开或启动时,如何向面板添 ...
- opencv python3 找图片色块_如何使用OpenCV在Python中找到图像的平均颜色?
如何修复错误 导致此错误的原因有两个: >文件名拼写错误. >图像文件不在当前工作目录中. 要解决此问题,您应确保文件名拼写正确(以大小写敏感检查)并且映像文件位于当前工作目录中(此处有两 ...
- matlab三维螺旋,如何在MATLAB或Python中生成三维螺旋线?
我写了一个生成螺旋线的x,y,z点的代码,得到了这个结果: 代码:clear all; delete all, clc; % Spiral constants THETA_0 = 5; % const ...
- python 生成pdf页面大小,如何在reportlab,python中创建具有不同页面大小的PDF文档...
Is it possible to create a PDF document with differing page sizes in reportlab? I would like to crea ...
最新文章
- UI设计培训怎么选择就业方向
- docker dockerfile 映射端口范围 批量映射端口
- 编程之美-子数组之和的最大值(二维)方法整理
- 比iPhone8更重要的新App Store,给内容产品的未来指出明路
- 【python数据挖掘课程】十四.Scipy调用curve_fit实现曲线拟合
- 【Redis】18.缓存预热、缓存雪崩、缓存击穿、缓存穿透、性能指标监控等企业级解决方案
- 每日一题:leetcode81.搜索旋转排序数组Ⅱ
- weblogic-wslt初探
- 遗传算法之TSP问题
- cisco sla 简单配置
- 2022年湖北安全员ABC证书查询是在哪里查真假呢?
- 淘宝客小程序制作(3)-API编写及部署
- 如何通过QQ群做网站推广
- position: sticky 属性
- 图像处理中的 亮度, 灰度, 对比度等概念
- 【分布式】分布式系统概述
- JPG图片插入到CAD图纸中的2种方法
- Jenkins邮箱配置中,使用SSL连接的问题
- VBA中数组72变(随心所欲复制)
- 人一个月瘦多少斤比较合适