Expression Web-您的新PHP工具包
I must confess, it’s been a long, long time since I’ve used a visual editor to write a web page. My text editor and I are the best of pals, and a visual development environment needs to be able to do a lot of neat stuff to impress me. So it was with a great deal of curiosity that I started poking around inside Expression Web 3, the latest version of Microsoft’s web development tool kit.Expression Web promises an intuitive and helpful web development experience. There’s support for code highlighting and completion for a number of different syntaxes; as well as the usual suspects–HTML, CSS, and JavaScript–you can also enjoy code completion for PHP, ASP.NET, and more. Testing tools include support for live viewing of PHP pages, a neat new way to test in Internet Explorer 6 through 8 (as well as Firefox), and lots of shortcuts for trying out other browsers you’ve installed. And in a really nice touch, you can even import content from a Photoshop document, making it easy to grab image parts from layers in your PSD to include in your pages.In this how-to tutorial, we’ll create a very simple PHP page, using the experience to put Expression through its paces. Let’s begin!
我必须承认,自从我使用可视化编辑器编写网页以来,已经很长时间了。 我和我的文本编辑器是最好的朋友,视觉开发环境需要能够做很多整洁的事情来打动我。 因此,出于极大的好奇心,我开始在Microsoft Web开发工具套件的最新版本Expression Web 3中闲逛。ExpressionWeb带来了直观而有用的Web开发体验。 支持多种不同语法的代码突出显示和完成。 除了常见的可疑对象(HTML,CSS和JavaScript)之外,您还可以享受PHP,ASP.NET等的代码完成功能。 测试工具包括对PHP页面的实时查看的支持,在Internet Explorer 6至8(以及Firefox)中进行测试的一种新颖的新方法以及用于试用已安装的其他浏览器的许多快捷方式。 而且,您甚至还可以从Photoshop文档中导入内容,从而轻松地从PSD的图层中抓取图像部分以包含在页面中。在此操作方法教程中,我们将创建一个非常简单PHP页面,利用经验来逐步处理Expression。 让我们开始!
在一开始的时候 (In the Beginning)
To start, we need to grab a few key items.
首先,我们需要掌握一些关键项目。
抓住Photoshop Comp (Grab a Photoshop Comp)
We’ll build a simple PHP page using this Photoshop comp I prepared earlier. If you’d like to follow along with this tutorial, feel free to grab the comp as well. Of course, if you’re feeling adventurous, it’s a great opportunity to play with a design you already have in mind!
我们将使用我之前准备的这个Photoshop comp构建一个简单PHP页面。 如果您想按照本教程进行操作,也可以随时获取该组件。 当然,如果您喜欢冒险,这是一个很好的机会来使用您已经想到的设计!
安装Expression Web或Expression Studio (Install Expression Web or Expression Studio)
Naturally, we’ll need a copy of Expression Web, which you can download from the Microsoft Expression site. You can choose a standalone installer for Expression Web and Super Preview alone, or install the complete Expression Studio. The trial is completely unlimited and lasts for 60 days, which should be more than enough time to decide whether you want to purchase.
当然,我们需要一个Expression Web副本,您可以从Microsoft Expression网站下载该副本。 您可以单独为Expression Web和Super Preview选择独立的安装程序,也可以安装完整的Expression Studio。 试用版完全不受限制,可以持续60天,这应该足以决定您是否要购买。
A Service Pack for Expression Web was released as we were writing this article in late November of 2009. If you installed Expression Web before that date, be sure that you have the latest version.
我们在2009年11月下旬撰写本文时发布了Expression Web Service Pack。如果您在此日期之前安装了Expression Web,请确保您具有最新版本。
By the way, if you do decide to purchase Expression Web 3 once your trial’s up, check whether you’re eligible for an upgrade price. Naturally, users of Expression Web 2 receive a discount on version 3; at the time of writing, however, upgrade pricing is also available to users of Adobe Creative Suite, Microsoft Office, and Visual Studio 2005. Pocket the difference and treat yourself to a sumptuous meal out!
顺便说一句,如果您决定在试用期结束后决定购买Expression Web 3,请检查您是否有资格获得升级价格 。 当然,Expression Web 2的用户可以获得版本3的折扣; 但是,在撰写本文时,Adobe Creative Suite,Microsoft Office和Visual Studio 2005的用户也可以享受升级价格。
安装PHP (Install PHP)
Expression Web includes support for coding PHP, but if we want to also preview PHP pages, we’ll need to install the PHP binaries.If you’ve yet to do so, grab the Windows PHP installer from the PHP for Windows web site. The easiest option here is to use the Installer option, as opposed to the source code. PHP, as always, is free.There are two important configuration variables you’ll need to check before proceeding, however: create or edit your php.ini file, and look for the doc_root and cgi.force_redirect lines. doc_root must be uncommented and set to localhost, and cgi.force_redirect must be uncommented and set to 0. If the installer has failed to do this for you, edit it now. Since this will be a development environment, it’s probably a good idea to ensure that display_errors is set to Yes.You now have all the bits and pieces you’ll need to follow along with this tutorial.
Expression Web包括对PHP编码的支持,但是如果我们还想预览PHP页面,则需要安装PHP二进制文件。如果尚未安装,请从PHP for Windows网站上获取Windows PHP安装程序。 这里最简单的选项是使用Installer选项,而不是源代码。 与往常一样,PHP是免费的。在继续操作之前,您需要检查两个重要的配置变量:创建或编辑php.ini文件,并查找doc_root和cgi.force_redirect行。 doc_root必须取消注释并设置为localhost ,而cgi.force_redirect必须取消注释并设置为0 。 如果安装程序无法为您完成此操作,请立即进行编辑。 由于这将是一个开发环境,因此最好将display_errors设置为Yes 。现在,您已经掌握了本教程所需要的所有细节。
探索表达网络 (Exploring Expression Web)
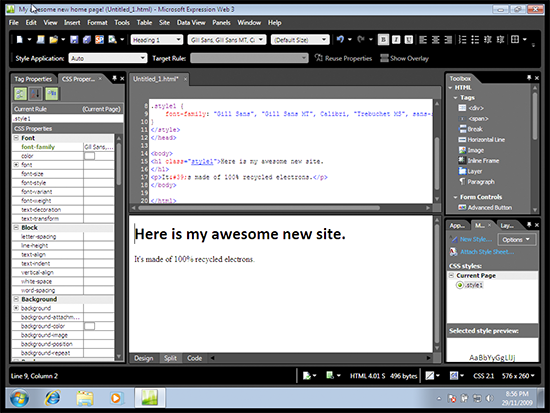
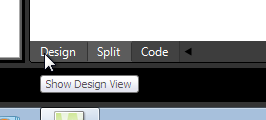

I like to become acquainted with a new app by leaping straight into action. When you first launch Expression Web, you’ll be greeted with a workspace full of sidebars, toolbars, and other goodies. In the center, you’ll see your document. Figure 1, “The Expression Web 3 workspace with a simple document open” illustrates how it looks.Figure 1. The Expression Web 3 workspace with a simple document openThis screenshot shows a simple document in Expression Web’s Split view, showing design and code at the same time. Markup can be entered in the top section, and the bottom area will reveal how it looks. You can swap between the Code, Design, or Split views using the tabs at the bottom of this window, shown in Figure 2, “Swap between Design, Split, and Code views”.Figure 2. Swap between Design, Split, and Code viewsThe panels to the left and right contain tools that we’ll find useful once we start working. To the left we have a tag and CSS properties panel, where we’re able to add various attributes and JavaScript events to any element, or adjust the element’s CSS properties. To the right, there’s a toolbox from which we can drag and drop a number of common elements, such as div elements, form widgets, or components such as Flash or Silverlight. If you’re an ASP.NET developer, there’s a collection of draggable goodies here for you, too. Other panels are available, but they’re hidden by default; you can reveal them using the Panels menu at the top of your screen.Looking at my design comp, I have a fairly good idea of what needs to happen: there should be a container div to hold the contents of the page, a nice heading area sitting to the left, and the contents of the page in a div on the right.Figure 3. A wireframe view of the structure of this page
我喜欢通过直接投入行动来结识新应用。 首次启动Expression Web时,会看到一个充满侧边栏,工具栏和其他物品的工作区。 在中心,您将看到您的文档。 图1“带有打开的简单文档的Expression Web 3工作区”说明了它的外观。 图1.打开了一个简单文档的Expression Web 3工作区此屏幕快照在Expression Web的Split视图中显示了一个简单文档,同时显示了设计和代码。 可以在顶部输入标记,底部显示其外观。 您可以使用此窗口底部的选项卡在Code,Design或Split视图之间进行交换 , 如图2“ Design,Split和Code视图之间的交换”所示 。 图2.在Design,Split和Code视图之间交换在左侧和右侧的面板中包含一些工具,一旦我们开始工作,它们将对您有用。 在左侧,我们有一个标签和CSS属性面板,可以在其中向任何元素添加各种属性和JavaScript事件,或调整该元素CSS属性。 在右侧,有一个工具箱,我们可以从中拖放许多常见元素,例如div元素,表单小部件或组件(例如Flash或Silverlight)。 如果您是ASP.NET开发人员,那么这里也有一系列可拖动的好东西。 其他面板可用,但是默认情况下它们是隐藏的。 您可以使用屏幕顶部的“面板”菜单来显示它们。查看我的设计组件,我对需要发生的事情有一个很好的了解:应该有一个容器div来保存页面的内容,标题不错区域位于左侧,页面的内容位于div 。 图3.此页面结构的线框视图
设计图 (Design View)
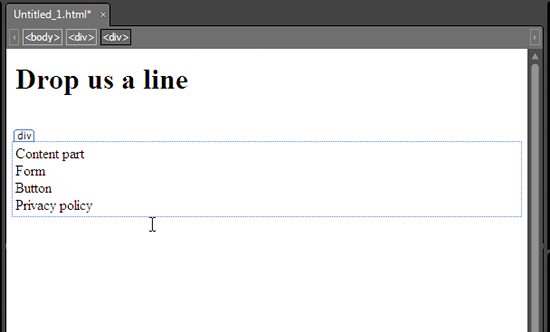
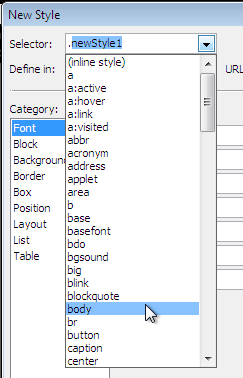
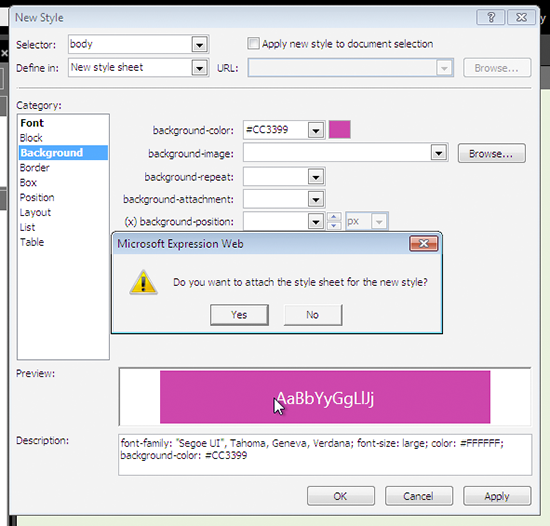
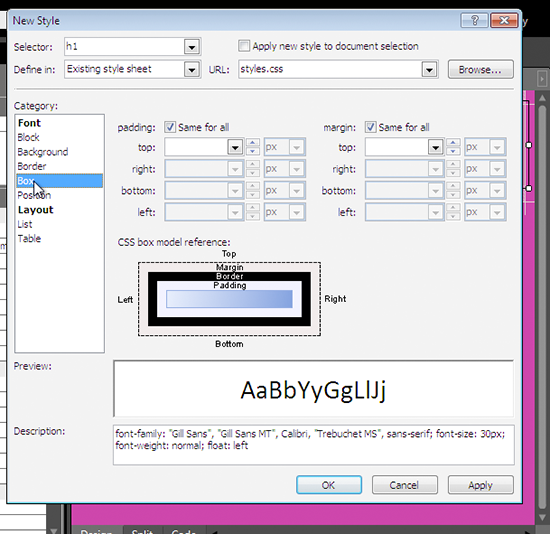
Since I’m a text editor, code-it-by-hand kind of gal, my first instinct is to leap into the code and start typing away. However, I’m curious about how well Expression’s visual editor will cope with what I need. Let’s switch into Design view.Below, I’ve added some very basic elements to provide a shell for my document. I’ve dropped in a div using the Toolbox panel to my right, which will become my container div. Inside it I’ve placed another div for the page contents, the h1 for the heading, and some text placeholders. In the image below, you can see a dotted line around the div I’m currently working in. At the top is a series of oblongs with elements in them—that’s my current position within the document’s tree.Figure 4. Uncharted territory for your humble authorLet’s see how easy it is to apply some CSS. We’ll start by selecting the body element. In Design view, this is easily achieved by clicking on the name of the element at the top of the Design window.Next, we’ll add a new style, using the Add New Style button from the CSS panel at the bottom right. The Style Wizard window appears, with a plethora of interesting options to select.By default, Expression will assume that you intend to apply a style called .style1, .style2, and so on. As we know, these sorts of style names are inappropriate for semantic markup. Fortunately, it’s super easy to change the selector so that it uses the body element instead. You can type it, or select it from the pull-down shown below.Figure 5. Choose the body element hereAnother great option here is to choose whether we’d like this to be placed in a style declaration within the page, or in a new style sheet. If we select the option to place this style declaration in a new style sheet, Expression helpfully creates one for us. That’s cool!Figure 6. Why yes, I would like that new style sheetUsing the Wizard, we can add all the required properties: font, background and text color, and the like. (Our Photoshop composition has a background image in it, but we’ll deal with that later.) Declarations are arranged into appropriate categories, and some panels even give you handy pointers—the Box category shows you a diagram of the CSS box model to help you remember how the parts of a box go together, which is great for newbies.Figure 7. A box model cheat sheetHit OK when you’ve added your declarations.Now that there’s a style sheet in place, we can view the CSS properties for each element in the CSS Properties panel on the left.We’ll use the same process to set up the positioning of the rest of the parts of this document, according to those instructions on the wireframe. To add id attributes to an element, use the Tag properties tab on the leftmost panel, and set the id for each of the elements you want to select. Then, use the Add Style button to add the styles for each ID. I’ve chosen to make the container div element 80% width, the h1 element 30% width, and the contents div 65% width.If you’ve yet to save your pages, now is the right time to do it. Be sure to save your HTML page as a PHP page—when you’re in the Save As dialog, select PHP from the Save as type pull-down menu.
由于我是一个文本编辑器,是一堆手工编写代码的gal,所以我的第一个直觉是跳入代码并开始打字。 但是,我很好奇Expression的可视化编辑器将如何满足我的需求。 让我们切换到设计视图。下面,我添加了一些非常基本的元素来为文档提供外壳。 我使用右侧的“工具箱”面板放入了一个div ,它将成为我的容器div 。 在其中,我为页面内容放置了另一个div ,为标题放置了h1 ,并添加了一些文本占位符。 在下面的图像中,您可以在我当前正在使用的div周围看到一条虚线。顶部是一系列带有元素的长方形-这是我在文档树中的当前位置。 图4.不起眼的作者的未知领域让我们看看应用一些CSS多么容易。 我们将从选择body元素开始。 在“设计”视图中,单击“ 设计”窗口顶部的元素名称即可轻松实现。接下来,我们将使用右下角CSS面板中的“ 添加新样式”按钮添加新样式 。 出现样式向导窗口,其中有很多有趣的选项可供选择。默认情况下,Expression将假定您打算应用称为.style1 , .style2的样式。 众所周知,这类样式名称不适合语义标记。 幸运的是,更改选择器以使其使用body元素非常容易。 您可以键入它,或从下面显示的下拉菜单中选择它。 图5.在这里选择body元素这里的另一个不错的选择是选择我们希望将其放置在页面中的样式声明中还是新样式表中。 如果我们选择将该样式声明放置在新样式表中的选项,则Expression会为我们创建一个声明。 这很酷! 图6.为什么,我想要新的样式表使用向导,我们可以添加所有必需的属性:字体,背景和文本颜色等。 (我们的Photoshop合成中包含背景图像,但是稍后我们将对其进行处理。)声明被安排在适当的类别中,某些面板甚至为您提供了方便的指针-Box类别向您显示CSS箱模型的图表帮助您记住盒子的各个部分如何结合在一起,这对新手来说非常有用。 图7.盒子模型备忘单添加声明后单击OK 。现在已经有了样式表,我们可以在左侧CSS Properties面板中查看每个元素CSS属性。按照线框上的那些说明,使用相同的过程来设置本文档其余部分的位置。 要将id属性添加到元素,请使用最左侧面板上的Tag属性标签,并为要选择的每个元素设置id 。 然后,使用“ 添加样式”按钮为每个ID添加样式。 我选择将容器div元素的宽度设置为80% ,将h1元素的宽度设置为30% ,将内容div宽度设置为65%如果您尚未保存页面,那么现在是正确的时机。 确保将HTML页面另存为PHP页面-在“另存为”对话框中时,从“ 另存为”类型下拉菜单中选择PHP。
所见即所得的布鲁斯 (WYSIWYG Blues)
Grizzled web veterans have horrific stories to tell of the kind of convoluted mess that a WYSIWYG editor can create. People with little or no knowledge of HTML can create some seriously grotty markup and styles using WYSIWYG tools, where best practice can fall by the wayside in favor of ease of use: layout tables, absolutely positioned divs, and incomprehensible styles sheets abound. Indeed, a truly determined newbie can easily createthat kind of page, even with Expression Web.The process we’ve used here is a good way to enjoy the benefits of Expression Web’s visual approach to web page construction without cluttering your document with weird crufty markup. If you prefer to use the more pointy-and-clicky tools, such as drawing divs directly onto the screen or formatting the text with the toolbars, be sure to use Expression’s tidy-up tools: the Optimize HTML and CSS Report wizards will help you identify any extraneous cruft.
灰溜溜的网络老手们讲述了一个可怕的故事,这些故事讲述了所见即所得编辑器可以创建的那种混乱的混乱情况。 几乎不懂HTML的人可以使用WYSIWYG工具创建一些粗俗的标记和样式,最佳实践可能会偏向于易用性:布局表,绝对定位的div和难以理解的样式表比比皆是。 的确,即使是使用Expression Web,真正有决心的新手也可以轻松创建这种页面。在此使用的过程是一种享受Expression Web可视化方法进行网页构建的好处的好方法,而不会因怪异的粗糙标记而使文档混乱。 如果您喜欢使用更加尖锐的工具,例如直接在屏幕上绘制div或使用工具栏设置文本格式,请确保使用Expression的整理工具:“优化HTML和CSS报告”向导将为您提供帮助您会发现任何无关紧要的东西。
超级Duper,超级预览 (Super Duper, Super Preview)
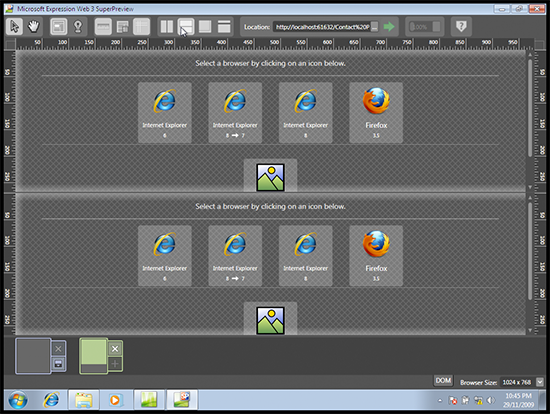
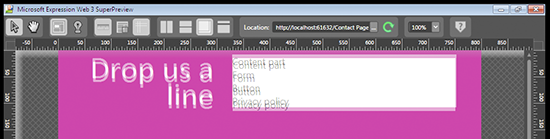
With a very basic layout now in place, let’s see how it shapes up. Hit the red-and-blue Super Preview button on the topmost toolbar. Super Preview’s split screen appears, asking which browsers you’d like to use. On the Internet Explorer side, you can choose from IE6, IE8, and IE7 compatibility mode. If you have Firefox installed, this will also figure as a choice. Super Preview also allows you to open your mockup image for comparison and supports several image file formats, including PSD files.Figure 8. A smorgasbord of preview optionsI have a narrow screen, so I’ve changed my split panes to top/bottom, rather than left/right. Once you’ve chosen two browsers to compare, hit the big green button beside the address bar and watch your pages load in both browsers at once.Super Preview is more than just a browser preview widget, though—there’s plenty of interesting tools to use. When the previews have loaded, try clicking an element in either screen; a box will highlight in both screens to show you any subtle differences between the two. In Figure 9, I’ve chosen IE6 and 8 as my two browsers, then clicked the h1 element. The display is showing me that there’s quite a bit of a difference in width, position, and boxsize. (Surprised? Neither am I. Stay classy, IE6.)Super Preview offers other ways to compare the two. If you’re short on screen real estate, as I am, you can use the Overlay comparison instead. Both views are made visible, like onion skins, so that it’s very easy to see discrepancies.Figure 9. Subtle differences are highlighted in the Overlay viewThere’s even a DOM browser tab available at the bottom of the screen, helping you to identify pesky elements.Of course, you can also preview your work in any browser installed on your system. PressF12to launch your default browser and see your work.In either instance, the Expression Development Server will launch. Because it’s a real web server, rather than merely opening files from your hard drive, you’ll be able to see any dynamic content like PHP or ASP code you’ve used. This will come in very handy later when we pop in some PHP.So far, so good! However, I’m itching to write some of my own code, and if you’re a hand coder type, I bet you are too. Let’s head back into Expression Web, and this time we’ll edit the code ourselves.
现在有了非常基本的布局,让我们看看它是如何形成的。 点击最上方工具栏上的红色和蓝色超级预览按钮。 出现Super Preview的分割屏幕,询问您要使用哪些浏览器。 在Internet Explorer端,您可以选择IE6,IE8和IE7兼容模式。 如果您安装了Firefox,这也可以作为一种选择。 Super Preview还允许您打开样机图像进行比较,并支持多种图像文件格式,包括PSD文件。 图8.一大堆预览选项我的屏幕狭窄,因此我将拆分窗格更改为上/下,而不是左/右。 选择了两种浏览器进行比较后,点击地址栏旁边的绿色大按钮,并立即查看页面在两种浏览器中的加载情况。不过,Super Preview不仅仅是浏览器预览小部件,还有很多有趣的工具可供使用。 加载预览后,尝试在任一屏幕中单击一个元素; 一个框将在两个屏幕中突出显示,以向您显示两者之间的细微差别。 在图9中,我选择IE6和8作为我的两个浏览器,然后单击h1元素。 显示屏告诉我,宽度,位置和盒子大小有很大的不同。 (惊讶吗?我也不是。保持优雅,IE6。)Super Preview提供了比较这两者的其他方法。 如果您的屏幕空间不足,可以使用覆盖比较。 两种视图都可以看到,就像洋葱皮一样,因此很容易看到差异。 图9.微妙的差异在Overlay视图中突出显示。屏幕底部甚至还提供一个DOM浏览器选项卡,可帮助您识别令人讨厌的元素。当然,您也可以在系统上安装的任何浏览器中预览工作。 按F12启动默认浏览器并查看您的工作。在这两种情况下,Expression Development Server都将启动。 因为它是一台真正的Web服务器,而不只是打开硬盘驱动器中的文件,所以您将能够看到任何动态内容,例如您所使用PHP或ASP代码。 稍后我们插入一些PHP时,这将非常方便。到目前为止,太好了! 但是,我很想编写一些自己的代码,如果您是手动编码器类型,那么我也敢打赌。 让我们回到Expression Web,这次我们将自己编辑代码。
代码查看 (Code View)
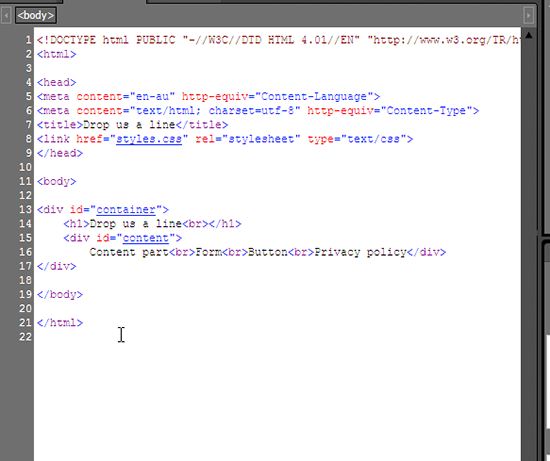
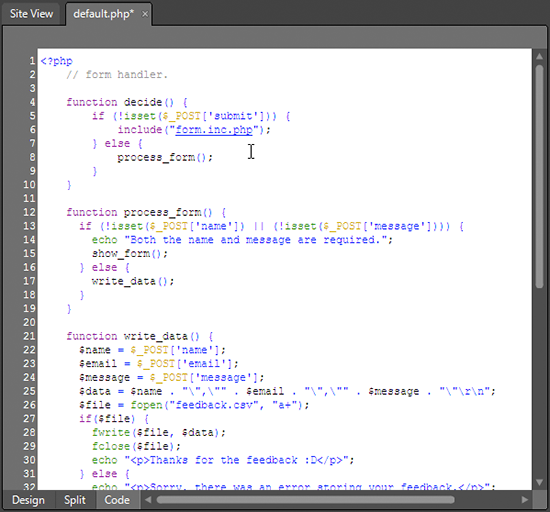
Back in Expression Web, I’ve swapped to Code view using the tabs below my window. The code created by the Design view seems quite tidy so far. Expression’s syntax highlighting is reasonably clear. Elements’ id attributes and the style sheet link itself are hyperlinks; control-clicking one of these whisks us away to that part of the style sheet. That’s convenient, and kind of nifty. Figure 10. shows how mine turned out:Figure 10. The Code viewLet’s code up the rest of our form and add some more CSS. You’ll find the markup and CSS I used in the code archive for this article, but I strongly encourage you to write your own. That way, you’ll see Expression Web’s helpful code completion features in action.Expression Web’s code completion helper is called Intellisense, and as we start writing code, we’ll see it kick in. To start with, let’s remove the placeholder text and add a paragraph with the text from the top of our form. Watch carefully as you type, and you’ll see Intellisense kick in. When writing HTML, the Intellisense helper suggests elements as soon as you open a bracket, reveals suitable attributes or events if you enter a space, helpfully inserts quotes for you when you use an equals sign, and even inserts the right closing tag for you when you close your brackets. In the CSS view, indents, closing semicolons, and helpful suggestions work in much the same way.For more keystroke-saving power, Expression comes with a number of preset code snippets you can invoke by pressing Ctrl Enter, and then typing a shortcut or selecting from a list. It’d take a while to learn them all, but once you do, you have some powerful text macros on your hands. These include useful tools like DOCTYPEs, common meta elements, empty script blocks, and more. You’ll also find the Code Snippet menu, offering the default set of snippets; of course, you could configure your own. If you find that you’re often constructing the same sort of text in lots of projects, the Code Snippet function will certainly save you some time.For my part, I find that Intellisense is a little too intelligent for my tastes, and I often find myself typing in extra closing quotes and tags out of sheer force of habit. It’s possible to grow used to any editor’s code completion tools with time, practice, and adjusting the configuration to suit your own style. Fortunately it’s easy to configure your Intellisense and Code Snippet preferences: just look for them in the application’s general editing preferences (Tools > Page Editor Options). Of course, if the very idea of code completion bugs you, you can even turn them all off.
回到Expression Web,使用窗口下方的标签切换到“代码”视图。 到目前为止,“设计”视图创建的代码看起来很整洁。 Expression的语法突出显示相当清晰。 元素的id属性和样式表链接本身是超链接; 按住Control键并单击其中之一,将我们带到样式表的该部分。 那很方便,也很漂亮。 图10.显示了我的结果: 图10.“代码”视图让我们对表单的其余部分进行编码,并添加更多CSS。 您将在本文的代码档案中找到标记和CSS,但是我强烈建议您编写自己的标记和CSS。 这样,您将看到Expression Web的有用的代码完成功能的运行情况。ExpressionWeb的代码完成帮助程序称为Intellisense,在开始编写代码时,我们将看到它的开始。首先,让我们删除占位符文本并从我们的表格顶部添加一个带有文本的段落。 键入时请仔细观察,然后您会看到Intellisense插入。编写HTML时,Intellisense帮助器会在您打开方括号时建议元素,如果您输入空格,则会显示合适的属性或事件,并在您插入空格时为您提供引号使用等号,甚至在关闭方括号时为您插入正确的结束标记。 在CSS视图中,缩进,结束分号和有用的建议的工作方式几乎相同。要获得更节省按键的功能,Expression附带了许多预设代码片段,您可以按Ctrl Enter ,然后键入快捷方式或从列表中选择。 学习所有这些可能要花一些时间,但是一旦您学会了它们,便会拥有一些强大的文本宏。 这些工具包括有用的工具,例如DOCTYPE,通用meta元素,空script块等。 您还将找到“代码片段”菜单,其中提供了默认的片段集。 当然,您可以配置自己的。 如果您发现经常在许多项目中构造相同类型的文本,则代码片段功能肯定会为您节省一些时间。就我而言,我发现Intellisense有点太聪明了,我经常发现自己完全出于习惯而输入多余的引号和标签。 随着时间,实践和调整配置以适合您自己的样式,有可能逐渐习惯于任何编辑器的代码完成工具。 幸运的是,配置Intellisense和代码片段首选项很容易:只需在应用程序的常规编辑首选项(“ 工具” >“ 页面编辑器选项” )中查找它们。 当然,如果代码完成的想法让您感到厌烦,您甚至可以将其全部关闭。
突出不良行为 (Highlighting Bad Behavior)


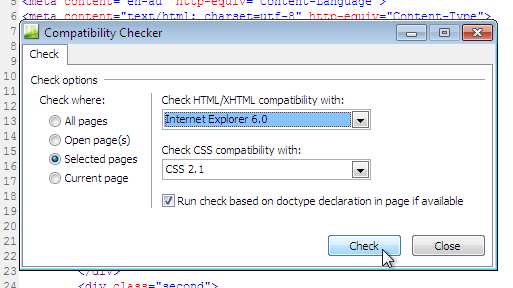
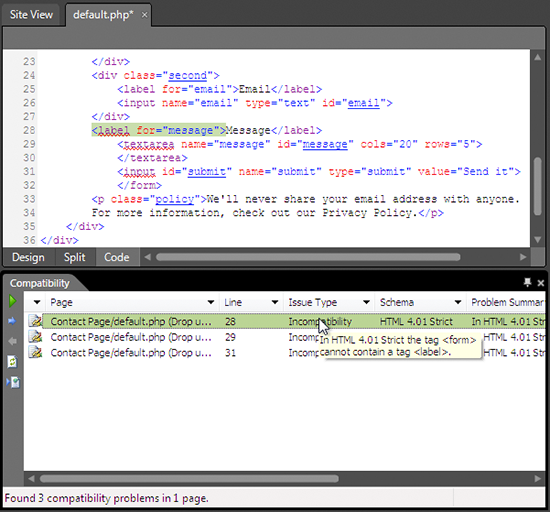
Expression Web’s aim is to help you create standards-compliant code with ease, and there’s a range of tools that can help us here. Expression Web’s tools are smart enough to detect which HTML DOCTYPE or CSS schema you’re using for your documents, and make suggestions accordingly.In Code view, if you try to use an invalid element or an unsupported CSS property, you’ll see the familiar red underline that usually means you’ve misspelled a word. In Expression Web, this red underline means that you’ve used some inappropriate code. Of course, this is handy for typos too—Figure 11. shows what happened when I mistakenly left the u out of background:Figure 11. backgrond-color is indeed unsupported by the CSS 2.1 schemaI’m also in the habit of typing self-closing elements in HTML 4 documents, which is very naughty. Expression Web does a good job of telling me off about this.Figure 12. Closing slashes are invalid in HTML 4You’ll find that you’ll see this red underline whenever you try to include any unsuitable elements, which is a great help for creating standards-based markup.Expression Web also includes a series of reporters that can help you identify invalid markup, browser support issues, potential accessibility hiccups, or CSS problems. I’ve fired up the Compatibility Checker (Tools > Compatibility) to check out my HTML; this checks both the validity of the code, and potential browser support issues. In the example below, I’m checking for whether there’s any part of my page that will cause problems in IE6.Figure 13. The Compatibility report optionsI’ve used fairly simple markup, so the reporter has nothing to say about IE6 compatibility. However, it did detect that I neglected to put the label and textarea in a block level element, which is required for HTML 4 validity. Oops! Double-clicking the errors reveals the offending markup.Figure 14. Better fix that then!
Expression Web的目标是帮助您轻松创建符合标准的代码,这里有许多工具可以为我们提供帮助。 Expression Web的工具足够聪明,可以检测到您在文档中使用HTML DOCTYPE或CSS模式,并提出相应的建议。在“代码”视图中,如果您尝试使用无效的元素或不受支持CSS属性,则会看到熟悉的红色下划线,通常意味着您拼错了一个单词。 在Expression Web中,此红色下划线表示您使用了一些不合适的代码。 当然,这对于错别字也很方便-图11.显示了我错误地将u移出background时发生的情况: Figure 11. backgrond-color CSS 2.1架构确实不支持Figure 11. backgrond-color我也习惯于键入self -在HTML 4文档中关闭元素,这很顽皮。 Expression Web很好地告诉了我这一点。 图12.在HTML 4中,斜杠无效。您会发现,当您尝试包含任何不合适的元素时,都会看到红色的下划线,这对于创建基于标准的标记很有帮助。ExpressionWeb还包括一系列报告人,可以帮助您识别无效的标记,浏览器支持问题,潜在的辅助功能故障或CSS问题。 我已经启动了兼容性检查器(“ 工具” >“ 兼容性” )以签出HTML; 这样既可以检查代码的有效性,也可以检查潜在的浏览器支持问题。 在下面的示例中,我正在检查页面的任何部分是否会导致IE6中的问题。 图13.兼容性报告选项我已经使用了相当简单的标记,因此报告者对IE6兼容性无话可说。 但是,它确实检测到我忽略了将label和textarea放在块级元素中,而这是HTML 4有效性所必需的。 糟糕! 双击错误将显示有问题的标记。 图14.然后更好地解决该问题!
从Photoshop导入图形 (Importing Graphics from Photoshop)
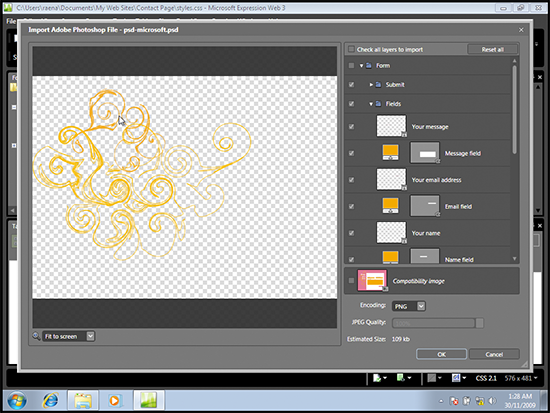
There’s a graphic element I need to pull up from my design comp. Time to fire up Photoshop and start exporting some layers, right? Actually, there’s no need for Photoshop today.Expression Web features a handy way to extract graphics from a Photoshop file right there in the app; this means spending less time messing about exporting individual layers in Photoshop, and more time making stuff look pretty. The PSD I’m working from has a swirly background, which I’d like to add now.From the File menu, choose Import > Adobe Photoshop (psd), and browse to the location of your Photoshop document. Expression Web will open up the document, with the layers intact. I only need the swirls, so I’ll uncheck all the other layers. The result so far is seen below, complete with alpha transparency and all.Figure 15. My background imageWhen I’m ready to save it, Expression asks me where to put the image. I’ll put it in the same directory as my CSS and PHP file, and insert that into the style sheet. That’s all there is to it!Importing your graphics in this manner is quite a time saver. There’s no need to save the PSD as some funky format first, or pre-slice the image—simply open up the file right there in Expression. That’s neat.
我需要从设计组件中提取一个图形元素。 是时候启动Photoshop并开始导出某些图层了,对吗? 实际上,今天不再需要Photoshop。ExpressionWeb提供了一种方便的方法,可以从应用程序中的Photoshop文件中提取图形。 这意味着花费更少的时间来处理在Photoshop中导出单个图层的麻烦,并花费更多的时间使内容看起来更漂亮。 我正在使用的PSD具有漩涡状的背景,现在我想添加它。从“文件”菜单中,选择“ 导入” >“ Adobe Photoshop(psd)” ,然后浏览到Photoshop文档的位置。 Expression Web将打开文档,其中各层完好无损。 我只需要漩涡,所以我将取消选中所有其他层。 到目前为止,结果如下所示,包括alpha透明度和所有内容。 图15.我的背景图像准备好保存它时,Expression会问我将图像放在哪里。 我将其放在与CSS和PHP文件相同的目录中,并将其插入样式表中。 这样就足够了!以这种方式导入图形可以节省大量时间。 无需先将PSD保存为某种时髦的格式,也无需预先切片图像-只需在Expression中打开文件即可。 那很整齐。
带上PHP (Bring On the PHP)
We’ve added markup and styles, and constructed some quite nice static pages—now it’s time to add some action to our form with PHP. We’ll be storing our feedback in a comma-separated value (CSV) file, so let’s add that functionality to this form. Remember, you should be saving your work often; now is a great time to do that!
我们已经添加了标记和样式,并构建了一些非常漂亮的静态页面-现在是时候使用PHP向我们的表单添加一些操作了。 我们会将反馈存储在逗号分隔值(CSV)文件中,因此我们将该功能添加到此表单中。 请记住,您应该经常保存工作; 现在是这样做的好时机!
保持简单,Stup-…呃,甜心 (Keep It Simple, Stup-… er, Sweetheart)
Since this is more an Expression Web tutorial, rather than a PHP tutorial, we’ll keep this very, very simple. This example is inappropriate for your production environment; in the real world you’d need additional functionality, such as a way to filter out spammers or perhaps storing feedback in a database. For a more comprehensive look at form handling and security, check out our other PHP tutorials published here at SitePoint.Here’s a very simple set of functions that will accept the form input, check to see whether the name and message are filled in, and write these to a file. If the form data hasn’t been submitted, the script will show the empty form.First, I’ll extract the form from the existing markup, add a form action (action="default.php") and include that in a new file, form.inc.php. Next, I’ll create some functions at the top of default.php to deal with the form’s submission. decide selects whether to show the form, or proceed with inspecting the form. process_form will do some rudimentary checking to ensure the form was actually completed, and write_data will store the three values from the field input in a CSV, and respond with a friendly message. There’s a big gap in the page now where the form used to be; I’ll put a call to decide in there.In the below code example, you’ll find my very simple form handler:
由于这更多是一个Expression Web教程,而不是PHP教程,因此我们将使其非常非常简单。 此示例不适合您的生产环境; 在现实世界中,您需要其他功能,例如过滤垃圾邮件者或将反馈存储在数据库中的方法。 要更全面地了解表单处理和安全性,请查看我们在SitePoint上发布的其他PHP教程。 这是一组非常简单的函数,它们将接受表单输入,检查名称和消息是否已填写,然后将它们写入文件。 如果尚未提交表单数据,则脚本将显示空表单。首先,我将从现有标记中提取表单,添加表单操作( action="default.php" )并将其包含在新表单中文件,form.inc.php。 接下来,我将在default.php的顶部创建一些函数来处理表单的提交。 decide选择是显示表单,还是继续检查表单。 process_form将进行一些基本检查,以确保表单实际上已完成,而write_data将来自字段输入的三个值存储为CSV,并以友好的消息进行响应。 现在页面在以前的表单上有很大的差距; 我把一个电话decide在there.In下面的代码示例,你会发现我很简单的表单处理程序:
<?phpfunction decide() {if(isset($_REQUEST['submit'])) { process_form(); } else { include("form.inc.php"); }}function process_form() {if (!isset($_POST['name']) || !isset($_POST['message'])) {echo "<p>There was an error in the form: Both the name and message are required.</p>";include("form.inc.php");} else {write_data();}}function write_data() {$name = $_POST['name'];$email = $_POST['email'];$message = $_POST['message'];$data = $name . "","" . $email . "","" . $message . ""rn";$file = fopen("feedback.csv", "a+");if($file) {fwrite($file, $data);fclose($file);$response = "<p>Thanks for the feedback :D</p>";} else {$response = "<p>Sorry, there was an error storing your feedback.</p>";}}?>
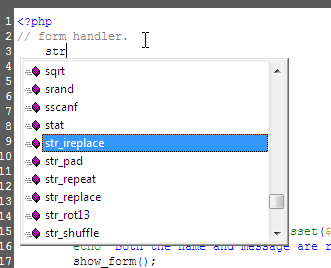

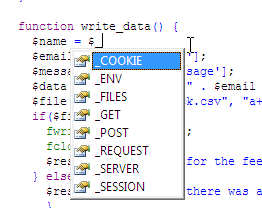
As I was coding away, it was good to see Expression Web’s syntax highlighting and Intellisense features help me out here as well. Below, you’ll see an example of some code being highlighted—plus those hyperlinks are available for PHP includes as well, making it a cinch to jump to them whenever needed.Figure 16. Some clear syntax highlightingIf you became accustomed to using Ctrl-Enter to bring up the Intellisense helper before, there’s one new keystroke to learn here in PHPmode; to see PHP functions instead of HTML elements, press Control-L. You’ll see a menu appear with a ready function reference, and as before, you can insert a number of common functions by scrolling or typing ahead.Figure 17. Typing ahead for a string functionAs you move through the function, a tool tip appears to let you know what the expected variables will be. Each variable is highlighted as you complete it. In this example, I’m using the fopen function, and it’s prompting me to move ahead with the required variables.Figure 18. A handy reminder of the expected variablesYou’ll be helped along with global variables here, too—no more terrible typos like $_PSOT['string'] here!Figure 19. Global variablesYou can configure the Intellisense PHP options in the Page Editor dialog we mentioned before. Of note is the ability to turn off various functions; if you’re using IIS and have no use for MySQL or Apache functions, time to unclutter that menu!When you’re happy with your script, it’s time to test it out! The Design view is unable to show PHP code in action, so we’ll need to use a real browser for this one. Hit F12 to launch your favorite browser. Again, because Expression includes a web server, we can test the script locally.If all went well, you should have a nice looking form at your disposal, ready to collect some feedback!
在我进行编码时,很高兴看到Expression Web的语法突出显示和Intellisense功能也帮助了我。 在下面,您将看到一个突出显示一些代码的示例-以及那些超链接也可用于PHP包括,这使得在需要时跳转到它们很容易。 图16.一些清晰的语法突出显示如果您以前习惯使用Ctrl-Enter来调出Intellisense帮助器,那么在PHPmode中有一个新的按键需要学习。 若要查看PHP函数而不是HTML元素,请按Control-L。 您会看到一个菜单,其中包含就绪的函数参考,并且像以前一样,您可以通过滚动或向前键入来插入许多常用功能。 图17.键入字符串函数在浏览该函数时,会出现一个工具提示,让您知道预期的变量是什么。 每个变量在完成时都会突出显示。 在此示例中,我使用了fopen函数,它提示我继续使用必需的变量。 图18.方便提醒您期望的变量您也将在此处获得全局变量的帮助-不再像$_PSOT['string']这样可怕的错别字! 图19.全局变量您可以在前面提到的Page Editor对话框中配置Intellisense PHP选项。 值得注意的是可以关闭各种功能; 如果您使用的是IIS并且没有使用MySQL或Apache函数,那么该整理菜单的时间到了。当您对脚本感到满意时,就该进行测试了! “设计”视图无法显示实际PHP代码,因此我们需要为此使用真正的浏览器。 按F12键启动您喜欢的浏览器。 同样,由于Expression包含Web服务器,因此我们可以在本地测试脚本。如果一切顺利,则应该使用外观漂亮的表格以准备收集一些反馈!
结论 (Conclusion)
Although this form is extremely simple, we’ve covered a good deal of ground. Along the way, we’ve learned how to use Expression’s Design view to visually edit our pages, seen how its code completion tools can help us create great, tidy markup, imported some graphics from Photoshop, and finally breathed some life into it with PHP. By now, you should have a strong idea of what’s possible in Expression Web 3. Why not grab your own copy and take it out for a spin?
尽管这种形式非常简单,但是我们已经涵盖了很多基础。 在此过程中,我们学习了如何使用Expression的“设计”视图直观地编辑页面,了解其代码完成工具如何帮助我们创建美观,整洁的标记,从Photoshop导入了一些图形,最后使用PHP为其注入了生命。 到目前为止,您应该对Expression Web 3中的功能有一个深刻的了解。为什么不拿起自己的副本并试一试呢?
翻译自: https://www.sitepoint.com/expression-web-3-php/
Expression Web-您的新PHP工具包相关推荐
- aspx网页_微软网页设计工具Expression Web快速入门
微软开发的网页设计工具Expression Web,作为网页设计工具FrontPage的替代品,在功能以及可扩展性方面都有了很大提升,它彻底解决了以前FrontPage会产生不标准网页代码的缺点,现在 ...
- Frontpage的下一代,Microsoft Expression Web
稍微用了一下这个新的Microsoft Expression Web,有话说说: 微软的汉化能力是最好的,无论是Office,还是Windows,都更本地产的软件差不多,语言方面都没有任何障碍.这个新 ...
- Microsoft Expression Web Beta 1
其实这款软件就是FrontPage的下一个版本的早期CTP,上午放出Beta1的消息,中午就已经提供下载,有兴趣的可以尝试下,从上次Office2007漏出的版本上来看,网页设计体验上的确改进很大. ...
- MS Expression Web中的Asp.net mvc(和其他网络编辑工具)
今天我放弃了要求我测试MS Expression web 2演示的所有横幅. 经过一些设置后,我解决了这个问题并立即遇到了一个问题:如何让这个工具与我的asp.net-mvc项目一起工作? 实际上,如 ...
- [翻译]为EXPRESSION WEB 4添翼—如何支持HTML5设计开发!
原文链接地址:http://blogs.msdn.com/b/xweb/archive/2010/10/06/add-html5-support-to-expression-web-4.aspx 翻译 ...
- 聊一聊 Web 框架的新趋势
今天跟大家一起聊聊 JavaScript 框架. 太过保守很难在 Javascript 生态系统中保持与时俱进. 对于那些刚进入这个行业的人来说,要在新的库.框架.概念和有力的意见中关注正在发生的事情 ...
- W3C发布HTML5正式推荐标准 开放Web平台迎来新的里程碑
W3C发布HTML5正式推荐标准 开放Web平台迎来新的里程碑 http://www.chinaw3c.org/html5-press.html 20142810月 W3C发布HTML5正式推荐标准, ...
- Ajax: 一个建立Web应用的新途径 [转]
如果要问做什么事是最有吸引力,那就是创建Web应用.毕竟,上次你听到有人称赞某产品的交互设计是什么时候的事了?(除了iPod之外) 它们都很cool, 而且都是很创新的项目. 抛开这些不管,Web设计 ...
- html5制作交互式课件,网易科技频道--Hot Potatoes 教你如何制作交互式Web课件的新工具...
交互式课件可以让学生在课后对课堂的内容做充分的复习和训练,我想大多数老师都常用Powerpoint或Authorware制作交互式课件,今天向大家介绍一款制作交互式Web课件的新工具--Hot Pot ...
最新文章
- 90后清华女孩:博二开始研究世界级难题,3年发5篇Science,现入选中国榜“35岁以下科技创新35人”!...
- 二值信号量和互斥锁到底有什么区别?
- 40、Power Query-Text.Combine函数进阶
- git常用命令流程图
- 最受欢迎中国技术博客? 我才狂写4周唉
- 几款效率神器助你走上人生巅峰
- 4月1号鸿蒙系统上线,4月1日太关键,鸿蒙迎来正式发布前的最后大考,华为将从此起飞...
- 使用 Spring 3 MVC HttpMessageConverter 功能构建 RESTful web 服务
- Sublime Text2.0.2注册码,添加python编译系统:
- oracle 批量插入 mysql 区别,Mysql与Oracle中批量插入和更新区别
- 疫情之下,你有多久没回过家了?
- C++ Arduino 串口输出读取整合
- HDU1846 Brave Game
- 当前的安全设置不允许从该位置下载文件--解决方法
- Vue项目设置ico
- 2019-12-24
- Metal Stack(Metal Scheme)
- AIX 挂载NFS错误nfsmnthelp: 1831-019之解决
- 洛谷P3906 Geodetic集合解题报告
- hadoop2.9 idea_Windows系统使用IntelliJ IDEA 搭建Hadoop的开发调试环境(一)
热门文章
- C语言程序设计第6章节练习题
- php教程适合高中生学吗,高中生请进 - 高一 - 简单学习网论坛_中高考学习交流论坛_中学生学习论坛 - Powered by phpwind...
- 智能综合交通(水运、航空)主题汇总(附下载链接)
- 机房收费系统.Net个人版总结
- RTF转HTML,HTML转TXT(Java版)
- 3D建模是什么?怎么学习?
- 为防双11系统崩盘,阿里P9架构师苦熬3个月终成亿级并发编程手册
- 银行面试十问——常见问题面试分析!(下)
- 西电南理工计算机学院,【全国六所电子科技大学排名】_电子科学与技术专业:最好的6所大学!有2所仅仅是211!...
- 有未经处理的异常: 0xC00000FD: Stack overflow