keras构建卷积神经网络_在python中使用tensorflow s keras api构建卷积神经网络的初学者指南...
keras构建卷积神经网络
初学者的深度学习 (DEEP LEARNING FOR BEGINNERS)
Welcome to Part 2 of the Neural Network series! In Part 1, we worked our way through an Artificial Neural Network (ANNs) using the Keras API. We talked about Sequential network architecture, activation functions, hidden layers, neurons, etc. and finally wrapped it all up in an end-to-end example that predicted whether loan application would be approved or rejected.
欢迎来到神经网络系列的第二部分! 在第1部分中 ,我们使用Keras API通过人工神经网络(ANN)进行工作。 我们讨论了顺序网络体系结构,激活功能,隐藏层,神经元等,最后将它们全部封装在一个端到端示例中,该示例预测贷款申请将被批准还是被拒绝。
In this tutorial, we will be learning how to create a Convolutional Neural Network (CNN) using the Keras API. To make it more intuitive, I will be explaining what each layer of this network does and provide tips and tricks to ease your deep learning journey. Our aim in this tutorial is to build a basic CNN that can classify images of chest Xrays and establish if it is normal or has pneumonia. Given the Covid-19 pandemic, I think this would make for an interesting project even for your data science interviews!
在本教程中,我们将学习如何使用Keras API创建卷积神经网络(CNN)。 为了使其更加直观,我将解释该网络的每一层的作用,并提供一些技巧和窍门,以简化您的深度学习之旅。 我们在本教程中的目的是建立一个基本的CNN,可以对胸部X射线的图像进行分类,并确定其是否正常或患有肺炎。 考虑到Covid-19大流行,即使是您的数据科学访谈,我认为这也将成为一个有趣的项目!
Let’s get started!
让我们开始吧!
什么时候应该使用卷积神经网络而不是人工神经网络? (When should I use a Convolutional Neural Network instead of an Artificial Neural Network?)
CNNs work best when the data can be represented in a spatial manner, say an image in MxN pixels. If you data is just as useful after shuffling any of your columns with each other then you cannot use CNN.
当可以以空间方式表示数据(例如以MxN像素表示的图像)时,CNN效果最佳。 如果在将任意一列相互改组后数据同样有用,那么您将无法使用CNN。
For instance, if you recall the loan application dataset from Part 1, it had two columns (or features), namely age and area , and if I were to swap the two columns (before feeding it to my network) it would make no difference whatsoever to my dataset. Hence, ANNs are preferred for such datasets. On the contrary, if I were to swap the columns (which are essentially pixel arrays) in my image, I am surely going to mess up my actual image. Hence, using ANNs is a big no-no and you must use CNNs.
例如,如果您回想起第1部分中的贷款申请数据集,它具有两列(或特征),即age和area ,并且如果我要交换这两列(在将其输入到我的网络之前),那没有什么区别无论我的数据集如何。 因此,对于此类数据集,首选人工神经网络。 相反,如果我要交换图像中的列(本质上是像素阵列),那么我肯定会弄乱我的实际图像。 因此,使用ANN是一个很大的禁忌,您必须使用CNN。
让我们深入研究编码... (Let’s dive right into the coding...)
We begin by installing Keras onto our machine. As I discussed in Part 1, Keras is integrated within TensorFlow, so all you have to do is pip install tensorflow in your terminal (for Mac OS) to access Keras in your Jupyter notebook. To check the version of Tensorflow, use tf.__version__.
我们首先将Keras安装到我们的机器上。 正如我在第1部分中讨论的那样,Keras集成在TensorFlow中,因此您所要做的就是在终端中(对于Mac OS) pip install tensorflow来访问Jupyter笔记本中的Keras。 要检查Tensorflow的版本,请使用tf.__version__ 。
导入库 (Importing libraries)
import tensorflow as tffrom tensorflow import kerasfrom tensorflow.keras.models import Sequentialfrom tensorflow.keras.layers import Activation, Dense, Flatten, BatchNormalization, Conv2D, MaxPool2Dfrom tensorflow.keras.optimizers import Adamfrom tensorflow.keras.metrics import categorical_crossentropyfrom sklearn.metrics import confusion_matrixfrom tensorflow.keras.preprocessing.image import ImageDataGeneratorimport numpy as npimport itertoolsimport osimport randomimport matplotlib.pyplot as plt%matplotlib inline数据集 (Dataset)
We will be working with the Chest X-Ray Images Kaggle dataset. Once you download and unzip it, you will see the chest_xray folder that contains images organized neatly into train, valid, and test subfolders. Each of these subfolders contains two sub-sub folders, one for normal chest Xrays and another for Xrays indicatingpneumonia.
我们将使用“ 胸部X射线图像” Kaggle数据集。 下载并解压缩后,您将看到Chest_xray文件夹 ,其中包含整齐地组织在train,valid和test子文件夹中的图像。 这些子文件夹中的每个子文件夹都包含两个子文件夹,一个用于normal胸部X射线,另一个用于表示pneumonia X射线。
Note: Make sure the chest_xray folder is sitting in the same directory as your Python Jupyter notebook.
注意:确保 Chest_xray文件夹 与Python Jupyter笔记本位于同一目录中。
Setting the paths to the train, validate, and test folders:
设置训练,验证和测试文件夹的路径:
train_path = "chest_xray/train"test_path = "chest_xray/test"valid_path = "chest_xray/val"Note: If you collected your own dataset & it is not neatly organized into the train, valid and test folders, worry not! Just make sure (a) you have saved all the images (normal and pneumonia) in a common folder called chest_xrays AND (b) the name of the image contains either of the two words — normal or pneumonia. From thereon, to organize images into train, valid, and test set, use the following code snippet.
注意:如果您收集了自己的数据集,并且没有将其整齐地组织到火车,有效和测试文件夹中,请不要担心! 只需确保(a)将所有图像(正常和肺炎)保存在一个名为Chest_xrays的公用文件夹中,并且(b)图像名称包含两个单词(正常或肺炎)之一。 从那里开始,要将图像组织为训练,有效和测试集,请使用以下代码段。
# Organize data into train, valid, test directoriesos.chdir('data/chest_xrays')if os.path.isdir('train/normal') is False: os.makedirs('train/normal') os.makedirs('train/pneumonia') os.makedirs('valid/normal') os.makedirs('valid/pneumonia') os.makedirs('test/normal') os.makedirs('test/pneumonia') for i in random.sample(glob.glob('pneumonia*'), 500): shutil.move(i, 'train/pneumonia') for i in random.sample(glob.glob('normal*'), 500): shutil.move(i, 'train/normal') for i in random.sample(glob.glob('pneumonia*'), 100): shutil.move(i, 'valid/pneumonia') for i in random.sample(glob.glob('normal*'), 100): shutil.move(i, 'valid/normal') for i in random.sample(glob.glob('pneumonia*'), 50): shutil.move(i, 'test/pneumonia') for i in random.sample(glob.glob('normal*'), 50): shutil.move(i, 'test/normal')os.chdir('../../')预处理图像数据 (Preprocessing the Image data)
We need to put the data into a format that the model expects. So we must put our images into a format of a Keras ImageGenerator . In short, we are going to create batches from train, test, and valid directories using theflow_from_directory()function in the ImageGeneratorclass. And it is precisely these batches of data that will be passed to the sequential model using the fit function. (Previously, we were passing NumPy arrays to the fit function when building ANNs in Part 1, but now we need to pass the batches to the fit function).
我们需要将数据放入模型期望的格式。 因此,我们必须将图像放入ImageGenerator的格式。 简而言之,我们将使用ImageGenerator类中的flow_from_directory()函数从训练目录,测试目录和有效目录中创建批处理 。 正是这些批次的数据将使用fit函数传递给顺序模型。 (以前,在第1部分中构建ANN时,我们是将NumPy数组传递给fit函数,但是现在我们需要将批处理传递给fit函数)。
As part of the preprocessing (before the batches are created), we will be applying preprocessing_function = tf.keras.applications.vgg16.preprocess_input. This will process our images in the same manner that images get processed when they are passed to the vgg16 model (the CNN model that won the ImageNet competition in 2014).
作为预处理的一部分(在创建批次之前),我们将应用preprocessing_function = tf.keras.applications.vgg16.preprocess_input 。 这将以与将图像传递给vgg16模型(2014年赢得ImageNet竞赛的CNN模型)相同的方式处理图像。
# Creating train, test and valid batches from the respective directoriestrain_batches = ImageDataGenerator(preprocessing_function=tf.keras.applications.vgg16.preprocess_input).flow_from_directory(directory=train_path, target_size=(224,224), classes=['pneumonia', 'normal'], batch_size=10)valid_batches = ImageDataGenerator(preprocessing_function=tf.keras.applications.vgg16.preprocess_input).flow_from_directory(directory=valid_path, target_size=(224,224), classes=['pneumonia', 'normal'], batch_size=10)test_batches = ImageDataGenerator(preprocessing_function=tf.keras.applications.vgg16.preprocess_input).flow_from_directory(directory=test_path, target_size=(224,224), classes=['pneumonia', 'normal'], batch_size=10, shuffle=False)Thetarget_size specifies what height and width we want the images to be resized to. This is important since we might have images of different sizes in our dataset.
target_size指定我们要将图像调整为何种高度和宽度。 这很重要,因为我们的数据集中可能有不同大小的图像。
The batch_size is set to 10 and the choice of 10 is arbitrary. Another common batch size value used in 32 but ideally, the most optimal value should be found by hyperparameter tuning (we will learn how to do so in the next tutorial).
batch_size设置为10,选择10是任意的。 在32中使用的另一个常见的批量大小值,但理想情况下,应该通过超参数调整找到最佳值(我们将在下一个教程中学习如何做到这一点)。
Batch size specifies how many training samples should be passed to the neural network in one go before the weights of the neural network are updated.
批次大小指定在更新神经网络权重 之前 一口气将多少训练样本传递给神经网络。
We also specify shuffle = False only for the test set because later on when we test our model, we want to have access to unshuffled labels to plot our confusion matrix. By default, shuffle is set to True.
我们还仅为测试集指定shuffle = False ,因为稍后在测试模型时,我们希望能够访问未混洗的标签以绘制混淆矩阵。 默认情况下,随机播放设置为True。

Note: If you see Found 0 images beloning to 2 classeswhen you run the code above, chances are you are pointing to the wrong directory! Fix that and it should work fine!
注意:如果您 在运行上述代码时 看到“ Found 0 images beloning to 2 classes ,则可能是您指向错误的目录! 解决这个问题,它应该可以正常工作!
可视化图像数据: (Visualize the image data:)
Using the plotting helper function from TensorFlow’s documentation.
使用TensorFlow 文档中的绘图助手功能。
# plot images in the form of a 1 by 10 grid and resize img to 20x20def plotImages(images_arr): fig, axes = plt.subplots(1, 10, figsize=(20,20)) axes = axes.flatten() for img, ax in zip( images_arr, axes): ax.imshow(img.astype(np.uint8)) ax.axis('off') plt.tight_layout() plt.show()Newt, we will use the Python function next() to grab a single batch of images and corresponding labels from the trainset. Since we set batch_size = 10, we will see we have 10 images in imgs and 10 corresponding labels in labels.
在Newt中,我们将使用Python函数next()从训练集中获取一批图像和相应的标签。 由于我们设置batch_size = 10 ,因此我们将看到imgs有10张图像,标签中有10个相应labels 。
imgs, labels = next(train_batches)plotImages(imgs)print(labels)Note: imshow expects inputs in the range of [0, 1] or [0, 255] so if the input array does not have this range, it will clip input. Thus, we explicitly cast the images to np.int8 format when displaying.
注意: imshow 期望输入在 [0, 1] 或 [0, 255] 范围内,因此,如果输入数组不具有此范围,它将裁剪输入。 因此,我们 在显示时 将图像显式 转换 为 np.int8 格式。

Note: The images might look a little bit different than the ones in your directories (perhaps a little distorted) but that's because we have performed some vgg16 preprocessing steps on it.
注意:这些映像看起来可能与您目录中的映像有些不同(也许有些失真),但这是因为我们已经对其执行了一些vgg16预处理步骤。
The labels are one-hot encoded vectors that indicate whether the image is pneumonia or normal. A [1 0] represents pneumonia whereas [0 1]means normal Xray.
标签是一热编码的向量,指示图像是肺炎还是正常。 [1 0]表示肺炎,而[0 1]表示正常X射线。
生成模型架构 (Generating the model architecture)
Recall we introduced a sequential model when we built an artificial neural network in Part 1 for predicting loan application outcomes. In short, the sequential API allows you to create models layer-by-layer.
回想一下,在第1部分中构建人工神经网络以预测贷款申请结果时,我们引入了顺序模型 。 简而言之,顺序API 允许您逐层创建模型。
model = Sequential([ Conv2D(filters=32, kernel_size=(3, 3), activation='relu', padding = 'same', input_shape=(224,224,3)), MaxPool2D(pool_size=(2, 2), strides=2), Conv2D(filters=64, kernel_size=(3, 3), activation='relu', padding = 'same'), MaxPool2D(pool_size=(2, 2), strides=2), Flatten(), Dense(units=2, activation='softmax')])The first hidden layer is a standard convolutional layer, Conv2D, with 32 filters each with a kernel size of 3x3. Remember each filter is dedicated to identifying some aspect of the image, say filter1 detects vertical boundaries of the ribcage, filter2 detects diagonal boundaries of the ribcage, and so on... The patterns that the filters are encoding will become complex over time as we go deeper into the convolutional layers of the network.
第一个隐藏层是标准卷积层Conv2D ,具有32个滤镜,每个滤镜的内核大小为3x3。 请记住,每个滤镜都专用于识别图像的某些方面,例如filter1检测胸腔的垂直边界,filter2检测胸腔的对角边界,依此类推...随着时间的流逝,滤镜编码的模式将变得复杂深入网络的卷积层。
Note: The choice of 32 is arbitrary!
注意:选择32是任意的!
A kernel is a small grid of numbers and you pass it over your whole image i.e. all the pixels in your input image, and transforming it based on what those numbers are.
内核是一个小的数字网格,您可以将其传递到整个图像(即输入图像中的所有像素),然后根据这些数字进行转换。
By using different numbers in the kernels, you can perform different types of image preprocessing (during image recognition) such as contrast, blur, sharpen, or edge detection. Generally speaking, the kernel is smaller than the image, and 3x3 is a pretty common choice!
通过在内核中使用不同的数字,可以执行不同类型的图像预处理(在图像识别期间),例如对比度,模糊,锐化或边缘检测。 一般来说,内核比图像小,而3x3是一个很常见的选择!
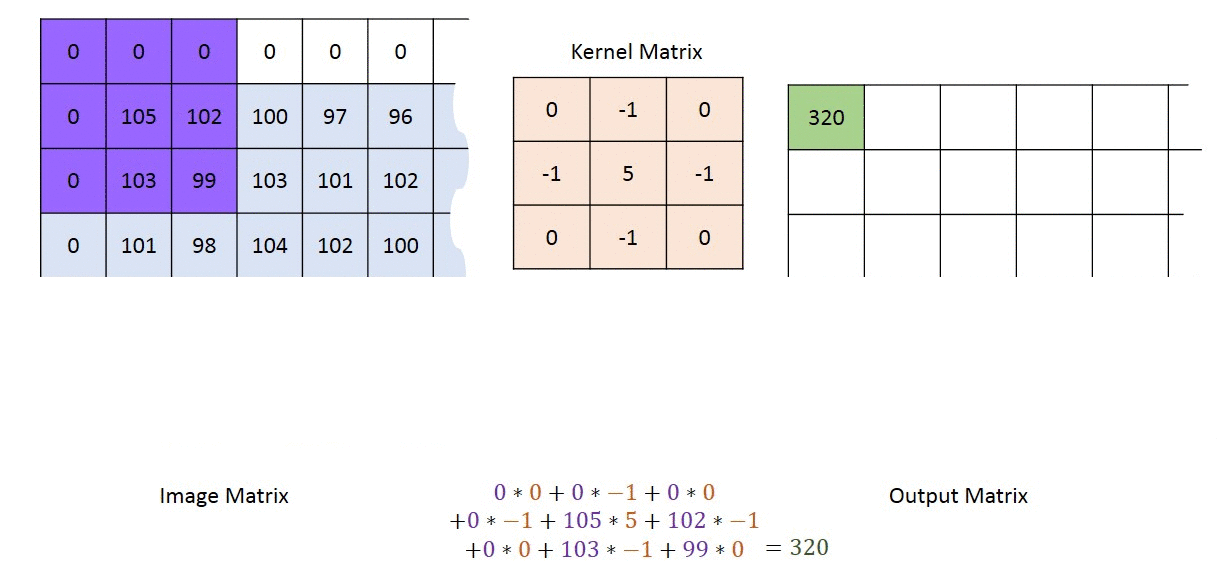
When a kernel reaches the edge of the image, it has to make some decision about what to do where there are no pixels present in the input image. For now, we are going forward with zero-padding the edges, achieved using padding = 'same'. Zero padding means providing a cushion of zeroes outside of the image (as seen in the gif image above). This helps to ensure the dimensionality of the input image isn’t reduced after the convolution operation.
当内核到达图像边缘时,它必须对输入图像中不存在像素的情况做出决定。 现在,我们将使用padding = 'same'实现边缘的零填充 。 零填充意味着在图像外部提供零缓冲(如上面的gif图像所示)。 这有助于确保在卷积运算后不会降低输入图像的尺寸 。
Note: Depending on the kernel size and image size, you might need to make this cushion two or three layers deep.
注意:根据内核大小和映像大小,您可能需要使此缓冲垫深两到三层。
From Part1, you already know how we have to come up with the input_shape parameter based on our own dataset. Basically, it can be thought of as the shape of a single image that is fed to the network, which in our case is 224x224x3 (height = width = 224 and 3 is for the color channel, more precisely the RGB component). You can verify if that's correct by checking the shape of a random element (say the first element) in imgs using imgs[0].shape which gives out the tuple (224,224,3)as the answer.
在第1部分中,您已经知道我们必须如何根据我们自己的数据集来提出input_shape参数。 基本上,可以将其视为馈送到网络的单个图像的形状,在我们的情况下为224x224x3(高度=宽度= 224,而3代表颜色通道,更确切地说是RGB分量)。 您可以验证,如果这是通过检查随机元素的形状(比如第一个元素)纠正imgs使用imgs[0].shape这给了元组(224,224,3)作为答案。
Finally, for the first hidden layer, we have the relu activation function that (discussed in Part1). To summarize, an activation function ensures values that are passed on lie within a tunable, expected range. The Rectified Linear Unit (or relu) function returns the value provided as input directly, or the value 0.0 if the input is 0.0 or less.
最后,对于第一个隐藏层,我们具有relu激活功能(在第1部分中进行了讨论)。 总而言之,激活函数可确保传递的值在可调的预期范围内。 整流线性单位 (或relu)函数直接返回作为输入提供的值,如果输入为0.0或更小,则返回值0.0。
The second hidden layer is a max-pooling layer, MaxPool2D, which is mainly for reducing the dimensionality of the data. The way it is doing that is by picking a window size ( pool_size = 2x2) from the filtered image (from convo/RELU layer) and then replace the 4 pixels in it with the highest value in that window. Next, it takes a stride of 2 steps to the right (or down or up) and replace those 4 pixels with the highest value. And so on until the entire image has been covered.
第二个隐藏层是最大池化层MaxPool2D ,主要用于降低数据的维数。 它的操作方式是从过滤图像(来自convo / RELU层)中pool_size = 2x2一个窗口大小( pool_size = 2x2 ),然后用该窗口中的最大值替换其中的4个像素。 接下来,它向右(或向下或向上) stride 2步,并用最高值替换这4个像素。 依此类推,直到覆盖了整个图像。

The third and fourth hidden layers are again Conv2Dand MaxPool2D, respectively.
第三和第四隐藏层分别是Conv2D和MaxPool2D 。
Note: The second Conv2D layer has filters = 64 , double the number of filters in the first Conv2D layer (which has 32 filters). This increment in functions is a common practice as we go into the later layers of the network.
注意:第二个 Conv2D 层的 filters = 64 ,是第一 层 Conv2D 层(具有32个过滤器) 的过滤器数量的两倍 。 随着我们进入网络的后面各层,功能的这种增加是一种常见的做法。
Finally, we flatten the output from the convolutional layer and pass it to the Dense layer with units = 2(corresponding to output classes pneumoniaand normal) and softmax activation. The softmax function returns the output probabilities for both classes. (For a detailed description of softmax activation, please read here).
最后,我们将卷积层的输出flatten ,并以units = 2 (对应于pneumonia和normal输出类别)和softmax激活将其传递到Dense层。 softmax函数返回两个类的输出概率。 (对于SOFTMAX激活的详细说明,请参阅这里 )。
This is how the model summary looks like:
模型摘要如下所示:
model.summary()
准备训练模型 (Preparing the model for training)
model.compile(optimizer=Adam(learning_rate=0.0001), loss='categorical_crossentropy', metrics=['accuracy'])Before we start training our model with actual data, we must compile the model with certain parameters. Here, we will be using the Adam optimizer . The loss parameter specifies categorical cross-entropy loss should be monitored at each iteration. The metrics parameter indicates we want to judge our model based on the accuracy.
在开始使用实际数据训练模型之前,我们必须使用某些参数来compile模型。 在这里,我们将使用Adam optimizer 。 loss参数指定应在每次迭代时监视分类交叉熵损失。 metrics参数表示我们要基于准确性来判断模型。
训练和验证模型 (Training and validating the model)
Note: While the following code runs, you can easily go grab a coffee or something. It took me about 5mins per epoch on a CPU, so approx 50 minutes to run through the 10 epochs.
注意:在运行以下代码时,您可以轻松地去喝咖啡或其他东西。 在一个CPU上,每个纪元花费了大约5分钟的时间,因此在10个纪元中运行了大约50分钟。
# recall that we set batch_size = 10 during preprocessingbatch_size = 10 model.fit( x = train_batches, steps_per_epoch=train_batches.samples // batch_size, epochs=10, validation_data=valid_batches, validation_steps=valid_batches.samples // batch_size, verbose=2)If you observe carefully, we haven’t explicitly stated the labels for the training set (as we did for ANNs in Part1 using the y parameter) and the reason is that they are already incorporated within train_batches iterator.
如果仔细观察,我们没有明确说明训练集的标签(就像我们使用y参数对Part1中的ANN所做的那样),原因是它们已经被合并到train_batches迭代器中。
Thesteps_per_epoch is calculated based on your training data. For example, if the number of samples in our train set is 1000 and the batch size is 20, then the steps_per_epoch is calculated by dividing 1000/20 = 50.
steps_per_epoch是根据您的训练数据计算得出的。 例如,如果我们的训练集中的样本数量为1000,而批次大小为20,则steps_per_epoch的计算方式为1000/20 = 50。
More formally,
更正式地说,
steps_per_epoch is an integer and corresponds to the total number of steps (batches of samples) to yield from generator before declaring one epoch finished and starting the next epoch. It should typically be equal to ceil(num_samples / batch_size).
steps_per_epoch 是整数,对应于在声明一个纪元完成并开始下一个纪元之前要从生成器产生的步骤总数(样本批次)。 它通常应等于ceil(num_samples / batch_size) 。
Also, since we are passing validation_data = valid_batches, we need to pass validation_steps as well. It is exactly like the steps_per_epoch parameter, but mainly in regard to the validation data (instead of the training data).
另外,由于我们要传递validation_data = valid_batches ,因此我们也需要传递validation_steps 。 它与steps_per_epoch参数完全一样,但主要针对验证数据(而不是训练数据)。
This is how the output from model training looks like, with verbose set to the highest level in terms of the output messages:
这是模型训练的输出的样子,将verbose设置为输出消息的最高级别:

As you can see, there is definitely some overfitting going on as train set accuracy is 100% and the training set loss is almost negligible but accuracy on the validation set is only 75%. But hey, even with such a basic model architecture and only six hidden layers, this is not bad at all, to begin with!
如您所见,由于火车定型精度为100%,并且训练定型损失几乎可以忽略,但肯定存在一些过拟合,但验证定型的准确率仅为75%。 但是,嘿,即使有了这样的基本模型架构和只有六个隐藏层,也可以从头开始!
If you want to aim for even higher accuracy (~92%), use a deeper model architecture like the one described here.
如果你要瞄准更高的准确度(〜92%),如所描述的使用更深的模型架构在这里 。
Other awesome ways to reduce overfitting is with Dropouts and Batch Regularization, which we will be covering in our next tutorial.
减少过拟合的其他很棒方法是使用Dropouts和Batch Regularization,我们将在下一个教程中介绍。
对测试集进行推断 (Making inference on the test set)
# making predictionspredictions = model.predict(x = test_batches, verbose=0)Using the plotting function directly from Scikit Learn documentation:
直接从Scikit Learn文档使用绘图功能:
def plot_confusion_matrix(cm, classes, normalize=False, title='Confusion matrix', cmap=plt.cm.Blues): """ This function prints and plots the confusion matrix. Normalization can be applied by setting `normalize=True`. """ plt.imshow(cm, interpolation='nearest', cmap=cmap) plt.title(title) plt.colorbar() tick_marks = np.arange(len(classes)) plt.xticks(tick_marks, classes, rotation=45) plt.yticks(tick_marks, classes)if normalize: cm = cm.astype('float') / cm.sum(axis=1)[:, np.newaxis] print("Normalized confusion matrix") else: print('Confusion matrix, without normalization')print(cm)thresh = cm.max() / 2. for i, j in itertools.product(range(cm.shape[0]), range(cm.shape[1])): plt.text(j, i, cm[i, j], horizontalalignment="center", color="white" if cm[i, j] > thresh else "black")plt.tight_layout() plt.ylabel('True label') plt.xlabel('Predicted label')使用混淆矩阵可视化预测结果 (Visualizing the prediction results using a confusion matrix)
# confusion matrixcm = confusion_matrix(y_true=test_batches.classes, y_pred=np.argmax(predictions, axis=-1))plot_confusion_matrix(cm, classes = ['Pneumonia', 'Normal'])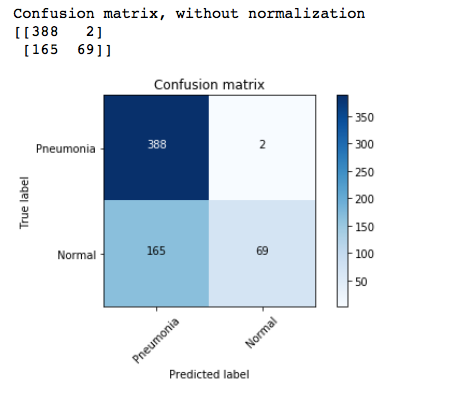
And there we have it — our very first CNN model for binary image classification in Python. Please refer to Part 1 to learn how to save the model architecture, weights, and state of the optimizer. In the next tutorial, we will be learning how to improve upon the accuracy of both CNNs and ANNs on the test data.
有了它,这是我们第一个使用Python对二进制图像进行分类的CNN模型。 请参考第1部分,以了解如何保存模型架构,权重和优化器的状态。 在下一个教程中,我们将学习如何提高测试数据上CNN和ANN的准确性。
Until then :)
直到那时 :)
翻译自: https://towardsdatascience.com/beginners-guide-to-building-convolutional-neural-networks-using-tensorflow-s-keras-api-in-python-6e8035e28238
keras构建卷积神经网络
http://www.taodudu.cc/news/show-6738903.html
相关文章:
- 这些资料(java、python、C++、linux等等)统统拿走!
- 使用python进行数据分析可视化入门指南
- Python深度学习之神经网络入门
- python层次分析_使用python深入分析层次结构过程
- python文本预处理
- el-dialog去除暗色背景或修改其底色
- 不使用样式覆盖修改ant-design-vue菜单颜色
- 为 Konsole 单独设置暗色主题
- SourceInsight4.0暗色主题配置
- 带给你设计灵感的30个超棒的暗色系网站设计
- 【Echarts】Vue项目使用echarts详细教程,暗色系柱状图,折线图,环形图等详细配置代码
- VSCODE 好看的亮色系主题
- 15.(cesium篇)cesium暗色系地图样式地图(滤镜实现,反色滤镜)
- leaflet暗色系地图样式地图(获取滤镜值)(leaflet篇.44)
- 北航计算机学院刘偲,刘偲-中国科学院大学-UCAS
- Z变换(Z-transform)
- 中国石油大学《工程力学》
- 【华人学者风采】刘康 中国科学院自动化所
- 锂动力研究院揭牌仪式 | SICOLAB喜格
- 上机6-电自1902郑媛元
- 历史上的今天:最短命的流媒体;Imgur 创始人出生;王安申请磁芯存储器专利...
- 编写Java程序,实现接受三个班各四个学员的成绩并求出平均分
- 输入三个班,每班10个学生的成绩,求和并求平均分
- 中国互联网医院行业竞争格局与运营模式创新分析报告2022-2028年版
- JSP医院在线挂号管理系统
- ArcGIS中如何用栅格裁剪栅格
- ArcGIS栅格裁剪-----裁剪前后的栅…
- ArcGIS拼接多张dem影像(含裁剪、dem负值处理)
- h5前端开发,杭州web前端培训课程
- 自适应功能简略
keras构建卷积神经网络_在python中使用tensorflow s keras api构建卷积神经网络的初学者指南...相关推荐
- python 加载动图_在浏览器中使用TensorFlow.js和Python构建机器学习模型(附代码)...
大数据文摘授权转载自数据派THU 作者:MOHD SANAD ZAKI RIZVI 本文主要介绍了: TensorFlow.js (deeplearn.js)使我们能够在浏览器中构建机器学习和深度学习 ...
- DL框架之Keras:深度学习框架Keras框架的简介、安装(Python库)、相关概念、Keras模型使用、使用方法之详细攻略
DL框架之Keras:深度学习框架Keras框架的简介.安装(Python库).相关概念.Keras模型使用.使用方法之详细攻略 目录 Keras的简介 1.Keras的特点 2.Keras四大特性 ...
- c语言调用tensorflow模型,C++调用Python中的Tensorflow模型
C++调用Python中的Tensorflow模型 利用c++调用Python2.7的程序,加载tensorflow模型(为什么不使用Python3,坑太多了,一直解决不好).整个环境在Ubuntu1 ...
- keras构建卷积神经网络_通过此简单教程学习在网络上构建卷积神经网络
keras构建卷积神经网络 by John David Chibuk 约翰·大卫·奇布克(John David Chibuk) 通过此简单教程学习在网络上构建卷积神经网络 (Learn to buil ...
- python回归分析预测模型_在Python中如何使用Keras模型对分类、回归进行预测
姓名:代良全 学号:13020199007 转载自:https://www.jianshu.com/p/83ba11abdffc [嵌牛导读]: 在Python中如何使用Keras模型对分类.回归进行 ...
- python求雅可比矩阵_在Python中计算神经网络的雅可比矩阵
通常,神经网络是一个多变量,矢量值函数,如下所示: 函数f有一些参数θ(神经网络的权重),它将一个N维向量x(即猫图片的N像素)映射到一个m维矢量(例如,x属于M个不同类别中的每个类别的概率): 在训 ...
- python 构建类_使用Python中的类构建餐厅菜单
python 构建类 Here, we try to use class in python to build a Menu for the restaurant. The Menu will con ...
- python计算协方差矩阵_在Python中构建协方差矩阵
首先,对于将来可能会遇到这个问题的其他人:如果你确实有数据并且想要估计协方差矩阵,正如几个人所指出的那样,使用np.cov或类似的东西. 从模式构建阵列 但是,您的问题是如何在给定一些预定义规则的 ...
- python文本结构化处理_在Python中标记非结构化文本数据
python文本结构化处理 Labelled data has been a crucial demand for supervised machine learning leading to a n ...
最新文章
- SQL Server select语句执行顺序
- 计算机视觉算法工程师 笔试,深度学习算法工程师笔试题目
- C# 操作 Word 修改word的高级属性中的自定义属性
- WinForm Paenl里面添加Form
- UVa 439 - Knight Moves
- C#LeetCode刷题-字典树
- 游戏窗口组合键消息失败_5失败的投资组合,以后我在这里
- 打印五行五列的直角三角形
- 对比图像分类五大方法:KNN、SVM、BPNN、CNN和迁移学习
- 鼠标测试软件m,[论坛]魔技无线激光鼠标测试心得(二)
- Spring框架学习
- WinForm 无边框窗体四周阴影 窗体可拖动 无边框自定义标题栏
- windows10家庭中文版设置共享文件密码访问
- macOS Big Sur 11.6.6 (20G624) 正式版 ISO、PKG、DMG、IPSW 下载
- cmake编译so库
- 安装mysql_python
- js时间转换的一些方法,时间转换天数,获取商品活动时间
- Layui表格实现显示空白行数据
- 神经网络中的sigmoid函数
- 三星 android 4.4.4,我的手机是三星4.4.4安卓系统,怎么升级到6.1版本