appserver安装配置_Appserver-服务器配置,目录结构和线程
appserver安装配置
In the first part of our Appserver series, we discussed the very high level differences of Appserver’s architecture to standard web server stacks and got you up and running with an Appserver instance. If you missed that part, please take the time to read it.
在我们的Appserver系列的第一部分中,我们讨论了Appserver的体系结构与标准Web服务器堆栈之间的高层差异,并让您启动并运行了一个Appserver实例。 如果您错过了该部分,请花一些时间阅读它 。
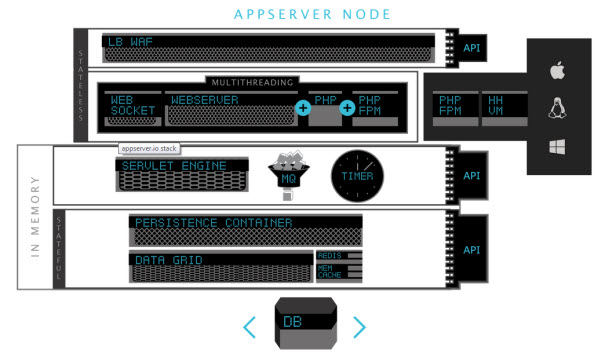
In this part, we will be exploring the Appserver architecture a bit more in depth. We will go through the concepts of the different contexts and the parts of Appserver you get out of the box, which cover some of the ground most of the popular PHP frameworks offer. We will also configure the web server and look into an application’s structure. Once we are finished, you should have a fair understanding about Appserver’s contexts in relation to threading, the web server, and its setup.
在这一部分中,我们将更深入地探索Appserver架构。 我们将详细介绍不同上下文的概念以及开箱即用的Appserver的各个部分,其中涵盖了大多数流行PHP框架提供的一些基础知识。 我们还将配置Web服务器并研究应用程序的结构。 完成之后,您应该对与线程,Web服务器及其设置有关的Appserver上下文有一个公平的了解。
In subsequent parts, we’ll continue to go over the servlet engine in more detail, the persistence container, beans, the messaging system and the timer module. (Note: as this series evolved, the direction also changed, in order to include more practical information to break up the dry theory.)
在后续部分中,我们将继续详细介绍servlet引擎,持久性容器,bean,消息传递系统和计时器模块。 ( 注:随着本系列的发展,方向也发生了变化,以便提供更多实用信息来打破干理论。 )
上下文和线程 (The Contexts and Threading)
As we had discussed in the first part, in today’s standard web server scenario, you will have a web server and either a web server module (mod_php) or a php process manager (PHP-FPM), to serve the PHP scripts/applications. The web server and the PHP process manager or module both handle their own work and threading to serve either the web page or the PHP application.
正如我们在第一部分中讨论的那样,在当今的标准Web服务器场景中,您将拥有一个Web服务器以及一个Web服务器模块(mod_php)或php进程管理器(PHP-FPM),以服务PHP脚本/应用程序。 Web服务器和PHP进程管理器或模块都处理自己的工作和线程,以服务于Web页面或PHP应用程序。
In this same respect, Appserver also handles threading for the client developer. However, the usage of the threads is somewhat different. The contents built within a thread aren’t constantly built and destroyed during the time appserver is running. In other words, as long as the appserver is running, the code you have given it to run, will continue to run (stay in memory) for each request. This fundamental difference is being repeated, as it is very important for understanding everything else we’ll be diving into.
在同一方面,Appserver还为客户端开发人员处理线程。 但是,线程的用法有些不同。 在appserver运行期间,不是一直在构建和销毁线程中构建的内容。 换句话说,只要应用服务器正在运行,您为它提供的要运行的代码将针对每个请求继续运行(保留在内存中)。 这种根本的差异正在重复出现,因为这对于理解我们将要研究的所有其他内容非常重要。
We went over threads in the last post. Now you might be asking, what is a context? The definition of a context in Appserver is “the runtime environment of a thread”. Thus, each thread has its own context. The advantage of a thread and its context, above a general process, is its ability to share its contents with other threads and still be “thread safe”. One can call this an advantage, but left uncontrolled, it can become a nightmare. So, in order to avoid the nightmare, Appserver controls sharing for you, and it is done through context or thread inheritance.
我们在上一篇文章中讨论了线程。 现在您可能会问,什么是上下文? Appserver中上下文的定义是“线程的运行时环境”。 因此,每个线程都有其自己的上下文。 与一般进程相比,线程及其上下文的优势在于它能够与其他线程共享其内容,并且仍然是“线程安全的”。 可以称其为一种优势,但是不受控制,就可能成为一场噩梦。 因此,为了避免噩梦,Appserver会为您控制共享,这是通过上下文或线程继承来完成的。
Appserver offers a number of standard contexts. Once Appserver is started and running, it will have constructed a hierarchy or tree of contexts, with the root context being the top level or parent context. From there, you will have the container context and below that the server context, were the web server resides. The web server builds worker contexts (the number of workers is configurable). It is the worker contexts which allow the parallel processing of requests, which are built and controlled within each worker.
Appserver提供了许多标准上下文。 一旦启动并运行Appserver,它将构建一个层次结构或上下文树,其中根上下文为顶级或父上下文。 从那里,您将拥有容器上下文,并且在该服务器上下文下方是Web服务器所在的容器上下文。 Web服务器构建工作程序上下文(工作程序的数量是可配置的)。 工作环境允许并行处理请求,这些请求在每个工作环境中建立和控制。
The child contexts can inherit instances, configuration values, constants, functions, class definitions and even comments from their parents in a selective way. The forming of contexts also allows for clear separation of concerns, where necessary. Though, please don’t confuse this inheritance with the usual OOP inheritance. It isn’t quite the same.
子上下文可以有选择地从其父级继承实例,配置值,常量,函数,类定义甚至注释。 上下文的形成还可以在必要时将关注点清楚地分开。 但是,请不要将此继承与通常的OOP继承混淆。 不太一样。
The sharing of data between contexts, and the fact the contexts aren’t destroyed with each request, is the capability within Appserver, which promises a boost in performance of an application specifically built for Appserver. Things like the results of the initialization of an application (bootstrapping), which is often considered one of the most costly processes in a PHP application, can now reside in memory. Also, work can be passed off to other contexts, so the application process doesn’t have to wait for the accomplishment of that work (asynchronous programming). These are some of the greater advantages given to a web developer using Appserver.
上下文之间的数据共享以及不随每个请求破坏上下文的事实是Appserver的功能,这有望提高专门为Appserver构建的应用程序的性能。 应用程序初始化(引导)的结果(通常被认为是PHP应用程序中最昂贵的进程之一)之类的事情现在可以驻留在内存中。 同样,可以将工作传递给其他上下文,因此应用程序进程不必等待该工作的完成(异步编程)。 这些是使用Appserver赋予Web开发人员的更大优势。
Before we get into the deep end of appserver’s modules and programming for them, we need to cover some of the programming concepts it uses.
在深入研究appserver模块的内容并为其编程之前,我们需要介绍其使用的一些编程概念。
Appserver中的编程概念和技术 (Programming Concepts and Techniques within Appserver)
注解 (Annotations)
One important and probably controversial technique used throughout Appserver is annotations. The core idea behind using annotations is “keep Appserver easy to configure” or rather, “keep Appserver easy to program for”. Annotations play a major role in programming within Appserver’s environment from routing, to declaring beans and setting up servlets.
整个Appserver中使用的一项重要且可能引起争议的技术是注释。 使用批注背后的核心思想是“保持Appserver易于配置”,或者“保持Appserver易于编程”。 注释在Appserver环境中的编程中(从路由,声明Bean和设置servlet)起着重要作用。
Although annotations are a core part of appserver’s configuration system, it is still possible for the client developer to configure with XML files. In fact, practically everything that is annotated can also be set and even overridden through a web.xml file found in the application’s directory (/WEB-INF). So, for those who’d rather not have annotations peppered in the code, you can use the XML file to set things up.
尽管注释是appserver配置系统的核心部分,但客户端开发人员仍然可以使用XML文件进行配置。 实际上,几乎所有带注释的内容都可以通过应用程序目录( /WEB-INF )中的web.xml文件进行设置甚至覆盖。 因此,对于那些不想在代码中添加注释的人,可以使用XML文件进行设置。
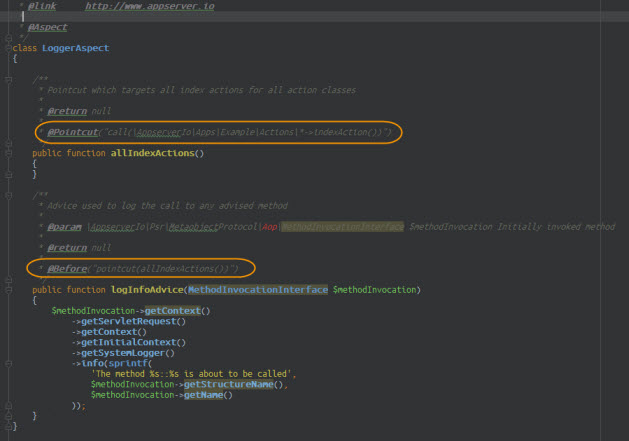
AOP –面向方面的编程 (AOP – Aspect Oriented Programming)
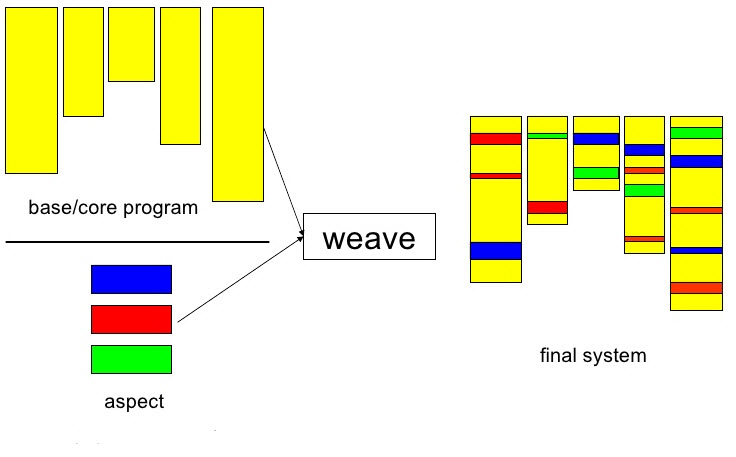
The fundamental programming paradigm used within Appserver is AOP or Aspect Oriented Programming. You aren’t locked into this, but it is a modern way of programming also followed by the likes of Laravel, probably the most popular PHP framework currently. Thus, this paradigm of OOP is well worth looking into. Understanding the meaning of cross-cutting concerns or aspects, weaving, and join points will help you understand some of the underpinnings behind the design and proper usage of Appserver.
Appserver中使用的基本编程范例是AOP或面向方面的编程 。 您并没有为此而烦恼,但是它是一种现代的编程方式,随后还有Laravel之类的东西,这可能是当前最受欢迎PHP框架。 因此,这种面向对象的范例非常值得研究。 了解横切关注点或方面,编织和连接点的含义将帮助您了解Appserver的设计和正确使用背后的一些基础。
合同设计 (Design by Contract)
Design by contract is also followed within Appserver. This is handy, as it enforces stricter typing between all the modules. Appserver uses the commented type annotations for parameters and return values of methods (something standard in most IDEs) and uses them to enforce stricter typing. If typing is not properly followed during runtime, exceptions can be thrown. Exceptions, which you can also create yourself. It is also possible to log these exceptions. We’ll show an example of this later.
Appserver中还遵循合同设计 。 这很方便,因为它强制在所有模块之间进行更严格的键入。 Appserver将带注释的类型批注用于参数和方法的返回值(大多数IDE中都是标准的),并使用它们来强制执行更严格的键入。 如果在运行时未正确遵循键入操作,则可能引发异常。 异常,您也可以创建自己。 也可以记录这些异常。 我们稍后将显示一个示例。
Now let’s go down into each of the modules available.
现在让我们进入每个可用的模块。
Web服务器 (The Web Server)
One of the main goals of Appserver is to offer a relatively easy to use, but enterprise ready web server stack for PHP developers. It does this by also offering a good bit of functionality found in most PHP frameworks, which form the basis for a more rapid PHP development environment. In fact, a “built in” web server is actually an important part missing from these frameworks.
Appserver的主要目标之一是为PHP开发人员提供相对易于使用的企业级Web服务器堆栈。 为此,它还提供了大多数PHP框架中提供的大量功能,这些功能构成了更快速PHP开发环境的基础。 实际上,“内置” Web服务器实际上是这些框架所缺少的重要部分。
The web server in Appserver is part of the server framework. It is a web server written purely in PHP. Yes! PHP! It also represents the main module of the server context of Appserver. Currently, connectivity to the web server is possible over HTTP 1.1. Support for HTTP 2.0 is planned for a future version, currently 1.3.0 or possibly 2.0.
Appserver中的Web服务器是服务器框架的一部分。 它是纯粹用PHP编写的Web服务器。 是! PHP! 它还代表Appserver服务器上下文的主要模块。 当前,可以通过HTTP 1.1连接到Web服务器。 计划在将来的版本(当前为1.3.0或可能为2.0)中支持HTTP 2.0。
A core functionality, which most of you probably recognize from most of the popular frameworks, comes from the web server in the form of the $request and $response objects. Since Appserver follows AOP, the objects will actually be called though an interface like HttpServletRequestInterface. We’ll get into using the request and response objects in our review of the example app installed with Appserver in the next part.
大多数人可能会从大多数流行的框架中识别出一种核心功能,该功能来自Web服务器,其形式为$request和$response对象。 由于Appserver遵循AOP,因此实际上将通过HttpServletRequestInterface类的接口调用对象。 在下一部分中,我们将对使用Appserver安装的示例应用程序进行回顾,以使用请求和响应对象。
From the Appserver user’s or client developer’s perspective, the web server’s configuration and usage is similar to that of the Apache web server. Things like rewrites, virtual hosts, setting environment variables and HTTP authentication are all possible within the web server module.
从Appserver用户或客户端开发人员的角度来看,Web服务器的配置和用法与Apache Web服务器的配置和用法相似。 诸如重写,虚拟主机,设置环境变量和HTTP身份验证之类的事情都可以在Web服务器模块中实现。
The most important config files for the server context are under /etc/appserver. There, you will find the appserver.xml file for the server, web server and container settings and the /conf.d/virtual-hosts.xml files, where your virtual host definitions will be added. There is an example file already installed, which will help you set up a virtual host.
服务器上下文最重要的配置文件位于/etc/appserver 。 在那里,您将找到appserver.xml文件,Web服务器和容器设置以及/conf.d/virtual-hosts.xml文件,将在其中添加虚拟主机定义。 已经安装了一个示例文件,它将帮助您设置虚拟主机。
Let’s set up a virtual host in appserver’s webserver now.
现在,让我们在appserver的网络服务器中设置虚拟主机。
创建虚拟主机 (Creating a Virtual Host)
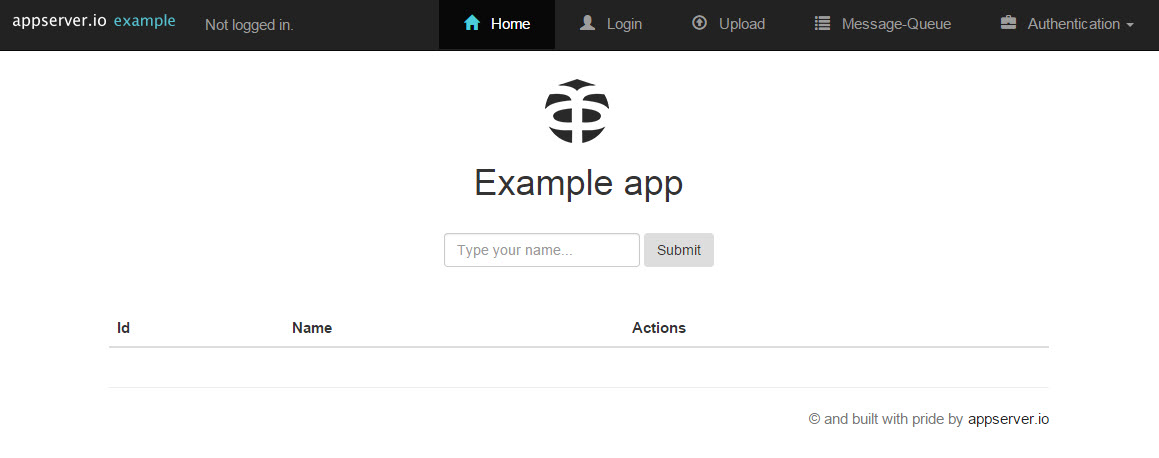
Hopefully you’ve followed the directions from the first part of this series and have Appserver running on your handy local VM. In the past blog post, we were using a Debian Wheezy VM. The installation should have set you up with the example app, which you can find under the URL http://my-app.com:9080/example. We’re going to set up Appserver to serve the example app under the URL http://my-app.com (my-app.com representing the name you’ve set up for the server, should it be different than what Bruno suggested in his article). This short process will give you a feel for setting up a virtual host.
希望您已按照本系列第一部分的说明进行操作,并使Appserver在您方便的本地VM上运行。 在过去的博客文章中,我们使用的是Debian Wheezy VM。 安装过程中应设置示例应用程序,您可以在URL http://my-app.com:9080/example下找到该应用程序。 我们将设置Appserver以在URL http://my-app.com ( my-app.com代表您为服务器设置的名称)下提供示例应用程序,如果该名称与Bruno不同在他的文章中建议 )。 这个简短的过程将使您有种设置虚拟主机的感觉。
步骤1 –更改端口(一次更改) (Step 1 – Change the Port (One Time Change))
Not completely necessary, but still handy. We will get rid of the need to enter the port number :9080 with every URL. First, make sure no other web server is blocking port 80 by stopping the service, with something like:
并非完全必要,但仍很方便。 我们将无需为每个URL输入端口号:9080 。 首先,通过停止服务,确保没有其他Web服务器通过以下方式阻止端口80:
service nginx stopor
要么
service apache2 stopThen go to the /opt/appserver/etc/appserver directory and open appserver.xml. Search for the following lines.
然后转到/opt/appserver/etc/appserver目录并打开appserver.xml 。 搜索以下行。
<server
name="http"
type="\AppserverIo\Server\Servers\MultiThreadedServer"
Below them, look for the port parameter.
在它们下面,查找端口参数。
<param name="port" type="integer">9080</param>And change 9080 to 80.
并将9080更改为80 。
步骤2 –更改/添加虚拟主机 (Step 2 – Change/ Add the Virtual Host)
Now go to the /conf.d directory and open the virtual-hosts.xml file. It should look like this.
现在转到/conf.d目录并打开virtual-hosts.xml文件。 它应该看起来像这样。
<?xml version="1.0" encoding="UTF-8"?>
<!--
! The following is a basic showcase example for a virtual host configuration.
! Some more examples can be found at:
!
! http://appserver.io/get-started/documentation/webserver.html#virtualhost-examples
-->
<virtualHosts xmlns="http://www.appserver.io/appserver">
<virtualHost name="example.local www.example.local">
<params>
<param name="admin" type="string">info@appserver.io</param>
<param name="documentRoot" type="string">webapps/example</param>
</params>
<rewrites>
<rewrite condition="-d{OR}-f{OR}-l" target="" flag="L" />
</rewrites>
<accesses>
<access type="allow">
<params>
<param name="X_REQUEST_URI" type="string">^.*
</param>
</params>
</access>
</accesses>
</virtualHost>
<virtualHost name="dbadmin.awesome.dev">
<params>
<param name="admin" type="string">info@appserver.io</param>
<param name="documentRoot" type="string">webapps/phpmyadmin</param>
</params>
<rewrites>
<rewrite condition="-d{OR}-f{OR}-l" target="" flag="L" />
</rewrites>
<accesses>
<access type="allow">
<params>
<param name="X_REQUEST_URI" type="string">^.*
</param>
</params>
</access>
</accesses>
</virtualHost>
</virtualHosts>
Important to note are the different areas of the file like, virtualHost, accesses and rewrites. These are the common configurations you’ll be dealing with per virtual host. Also notice the documentRoot parameter. This will now help us avoid adding the directory /example to the URL.
需要注意的是一样,该文件的不同领域virtualHost , accesses和rewrites 。 这些是每个虚拟主机要处理的常见配置。 还要注意documentRoot参数。 现在,这将帮助我们避免将目录/example添加到URL。
Change the virtualHost name to look like this.
更改virtualHost名称,如下所示。
<virtualHost name="my-app.com www.my-app.com">Again, my-app.com is the name you created with the Vagrant box. We are also adding www.my-app.com here too, as we are simulating a proper website with access to a www. sub-domain.
同样, my-app.com是您在“ Vagrant”框中创建的名称。 我们也在这里添加www.my-app.com ,因为我们正在模拟一个可以访问www.的适当网站www. 子域。
For these changes to take effect, you now need to restart Appserver.
为了使这些更改生效,您现在需要重新启动Appserver。
service appserver restartIf you wanted to (and you should), you could add a rewrite rule, which will intercept any call to the www. subdomain and reroute it to the main domain or vice versa. We’ll go with the former, www. subdomain to the main domain. This follows a very important and fairly standard rule of SEO. The same content should never be accessible under different URLs!
如果您希望(并且应该这样做),可以添加一个重写规则,该规则将拦截对www.任何调用www. 子域,然后将其重新路由到主域,反之亦然。 我们将使用前者www. 子域到主域。 这遵循非常重要且相当标准的SEO规则。 相同的内容永远不能在不同的URL下访问!
To create this rule, under <rewites> add the following line below the rewrite condition already present.
要创建此规则,请在<rewites>下在已经存在的重写条件下添加以下行。
<rewrite condition="^www\.@$HTTP_HOST" target="$REQUEST_SCHEME://my-app.com$X_REQUEST_URI" flag="R,L" />This condition looks for any URL prefixed with www. and reroutes it to the target scheme, which is our main domain. Notice also, we can simply add the variable $X_REQUEST_URI, instead of a backreference. This saves a bit of computing for a regex. You can use any $_SERVER array values normally available from PHP in the rewrite rules. That is handy, isn’t it?
此条件将查找任何以www. URL www. 并将其重新路由到目标方案,这是我们的主要领域。 还要注意,我们可以简单地添加变量$X_REQUEST_URI ,而不是后向引用。 这为正则表达式节省了一些计算时间。 您可以在重写规则中使用通常可从PHP获得的任何$_SERVER数组值。 那很方便,不是吗?
Check to see if you can now see the example app under your domain name. In our example, it will be under:
检查您现在是否可以在域名下看到示例应用程序。 在我们的示例中,它将位于:
http://my-app.com
http://my-app.com
If all has gone well, you should see the example app.
如果一切顺利,您应该看到示例应用程序。
One last note, before we dig into servlets. Appserver also comes with its own PHP-FPM, currently 5.5.x running on port 9010. You can also run with your own FPM by changing the port in the appserver.xml file. Also, Appserver currently doesn’t start its FPM service automatically, so remember to also start it, should you need to run apps not directly built for Appserver (like WordPress). To start the service, in your shell console enter
最后一点,在深入探讨servlet之前。 Appserver还附带了自己PHP-FPM,当前在端口9010上运行5.5.x。您也可以通过更改appserver.xml文件中的端口以自己的FPM运行。 此外,Appserver当前不会自动启动其FPM服务,因此,如果您需要运行不是直接为Appserver构建的应用程序(如WordPress),请记住也要启动它。 要启动该服务,请在您的Shell控制台中输入
service appserver-php5-fpm start
service appserver-php5-fpm start
If you need to make any changes to Appserver’s PHP settings, you’ll also find the related .ini file under /opt/appserver/etc.
如果您需要对AppserverPHP设置进行任何更改,还可以在/opt/appserver/etc下找到相关的.ini文件。
Servlet引擎 (The Servlet Engine)
If you can imagine the web server is the eyes, ears and mouth of Appserver, then the servlet engine is the temporal lobe of the brain. Those of you fond of Java may also recognize the similarities between Appserver’s servlets and Java servlets. In theory and practice, they are pretty much the same thing.
如果您可以想象Web服务器是Appserver的眼睛,耳朵和嘴巴,那么servlet引擎就是大脑的颞叶 。 那些喜欢Java的人可能还会认识到Appserver的servlet和Java servlet之间的相似之处。 在理论和实践上,它们几乎是同一件事。
痛苦的引导过程不再 (The Painful Bootstrap Process No Longer)
One of the most costly processes all major frameworks or heavy duty web applications have with current PHP web server stacks is the bootstrapping process. This process is where configuration is read and the runtime environment is set up. Since this process must be done with each request, it is a source for performance loss and is often compensated for with some sort of caching scheme, which adds complexity to the application. With appserver, the bootstrapping process is done only once, at server start-up, so basically automatically cached. The bootstrapped code, like the servlets in the servlet engine, is held in memory, until appserver is stopped. This initialization portion of appserver is quite important and one of its major benefits.
自举过程是所有主要框架或重型Web应用程序与当前PHP Web服务器堆栈所具有的最昂贵的过程之一。 在此过程中,读取配置并设置运行时环境。 由于必须针对每个请求完成此过程,因此这是造成性能损失的根源,并且经常通过某种缓存方案进行补偿,这会增加应用程序的复杂性。 使用appserver,引导过程仅在服务器启动时执行一次,因此基本上可以自动缓存。 像Servlet引擎中的Servlet一样,自举代码会保留在内存中,直到appserver停止为止。 appserver的初始化部分非常重要,也是其主要优点之一。
Appserver文件结构 (Appserver File Structure)
Before we go any further, we first need to understand the file and directory structure of an Appserver application. It is different than the normal file structure you might find in most PHP projects. The actual applications are found under the directory /webapps. In our Appserver installation, you should see the example app under the /example directory. Under this directory, you’ll find the following directory structure.
在继续之前,我们首先需要了解Appserver应用程序的文件和目录结构。 它与大多数PHP项目中可能会发现的普通文件结构不同。 实际的应用程序位于目录/webapps 。 在我们的Appserver安装中,您应该在/example目录下看到示例应用程序。 在此目录下,您将找到以下目录结构。

Here is a quick synopsis of the important directories in an Appserver application.
这是Appserver应用程序中重要目录的快速摘要。
/WEB-INF – this directory holds the client facing PHP classes. You’ll notice in the example app there are both examples for servlets (which aren’t directly used in the app) and also “action” classes, which are used in the app. These classes form the controllers of the application.
/WEB-INF –此目录保存面向PHP类的客户端。 您会在示例应用程序中注意到,既有servlet的示例(在应用程序中未直接使用),也有在应用程序中使用的“动作”类。 这些类构成应用程序的控制器。
/META-INF – this directory holds the code for the back-end services. This is where aspects and any entry code for the domain models should be held.
/META-INF –此目录包含后端服务的代码。 这是应该保存方面和领域模型的任何入门代码的地方。
/common – This directory holds common classes shared between META-INF and WEB-INF classes.
/common –此目录包含META-INF和WEB-INF类之间共享的公共类。
/vendor – This directory holds any libraries you may have imported into your project with Composer. Appserver supports Composer and PSR-0 for class autoloading. PSR-4 isn’t supported, due to the custom directory structure required.
/vendor –此目录包含您可能已使用Composer导入到项目中的所有库。 Appserver支持Composer和PSR-0进行类自动加载。 由于需要自定义目录结构,因此不支持PSR-4。
/static – This directory is home for all the static resources (i.e. JS, CSS and image files), which are necessary for the web application to render properly.
/static –该目录是所有静态资源(即JS,CSS和图像文件)的目录,这些资源对于Web应用程序正确呈现是必不可少的。
The above directories are the default directory structure. The structure can also be customized over an additional context.xml file in either META-INF or WEB-INF. If you do intend to break from the default structure, more information on doing so can be found in the appserver docs.
上面的目录是默认目录结构。 也可以在META-INF或WEB-INF中的其他context.xml文件上自定义结构。 如果您确实想突破默认结构,请在appserver docs中找到有关此默认信息的更多信息 。
Important to Note – Communication between classes used within the servlet engine (WEB-INF) and the persistence container (META-INF) can be done with proxy objects. These objects can be communicated over a network, similar to remote method invocation in Java. This means it is possible to extrapolate these two layers into their own machines and have them run as services in an SOA based system. This ability to send objects across the network allows for asymmetrical scaling of Appservers, which is another one of its built in features.
需要注意的重要事项 – servlet引擎(WEB-INF)中使用的类与持久性容器(META-INF)之间的通信可以通过代理对象完成。 这些对象可以通过网络进行通信,类似于Java中的远程方法调用。 这意味着可以将这两层外推到它们自己的机器中,并使它们作为服务在基于SOA的系统中运行 。 通过网络发送对象的能力允许Appserver的非对称扩展,这是其内置功能之一。
结论 (Conclusion)
We’ve covered contexts and threading in Appserver and how Appserver takes care of the “dirty work” for you with threading, by pre-building the necessary modules within contexts of threads. We’ve briefly covered the different programming tools and paradigms on offer, such as AOP or design by contract. We’ve gotten you up and running with Appserver’s web server, and explained how an app file structure should look like. We also dived into the configuration of the web server.
我们已经介绍了Appserver中的上下文和线程,以及Appserver如何通过在线程上下文中预先构建必要的模块来为您处理线程的“肮脏工作”。 我们简要介绍了提供的各种编程工具和范例,例如AOP或按合同设计。 我们已帮助您启动并运行Appserver的Web服务器,并说明了应用程序文件结构的外观。 我们还深入研究了Web服务器的配置。
Phew!
!
And, we haven’t even scratched the surface of Appserver, really. It is a great platform and offers a new chance to build more powerful and easily scalable web applications in PHP.
而且,实际上,我们甚至还没有刮过Appserver的表面。 它是一个很棒的平台,并提供了一个新的机会来用PHP构建功能更强大且易于扩展的Web应用程序。
In the following parts, we’ll be diving into the other modules offered out-of-the-box, like the servlet engine and the message queue.
在以下部分中,我们将深入研究其他现成的模块,例如servlet引擎和消息队列。
As always, your great comments, critique and requests to cover any areas missed are highly welcomed!
与往常一样,我们非常欢迎您提出宝贵的意见,批评和要求,以弥补错过的任何问题!
Note: The above post was made with appserver version 1.0.6. The newest version, 1.1.0 was released just before this post was put into the publication process. We’ll make sure to cover the new features, as much as possible, in the next parts of this series.
注意:上面的帖子是使用appserver 1.0.6版发布的。 在发布此帖子之前,已发布了最新版本1.1.0。 我们将确保在本系列的下一部分中尽可能多地介绍新功能。
翻译自: https://www.sitepoint.com/appserver-server-configuration-dir-structure-and-threads/
appserver安装配置
appserver安装配置_Appserver-服务器配置,目录结构和线程相关推荐
- Hadoop入门(上):大数据特点、大数据前景、大数据组织结构、Hadoop组成、Hadoop版本介绍、Hadoop运行环境搭建、CentOS6安装JDK、安装Hadoop、Hadoop目录结构
资料来源于尚硅谷 本篇文章目录 第1章·大数据概论 1.1.大数据概念. 1.2.大数据特点(4V) 1.3.大数据应用场景 1.4.大数据发展前景 1.5·大数据部门业务流程分析. 1.6·大数据部 ...
- Linux基础篇① (Linux介绍;VM和CentOS详细安装教程;工具环境搭建,配置;Linux目录结构)
目录 第一章 Linux入门 1.1 Linux应用领域 1.1.1 个人桌面领域的应用 1.1.2 服务器领域 1.1.3 嵌入式领域 1.2 Linux介绍 1.2.1 linux概述 1.3 L ...
- ubuntu安装nginx及其默认目录结构
一. 安装包安装 1.1 安装Nginx $sudo apt-get install nginx Ubuntu安装之后的文件结构大致为: 所有的配置文件都在/etc/nginx下,并且每个虚拟主机已经 ...
- mysql安装后目录介绍,MySQL安装后的目录结构及配置文件详解
MySQL安装后的目录结构及配置文件详解 MySQL安装后的目录结构及配置文件详解 MySQL目录结构说明 MySQL 安装完成后,会在磁盘上生成一个目录,该目录就被称为 MySQL 的安装目录. M ...
- linux下mysql目录结构_linux下mysql安装配置与目录结构
本节内容: linux下mysql安装与配置.mysql目录结构. 1.准备安装程序(官方网站下载) 服务端:MySQL-server-community-5.1.44-1.rhel4.i386.rp ...
- ant design pro(一)安装、目录结构、项目加载启动【原始、以及idea开发】
一.概述 1.1.脚手架概念 编程领域中的"脚手架(Scaffolding)"指的是能够快速搭建项目"骨架"的一类工具.例如大多数的React项目都有src,p ...
- Maven进价:Maven的安装和目录结构
一.在windows上安装Maven 1.下载 下载地址:http://maven.apache.org/download.html 下载最新版本 maven3.2.5 2.解压 解压地址:F:\Ja ...
- 【Python】Python2.7.15 - Windows安装Python以及Python安装目录结构详解
文章目录 Python 2.7.15安装 下载安装程序 启动安装程序 指定安装目录 安装选项 启用环境变量 高级选项 安装完毕 安装成功验证 检查Windows环境变量 确认Python版本 探索Py ...
- MongoDB 学习(一)安装配置和简单应用
一.安装和部署 1.服务端安装 1.官网下载(官方网站 https://www.mongodb.org/downloads/#production),傻瓜式安装,注意修改安装路径. 安装完成后的目录结 ...
最新文章
- HarmonyOS 点击事件的实现
- 2018-12-25 数据库插入数据
- 离散数学 消解算法判断合取范式的可满足性
- Python 内建函数 - sorted(iterable[, key][, reverse])
- DOM-15/16【实战】鼠标行为预测技术
- 使用Forms Authentication实现用户注册、登录 (三)用户实体替换
- 使用RabbitMQ实现接口补偿
- sql 返回日期的年月部分_公示|2020年11月部分志愿活动名单公示
- 阿里下一代云分析型数据库AnalyticDB入选Forrester云化数仓象限
- android中activity布局,Activity布局初步(一)
- 安装Caffe报错:/usr/local/cuda-10.1/targets/x86_64-linux/lib/libcudnn.so.7 is not a symbolic link
- JS-13-jquery
- kaptcha谷歌验证码工具
- IDEA 设置控制台背景颜色
- 【STM32】 AMS1117(稳压)模块
- vue基于element组件的国籍选择框
- 【利用Python进行数据分析——经验篇2】计算微博转发/评论/点赞h指数的Python代码
- IrisSkin 皮肤
- 第19天---python办公自动化---操作PDF文件
- 通过submit提交的表单怎么实现ajax提交