分布式系统监控系统zipkin入门
zipkin为分布式链路调用监控系统,聚合各业务系统调用延迟数据,达到链路调用监控跟踪。
architecture
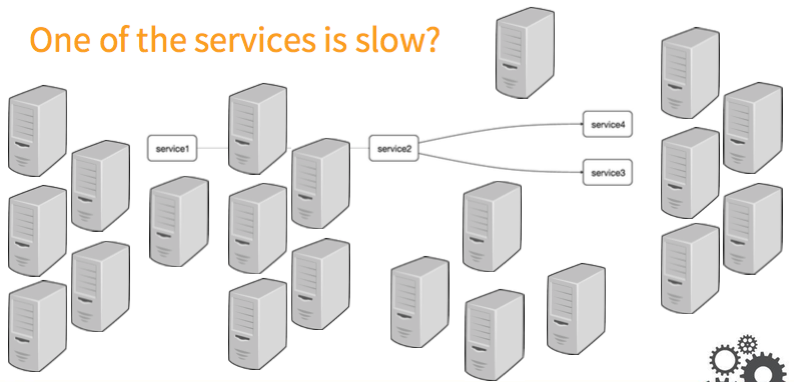
如图,在复杂的调用链路中假设存在一条调用链路响应缓慢,如何定位其中延迟高的服务呢?
- 日志: 通过分析调用链路上的每个服务日志得到结果
- zipkin:使用
zipkin的web UI可以一眼看出延迟高的服务
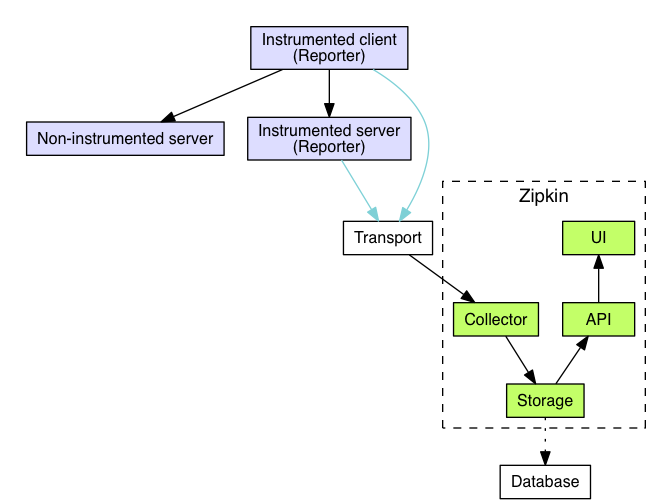
如图所示,各业务系统在彼此调用时,将特定的跟踪消息传递至zipkin,zipkin在收集到跟踪信息后将其聚合处理、存储、展示等,用户可通过web UI方便
获得网络延迟、调用链路、系统依赖等等。
zipkin主要涉及四个组件 collector storage search web UI
Collector接收各service传输的数据Cassandra作为Storage的一种,也可以是mysql等,默认存储在内存中,配置cassandra可以参考这里Query负责查询Storage中存储的数据,提供简单的JSON API获取数据,主要提供给web UI使用Web提供简单的web界面
2.安装
执行如下命令下载jar包
wget -O zipkin.jar 'https://search.maven.org/remote_content?g=io.zipkin.java&a=zipkin-server&v=LATEST&c=exec'- 1
- 1
其为一个spring boot 工程,直接运行jar
nohup java -jar zipkin.jar & - 1
- 1
访问 http://ip:9411

概念:
使用zipkin涉及几个概念
Span:基本工作单元,一次链路调用(可以是RPC,DB等没有特定的限制)创建一个span,通过一个64位ID标识它,
span通过还有其他的数据,例如描述信息,时间戳,key-value对的(Annotation)tag信息,parent-id等,其中parent-id
可以表示span调用链路来源,通俗的理解span就是一次请求信息Trace:类似于树结构的Span集合,表示一条调用链路,存在唯一标识Annotation: 注解,用来记录请求特定事件相关信息(例如时间),通常包含四个注解信息cs - Client Start,表示客户端发起请求
sr - Server Receive,表示服务端收到请求
ss - Server Send,表示服务端完成处理,并将结果发送给客户端
cr - Client Received,表示客户端获取到服务端返回信息
BinaryAnnotation:提供一些额外信息,一般已key-value对出现
概念说完,来看下完整的调用链路

上图表示一请求链路,一条链路通过Trace Id唯一标识,Span标识发起的请求信息,各span通过parent id 关联起来,如图

整个链路的依赖关系如下:

完成链路调用的记录后,如何来计算调用的延迟呢,这就需要利用Annotation信息
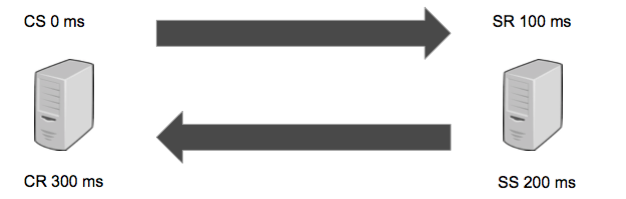
sr-cs 得到请求发出延迟
ss-sr 得到服务端处理延迟
cr-cs 得到真个链路完成延迟
brave
作为各调用链路,只需要负责将指定格式的数据发送给zipkin即可,利用brave可快捷完成操作。
首先导入jar包pom.xml
<parent><groupId>org.springframework.boot</groupId><artifactId>spring-boot-starter-parent</artifactId><version>1.3.6.RELEASE</version></parent><!-- https://mvnrepository.com/artifact/io.zipkin.brave/brave-core --><dependencies><dependency><groupId>org.springframework.boot</groupId><artifactId>spring-boot-starter-web</artifactId></dependency><dependency><groupId>org.springframework.boot</groupId><artifactId>spring-boot-starter-aop</artifactId></dependency><dependency><groupId>org.springframework.boot</groupId><artifactId>spring-boot-starter-actuator</artifactId></dependency><dependency><groupId>io.zipkin.brave</groupId><artifactId>brave-core</artifactId><version>3.9.0</version></dependency><!-- https://mvnrepository.com/artifact/io.zipkin.brave/brave-http --><dependency><groupId>io.zipkin.brave</groupId><artifactId>brave-http</artifactId><version>3.9.0</version></dependency><dependency><groupId>io.zipkin.brave</groupId><artifactId>brave-spancollector-http</artifactId><version>3.9.0</version></dependency><dependency><groupId>io.zipkin.brave</groupId><artifactId>brave-web-servlet-filter</artifactId><version>3.9.0</version></dependency><dependency><groupId>io.zipkin.brave</groupId><artifactId>brave-okhttp</artifactId><version>3.9.0</version></dependency><!-- https://mvnrepository.com/artifact/org.slf4j/slf4j-api --><dependency><groupId>org.slf4j</groupId><artifactId>slf4j-api</artifactId><version>1.7.13</version></dependency><dependency><groupId>org.apache.httpcomponents</groupId><artifactId>httpclient</artifactId><version>4.5.1</version></dependency></dependencies>
- 1
- 2
- 3
- 4
- 5
- 6
- 7
- 8
- 9
- 10
- 11
- 12
- 13
- 14
- 15
- 16
- 17
- 18
- 19
- 20
- 21
- 22
- 23
- 24
- 25
- 26
- 27
- 28
- 29
- 30
- 31
- 32
- 33
- 34
- 35
- 36
- 37
- 38
- 39
- 40
- 41
- 42
- 43
- 44
- 45
- 46
- 47
- 48
- 49
- 50
- 51
- 52
- 53
- 54
- 55
- 56
- 57
- 58
- 59
- 60
- 61
- 62
- 63
- 64
- 65
- 66
- 67
利用spring boot创建工程
Application.Java
package com.lkl.zipkin;import org.springframework.boot.SpringApplication;import org.springframework.boot.autoconfigure.SpringBootApplication;/**** Created by liaokailin on 16/7/27.*/@SpringBootApplicationpublic class Application {public static void main(String[] args) {SpringApplication app = new SpringApplication(Application.class);app.run(args);}}
- 1
- 2
- 3
- 4
- 5
- 6
- 7
- 8
- 9
- 10
- 11
- 12
- 13
- 14
- 15
- 16
- 17
- 18
- 19
- 20
- 21
- 1
- 2
- 3
- 4
- 5
- 6
- 7
- 8
- 9
- 10
- 11
- 12
- 13
- 14
- 15
- 16
- 17
- 18
- 19
- 20
- 21
建立controller对外提供服务
HomeController.java
RestController@RequestMapping("/")public class HomeController {@Autowiredprivate OkHttpClient client;private Random random = new Random();@RequestMapping("start")public String start() throws InterruptedException, IOException {int sleep= random.nextInt(100);TimeUnit.MILLISECONDS.sleep(sleep);Request request = new Request.Builder().url("http://localhost:9090/foo").get().build();Response response = client.newCall(request).execute();return " [service1 sleep " + sleep+" ms]" + response.body().toString();}
- 1
- 2
- 3
- 4
- 5
- 6
- 7
- 8
- 9
- 10
- 11
- 12
- 13
- 14
- 15
- 16
- 17
- 18
- 1
- 2
- 3
- 4
- 5
- 6
- 7
- 8
- 9
- 10
- 11
- 12
- 13
- 14
- 15
- 16
- 17
- 18
HomeController中利用OkHttpClient调用发起http请求。在每次发起请求时则需要通过brave记录Span信息,并异步传递给zipkin
作为被调用方(服务端)也同样需要完成以上操作.
ZipkinConfig.java
package com.lkl.zipkin.config;import com.github.kristofa.brave.Brave;import com.github.kristofa.brave.EmptySpanCollectorMetricsHandler;import com.github.kristofa.brave.SpanCollector;import com.github.kristofa.brave.http.DefaultSpanNameProvider;import com.github.kristofa.brave.http.HttpSpanCollector;import com.github.kristofa.brave.okhttp.BraveOkHttpRequestResponseInterceptor;import com.github.kristofa.brave.servlet.BraveServletFilter;import okhttp3.OkHttpClient;import org.springframework.beans.factory.annotation.Autowired;import org.springframework.context.annotation.Bean;import org.springframework.context.annotation.Configuration;/*** Created by liaokailin on 16/7/27.*/@Configurationpublic class ZipkinConfig {@Autowiredprivate ZipkinProperties properties;@Beanpublic SpanCollector spanCollector() {HttpSpanCollector.Config config = HttpSpanCollector.Config.builder().connectTimeout(properties.getConnectTimeout()).readTimeout(properties.getReadTimeout()).compressionEnabled(properties.isCompressionEnabled()).flushInterval(properties.getFlushInterval()).build();return HttpSpanCollector.create(properties.getUrl(), config, new EmptySpanCollectorMetricsHandler());}@Beanpublic Brave brave(SpanCollector spanCollector){Brave.Builder builder = new Brave.Builder(properties.getServiceName()); //指定statebuilder.spanCollector(spanCollector);builder.traceSampler(Sampler.ALWAYS_SAMPLE);Brave brave = builder.build();return brave;}@Beanpublic BraveServletFilter braveServletFilter(Brave brave){BraveServletFilter filter = new BraveServletFilter(brave.serverRequestInterceptor(),brave.serverResponseInterceptor(),new DefaultSpanNameProvider());return filter;}@Beanpublic OkHttpClient okHttpClient(Brave brave){OkHttpClient client = new OkHttpClient.Builder().addInterceptor(new BraveOkHttpRequestResponseInterceptor(brave.clientRequestInterceptor(), brave.clientResponseInterceptor(), new DefaultSpanNameProvider())).build();return client;}}
- 1
- 2
- 3
- 4
- 5
- 6
- 7
- 8
- 9
- 10
- 11
- 12
- 13
- 14
- 15
- 16
- 17
- 18
- 19
- 20
- 21
- 22
- 23
- 24
- 25
- 26
- 27
- 28
- 29
- 30
- 31
- 32
- 33
- 34
- 35
- 36
- 37
- 38
- 39
- 40
- 41
- 42
- 43
- 44
- 45
- 46
- 47
- 48
- 49
- 50
- 51
- 52
- 53
- 54
- 55
- 56
- 57
- 1
- 2
- 3
- 4
- 5
- 6
- 7
- 8
- 9
- 10
- 11
- 12
- 13
- 14
- 15
- 16
- 17
- 18
- 19
- 20
- 21
- 22
- 23
- 24
- 25
- 26
- 27
- 28
- 29
- 30
- 31
- 32
- 33
- 34
- 35
- 36
- 37
- 38
- 39
- 40
- 41
- 42
- 43
- 44
- 45
- 46
- 47
- 48
- 49
- 50
- 51
- 52
- 53
- 54
- 55
- 56
- 57
SpanCollector配置收集器Brave各工具类的封装,其中builder.traceSampler(Sampler.ALWAYS_SAMPLE)设置采样比率,0-1之间的百分比BraveServletFilter作为拦截器,需要serverRequestInterceptor,serverResponseInterceptor分别完成sr和ss操作OkHttpClient添加拦截器,需要clientRequestInterceptor,clientResponseInterceptor分别完成cs和cr操作,该功能由
brave中的brave-okhttp模块提供,同样的道理如果需要记录数据库的延迟只要在数据库操作前后完成cs和cr即可,当然brave提供其封装。
以上还缺少一个配置信息ZipkinProperties.java
package com.lkl.zipkin.config;import org.springframework.boot.context.properties.ConfigurationProperties;import org.springframework.context.annotation.Configuration;/*** Created by liaokailin on 16/7/28.*/@Configuration@ConfigurationProperties(prefix = "com.zipkin")public class ZipkinProperties {private String serviceName;private String url;private int connectTimeout;private int readTimeout;private int flushInterval;private boolean compressionEnabled;public String getUrl() {return url;}public void setUrl(String url) {this.url = url;}public int getConnectTimeout() {return connectTimeout;}public void setConnectTimeout(int connectTimeout) {this.connectTimeout = connectTimeout;}public int getReadTimeout() {return readTimeout;}public void setReadTimeout(int readTimeout) {this.readTimeout = readTimeout;}public int getFlushInterval() {return flushInterval;}public void setFlushInterval(int flushInterval) {this.flushInterval = flushInterval;}public boolean isCompressionEnabled() {return compressionEnabled;}public void setCompressionEnabled(boolean compressionEnabled) {this.compressionEnabled = compressionEnabled;}public String getServiceName() {return serviceName;}public void setServiceName(String serviceName) {this.serviceName = serviceName;}}
- 1
- 2
- 3
- 4
- 5
- 6
- 7
- 8
- 9
- 10
- 11
- 12
- 13
- 14
- 15
- 16
- 17
- 18
- 19
- 20
- 21
- 22
- 23
- 24
- 25
- 26
- 27
- 28
- 29
- 30
- 31
- 32
- 33
- 34
- 35
- 36
- 37
- 38
- 39
- 40
- 41
- 42
- 43
- 44
- 45
- 46
- 47
- 48
- 49
- 50
- 51
- 52
- 53
- 54
- 55
- 56
- 57
- 58
- 59
- 60
- 61
- 62
- 63
- 64
- 65
- 66
- 67
- 68
- 69
- 70
- 71
- 72
- 73
- 74
则可以在配置文件application.properties中配置相关信息
com.zipkin.serviceName=service1com.zipkin.url=http://110.173.14.57:9411com.zipkin.connectTimeout=6000com.zipkin.readTimeout=6000com.zipkin.flushInterval=1com.zipkin.compressionEnabled=trueserver.port=8080
- 1
- 2
- 3
- 4
- 5
- 6
- 7
- 1
- 2
- 3
- 4
- 5
- 6
- 7
那么其中的service1即完成,同样的道理,修改配置文件(调整com.zipkin.serviceName,以及server.port)以及controller对应的方法构造若干服务
service1 中访问http://localhost:8080/start需要访问http://localhost:9090/foo,则构造server2提供该方法
server2配置
com.zipkin.serviceName=service2com.zipkin.url=http://110.173.14.57:9411com.zipkin.connectTimeout=6000com.zipkin.readTimeout=6000com.zipkin.flushInterval=1com.zipkin.compressionEnabled=trueserver.port=9090
- 1
- 2
- 3
- 4
- 5
- 6
- 7
- 8
- 9
- 1
- 2
- 3
- 4
- 5
- 6
- 7
- 8
- 9
controller方法
@RequestMapping("foo")public String foo() throws InterruptedException, IOException {Random random = new Random();int sleep= random.nextInt(100);TimeUnit.MILLISECONDS.sleep(sleep);Request request = new Request.Builder().url("http://localhost:9091/bar").get().build(); //service3Response response = client.newCall(request).execute();String result = response.body().string();request = new Request.Builder().url("http://localhost:9092/tar").get().build(); //service4response = client.newCall(request).execute();result += response.body().string();return " [service2 sleep " + sleep+" ms]" + result;}
- 1
- 2
- 3
- 4
- 5
- 6
- 7
- 8
- 9
- 10
- 11
- 12
- 13
- 1
- 2
- 3
- 4
- 5
- 6
- 7
- 8
- 9
- 10
- 11
- 12
- 13
在server2中调用server3和server4中的方法
方法分别为
@RequestMapping("bar")public String bar() throws InterruptedException, IOException { //service3 methodRandom random = new Random();int sleep= random.nextInt(100);TimeUnit.MILLISECONDS.sleep(sleep);return " [service3 sleep " + sleep+" ms]";}@RequestMapping("tar")public String tar() throws InterruptedException, IOException { //service4 methodRandom random = new Random();int sleep= random.nextInt(1000);TimeUnit.MILLISECONDS.sleep(sleep);return " [service4 sleep " + sleep+" ms]";}
- 1
- 2
- 3
- 4
- 5
- 6
- 7
- 8
- 9
- 10
- 11
- 12
- 13
- 14
- 15
- 1
- 2
- 3
- 4
- 5
- 6
- 7
- 8
- 9
- 10
- 11
- 12
- 13
- 14
- 15
将工程修改后编译成jar形式
执行
nohup java -jar server4.jar &nohup java -jar server3.jar &nohup java -jar server2.jar &nohup java -jar server1.jar &
- 1
- 2
- 3
- 4
- 5
- 6
- 1
- 2
- 3
- 4
- 5
- 6
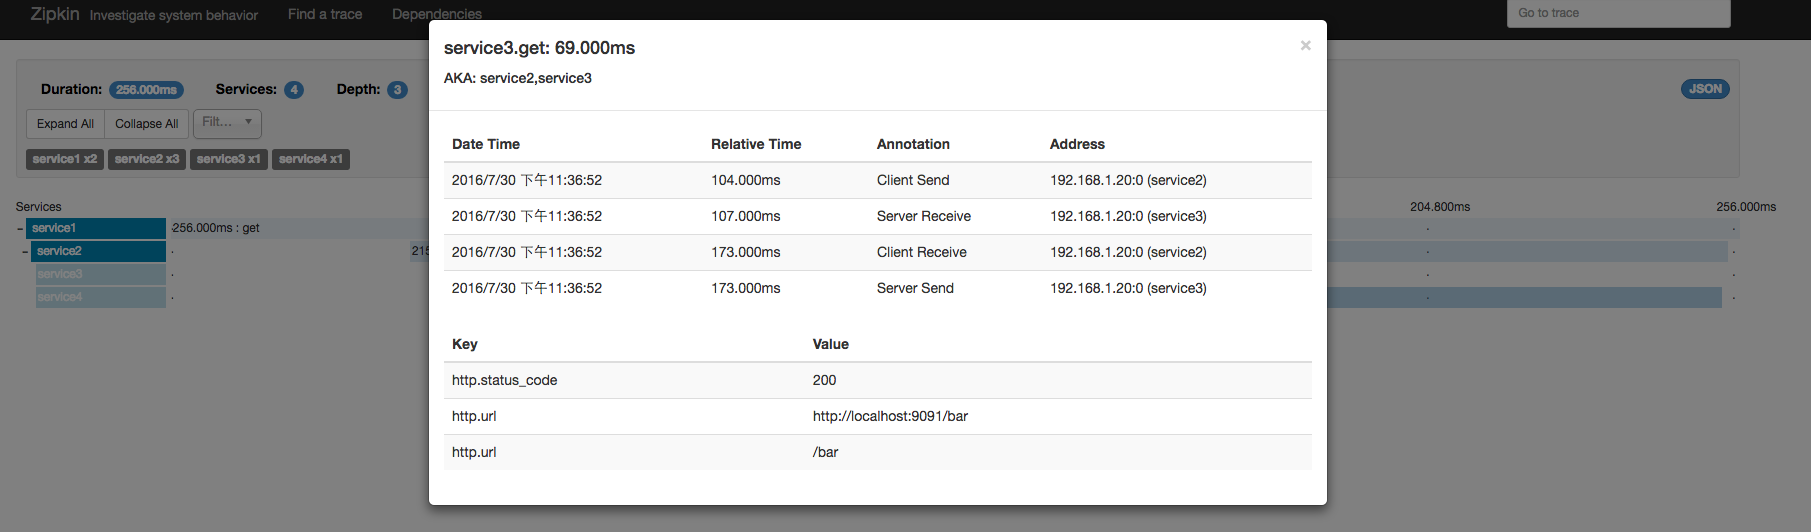
访问http://localhost:8080/start后查看zipkin的web UI

点击条目可以查看具体的延迟信息
服务之间的依赖为

brave 源码
以上完成了基本的操作,下面将从源码角度来看下brave的实现
首先从SpanCollector来入手
@Beanpublic SpanCollector spanCollector() {HttpSpanCollector.Config config = HttpSpanCollector.Config.builder().connectTimeout(properties.getConnectTimeout()).readTimeout(properties.getReadTimeout()).compressionEnabled(properties.isCompressionEnabled()).flushInterval(properties.getFlushInterval()).build();return HttpSpanCollector.create(properties.getUrl(), config, new EmptySpanCollectorMetricsHandler());}
- 1
- 2
- 3
- 4
- 5
- 6
- 7
- 8
- 1
- 2
- 3
- 4
- 5
- 6
- 7
- 8
从名称上看HttpSpanCollector是基于http的span收集器,因此超时配置是必须的,默认给出的超时时间较长,flushInterval表示span的传递
间隔,实际为定时任务执行的间隔时间.在HttpSpanCollector中覆写了父类方法sendSpans
@Overrideprotected void sendSpans(byte[] json) throws IOException {// intentionally not closing the connection, so as to use keep-alivesHttpURLConnection connection = (HttpURLConnection) new URL(url).openConnection();connection.setConnectTimeout(config.connectTimeout());connection.setReadTimeout(config.readTimeout());connection.setRequestMethod("POST");connection.addRequestProperty("Content-Type", "application/json");if (config.compressionEnabled()) {connection.addRequestProperty("Content-Encoding", "gzip");ByteArrayOutputStream gzipped = new ByteArrayOutputStream();try (GZIPOutputStream compressor = new GZIPOutputStream(gzipped)) {compressor.write(json);}json = gzipped.toByteArray();}connection.setDoOutput(true);connection.setFixedLengthStreamingMode(json.length);connection.getOutputStream().write(json);try (InputStream in = connection.getInputStream()) {while (in.read() != -1) ; // skip} catch (IOException e) {try (InputStream err = connection.getErrorStream()) {if (err != null) { // possible, if the connection was droppedwhile (err.read() != -1) ; // skip}}throw e;}}}
- 1
- 2
- 3
- 4
- 5
- 6
- 7
- 8
- 9
- 10
- 11
- 12
- 13
- 14
- 15
- 16
- 17
- 18
- 19
- 20
- 21
- 22
- 23
- 24
- 25
- 26
- 27
- 28
- 29
- 30
- 31
- 32
- 33
- 34
- 1
- 2
- 3
- 4
- 5
- 6
- 7
- 8
- 9
- 10
- 11
- 12
- 13
- 14
- 15
- 16
- 17
- 18
- 19
- 20
- 21
- 22
- 23
- 24
- 25
- 26
- 27
- 28
- 29
- 30
- 31
- 32
- 33
- 34
可以看出最终span信息是通过HttpURLConnection实现的,同样道理就可以推理brave对brave-spring-resttemplate-interceptors模块的实现,
只是换了一种http封装。
Brave
@Beanpublic Brave brave(SpanCollector spanCollector){Brave.Builder builder = new Brave.Builder(properties.getServiceName()); //指定statebuilder.spanCollector(spanCollector);builder.traceSampler(Sampler.ALWAYS_SAMPLE);Brave brave = builder.build();return brave;}
- 1
- 2
- 3
- 4
- 5
- 6
- 7
- 8
- 9
- 1
- 2
- 3
- 4
- 5
- 6
- 7
- 8
- 9
Brave类包装了各种工具类
public Brave build() {return new Brave(this);}
- 1
- 2
- 3
- 1
- 2
- 3
创建一个Brave
private Brave(Builder builder) {serverTracer = ServerTracer.builder().randomGenerator(builder.random).spanCollector(builder.spanCollector).state(builder.state).traceSampler(builder.sampler).build();clientTracer = ClientTracer.builder().randomGenerator(builder.random).spanCollector(builder.spanCollector).state(builder.state).traceSampler(builder.sampler).build();localTracer = LocalTracer.builder().randomGenerator(builder.random).spanCollector(builder.spanCollector).spanAndEndpoint(SpanAndEndpoint.LocalSpanAndEndpoint.create(builder.state)).traceSampler(builder.sampler).build();serverRequestInterceptor = new ServerRequestInterceptor(serverTracer);serverResponseInterceptor = new ServerResponseInterceptor(serverTracer);clientRequestInterceptor = new ClientRequestInterceptor(clientTracer);clientResponseInterceptor = new ClientResponseInterceptor(clientTracer);serverSpanAnnotationSubmitter = AnnotationSubmitter.create(SpanAndEndpoint.ServerSpanAndEndpoint.create(builder.state));serverSpanThreadBinder = new ServerSpanThreadBinder(builder.state);clientSpanThreadBinder = new ClientSpanThreadBinder(builder.state);}
- 1
- 2
- 3
- 4
- 5
- 6
- 7
- 8
- 9
- 10
- 11
- 12
- 13
- 14
- 15
- 16
- 17
- 18
- 19
- 20
- 21
- 22
- 23
- 24
- 25
- 26
- 27
- 28
- 29
- 1
- 2
- 3
- 4
- 5
- 6
- 7
- 8
- 9
- 10
- 11
- 12
- 13
- 14
- 15
- 16
- 17
- 18
- 19
- 20
- 21
- 22
- 23
- 24
- 25
- 26
- 27
- 28
- 29
封装了*Tracer,*Interceptor,*Binder等
其中 serverTracer当服务作为服务端时处理span信息,clientTracer当服务作为客户端时处理span信息
Filter
BraveServletFilter是http模块提供的拦截器功能,传递serverRequestInterceptor,serverResponseInterceptor,spanNameProvider等参数
其中spanNameProvider表示如何处理span的名称,默认使用method名称,spring boot中申明的filter bean 默认拦截所有请求
@Overridepublic void doFilter(ServletRequest request, ServletResponse response, FilterChain filterChain) throws IOException, ServletException {String alreadyFilteredAttributeName = getAlreadyFilteredAttributeName();boolean hasAlreadyFilteredAttribute = request.getAttribute(alreadyFilteredAttributeName) != null;if (hasAlreadyFilteredAttribute) {// Proceed without invoking this filter...filterChain.doFilter(request, response);} else {final StatusExposingServletResponse statusExposingServletResponse = new StatusExposingServletResponse((HttpServletResponse) response);requestInterceptor.handle(new HttpServerRequestAdapter(new ServletHttpServerRequest((HttpServletRequest) request), spanNameProvider));try {filterChain.doFilter(request, statusExposingServletResponse);} finally {responseInterceptor.handle(new HttpServerResponseAdapter(new HttpResponse() {@Overridepublic int getHttpStatusCode() {return statusExposingServletResponse.getStatus();}}));}}}
- 1
- 2
- 3
- 4
- 5
- 6
- 7
- 8
- 9
- 10
- 11
- 12
- 13
- 14
- 15
- 16
- 17
- 18
- 19
- 20
- 21
- 22
- 23
- 24
- 25
- 26
- 27
- 1
- 2
- 3
- 4
- 5
- 6
- 7
- 8
- 9
- 10
- 11
- 12
- 13
- 14
- 15
- 16
- 17
- 18
- 19
- 20
- 21
- 22
- 23
- 24
- 25
- 26
- 27
首先来看requestInterceptor.handle方法,
public void handle(ServerRequestAdapter adapter) {serverTracer.clearCurrentSpan();final TraceData traceData = adapter.getTraceData();Boolean sample = traceData.getSample();if (sample != null && Boolean.FALSE.equals(sample)) {serverTracer.setStateNoTracing();LOGGER.fine("Received indication that we should NOT trace.");} else {if (traceData.getSpanId() != null) {LOGGER.fine("Received span information as part of request.");SpanId spanId = traceData.getSpanId();serverTracer.setStateCurrentTrace(spanId.traceId, spanId.spanId,spanId.nullableParentId(), adapter.getSpanName());} else {LOGGER.fine("Received no span state.");serverTracer.setStateUnknown(adapter.getSpanName());}serverTracer.setServerReceived();for(KeyValueAnnotation annotation : adapter.requestAnnotations()){serverTracer.submitBinaryAnnotation(annotation.getKey(), annotation.getValue());}}}
- 1
- 2
- 3
- 4
- 5
- 6
- 7
- 8
- 9
- 10
- 11
- 12
- 13
- 14
- 15
- 16
- 17
- 18
- 19
- 20
- 21
- 22
- 23
- 24
- 25
- 26
- 27
- 1
- 2
- 3
- 4
- 5
- 6
- 7
- 8
- 9
- 10
- 11
- 12
- 13
- 14
- 15
- 16
- 17
- 18
- 19
- 20
- 21
- 22
- 23
- 24
- 25
- 26
- 27
其中serverTracer.clearCurrentSpan()清除当前线程上的span信息,调用ThreadLocalServerClientAndLocalSpanState中的
@Overridepublic void setCurrentServerSpan(final ServerSpan span) {if (span == null) {currentServerSpan.remove();} else {currentServerSpan.set(span);}}
- 1
- 2
- 3
- 4
- 5
- 6
- 7
- 8
- 9
- 1
- 2
- 3
- 4
- 5
- 6
- 7
- 8
- 9
currentServerSpan为ThreadLocal对象
private final static ThreadLocal<ServerSpan> currentServerSpan = new ThreadLocal<ServerSpan>() {- 1
- 1
回到ServerRequestInterceptor#handle()方法中final TraceData traceData = adapter.getTraceData()
@Overridepublic TraceData getTraceData() {final String sampled = serverRequest.getHttpHeaderValue(BraveHttpHeaders.Sampled.getName());if (sampled != null) {if (sampled.equals("0") || sampled.toLowerCase().equals("false")) {return TraceData.builder().sample(false).build();} else {final String parentSpanId = serverRequest.getHttpHeaderValue(BraveHttpHeaders.ParentSpanId.getName());final String traceId = serverRequest.getHttpHeaderValue(BraveHttpHeaders.TraceId.getName());final String spanId = serverRequest.getHttpHeaderValue(BraveHttpHeaders.SpanId.getName());if (traceId != null && spanId != null) {SpanId span = getSpanId(traceId, spanId, parentSpanId);return TraceData.builder().sample(true).spanId(span).build();}}}return TraceData.builder().build();}
- 1
- 2
- 3
- 4
- 5
- 6
- 7
- 8
- 9
- 10
- 11
- 12
- 13
- 14
- 15
- 16
- 17
- 18
- 19
- 1
- 2
- 3
- 4
- 5
- 6
- 7
- 8
- 9
- 10
- 11
- 12
- 13
- 14
- 15
- 16
- 17
- 18
- 19
其中SpanId span = getSpanId(traceId, spanId, parentSpanId) 将构造一个SpanId对象
private SpanId getSpanId(String traceId, String spanId, String parentSpanId) {return SpanId.builder().traceId(convertToLong(traceId)).spanId(convertToLong(spanId)).parentId(parentSpanId == null ? null : convertToLong(parentSpanId)).build();}
- 1
- 2
- 3
- 4
- 5
- 6
- 7
- 1
- 2
- 3
- 4
- 5
- 6
- 7
将traceId,spanId,parentId关联起来,其中设置parentId方法为
public Builder parentId(@Nullable Long parentId) {if (parentId == null) {this.flags |= FLAG_IS_ROOT;} else {this.flags &= ~FLAG_IS_ROOT;}this.parentId = parentId;return this;}
- 1
- 2
- 3
- 4
- 5
- 6
- 7
- 8
- 9
- 10
- 1
- 2
- 3
- 4
- 5
- 6
- 7
- 8
- 9
- 10
如果parentId为空为根节点,则执行this.flags |= FLAG_IS_ROOT ,因此后续在判断节点是否为根节点时,只需要执行(flags & FLAG_IS_ROOT) == FLAG_IS_ROOT即可.
构造完SpanId后看
serverTracer.setStateCurrentTrace(spanId.traceId, spanId.spanId,spanId.nullableParentId(), adapter.getSpanName());
- 1
- 2
- 1
- 2
设置当前Span
public void setStateCurrentTrace(long traceId, long spanId, @Nullable Long parentSpanId, @Nullable String name) {checkNotBlank(name, "Null or blank span name");spanAndEndpoint().state().setCurrentServerSpan(ServerSpan.create(traceId, spanId, parentSpanId, name));}
- 1
- 2
- 3
- 4
- 5
- 6
- 1
- 2
- 3
- 4
- 5
- 6
ServerSpan.create创建Span信息
static ServerSpan create(long traceId, long spanId, @Nullable Long parentSpanId, String name) {Span span = new Span();span.setTrace_id(traceId);span.setId(spanId);if (parentSpanId != null) {span.setParent_id(parentSpanId);}span.setName(name);return create(span, true);}
- 1
- 2
- 3
- 4
- 5
- 6
- 7
- 8
- 9
- 10
- 11
- 1
- 2
- 3
- 4
- 5
- 6
- 7
- 8
- 9
- 10
- 11
构造了一个包含Span信息的AutoValue_ServerSpan对象
通过setCurrentServerSpan设置到当前线程上
继续看serverTracer.setServerReceived()方法
public void setServerReceived() {submitStartAnnotation(zipkinCoreConstants.SERVER_RECV);}
- 1
- 2
- 3
- 1
- 2
- 3
为当前请求设置了server received event
void submitStartAnnotation(String annotationName) {Span span = spanAndEndpoint().span();if (span != null) {Annotation annotation = Annotation.create(currentTimeMicroseconds(),annotationName,spanAndEndpoint().endpoint());synchronized (span) {span.setTimestamp(annotation.timestamp);span.addToAnnotations(annotation);}}}
- 1
- 2
- 3
- 4
- 5
- 6
- 7
- 8
- 9
- 10
- 11
- 12
- 13
- 14
- 15
- 1
- 2
- 3
- 4
- 5
- 6
- 7
- 8
- 9
- 10
- 11
- 12
- 13
- 14
- 15
在这里为Span信息设置了Annotation信息,后续的
for(KeyValueAnnotation annotation : adapter.requestAnnotations()){serverTracer.submitBinaryAnnotation(annotation.getKey(), annotation.getValue());}
- 1
- 2
- 3
- 4
- 5
- 1
- 2
- 3
- 4
- 5
设置了BinaryAnnotation信息,adapter.requestAnnotations()在构造HttpServerRequestAdapter时已完成
@Overridepublic Collection<KeyValueAnnotation> requestAnnotations() {KeyValueAnnotation uriAnnotation = KeyValueAnnotation.create(TraceKeys.HTTP_URL, serverRequest.getUri().toString());return Collections.singleton(uriAnnotation);}
- 1
- 2
- 3
- 4
- 5
- 6
- 1
- 2
- 3
- 4
- 5
- 6
以上将Span信息(包括sr)存储在当前线程中,接下来继续看BraveServletFilter#doFilter方法的finally部分
responseInterceptor.handle(new HttpServerResponseAdapter(new HttpResponse() {@Override //获取http状态码public int getHttpStatusCode() {return statusExposingServletResponse.getStatus();}}));
- 1
- 2
- 3
- 4
- 5
- 6
- 7
- 1
- 2
- 3
- 4
- 5
- 6
- 7
handle方法
public void handle(ServerResponseAdapter adapter) {// We can submit this in any case. When server state is not set or// we should not trace this request nothing will happen.LOGGER.fine("Sending server send.");try {for(KeyValueAnnotation annotation : adapter.responseAnnotations()){serverTracer.submitBinaryAnnotation(annotation.getKey(), annotation.getValue());}serverTracer.setServerSend();} finally {serverTracer.clearCurrentSpan();}}
- 1
- 2
- 3
- 4
- 5
- 6
- 7
- 8
- 9
- 10
- 11
- 12
- 13
- 14
- 15
- 1
- 2
- 3
- 4
- 5
- 6
- 7
- 8
- 9
- 10
- 11
- 12
- 13
- 14
- 15
首先配置BinaryAnnotation信息,然后执行serverTracer.setServerSend,在finally中清除当前线程中的Span信息(不管前面是否清楚成功,最终都将执行该不走),ThreadLocal中的数据要做到有始有终
看serverTracer.setServerSend()
public void setServerSend() {if (submitEndAnnotation(zipkinCoreConstants.SERVER_SEND, spanCollector())) {spanAndEndpoint().state().setCurrentServerSpan(null);}}
- 1
- 2
- 3
- 4
- 5
- 6
- 1
- 2
- 3
- 4
- 5
- 6
终于看到spanCollector收集器了,说明下面将看是收集Span信息,这里为ss注解
boolean submitEndAnnotation(String annotationName, SpanCollector spanCollector) {Span span = spanAndEndpoint().span();if (span == null) {return false;}Annotation annotation = Annotation.create(currentTimeMicroseconds(),annotationName,spanAndEndpoint().endpoint());span.addToAnnotations(annotation);if (span.getTimestamp() != null) {span.setDuration(annotation.timestamp - span.getTimestamp());}spanCollector.collect(span);return true;}
- 1
- 2
- 3
- 4
- 5
- 6
- 7
- 8
- 9
- 10
- 11
- 12
- 13
- 14
- 15
- 16
- 17
- 18
- 1
- 2
- 3
- 4
- 5
- 6
- 7
- 8
- 9
- 10
- 11
- 12
- 13
- 14
- 15
- 16
- 17
- 18
首先获取当前线程中的Span信息,然后处理注解信息,通过annotation.timestamp - span.getTimestamp()计算延迟,
调用spanCollector.collect(span)进行收集Span信息,那么Span信息是同步收集的吗?肯定不是的,接着看
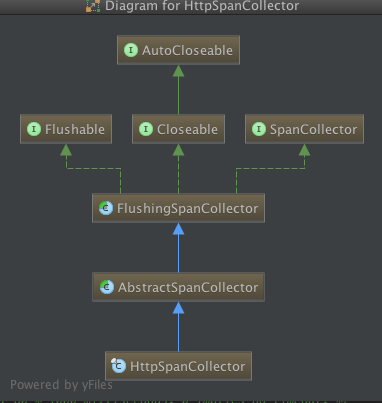
调用spanCollector.collect(span)则执行FlushingSpanCollector中的collect方法
@Overridepublic void collect(Span span) {metrics.incrementAcceptedSpans(1);if (!pending.offer(span)) {metrics.incrementDroppedSpans(1);}}
- 1
- 2
- 3
- 4
- 5
- 6
- 7
- 8
- 1
- 2
- 3
- 4
- 5
- 6
- 7
- 8
首先进行的是metrics统计信息,可以自定义该SpanCollectorMetricsHandler信息收集各指标信息,利用如grafana等展示信息
pending.offer(span)将span信息存储在BlockingQueue中,然后通过定时任务去取出阻塞队列中的值,偷偷摸摸的上传span信息
定时任务利用了Flusher类来执行,在构造FlushingSpanCollector时构造了Flusher类
static final class Flusher implements Runnable {final Flushable flushable;final ScheduledExecutorService scheduler = Executors.newScheduledThreadPool(1);Flusher(Flushable flushable, int flushInterval) {this.flushable = flushable;this.scheduler.scheduleWithFixedDelay(this, 0, flushInterval, SECONDS);}@Overridepublic void run() {try {flushable.flush();} catch (IOException ignored) {}}}
- 1
- 2
- 3
- 4
- 5
- 6
- 7
- 8
- 9
- 10
- 11
- 12
- 13
- 14
- 15
- 16
- 17
- 18
- 1
- 2
- 3
- 4
- 5
- 6
- 7
- 8
- 9
- 10
- 11
- 12
- 13
- 14
- 15
- 16
- 17
- 18
创建了一个核心线程数为1的线程池,每间隔flushInterval秒执行一次Span信息上传,执行flush方法
@Overridepublic void flush() {if (pending.isEmpty()) return;List<Span> drained = new ArrayList<Span>(pending.size());pending.drainTo(drained);if (drained.isEmpty()) return;int spanCount = drained.size();try {reportSpans(drained);} catch (IOException e) {metrics.incrementDroppedSpans(spanCount);} catch (RuntimeException e) {metrics.incrementDroppedSpans(spanCount);}}
- 1
- 2
- 3
- 4
- 5
- 6
- 7
- 8
- 9
- 10
- 11
- 12
- 13
- 14
- 15
- 16
- 17
- 1
- 2
- 3
- 4
- 5
- 6
- 7
- 8
- 9
- 10
- 11
- 12
- 13
- 14
- 15
- 16
- 17
首先将阻塞队列中的值全部取出存如集合中,最后调用reportSpans(List<Span> drained)抽象方法,该方法在AbstractSpanCollector得到覆写
@Overrideprotected void reportSpans(List<Span> drained) throws IOException {byte[] encoded = codec.writeSpans(drained);sendSpans(encoded);}
- 1
- 2
- 3
- 4
- 5
- 6
- 1
- 2
- 3
- 4
- 5
- 6
转换成字节流后调用sendSpans抽象方法发送Span信息,此时就回到一开始说的HttpSpanCollector通过HttpURLConnection实现的sendSpans方法。
具体使用可以参考:https://github.com/liaokailin/zipkin#architecture,下载这个maven项目并按照里面的说明运行即可。
分布式系统监控系统zipkin入门相关推荐
- 开源监控系统 Prometheus 入门
点击上方蓝色"程序猿DD",选择"设为星标" 回复"资源"获取独家整理的学习资料! 来源 | 公众号「yangyidba」 一 简介 Pro ...
- 【Prometheus】 Prometheus 入门到实战搭建监控系统
Prometheus (普罗米修斯)是一款基于时序数据库的开源监控告警系统,说起 Prometheus 则不得不提 SoundCloud,这是一个在线音乐分享的平台,类似于做视频分享的 YouTube ...
- 视频监控系统由哪几部分组成?(视频监控入门基础-附思维导图)
视频监控系统是安全技术防范工程的核心部分,也是很多弱电工程新人踏入行业中最先接触的部分.以前就经常有人咨询白哥,初入弱电行业该如何学起,我给的建议就是以视频监控系统为起点.为支点,围绕这套系统不断扩大 ...
- Prometheus监控系统入门与部署
Prometheus监控系统入门与部署 本文介绍新一代的监控系统 Prometheus,并指导用户如何一步一步搭建一个 Prometheus 系统. 什么是 Prometheus ? Promethe ...
- 一篇文章带你入门zabbix监控系统
目录 一.监控介绍 二.监控软件区别 三.zabbix监控架构 四.zabbix监控介绍 1.zabbix优点 2.zabbix缺点 3.zabbix监控系统监控对象 4.zabbix监控方式 五.z ...
- Nightingale滴滴夜莺监控系统入门(三)--页面功能说明
Nightingale滴滴夜莺监控系统入门(三) 功能模块 V3.4.1 用户资源中心 资产管理系统 任务执行中心 监控告警系统 监控看图 监控大盘 告警策略 部署客户端 生产环境开放服务端端口 部署 ...
- Nightingale滴滴夜莺监控系统入门(五)--采集功能
Nightingale滴滴夜莺监控系统入门(五)–采集功能 不知不觉夜莺已经更新到3.6版本,后续会议3.6来演示夜莺支持采集[端口][进程][日志][自定义插件]以及在3.5版本以后支持的主动采集[ ...
- Prometheus 监控系统入门与实践
原文地址:https://www.ibm.com/developerworks/cn/cloud/library/cl-lo-prometheus-getting-started-and-practi ...
- 华为吴晟:分布式监控系统的设计与实现
微服务架构其实就是将单一的应用程序划分成为一组小的服务,其中每个服务都是独立的业务单元,同时又能够被独立开发.运行.测试以及部署.简单来说,它的本质其实就是拆分和独立,这也决定了微服务的部署应该是分布 ...
最新文章
- 在apache中使用 memcache 来作 session 存储
- 第十章:Java_IO流
- Schedulerx2.0工作流支持数据传输
- java中fis和fos_java中-的流-与操作
- 美团点评成中国第三大互联网公司!
- 博士和博士后的有什么区别?
- python读取字符串按列分配后按行读出
- pc 浏览器最小字体12px
- [数学建模] TOPSIS法(考虑权重和不考虑权重)--评价类问题
- asdm java设置,[小技巧] 在CISCO ASA 5505防火墙上开启ASDM图形界面
- 生活-急救常识(2)
- Windows10系统设置共享文件夹和访问共享文件夹方法
- 【读书笔记】Flickr 网站用户标签的质量控制对策
- 如何分配资源和管理资源
- bittorrent协议
- 中国裸眼3D视频广告定制市场动态分析与发展策略研究报告2022-2028年
- Mysql DBA 高级运维学习之路-mysql数据库乱码问题
- JTS Java空间几何计算、距离、最近点、subLine等计算
- 多线程采集表情包,下一届斗图王者属于你
- python中的pai怎么打_python 调用win32pai 操作cmd的方法
热门文章
- Python程序开发——第八章 文件
- Shell脚本函数(函数传参、递归、创建库)
- exfat linux 读写速度,Ubuntu / Xubuntu : 读写 exFAT 文件系统
- php 匹配正则,php正则匹配类
- python删除文本中指定内容_Python实现删除文件中含“指定内容”的行示例
- 地理防灾减灾思维导图_17张思维导图,让你轻松学好高中地理必修一
- gddr6速率_GDDR6 显存两年后问世:比 GDDR5X 更快,速率可达 16Gbps
- python文本分析的开源工具_重磅开源:TN文本分析语言
- python项目部署到url_项目上线部署
- mina mysql_Mina学习笔记(二)