LibGDX重建Flappy Bird——(4) 创建游戏对象
package com.art.zok.flappybird.game.object;import com.badlogic.gdx.graphics.g2d.SpriteBatch;
import com.badlogic.gdx.math.MathUtils;
import com.badlogic.gdx.math.Vector2;
import com.badlogic.gdx.physics.box2d.Body;public abstract class AbstractGameObject {public Vector2 position;public Vector2 dimension;public Vector2 origin;public Vector2 scale;public float rotation;public Body body;public AbstractGameObject() {position = new Vector2();dimension = new Vector2(1, 1);origin = new Vector2();scale = new Vector2(1, 1);rotation = 0;}public void update(float deltaTime) {if(body != null) {position.set(body.getPosition());rotation = body.getAngle() * MathUtils.radiansToDegrees;}}public abstract void render(SpriteBatch batch);
}
该类存储了对象的位置、尺寸、原点、缩放因子和旋转角度。该类还包含两个方法,update()和render(),这两个方法将分别在控制器和渲染器中调用。因为我们创建的每个对象都需要参与碰撞检测,因此我们在该类中还包含一个BOX2D的Body类型成员变量,在update()中,如果body不等于null则说明我们需要使用BOX2D进行物理仿真,然后我们使用body对象的位置和旋转角度更新该对象的位置和旋转角度。对于渲染方法,我们会为每个对象提供一个特定的实现,因此我们将render()定义为abstract。
- 将gdx-box2d.jar拷贝到FlappyBird项目(libs文件中)。
- 将gdx-box2d-native.jar拷贝到FlappyBird-desktop项目。
- 将armeabi、armeabi-v7a和x86三个文件夹下的libgdx-box2d.so拷贝到FlappyBird-android项目的相应文件夹中。
- 将各项目新添加的库文件加入构建路径中。
package com.art.zok.flappybird.game.object;import com.art.zok.flappybird.game.Assets;
import com.badlogic.gdx.Gdx;
import com.badlogic.gdx.graphics.g2d.Animation;
import com.badlogic.gdx.graphics.g2d.SpriteBatch;
import com.badlogic.gdx.graphics.g2d.TextureAtlas.AtlasRegion;
import com.badlogic.gdx.graphics.g2d.TextureRegion;
import com.badlogic.gdx.physics.box2d.World;
import com.badlogic.gdx.utils.Array;public class Bird extends AbstractGameObject {protected enum WAVE_STATE {WAVE_FALLING, WAVE_RISE}private Array<AtlasRegion> birds;private float animDuration;private Animation birdAnimation;private TextureRegion currentFrame;private float max_wave_height;private float min_wave_height;private WAVE_STATE waveState = WAVE_STATE.WAVE_RISE;public Bird() {init((int) (Math.random() * 3));}// 初始化public void init(int selected) {if (selected == 1) {birds = Assets.instance.bird.bird0;} else if (selected == 2) {birds = Assets.instance.bird.bird1;} else {birds = Assets.instance.bird.bird2;}birdAnimation = new Animation(0.1f, birds);birdAnimation.setPlayMode(Animation.PlayMode.LOOP);dimension.set(3.72f, 2.64f);position.set(-dimension.x * 1.5f, dimension.y / 2);max_wave_height = position.y + 0.7f;min_wave_height = position.y - 0.7f;}@Overridepublic void update(float deltaTime) {super.update(deltaTime);if (body == null) {if (waveState == WAVE_STATE.WAVE_FALLING)position.y -= 0.05f;else if (waveState == WAVE_STATE.WAVE_RISE) {position.y += 0.05f;}if (position.y < min_wave_height) {waveState = WAVE_STATE.WAVE_RISE;} else if (position.y > max_wave_height) {waveState = WAVE_STATE.WAVE_FALLING;}} }@Overridepublic void render(SpriteBatch batch) {animDuration += Gdx.graphics.getDeltaTime();currentFrame = birdAnimation.getKeyFrame(animDuration);batch.draw(currentFrame.getTexture(), position.x - dimension.x / 2, position.y - dimension.y / 2,dimension.x / 2, dimension.y / 2, dimension.x, dimension.y, scale.x, scale.y, rotation,currentFrame.getRegionX(), currentFrame.getRegionY(), currentFrame.getRegionWidth(),currentFrame.getRegionHeight(), false, false);}
}
首先,毋庸置疑Bird对象是一个动画对象,创建动画我们需要使用Animation类。Animation的构造函数需要一组动画帧作为参数,在Bird的 构造函数中我们首先产生了一个范围在[0-3)之内的随机整数作为init()方法的参数。在init()方法中我们首先使用传递进来的参数从三个可选的资源中选择一个作为Bird对象的动画资源。然后我们创建了一个周期为0.1秒的birdAnimation动画对象,并将其设定为循环 模式 。接下来我们设置了对象的尺寸和位置,这些魔法数是经过比例测算而来的,没有什么借鉴的价值,你也可以设定为其他值。
package com.art.zok.flappybird.game;  import com.art.zok.flappybird.game.object.Bird;public class WorldController {  private static final String TAG =   WorldController.class.getName();  public Bird bird;public WorldController() { init();}  private void init() { initBird();}  private void initBird() {if(bird == null) {bird = new Bird();} else {bird.init((int) (Math.random() * 3));}}public void update(float deltaTime) {bird.update(deltaTime);}
}
我们为WorldController添加了一个bird成员变量和一个私有initBird()方法,我们在initBird()方法中为成员变量bird创建了一个Bird对象。因为Bird对象的构造方法和初始化方法分离所以我们可以通过这个小技巧重用Bird对象,而不需要每次重新开始时都创建新的Bird对象。
package com.art.zok.flappybird.game;import com.art.zok.flappybird.util.Constants;
import com.badlogic.gdx.graphics.OrthographicCamera;
import com.badlogic.gdx.graphics.g2d.SpriteBatch;
import com.badlogic.gdx.utils.Disposable;public class WorldRenderer implements Disposable {  private OrthographicCamera camera;  private SpriteBatch batch;  private WorldController worldController;  public WorldRenderer(WorldController worldController) { this.worldController = worldController;init();}  private void init() {batch = new SpriteBatch();camera = new OrthographicCamera(Constants.VIEWPORT_WIDTH, Constants.VIEWPORT_HEIGHT);camera.position.set(0, 0, 0);camera.update();}  public void render() { renderWorld(batch);}  private void renderWorld (SpriteBatch batch) { batch.setProjectionMatrix(camera.combined);batch.begin();worldController.bird.render(batch);batch.end();}public void resize(int width, int height) { // 更新camera视口尺寸camera.viewportWidth = Constants.VIEWPORT_HEIGHT * width / height; camera.update();}  @Override  public void dispose() { batch.dispose();}
}
这次为WorldRenderer添加了不少代码,首先我们将构造函数的worldController实例对象的引用保存到成员变量中。然后我们在init()初始化方法中创建了SpriteBatch对象,和OrthographicCamera正交投影相机实例对象,该相机的视口尺寸我们设定为Constants.VIEWPORT_WIDTH和Constants.VIEWPORT_HEIGHT即就是50*50米。接着,将相机的初始位置设定为(0,0,0),也就是世界坐标的原点,最后更新相机的投影矩阵。
还有,我们在resize()方法中添加了两行代码,首先计算camera.viewportWidth的最新值,然后再更新camera的投影矩阵。这里其实就是我们之前遗留下来的那个视口单位长度不统一的解决地方。首先想象一下,无论窗口尺寸怎么变,我们始终保持视口的高度为50米,当窗口尺寸发生改变时,我们通过竖直方向上每像素等于几米来计算视口的最新宽度即就是width*(Constants.VIEWPORT_HEIGHT/height)。
最后我们在dispose方法中释放了SpriteBatch对象。

package com.art.zok.flappybird.game.object;import com.art.zok.flappybird.game.Assets;
import com.art.zok.flappybird.util.Constants;
import com.badlogic.gdx.Gdx;
import com.badlogic.gdx.graphics.g2d.SpriteBatch;
import com.badlogic.gdx.graphics.g2d.TextureAtlas.AtlasRegion;public class Land extends AbstractGameObject {private static final float LAND_VELOCITY = -15f;   // 恒定向左以15m/s的速度移动public static final float LAND_HEIGHT = 10.3f;private AtlasRegion land;private float leftMoveDist;private float viewWidth;public Land() {land = Assets.instance.land.land;viewWidth = Constants.VIEWPORT_HEIGHT *Gdx.graphics.getWidth() / Gdx.graphics.getHeight();init();}public void init() {float startPosX = -viewWidth / 2;dimension.set(viewWidth, LAND_HEIGHT);position.set(startPosX, -Constants.VIEWPORT_HEIGHT / 2);}private void wrapLand() {if (leftMoveDist >= viewWidth) {if (body == null) {position.x += leftMoveDist;}leftMoveDist = 0;}}@Overridepublic void update(float deltaTime) {wrapLand();                    // 转换landsuper.update(deltaTime);       // 更新应用body对象if (body == null) {          // 如果没有body对象自动更新position.x += LAND_VELOCITY * deltaTime;}leftMoveDist += Math.abs(LAND_VELOCITY * deltaTime);}@Overridepublic void render(SpriteBatch batch) {batch.draw(land.getTexture(), position.x, position.y, origin.x, origin.y, dimension.x, dimension.y, scale.x,scale.y, rotation, land.getRegionX(), land.getRegionY(), land.getRegionWidth(), land.getRegionHeight(),false, false);batch.draw(land.getTexture(), position.x + viewWidth, position.y, origin.x, origin.y, dimension.x, dimension.y, scale.x,scale.y, rotation, land.getRegionX(), land.getRegionY(), land.getRegionWidth(), land.getRegionHeight(),false, false);batch.draw(land.getTexture(), position.x + 2 * viewWidth, position.y, origin.x, origin.y, dimension.x, dimension.y, scale.x,scale.y, rotation, land.getRegionX(), land.getRegionY(), land.getRegionWidth(), land.getRegionHeight(),false, false);}}
首先在构造函数中,我们获取到Land的纹理资源并保存到成员变量land。接下来我们计算了一个viewWidth值,根据表达式我们可以看出该值表示当前视口的宽度。但是这里有一个很大的问题,首先Land对象我们只在一开始创建,所以viewWidth的值只能表示启动时视口的宽度,当运行中改变窗口的尺寸时viewWidth并不会得到更新。所以这里我们需要将桌面窗口尺寸设定为不可调整,还有一个让窗口不可调整的重要原因是,Flappy Bird的背景图片是满屏显示到窗口中的,如果窗口尺寸可以改变,则背景可能会被拉伸,因此为了避免失真,窗口尺寸不能随意更改。要将窗口设定为不可更改尺寸,只需要打开FlappyBird-desktop项目的启动类Main,为配置参数cfg添加一行cfg.resizable = false;即可。
package com.art.zok.flappybird.game;  import com.art.zok.flappybird.game.object.Bird;
import com.art.zok.flappybird.game.object.Land;public class WorldController {  private static final String TAG =   WorldController.class.getName();  public Bird bird;public Land land;public WorldController() { init();}  private void init() { initBird();initLand();}  private void initBird() {if(bird == null) {bird = new Bird();} else {bird.init((int) (Math.random() * 3));}}private void initLand() {if(land == null) {land = new Land();} else {land.init();}}public void update(float deltaTime) {bird.update(deltaTime);land.update(deltaTime);}
}
和Bird对象完全相同,我们为land对象添加了类似的代码,这里就不多解释了。接下来WorldRenderer.renderWorld()方法:
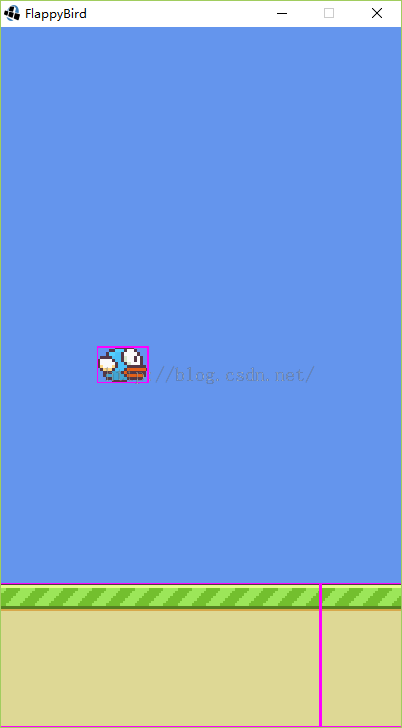
private void renderWorld (SpriteBatch batch) { batch.setProjectionMatrix(camera.combined);batch.begin();worldController.bird.render(batch);worldController.land.render(batch);batch.end();}可以看到我们在renderWorld中添加了land对象的渲染。现在可以启动应用观察并测试,下面是桌面平台运行画面截图:
package com.art.zok.flappybird.game.object;import com.art.zok.flappybird.game.Assets;
import com.art.zok.flappybird.util.Constants;
import com.badlogic.gdx.Gdx;
import com.badlogic.gdx.graphics.g2d.SpriteBatch;
import com.badlogic.gdx.graphics.g2d.TextureAtlas.AtlasRegion;
import com.badlogic.gdx.math.MathUtils;
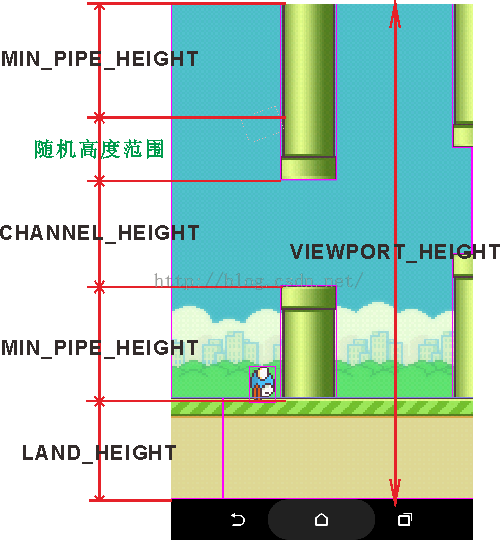
import com.badlogic.gdx.utils.Array;public class Pipes extends AbstractGameObject {public static final float PIPE_DISTANCE = 17.24f;Pipe curPipe;Array<Pipe> pipes;private float viewWidth;public Pipes() {viewWidth = Constants.VIEWPORT_HEIGHT *Gdx.graphics.getWidth() / Gdx.graphics.getHeight();pipes = new Array<Pipes.Pipe>();init();}public void init() {pipes.clear();pipes.add(curPipe = new Pipe());}private void testPipeNumberIsTooLarge(int amount) {if (pipes != null && pipes.size > amount) {pipes.removeIndex(0);}}private void wrapPipe() {if (curPipe.position.x <= viewWidth - PIPE_DISTANCE) {pipes.add(curPipe = new Pipe());}}@Overridepublic void update(float deltaTime) {wrapPipe();for(Pipe pipe : pipes) pipe.update(deltaTime);testPipeNumberIsTooLarge(8);}@Overridepublic void render(SpriteBatch batch) {for(Pipe pipe : pipes) {pipe.render(batch);}}public class Pipe extends AbstractGameObject {private static final float PIPE_WIDTH = 5.72f;private static final float CHANNEL_HEIGHT = 10.56f;public static final float MIN_PIPE_HEIGHT = 5.27f;private static final float PIPE_VELOCITY = -15f; // 恒定向左以15m/s的速度移动private AtlasRegion pipe;private float dnPipeHeight;private boolean isCollected;public Pipe() {pipe = Assets.instance.pipe.pipeDownGreen;init();}public void init() {isCollected = false;position.set(viewWidth, Land.LAND_HEIGHT - Constants.VIEWPORT_HEIGHT / 2);dimension.set(PIPE_WIDTH, Constants.VIEWPORT_HEIGHT - Land.LAND_HEIGHT);dnPipeHeight = MathUtils.random(dimension.y - 2 * MIN_PIPE_HEIGHT - CHANNEL_HEIGHT) + MIN_PIPE_HEIGHT;}public int getScore() {if(isCollected) return 0;else {isCollected = true;return 1;}}@Overridepublic void render(SpriteBatch batch) {// downbatch.draw(pipe.getTexture(), position.x, position.y + dnPipeHeight - Constants.VIEWPORT_HEIGHT/1.5f,origin.x, origin.y, dimension.x, Constants.VIEWPORT_HEIGHT/1.5f, scale.x, scale.y,rotation, pipe.getRegionX(), pipe.getRegionY(), pipe.getRegionWidth(), pipe.getRegionHeight(), false, true);// upbatch.draw(pipe.getTexture(), position.x, position.y + dnPipeHeight + CHANNEL_HEIGHT,origin.x, origin.y, dimension.x, dimension.y/1.5f,scale.x, scale.y, rotation, pipe.getRegionX(), pipe.getRegionY(),pipe.getRegionWidth(), pipe.getRegionHeight(), false, false);}}
}
@Overridepublic void update(float deltaTime) {super.update(deltaTime);if(body == null) {position.x += PIPE_VELOCITY * deltaTime;}}这里其实和Bird一样,如果没有开始模拟则手动让他向左移动。
package com.art.zok.flappybird.game;  import com.art.zok.flappybird.game.object.Bird;
import com.art.zok.flappybird.game.object.Land;
import com.art.zok.flappybird.game.object.Pipes;public class WorldController {  private static final String TAG =   WorldController.class.getName();  public Bird bird;public Land land;public Pipes pipes;public WorldController() { init();}  private void init() { initBird();initLand();initPipes();}  private void initBird() {if(bird == null) {bird = new Bird();} else {bird.init((int) (Math.random() * 3));}}private void initLand() {if(land == null) {land = new Land();} else {land.init();}}private void initPipes() {if(pipes == null) {pipes = new Pipes();} else {pipes.init();}}public void update(float deltaTime) {bird.update(deltaTime);land.update(deltaTime);pipes.update(deltaTime);}
}
完全类似的方法,所以不用再解释。下面为WorldRenderer.renderWorld()方法添加Pipes对象的渲染过程:
private void renderWorld (SpriteBatch batch) { batch.setProjectionMatrix(camera.combined);batch.begin();worldController.bird.render(batch);worldController.land.render(batch);worldController.pipes.render(batch);batch.end();}现在启动桌面应用并测试:
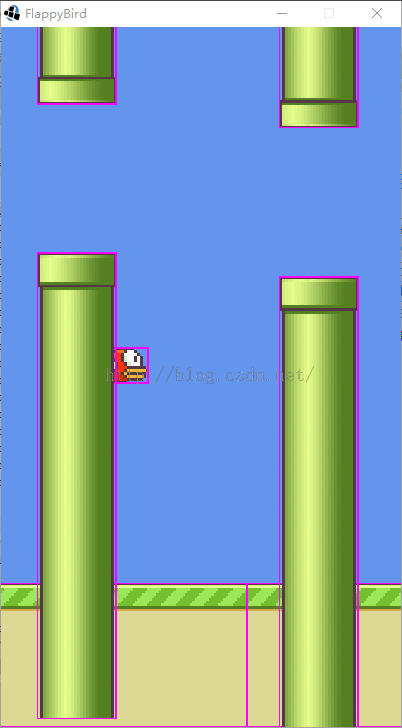
在上图中可以看到Pipe对象覆盖了Land和Bird对象。很明显,这里我们将渲染的顺序搞错了,首先应该渲染Pipes对象,然后是Land,最后是Bird,所以修改WorldRenderer.renderWorld()方法如下:
private void renderWorld (SpriteBatch batch) { batch.setProjectionMatrix(camera.combined);batch.begin();worldController.pipes.render(batch);worldController.land.render(batch);worldController.bird.render(batch);batch.end();}
现在看起来不错哦,所有对象都能正确渲染了,但是上述Pipe的update()方法只是为测试修改的,所以测试完成后应该删除。
public Bird bird;public Land land;public Pipes pipes;public AtlasRegion background; private void init() { background = Assets.instance.decoration.bg.random();initBird();initLand();initPipes();}首先我们为WorldController添加了一个成员变量background,然后再init()方法中初始化他,这里我们使用了Array<AtlasRegion>.random()方法随机获得一个背景纹理。接下来修改WorldRenderer.renderWorld()方法:
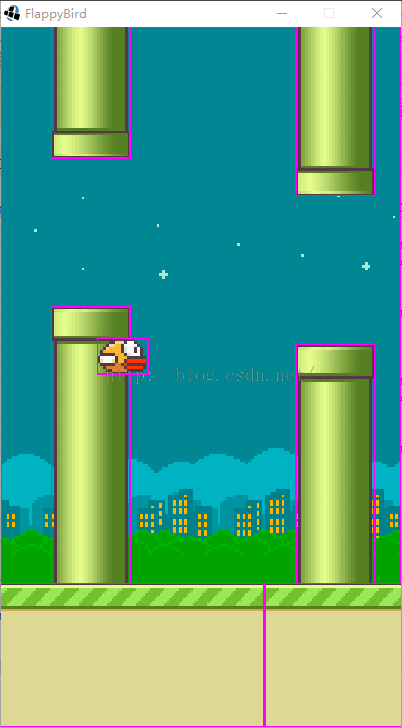
private void renderWorld (SpriteBatch batch) { batch.setProjectionMatrix(camera.combined);batch.begin();batch.draw(worldController.background,-camera.viewportWidth / 2, -camera.viewportHeight / 2, camera.viewportWidth, camera.viewportHeight);worldController.pipes.render(batch);worldController.land.render(batch);worldController.bird.render(batch);batch.end();}因为背景是最底层的对象,所以我们需要将背景放在最前面绘制。这里draw()方法的参数分别是视口的左下角和视口的宽高,这样做总能使背景平铺到整个窗口。最后测试运行应用,下图是测试截图:
本章内容到现在就全部介绍完了,我们成功的创建了三个对象,并成功的将三个对象和背景渲染到场景内,下一章我们将详细介绍BOX2D的物理仿真和碰撞检测过程。
转载于:https://my.oschina.net/u/2432369/blog/610412
LibGDX重建Flappy Bird——(4) 创建游戏对象相关推荐
- LibGDX重建Flappy Bird——(8)屏幕切换与播放声音(终结)
本章源码链接:http://pan.baidu.com/s/1sjYE0sH 密码:q4n2 正如标题上所标注的,本章将完成FlappyBird的所有剩余内容.对比原版游戏我们可以发现Flappy ...
- 【源码+图片素材+详细教程】Java游戏开发_Java开发经典游戏飞翔的小鸟_飞扬的小鸟_Java游戏项目Flappy Bird像素鸟游戏_Java课程设计项目
课程目标: 1.通过本课程的学习巩固Java的相关基础知识,例如循环判断,数组和集合的使用,对象的继承,接口的实现,窗口的创建,事件监听,图形绘制. 2.完成小鸟的移动,管道自动生成.碰撞死亡,计分系 ...
- 使用cocos2d-x实现一款类似《Flappy Bird》的游戏
最近,一只8比特位像素的小鸟霸占了IOS免费游戏排行榜的第一名,这款<Flappy Bird>游戏可谓是一夜爆红,简单并不粗糙的画面.超级玛丽游戏中的绿色通道.眼神有些呆滞的小鸟和几朵白云 ...
- 【教程+源码】Java开发经典游戏飞翔的小鸟_Java游戏项目Flappy Bird像素鸟游戏
在飞翔的小鸟游戏中,玩家只需通过点击方向键操纵让小鸟避开绿色管道等障碍物即可继续前进.如果小鸟碰到管道,游戏立即结束. 那么如何用Java编写一款属于自己的飞翔的小鸟游戏呢?其过程并不复杂,本课程详细 ...
- 【源码+图片素材】Java开发经典游戏飞翔的小鸟_Java游戏项目Flappy Bird像素鸟游戏_Java小游戏_Java初级项目_Java课程设计项目
开发环境: jdk1.8 开发工具: IDEA JavaEE基础: 变量.数据类型.判断语句.循环结构.数组.集合.简单窗口创建.图形图片绘制.双缓存技术.事件-键盘事件.物体的碰撞检测.File [ ...
- C语言版flappy bird黑白框游戏
在此记录下本人在大一暑假,2014.6~8这段时间复习C语言,随手编的一个模仿之前很火热的小游戏----flappy bird.代码bug基本被我找光了,如果有哪位兄弟找到其他的就帮我留言下吧,谢谢了 ...
- 使用canvas写一个flappy bird小游戏
简介 canvas 是HTML5 提供的一种新标签,它可以支持 JavaScript 在上面绘画,控制每一个像素,它经常被用来制作小游戏,接下来我将用它来模仿制作一款叫flappy bird的小游戏. ...
- Pygame开发Flappy Bird小游戏(上)
Flappy Bird是一款鸟类飞行游戏,由云娜河内独立游戏开发者阮哈东(Dong Nguyen)开发.在Flappy Bird这款游戏中,玩家只需要一根手指来操控,单机手机屏幕,小鸟就会往上飞,不断 ...
- U3D游戏开发从入门到弯道超车(2):《Flappy Bird》场景动画及角色动画制作
1. 前言 上节课我们重点说了游戏开发和其他开发岗位的区别,以及如何高效地学习游戏开发.今天这节课,我们就正式开始运用上节课中提到的HOPL(hands-on project learning)学习大 ...
最新文章
- 放弃“for循环”,教你用这种算法 !(附代码)
- 无聊中安装的MAC OS截图欣赏
- python语法速成方法_30分钟学完Python基础语法
- mate40pro什么时候用鸿蒙,mate40Pro什么时候可以用鸿蒙
- git或gitlab修改密码之后,报错remote: HTTP Basic: Access denied,fatal: Authentication failed for ‘git或gitlab地址’
- 【经典回放】多种语言系列数据结构算法:二叉树(JavaScript版)
- JS 构造图片Image对象
- 读取模式错误、计算引擎操作复杂:这些Hadoop问题该如何应对?
- 手机端主图在哪里设置_原来华为手机灭屏也能看时间,操作方法非常简单,1分钟学会...
- 如何用开源经历为你的简历增加光彩
- REDIS中加锁和解锁问题
- android 打开闹钟,Android中的闹钟设置关闭和打开
- 处理器的排名_齐齐哈尔LPCVD尾气处理器排名推荐
- 让0球平局怎么算_古迪逊公园默郡德比,平局德比丨第30轮
- ib课程北京国际学校哪里有?
- VS Code插件Code Runner使用python虚拟环境
- docker logs 查看日志
- wps连接mysql odbc_如何在WPS中使用ADO连接数据库?
- c语言fseek128字节,你知道C语言是如何处理fseek()和ftell()这两个I/O随机访问数吗?...
- 数据集划分函数sklearn.model_selection.train_test_split参数详解