css3图片旋转轮播_使用CSS和JavaScript构建3D旋转轮播
css3图片旋转轮播
A lot has been said on the use of traditional 2D carousels, for example this piece on Smashing Magazine covers this subject. There’s no simple yes or no answer to the ‘should I use a carousel?’ question; it depends on the particular situation.
关于使用传统2D轮播的说法很多,例如,《 Smashing Magazine》上的这篇文章涵盖了这个主题。 “ 我应该使用轮播吗? ”没有简单的是或否答案。 ' 题; 这取决于具体情况。
When I started researching this topic, I didn’t need a 3D carousel, but rather, I was more interested in the technical details on implementing it. The core employed techniques are of course from the CSS Transforms Module Level 1, but along the way a bunch of other front end development technologies will be applied, touching on various topics in CSS, Sass, and client-side JavaScript.
当我开始研究该主题时,我并不需要3D轮播,而是对实现它的技术细节更感兴趣。 当然,所采用的核心技术来自CSS转换模块1级 ,但是在此过程中,还将应用其他一系列前端开发技术,涉及CSS, Sass和客户端JavaScript的各种主题。
This CodePen displays different versions of the component I’ll be showing you how to build.
该CodePen显示组件的不同版本,我将向您展示如何构建 。
To illustrate the setup of the CSS 3D transforms, I’ll show you a CSS-only version of the component. Then, I’ll show you how to enhance it with JavaScript, developing a simple component script.
为了说明CSS 3D转换的设置,我将向您展示该组件的仅CSS版本。 然后,我将向您展示如何使用JavaScript增强它,并开发一个简单的组件脚本。
轮播的标记 (The Markup for the Carousel)
For the markup, the images inside the component are wrapped inside a <figure> element, which provides a basic skeleton:
对于标记,组件内部的图像被包装在<figure>元素内,该元素提供了基本的骨架:
<div class="carousel">
<figure>
<img src="..." alt="">
<img src="..." alt="">
...
<img src="..." alt="">
</figure>
</div>
This will be our starting point.
这将是我们的出发点。
轮播的几何结构 (The Carousel Geometric Structure)
Before looking into the CSS, let’s have an overview of the plan that will be developed in the following sections.
在研究CSS之前,我们先概述一下将在以下各节中制定的计划。
The <img> elements should be arranged around the circle delineated by the carousel. This circle can be approximated by its circumscribed regular polygon and the images placed on its sides:
<img>元素应围绕旋转木马划定的圆圈排列。 该圆可通过其外接的正多边形和放置在其侧面的图像来近似:
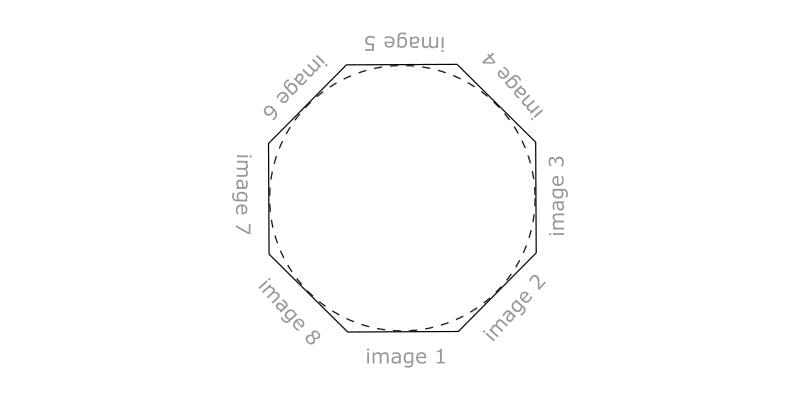
So, the number of sides of such a polygon is the same as the number of images in the carousel: with three images, the polygon is an equilateral triangle; with four images it is a square; with five a pentagon; and so on:
因此,该多边形的边数与轮播中的图像数相同:对于三个图像,该多边形为等边三角形; 有四个图像是一个正方形; 有五个五边形; 等等:
See the Pen Regular Polygons by SitePoint (@SitePoint) on CodePen.
见笔正多边形由SitePoint( @SitePoint上) CodePen 。
What if there are fewer than three images in the carousel? The polygon cannot be defined and the following procedure cannot be applied as it is. Anyway, the case of only one image is rather useless; two images are slightly more probable, and they could be placed on two diametrically opposed points on the circle. For simplicity, these special cases aren’t handled and at least three images are assumed. However, the relative code modifications would not be hard.
如果转盘中的图像少于三个,该怎么办? 无法定义多边形,因此无法直接应用以下步骤。 无论如何,仅一张图像的情况就毫无用处。 两个图像的可能性更大,可以将它们放置在圆上两个相对的点上。 为简单起见,不处理这些特殊情况,并且假定至少三个图像。 但是,相对的代码修改并不难。
This imaginary reference polygon will be positioned in 3D space, perpendicular to the plane of the viewport and with its center pushed back into the screen at a distance equal to its apothem, the distance of a side of the polygon from its center, as illustrated in this top down view of the carousel:
该虚构参考多边形将位于3D空间中,垂直于视口平面,并且其中心以等于其顶点 (即多边形的一面距其中心的距离)的距离推回到屏幕中,如图所示。旋转木马的俯视图:
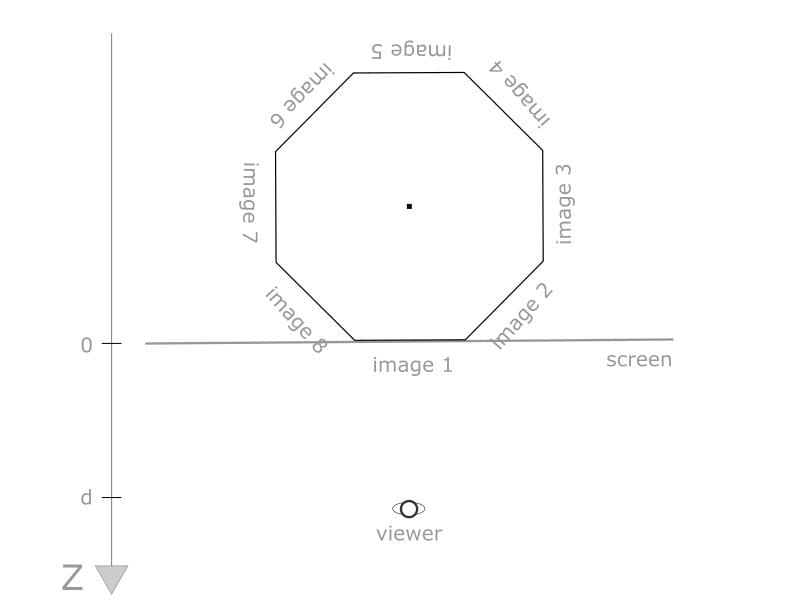
This way, the side that is currently facing the viewer will be on the screen plane at z = 0, and the front image, not being affected by the perspective foreshortening, will have its ordinary 2D size. The d letter in the picture represents the value for the CSS perspective property.
这样,当前面对观察者的一侧将位于屏幕平面上,z = 0,并且不受透视透视缩短影响的正面图像将具有其普通的2D尺寸。 图片中的d字母表示CSS perspective属性的值。
建立轮播几何 (Building the Carousel Geometry)
In this section I’ll show you the key CSS rules, which I’ll go through step by step.
在本节中,我将向您展示关键CSS规则,并将逐步进行介绍。
In the following code snippets, some Sass variables are used to make the component more configurable. I’ll use $n to denote the number of images in the carousel and $item-width to specify the width of an image.
在以下代码段中,一些Sass变量用于使组件更具可配置性。 我将使用$n表示轮播中的图像数量,并使用$item-width来指定图像的宽度。
The <figure> element is the containing box for the first image and the reference element around which the other images are positioned and transformed. Supposing, just for now, that the carousel had only one image to showcase, I can start with the sizing and the alignment:
<figure>元素是第一个图像和其他图像围绕和变换的参考元素的包含框。 假设就目前而言,该轮播仅展示一幅图像,我可以从调整大小和对齐方式开始:
.carousel {
display: flex;
flex-direction: column;
align-items: center;
> * {
flex: 0 0 auto;
}
.figure {
width: $item-width;
transform-style: preserve-3d;
img {
width: 100%;
&:not(:first-of-type) {
display: none /* Just for now */
}
}
}
}
The <figure> element has the prescribed carousel item width and it has the same height of the images (they can have different sizes but they must have the same aspect ratio). In this way, the carousel container height adapts itself based on the height of the images. Also, <figure> is horizontally centered in the carousel container.
<figure>元素具有规定的轮播项目宽度,并且具有相同的图像高度(它们可以具有不同的大小,但必须具有相同的纵横比)。 这样,轮播容器的高度会根据图像的高度自行调整。 同样, <figure>在转盘容器中水平居中。
The first image doesn’t need additional transformations because it is already in its target position, i.e., on the front face of the carousel.
第一个图像不需要进行其他转换,因为它已经处于其目标位置,即在转盘的前面。
The carousel can be turned in 3D space by applying a rotation transform to the <figure> element. This rotation has to be around the center of the polygon, so I’ll change the default transform origin of <figure>:
通过对<figure>元素应用旋转变换,可以在3D空间中旋转圆盘传送带。 该旋转必须围绕多边形的中心,因此我将更改默认的变换原点<figure> :
.carousel figure {
transform-origin: 50% 50% (-$apothem);
}
This value is negated because in CSS the positive direction of the z-axis is off the screen, toward the viewer. The parentheses are needed to avoid Sass syntax errors. The computation of the polygon apothem will be explained later.
否定此值是因为在CSS中,z轴的正方向朝着查看者偏离了屏幕。 需要使用括号以避免Sass语法错误。 稍后将解释多边形原子的计算。
Having translated the reference system of the <figure> element, the whole carousel can be turned with a rotation on its (new) y-axis:
平移<figure>元素的参考系统后,可以在其(新)y轴上旋转旋转整个旋转木马:
.carousel figure {
transform: rotateY(/* some amount here */rad);
}
I will return to the details of this rotation later.
稍后,我将返回此轮换的详细信息。
Let’s proceed with the transformations for the other images. With absolute positioning the images are stacked inside <figure>:
让我们继续其他图像的转换。 绝对定位后,图像堆叠在<figure>内部:
.carousel figure img:not(:first-of-type) {
position: absolute;
left: 0;
top: 0;
}
The z-index values are ignored because this is only a preliminary step for the following transformations. In fact, now each image can be rotated on the y-axis of the carousel by a rotation angle that depends on the polygon side on which the image is assigned. First, as done with the <figure> element, the default transform origin of the images is modified, moving it to the center of the polygon:
z-index值将被忽略,因为这只是以下转换的初步步骤。 实际上,现在每个图像都可以在旋转木马的y轴上旋转一个旋转角度,该旋转角度取决于为其分配图像的多边形一侧。 首先,与<figure>元素一样,修改图像的默认变换原点,将其移至多边形的中心:
.img:not(:first-of-type) {
transform-origin: 50% 50% (-$apothem);
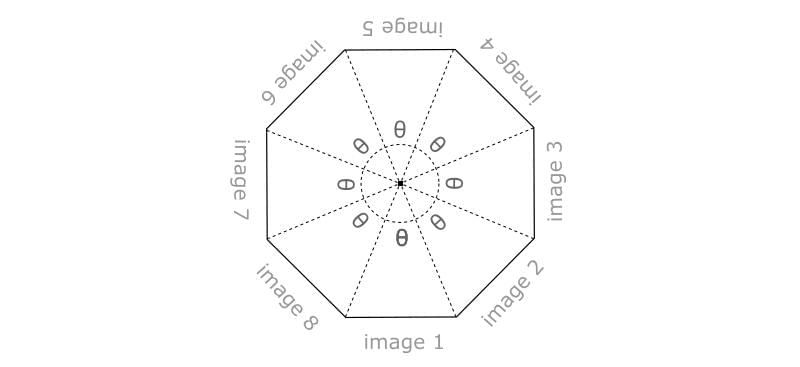
}Then the images can be rotated on their new y-axis by an amount given by ($i - 1) * $theta radians, where $i is the index (starting from one) of the image and $theta = 2 * $PI / $n, with $PI representing the mathematical constant pi. Therefore, the second image will be rotated by $theta, the third by 2 * $theta, and so on, up to the last image that will be rotated by ($n - 1) * $theta.
然后图像可以在其新的y轴上旋转($i - 1) * $theta radians给定的量,其中$i是图像的索引(从一个开始), $theta = 2 * $PI / $n ,其中$PI代表数学常数pi 。 因此,第二个图像将旋转$theta ,第三个图像将旋转2 * $theta ,依此类推,直到最后一个图像将旋转($n - 1) * $theta 。
This relative arrangement of the images will be preserved during the rotations of the carousel (that is, the rotation about the modified y-axis of <figure>) thanks to the hierarchical nature of the nested CSS transforms.
由于嵌套CSS转换的层次性质,在轮播旋转期间(即绕<figure>的修改后的y轴旋转),将保留图像的这种相对排列。
This per-image rotation amount can be assigned using the Sass @for control directive:
可以使用Sass @for控制指令分配每个图像的旋转量:
.carousel figure img {
@for $i from 2 through $n {
&:nth-child(#{$i}) {
transform: rotateY(#{($i - 1) * $theta}rad);
}
}
}
This is using the for...through construct rather than for...to because with for...to the last value assigned to the index variable $i would be n-1 instead of n.
这是使用for...through构造而不是for...to因为with for...to分配给索引变量$i的最后一个值将是n-1而不是n 。
Note the two instances of Sass’s #{} interpolation syntax. In the first instance it’s used for the index of the :nth-child() selector; in the second instance it’s used to set the rotation property value.
注意Sass的#{}插值语法的两个实例。 在第一种情况下,它用于:nth-child()选择器的索引; 在第二种情况下,它用于设置旋转属性值。
计算Apothem (Computing the Apothem)
The computation of the polygon’s apothem depends on the number of sides and the width of a side, that is, on the $n and $item-width variables. The formula is:
多边形的矩的计算取决于边的数量和边的宽度,即$n和$item-width变量。 公式为:
$image-width / (2 * tan($PI/$n))where tan() is the tangent trigonometric function.
其中tan()是正切三角函数 。
This formula can be derived with a bit of geometry and trigonometry. In the pen source, this formula is not implemented as written because the tangent function is not readily available in Sass, so a hardcoded value is used instead. The formula will be fully implemented in the JavaScript demo instead.
该公式可以用一些几何和三角函数导出。 在钢笔源中,此公式未按书面形式实现,因为切线函数在Sass中不易使用,因此改用硬编码值。 该公式将完全在JavaScript演示中实现。
间隔轮播项目 (Spacing the Carousel Items)
At this point the carousel images are “sewn” side by side, forming the required polygonal shape. But here they are tightly packed, while often in 3D carousels there is space between them. This distance enhances the perception of a 3D space because it allows you to see the back-facing images on the rear of the carousel.
此时,轮播图像被并排“缝制”,形成所需的多边形形状。 但是在这里它们紧密地包装在一起,而在3D旋转木马中,它们之间经常有空间。 此距离增强了对3D空间的感知,因为它使您可以看到圆盘传送带背面的背面图像。
It is possible to optionally add this gap between the images by introducing another configuration variable, $item-separation, and using it as the horizontal padding for each <img> element. More precisely, taking half of this value for the left and right padding:
通过引入另一个配置变量$item-separation并将其用作每个<img>元素的水平填充,可以有选择地在图像之间添加此间隙。 更准确地说,将这个值的一半用于左右填充:
.carousel figure img {
padding: 0 $item-separation / 2;
}
The final result can be seen in the following demo:
最终结果可以在以下演示中看到:
See the Pen Carousel Items Spaced by SitePoint (@SitePoint) on CodePen.
请参见在CodePen上由SitePoint( @SitePoint ) 隔开的Pen Carousel项目 。
The images are made translucent with the opacity property to better illustrate the carousel structure, and the flex layout on the carousel root element was used to vertically center it in the viewport.
使图像具有opacity属性以使其更加透明,以更好地说明圆盘传送带的结构,并且圆盘传送带根元素上的柔韧性布局用于将其在视口中垂直居中。
旋转转盘 (Rotating the Carousel)
To facilitate testing of the carousel rotation, I’m going to add a UI control to navigate back and forth between the images. See the CodePen demo for the HTML, CSS and JavaScript implementing this control; here I’ll describe only the code relating to the rotation.
为了便于测试轮播旋转,我将添加一个UI控件以在图像之间来回导航。 有关实现此控件HTML,CSS和JavaScript,请参见CodePen演示。 在这里,我将仅描述与旋转有关的代码。
We use a currImage integer variable to indicate which image is at the front of the carousel. When the user interacts with the previous/next buttons, this variable is incremented or decremented by one unit.
我们使用currImage整数变量来指示哪个图像位于轮播的前面。 当用户与上一个/下一个按钮交互时,此变量以一个单位递增或递减。
After having updated currImage, the carousel rotation is performed with:
更新了currImage ,轮播旋转使用以下命令执行:
figure.style.transform = `rotateY(${currImage * -theta}rad)`;(Here and in the following snippets, ES6 template literals are employed to interpolate expressions in strings; feel free to use the traditional ‘+’ concatenation operator if you prefer)
( 在这里和以下代码段中,使用ES6模板文字对字符串中的表达式进行插值;如果愿意,可以随意使用传统的'+'串联运算符 )
where theta is the same as before:
theta与以前相同:
numImages = figure.childElementCount;
theta =  2 * Math.PI / numImages;
The rotation is by - theta because to navigate to the next item a counter-clockwise rotation is needed and such rotation values are negative in CSS transforms.
旋转角度为- theta因为要导航到下一个项目,需要逆时针旋转,并且这种旋转值在CSS变换中为负。
Note that the currImage value is not constrained to the [0, numImages – 1] range, but instead it can grow indefinitely, both in the positive and in the negative direction. In fact, If the image on the front is the last one (so currImage == n-1), and the user clicks the next button, if we reset currImage to 0 to advance to the first carousel image, there would be a transition of the rotation angle from (n-1)*theta to 0 and this would turn the carousel in the opposite direction across all the previous images. A similar issue would happen when clicking the prev button when the front image is the first one.
请注意, currImage值currImage于[0,numImages – 1]范围,而是可以无限期地在正方向和负方向上增长。 实际上,如果前面的图像是最后一个图像(所以currImage == n-1),并且用户单击了下一个按钮,如果我们将currImage重置为0以前进到第一个轮播图像,则会发生过渡从(n-1)*theta到0的旋转角度,这将使轮播在所有先前的图像上朝相反的方向旋转。 当正面图像是第一个图像时,单击prev按钮会发生类似的问题。
To be picky, I should even check for potential overflows of currentImage, because the Number data type cannot take arbitrarily large values. These checks are not implemented in the demo code.
要挑剔,我什至应该检查currentImage潜在溢出,因为Number数据类型不能采用任意大的值。 这些检查未在演示代码中实现。
And here is the rotating carousel:
这是旋转的旋转木马:
See the Pen 3D Rotating Carousel (before enhancements) by SitePoint (@SitePoint) on CodePen.
请参阅CodePen上的SitePoint ( @SitePoint )的Pen 3D旋转转盘(增强之前) 。
增强JavaScript (Enhancing with JavaScript)
Having seen the basic CSS that lies at the core of the carousel, now JavaScript can be used to enhance the component in several ways, such as:
看到了旋转木马核心的基本CSS之后,现在可以使用JavaScript通过多种方式增强组件,例如:
- Arbitrary number of images任意数量的图像
- Images with percentage widths具有百分比宽度的图像
- Multiple carousel instances on the page页面上有多个轮播实例
- Per-instance configurations, such as the gap size and the back-face visibility每个实例的配置,例如间隙大小和背面可见性
- Configuration using HTML5 data-* attributes使用HTML5 data- *属性进行配置
First I remove from the style sheet the variables and rules related to the transform origins and the rotations, because these will be done using JavaScript:
首先,我从样式表中删除与转换原点和旋转相关的变量和规则,因为这些将使用JavaScript完成:
$item-width: 40%; // Now we can use percentages
$item-separation: 0px; // This now is set with Js
$viewer-distance: 500px;
.carousel {
padding: 20px;
perspective: $viewer-distance;
overflow: hidden;
display: flex;
flex-direction: column;
align-items: center;
> * {
flex: 0 0 auto;
}
figure {
margin: 0;
width: $item-width;
transform-style: preserve-3d;
transition: transform 0.5s;
img {
width: 100%;
box-sizing: border-box;
padding: 0 $item-separation / 2;
&:not(:first-of-type) {
position: absolute;
left: 0;
top: 0;
}
}
}
}
Next in the script is a carousel() function that takes care of the initialization of an instance:
脚本中的下一个是carousel()函数,它负责实例的初始化:
function carousel(root) {
// coming soon...
}
The root argument refers to the DOM element that holds the carousel.
root参数是指持有轮播的DOM元素。
Usually this function would be a constructor, to generate one object for each carousel on the page, but here I am not writing a carousel library, so a simple function will be sufficient.
通常,此函数将是构造函数,以便为页面上的每个轮播生成一个对象,但是这里我没有编写轮播库,因此一个简单的函数就足够了。
To instantiate several components on the same page, the code waits that all the images are loaded, registering a listener on the window object for the load event, and then invokes carousel() for each element with the carousel class:
要实例化同一页面上的几个组件,代码将等待所有图像都加载完毕,然后在window对象上注册一个load事件的侦听器,然后使用carousel类为每个元素调用carousel() :
window.addEventListener('load', () => {
var carousels = document.querySelectorAll('.carousel');
for (var i = 0; i < carousels.length; i++) {
carousel(carousels[i]);
}
});
carousel() executes three main tasks:
carousel()执行三个主要任务:
- The navigation setup. This is the same code presented in the second CodePen demo导航设置。 这与第二个CodePen演示中呈现的代码相同
- The transforms setup转换设置
- Register a window resize listener to keep the carousel responsive, adapting it to the new viewport size注册一个窗口调整大小的侦听器,以保持轮播响应,使其适应新的视口大小
Before examining the transform setup code, I’ll go through some key variables and how they are initialized based on the instance configuration:
在检查转换设置代码之前,我将介绍一些关键变量以及如何根据实例配置对其进行初始化:
var
figure = root.querySelector('figure'),
images = figure.children,
n = images.length,
gap = root.dataset.gap || 0,
bfc = 'bfc' in root.dataset
;
The number of images (n), is initialized based on the number of child elements of the <figure> element. The separation between the slides (gap), is initialized from the HTML5 data-gap attribute, if set. The backside visibility flag (bfc), is read using HTML5’s dataset API. This will be used later to determine if the images on the back of the carousel should be visible or not.
根据<figure>元素的子元素数量初始化图像数量( n )。 幻灯片之间的gap ( gap )是从HTML5 data-gap属性(如果已设置)初始化的。 使用HTML5的数据集API读取背面可见性标志( bfc )。 稍后将使用它来确定转盘背面的图像是否应可见。
设置CSS转换 (Setting the CSS Transforms)
The code that sets the CSS transforms-related properties is encapsulated in setupCarousel(). This nested function takes two arguments. The first is the number of items in the carousel, that is, the n variable introduced above. The second parameter, s, is the length of the side of the carousel polygon. As I mentioned earlier, this is equal to the width of the images, so it is possible to read the current width of one of them with getComputedStyle():
设置CSS转换相关属性的代码封装在setupCarousel() 。 此嵌套函数带有两个参数。 第一个是轮播中项目的数量,即上面介绍的n变量。 第二个参数s是轮播多边形的边的长度。 如前所述,它等于图像的宽度,因此可以使用getComputedStyle()读取其中之一的当前宽度:
setupCarousel(n, parseFloat(getComputedStyle(images[0]).width));In this way, image widths can be set with percentages values.
这样,可以使用百分比值设置图像宽度。
To keep the carousel responsive, I register a listener for the window resize event that calls setupCarousel() again with the (eventually)modified size of the images:
为了使轮播保持响应,我为窗口resize事件注册了一个侦听器,该事件再次使用(最终)修改后的图像大小再次调用setupCarousel() :
window.addEventListener('resize', () => {
setupCarousel(n, parseFloat(getComputedStyle(images[0]).width));
});
For the sake of simplicity I am not debouncing the resize listener.
为了简单起见,我没有对调整大小的侦听器进行反弹 。
The first thing that setupCarousel() does is compute the apothem of the polygon, using the passed parameters and the previously discussed formula:
setupCarousel()要做的第一件事是使用传递的参数和前面讨论的公式来计算多边形的setupCarousel() :
apothem = s / (2 * Math.tan(Math.PI / n));Then this value is used to modify the transform origin of the figure element, to obtain the new rotation axis of the carousel:
然后,使用此值来修改图形元素的变换原点,以获得轮播的新旋转轴:
figure.style.transformOrigin = `50% 50% ${-apothem}px`;Next, the styles for the images are applied:
接下来,应用图像的样式:
for (var i = 0; i < n; i++) {
images[i].style.padding = `${gap}px`;
}
for (i = 1; i < n; i++) {
images[i].style.transformOrigin = `50% 50% ${- apothem}px`;
images[i].style.transform = `rotateY(${i * theta}rad)`;
}
if (bfc) {
for (i = 0; i < n; i++) {
images[i].style.backfaceVisibility = 'hidden';
}
}
The first cycle assigns the padding for the space between the carousel items. The second cycle sets the 3D transforms. The last cycle handles the back-faces if the related flag was specified in the carousel configuration.
第一个循环为轮播项目之间的空间分配填充。 第二个周期设置3D变换。 如果在轮播配置中指定了相关标志,则最后一个循环将处理背面。
Finally, rotateCarousel() is called to take the current image to the front. This is a little helper function that, given the index of the image to show, rotates the figure element on its y-axis to move the target image to the front. It is also used by the navigation code to go back and forth:
最后, rotateCarousel()将当前图像显示在最前面。 这是一个小辅助功能,给定要显示图像的索引,该功能将图形元素沿其y轴旋转以将目标图像移到前面。 导航代码也使用它来回移动:
function rotateCarousel(imageIndex) {
figure.style.transform = `rotateY(${imageIndex * -theta}rad)`;
}
Here is the final result, a demo where several carousels are instantiated, each one with a different configuration:
这是最终的结果,该示例演示了多个轮播实例化,每个轮播具有不同的配置:
See the Pen 3D Rotating Carousel with CSS and JavaScript by SitePoint (@SitePoint) on CodePen.
请参阅CodePen上SitePoint ( @SitePoint ) 提供的带有CSS和JavaScript的Pen 3D旋转 圆盘 传送带 。
资料来源和结论 (Sources and Conclusion)
Before concluding, I just wanted to give credit to a few sources used for researching this tutorial:
在结束之前,我只想感谢用于研究本教程的一些资源:
Simple CSS 3D Carousel Gallery
简单CSS 3D轮播图片库
Advanced CSS 3D Carousel
先进CSS 3D轮播
Intro to CSS 3D Transforms – Carousel
CSS 3D变换简介–轮播
If you have any questions or comments on the code or the way the carousel functions, please free to leave them below.
如果您对代码或轮播功能有任何疑问或意见,请随时将其留在下面。
翻译自: https://www.sitepoint.com/building-3d-rotating-carousel-css-javascript/
css3图片旋转轮播
css3图片旋转轮播_使用CSS和JavaScript构建3D旋转轮播相关推荐
- 水平时间轴css代码_使用CSS和JavaScript构建水平时间线
水平时间轴css代码 在上一篇文章中 ,我向您展示了如何从头开始构建响应式垂直时间轴. 今天,我将介绍创建相关的水平时间线的过程. 与往常一样,要初步了解我们将要构建的内容,请查看相关的CodePen ...
- css菜单缓慢滑动_如何使用HTML,CSS和JavaScript构建滑动菜单栏
css菜单缓慢滑动 by Supriya Shashivasan 由Supriya Shashivasan 如何使用HTML,CSS和JavaScript构建滑动菜单栏 (How to build a ...
- 如何使用CSS和JavaScript构建简单的甘特图
到目前为止,在我们CSS图表系列教程中,我们已经学习了如何创建不同类型的图表,包括条形图,温度计图和饼图. 今天,我们将通过在甘特图中构建和呈现数据来继续这一旅程. 与其他图表教程不同,我们将大量使用 ...
- css3动画源代码库_清理CSS代码库
css3动画源代码库 You have just been onboarded to an existing project to replace a departing developer. Or ...
- css 反色_使用CSS和JavaScript检测反色
css 反色 There was something that bugged me after reading David's article on the invert filter last we ...
- java实现选项卡定时轮播_原生js面向对象编程-选项卡(自动轮播)
原生js面向对象编程-选项卡(自动轮播) }#div1 input{color:#fff;width:100px;height:40px;background:darkseagreen;border: ...
- 如何使用HTML,CSS和JavaScript构建技巧计算器
A Tip Calculator is a calculator that calculates a tip based on the percentage of the total bill. 小费 ...
- electron 桌面程序_如何使用Electron使用JavaScript构建您的第一个桌面应用程序
electron 桌面程序 by Carol-Theodor Pelu 通过Carol-Theodor Pelu 如何使用Electron使用JavaScript构建您的第一个桌面应用程序 (How ...
- css33d图片轮播_手把手教你用纯css3实现轮播图效果
首先先看demo吧,点击查看demo 一.随便说几句 css3动画效果的强大不言而喻,自它出现一直热度不减,它与js动画的优劣也一直成为前端界争论的话题,不可置疑的是css3动画的出现在一定程度上降低 ...
最新文章
- 黄河科技学院计算机补考好过吗,学生吐槽:重修费每学分240元不该收 黄河科技学院回应:收费合理...
- Sphinx+gitee+Read the Docs搭建在线文档系统
- Google:狡兔三窟
- 塞尔达盾反机器人_微软商店惊现《塞尔达传说:旷野之息》!任天堂暗示《喷射战士3》?| Jump简报...
- MYSQ--SHOW PROFILE Syntax and useing
- PHP设计模式——解释器模式
- SUSE12Sp3安装配置.net core 生产环境-总汇(持续更新中...)
- 数据仓库分层设计思想
- 从零开始学习CANoe(三)—— 系统变量的创建和使用
- 无线宽带接入802.16技术简介(转)
- javaweb项目中连接mysql导入驱动包
- 常见的文件名后缀及用法
- 重磅!Science发表西湖大学周强实验室关于“新冠”的最新研究成果
- python怎么编写在线excel_超简单:用Python让Excel飞起来(零基础学python,用python实现办公自动化)...
- 221007工作日志:SPSS logistic回归分析结果释读详解
- LEP与负载均衡—— 以PCDUINO实际案例来使用LEP提高网络带宽
- CODESYS在工厂自动化中的应用案例:运动控制集成方案
- 如何在U-Boot中添加自定义命令
- qrc文件的使用方法
- 为什么移动计算比移动数据更便宜?